Table of Contents
ToggleAmcrest Smart Home App User guide
How to Upgrade Firmware Using the Amcrest IP Config Tool
The firmware for your device can be upgraded manually using the Amcrest Smart Home IP Config tool. Before proceeding, please make sure your device is still connected to the same network as the device that is using the Amcrest IP Config tool. To download the Amcrest IP Config tool, clickhere
For more information on how to manually upgrade the firmware, please refer to the information provided below.
Step 1:Locate the .bin file for your specific device.
Step 2: Open the IP config tool, select your device and click Login.
Step 3: Enter the username and password for your device and click OK.
Step 4: Click on the Upgrade tab.
Step 5: Click Open File and access the .bin file and click Upgrade.
Allow the device to upgrade, the device will go offline and reboot. Once the reboot is finished the device will come back online (solid green LED) and you will be able to access the device again.
Load More :
Wi-Fi Best Practices (Amcrest Smart Home)
Most Wi-FiAmcrest Smart Home devices have a communication distance of up to 164ft (open field) however if you notice the device is going offline regularly or becomes unresponsive your network and the location of the device may play a huge role in its ability to function properly. For more information on location and how it affects a Wi-Fi device, please refer to the information provided below.
Location: How far is the device is from the wireless router.
- Larger distances can be affected more by interference and be susceptible to connection issues. This can cause the hub to go offline which will also affect the sensors.
- Actual distances can vary drastically by the type of router. If connection issues arise, then a Wi-Fi extender should be considered.
Range Limiting Factors
 |
 |
 |
 |
 |
| Reflection: The signal reflects back. | Scattering: The signal scatters back into multiple new signals. | Refraction: The signal bends as it travels through an object (e.g. glass window). | Diffraction: The signal changes direction as it passes around an object. | Attenuation: The signal strength weakens as it passes through an object. |
Wi-Fi signal strength decreases as it passes through different types of material. Try to position your wireless camera and receiver where the signal does not pass through metal or concrete blocks, which can significantly reduce signal strength (as shown in the information provided below).
Plastic & Wood: 10 – 30%
Brick: 30 – 50%
Concrete Cinder Blocks: 50 – 70%
Metal & Metal Cladding: 70 – 90%
Note: Signals that must pass through wet or moist materials (e.g. shrubs and trees) may be significantly reduced.
Using Amcrest Smart Home Products with Amcrest View Pro
Amcrest Smart Home devices such as deterrent cameras, doorbells, or other related Amcrest Smart Home devices, excluding battery cameras, are capable of connecting to both the Amcrest Smart Home app as well as the Amcrest View Pro app.
However, since Amcrest Smart Home devices function primarily on a cloud-based platform setting up an Amcrest Smart Home device to the Amcrest View Pro app will result in only live view being available and must be set up first using the Amcrest Smart Home app. If using push notifications, please make sure push notifications settings are established in the Amcrest Smart Home app, prior to adding the device to view pro. For more information on activating push notifications, click here.
For more information on how to add your specific device using the Amcrest Smart Home app, please refer to the Quick Start Guide for your specific device.
If you would like to view your Amcrest Smart Home devices using the Amcrest View Pro app, please refer to the information provided below.
Adding an Amcrest Smart Home Device to Amcrest View Pro
Please make sure your mobile device and Amcrest Smart Home device are connected to the same network during setup.
Step 1: Open the Amcrest View Pro app.
Step 2: Tap on the Settings ( ![]() ) icon in the upper left corner and tap on Device Manager. Then tap on Add Device.
) icon in the upper left corner and tap on Device Manager. Then tap on Add Device.
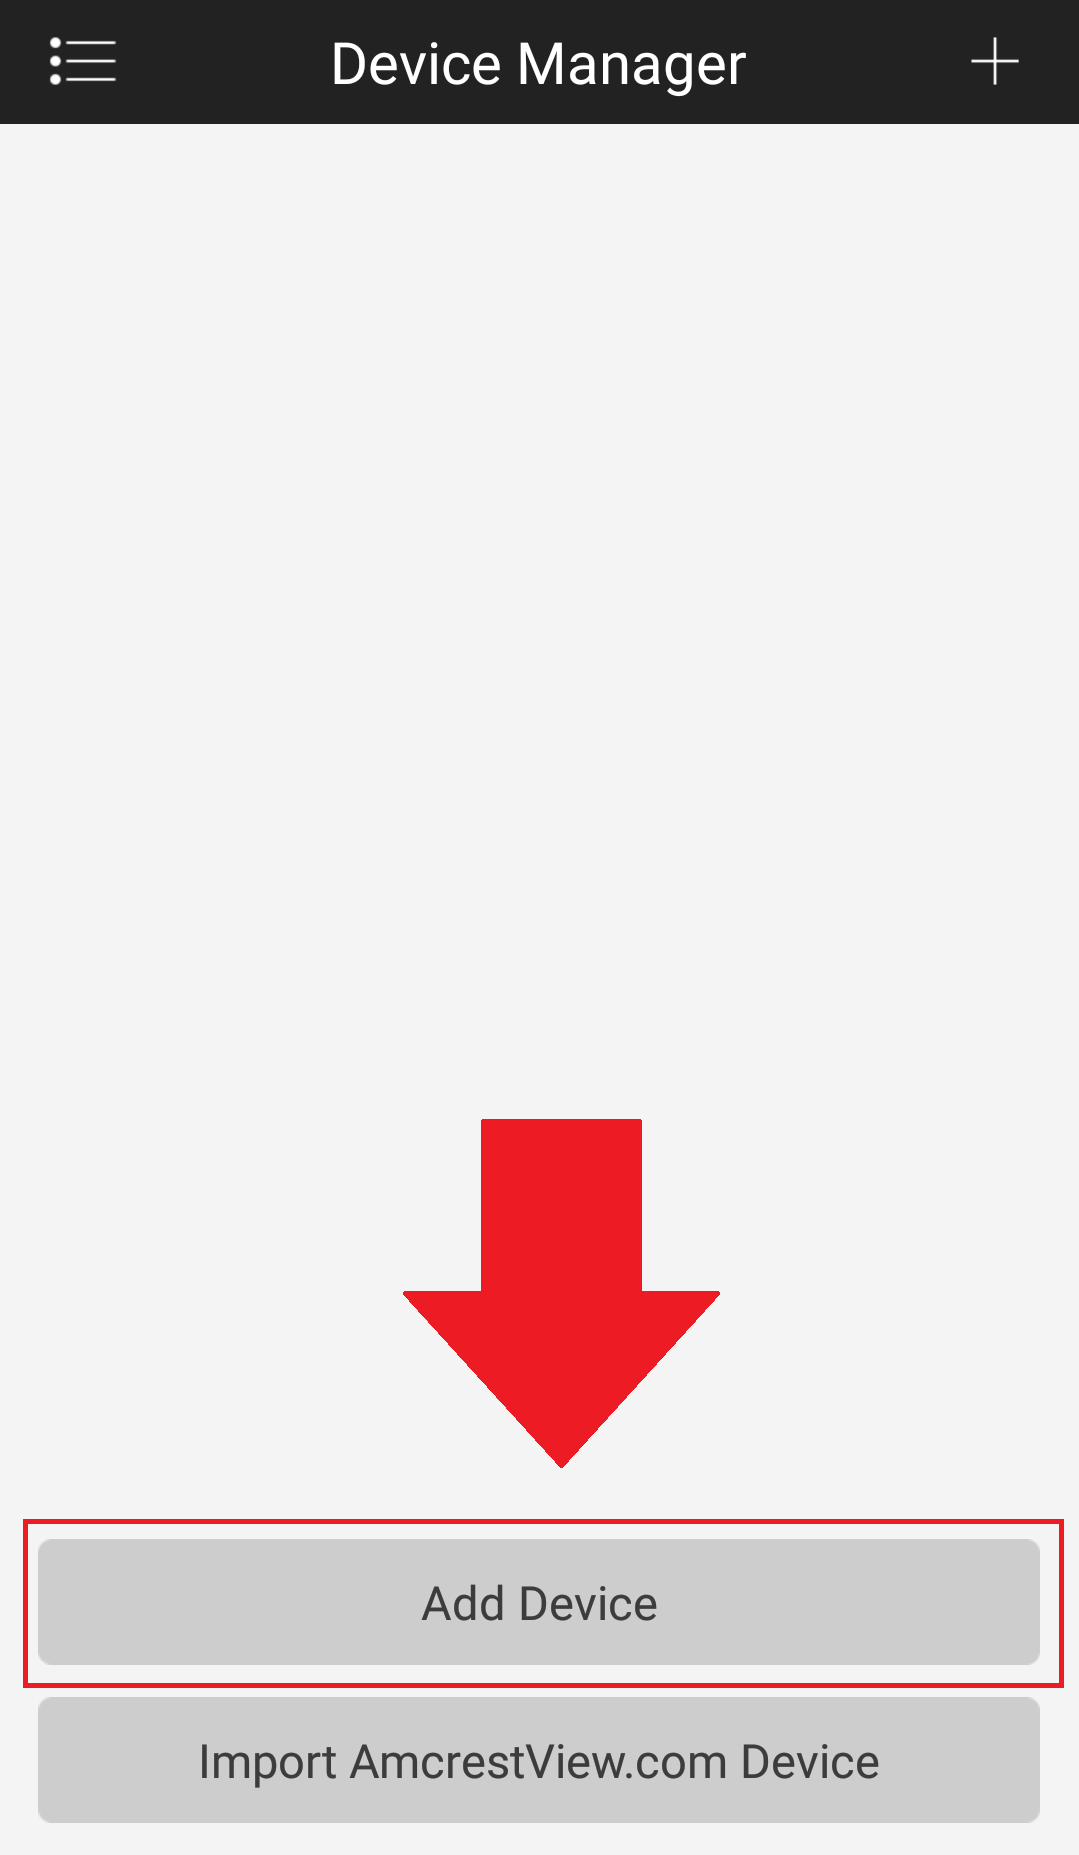
Step 3: Tap on Search Device.
Step 4: Select your Amcrest Smart Home device from the Device List. Tap on Connection Type to continue.
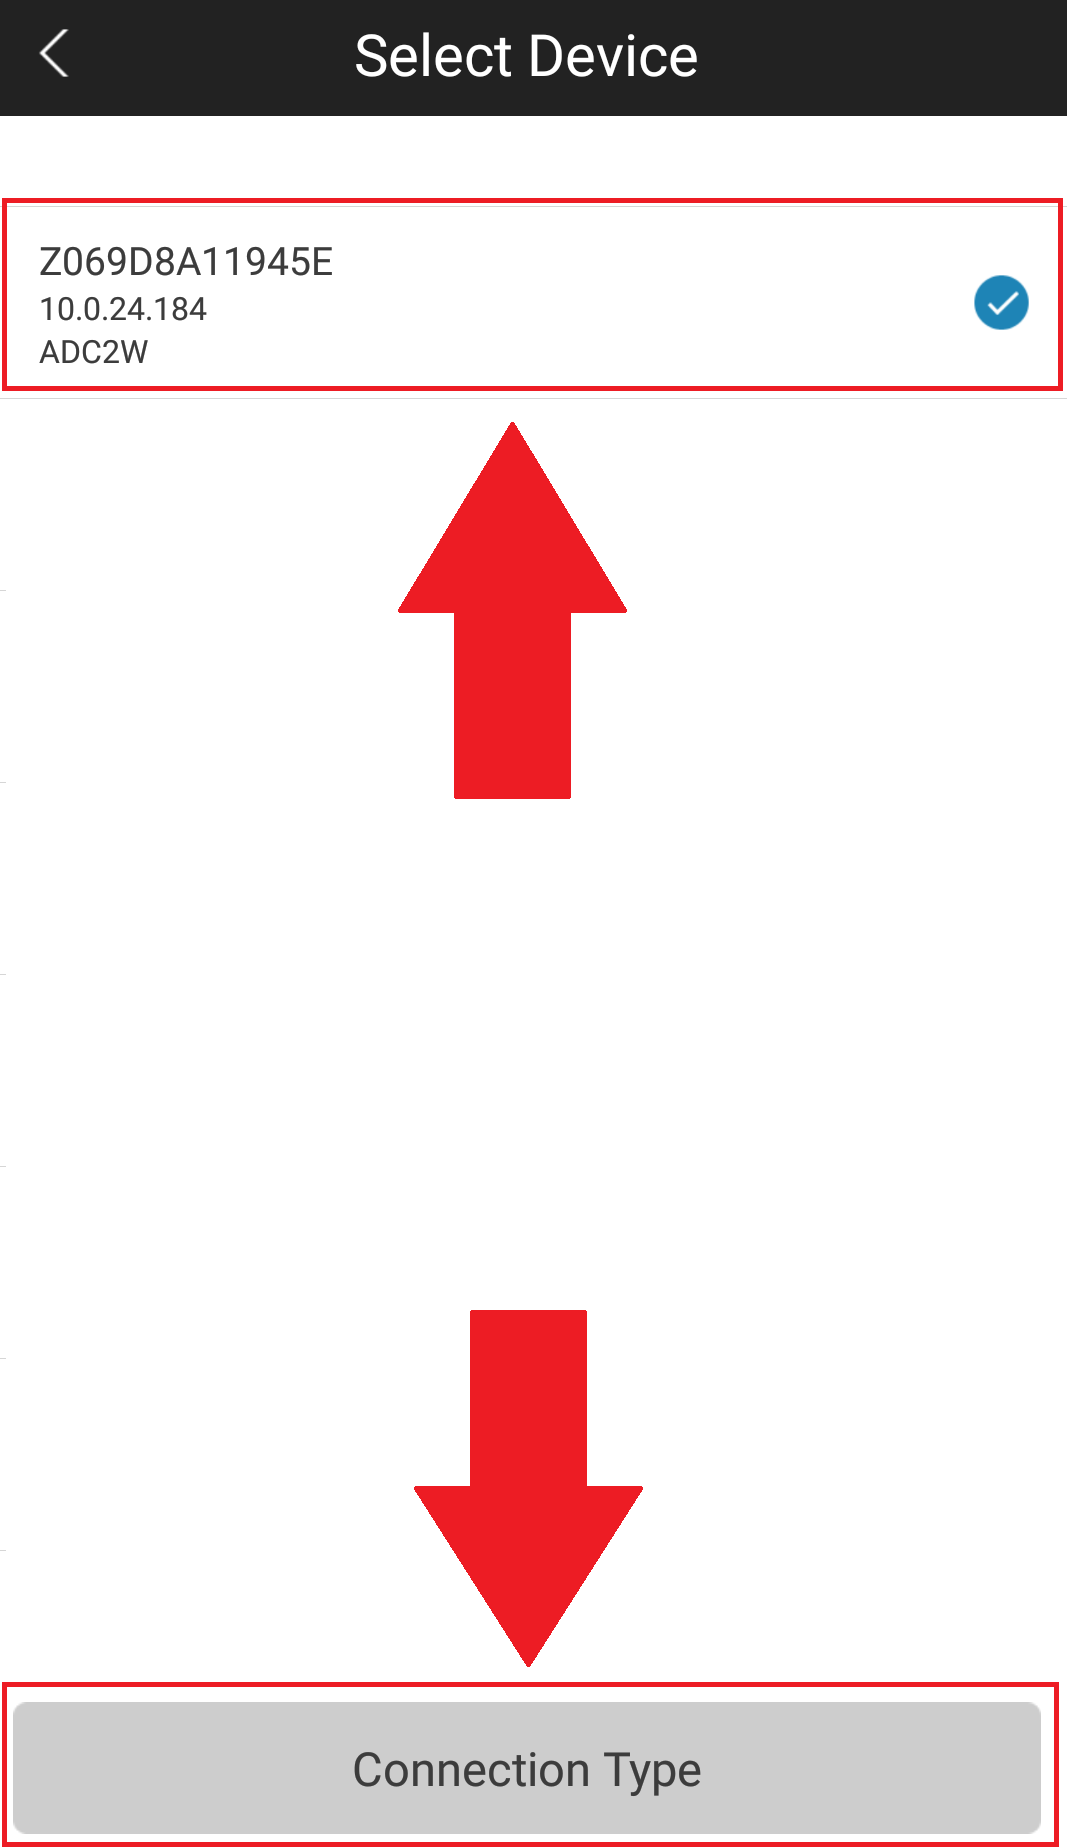
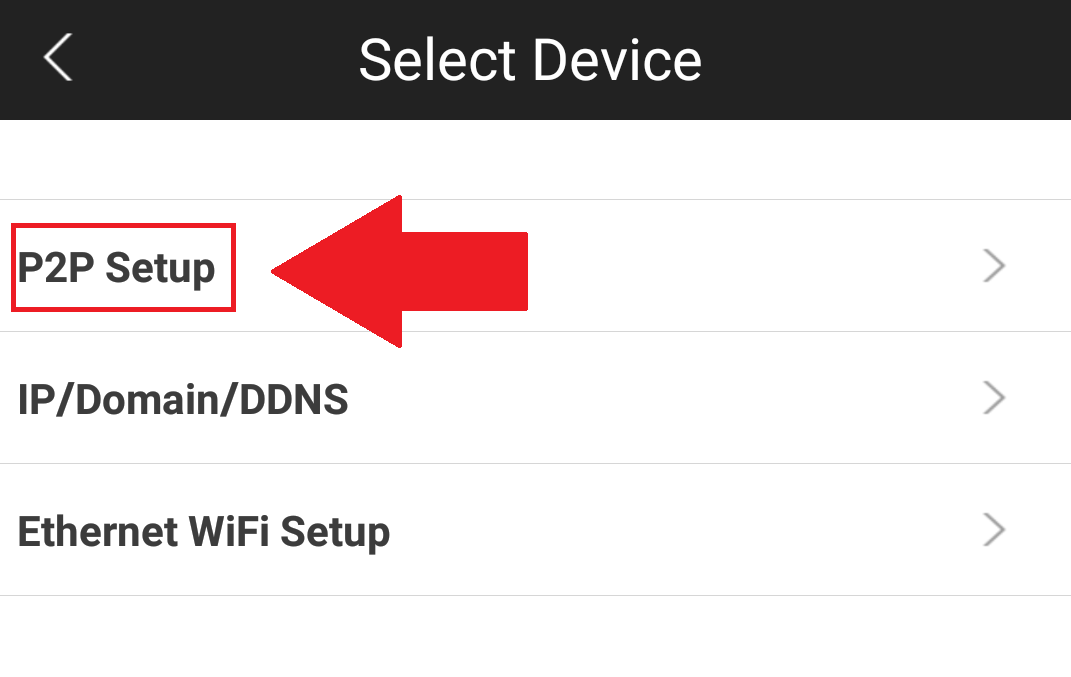
Step 5: Tap on P2P Setup
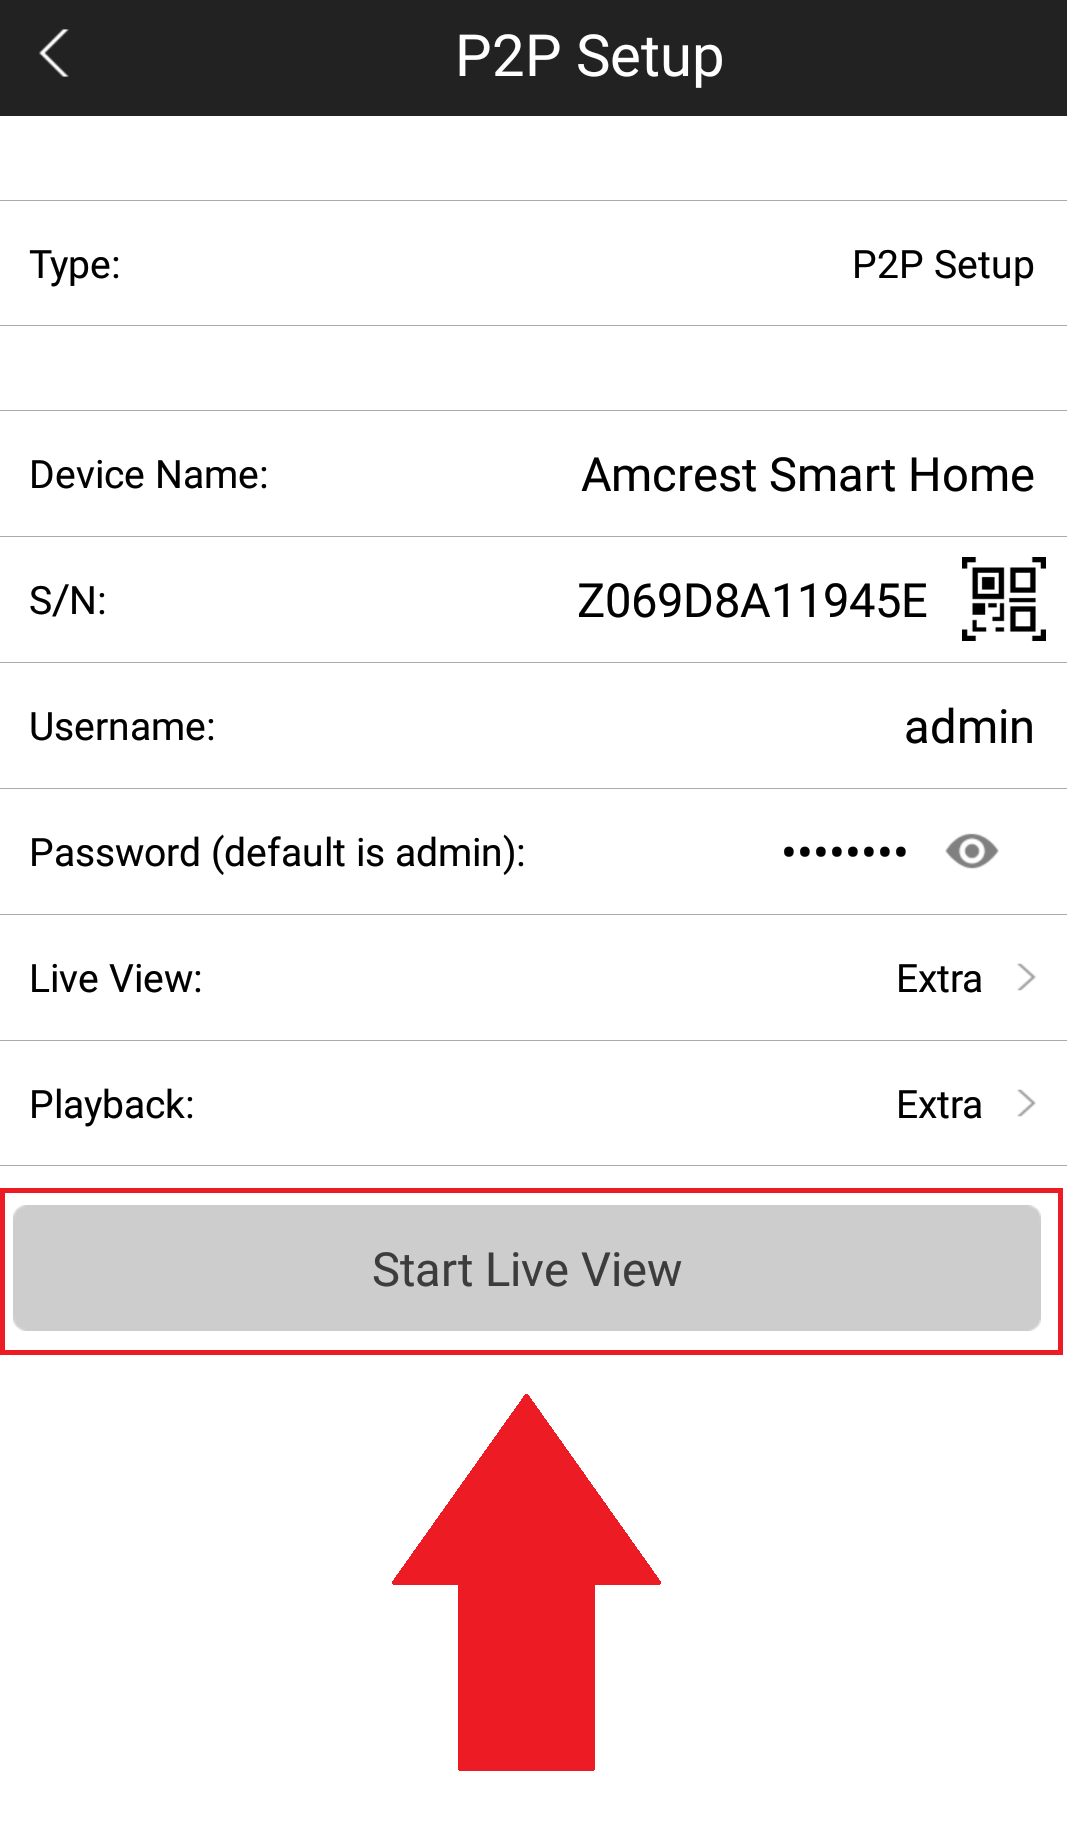
Step 6: Enter a name for your camera in the Device Name field and enter the password for your device in the Password (default is admin) field. The password used in this field will be the password originally set for the camera in the Amcrest Smart Home app. Tap Start Live View to continue.
Your Amcrest Smart Home device has now been added to your Amcrest View Pro app.
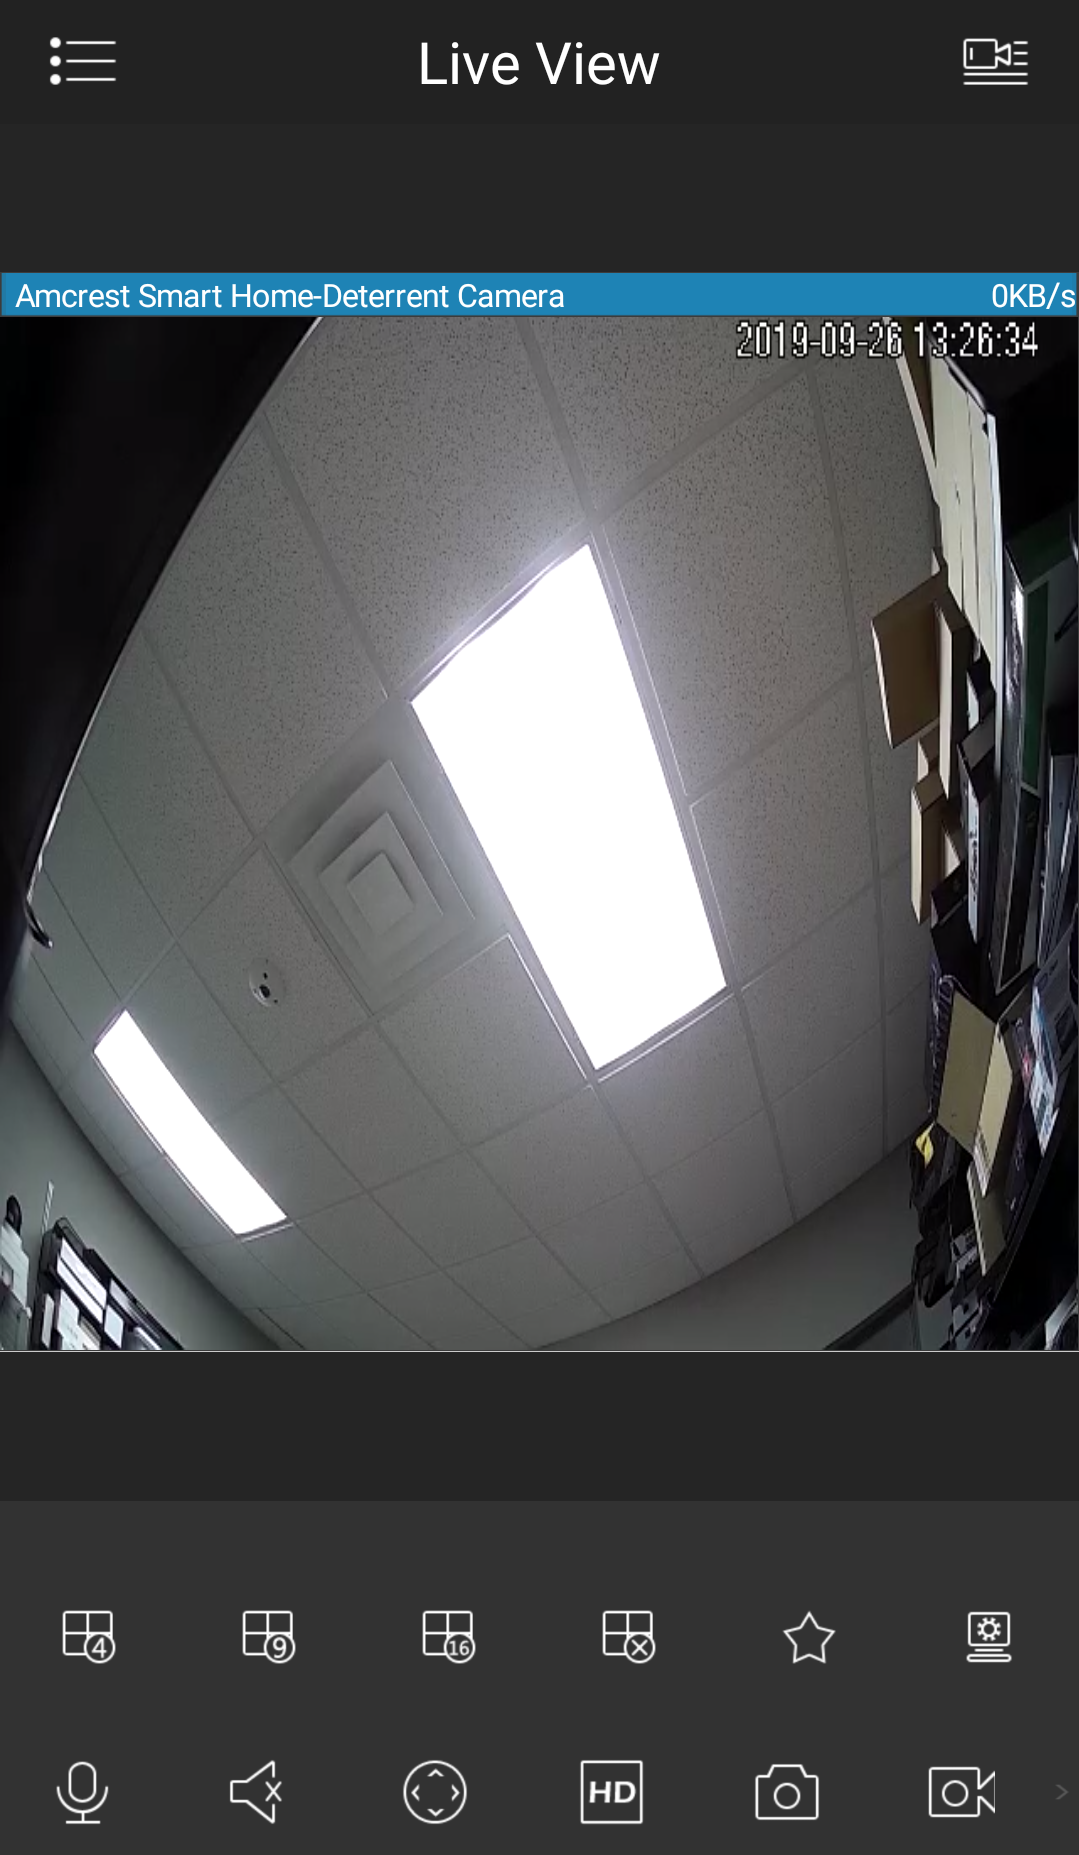
Note: Live view features such as, microphone, speaker, etc will be available in the Amcrest View Pro app. Other features such as playback, configuration, etc will not be available. To access and use these settings, please use the Amcrest Smart Home app.
How to Connect An Amcrest Smart Home Camera to the Amcrest View Pro App Using the Camera’s QR Code.
Amcrest Smart Home devices such as deterrent cameras, doorbells, or other related Amcrest Smart Home devices, excluding the AB2WFSET, are capable of connecting to both the Amcrest Smart Home app as well as the Amcrest View Pro app.
However, since Amcrest Smart Home devices function primarily on a cloud-based platform setting up an Amcrest Smart Home device to the Amcrest View Pro app will result in only live view being available and must be set up first using the Amcrest Smart Home app.
For more information on how to add your specific device using the Amcrest Smart Home app, please refer to the Quick Start Guide for your specific device.
Please note, the recommended set up method for adding an Amcrest Smart Home device to your view pro app will be using the built in Device Search option that can be found in the Amcrest View Pro app. For more information on how to add the device using the device search menu, click here.
However, if you would like to view your Amcrest Smart Home devices using the Amcrest View Pro app, and connect using the QR code that is found on your device, please refer to the information provided below.
Please make sure your mobile device and Amcrest Smart Home device are connected to the same network during setup.
Step 1: Open the Amcrest View Pro app.
Step 2: Tap on the Settings ( ![]() ) icon in the upper left corner and tap on Device Manager. Then tap on Add Device.
) icon in the upper left corner and tap on Device Manager. Then tap on Add Device.

Step 3: Tap WiFi Camera and select the Add Connected Device tab. Tap P2P Setup.

Step 4: Locate the QR code found on your device and scan the QR code.
Step 5: The information found in the S/N will need to be updated. Please remove the extra wording found in this field and verify the serial number is entered correctly. The serial number will start as “Z” followed by 13 characters (letters and numbers. This information can be verified on the serial tag of the device as well if needed. Tap Next.

Note: If you do not remove the additional wording it will result in a failure to connect as the serial number for the device is registering as invalid. Please make sure the correct serial number is being entered into the app before tapping Next.
Step 6: Enter a name for your camera in the Device Name field and enter the password for your device in the Password (default is admin) field. The password used in this field will be the password originally set for the camera in the Amcrest Smart Home app. Tap Start Live View to continue.

Your Amcrest Smart Home device has now been added to your Amcrest View Pro app.
Note: Live view features such as, microphone, speaker, etc will be available in the Amcrest View Pro app. Other features such as playback, configuration, etc will not be available. To access and use these settings, please use the Amcrest Smart Home app.
SDK Programming Guide For Amcrest Smart Home
To download the latest SDK for your device please click on the link provided below.
Amcrest_SDK_Programming_Guide.pdf
How To Externally Format a MicroSD Card to FAT32
How To Externally Format a MicroSD card
If you are unable to format your microSD card using the Amcrest Smart Home app you can also format it using the GUI format tool provided in the link below.
- GUI Format Tool.exe
(80 KB)
Note: A microSD adapter or USB microSD card reader will be required to read the MicroSD card on your computer. Mac users, click here.
Step 1: Download and load the GUI Format Tool.
Step 2: Insert your SD card into your computer and allow the program to read the card.
Note: Uncheck the Quick Format checkbox if you would like a full format of the SD card. Formatting the SD card will remove all information and data from the card and format the card to FAT32.
Step 3: Click Start in the FAT32 Format menu and allow the program to format the card. Click OK to continue.
Step 4: Allow the program to finish formatting the SD card. When finished, click the Close button to close the program.
The microSD card has now been properly formatted to FAT32. Remove the microSD card and insert it into your device.
Amcrest Smart Home App Icons Explained
See below for a chart that details what each icon of the Amcrest Smart Home app:
How to Disable the Indicator Light on Your Amcrest Smart Home Camera
The Indicator light on your camera can be disabled or enabled using the Amcrest Smart Home app. For more information, please refer to the information provided below.
Step 1: Log in to the app and access your device.
Step 2: Tap on the Settings icon.
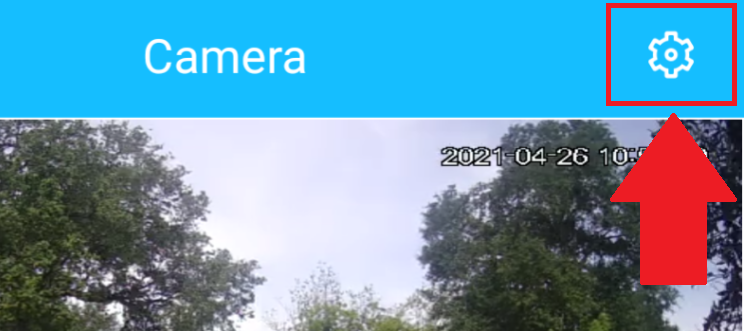
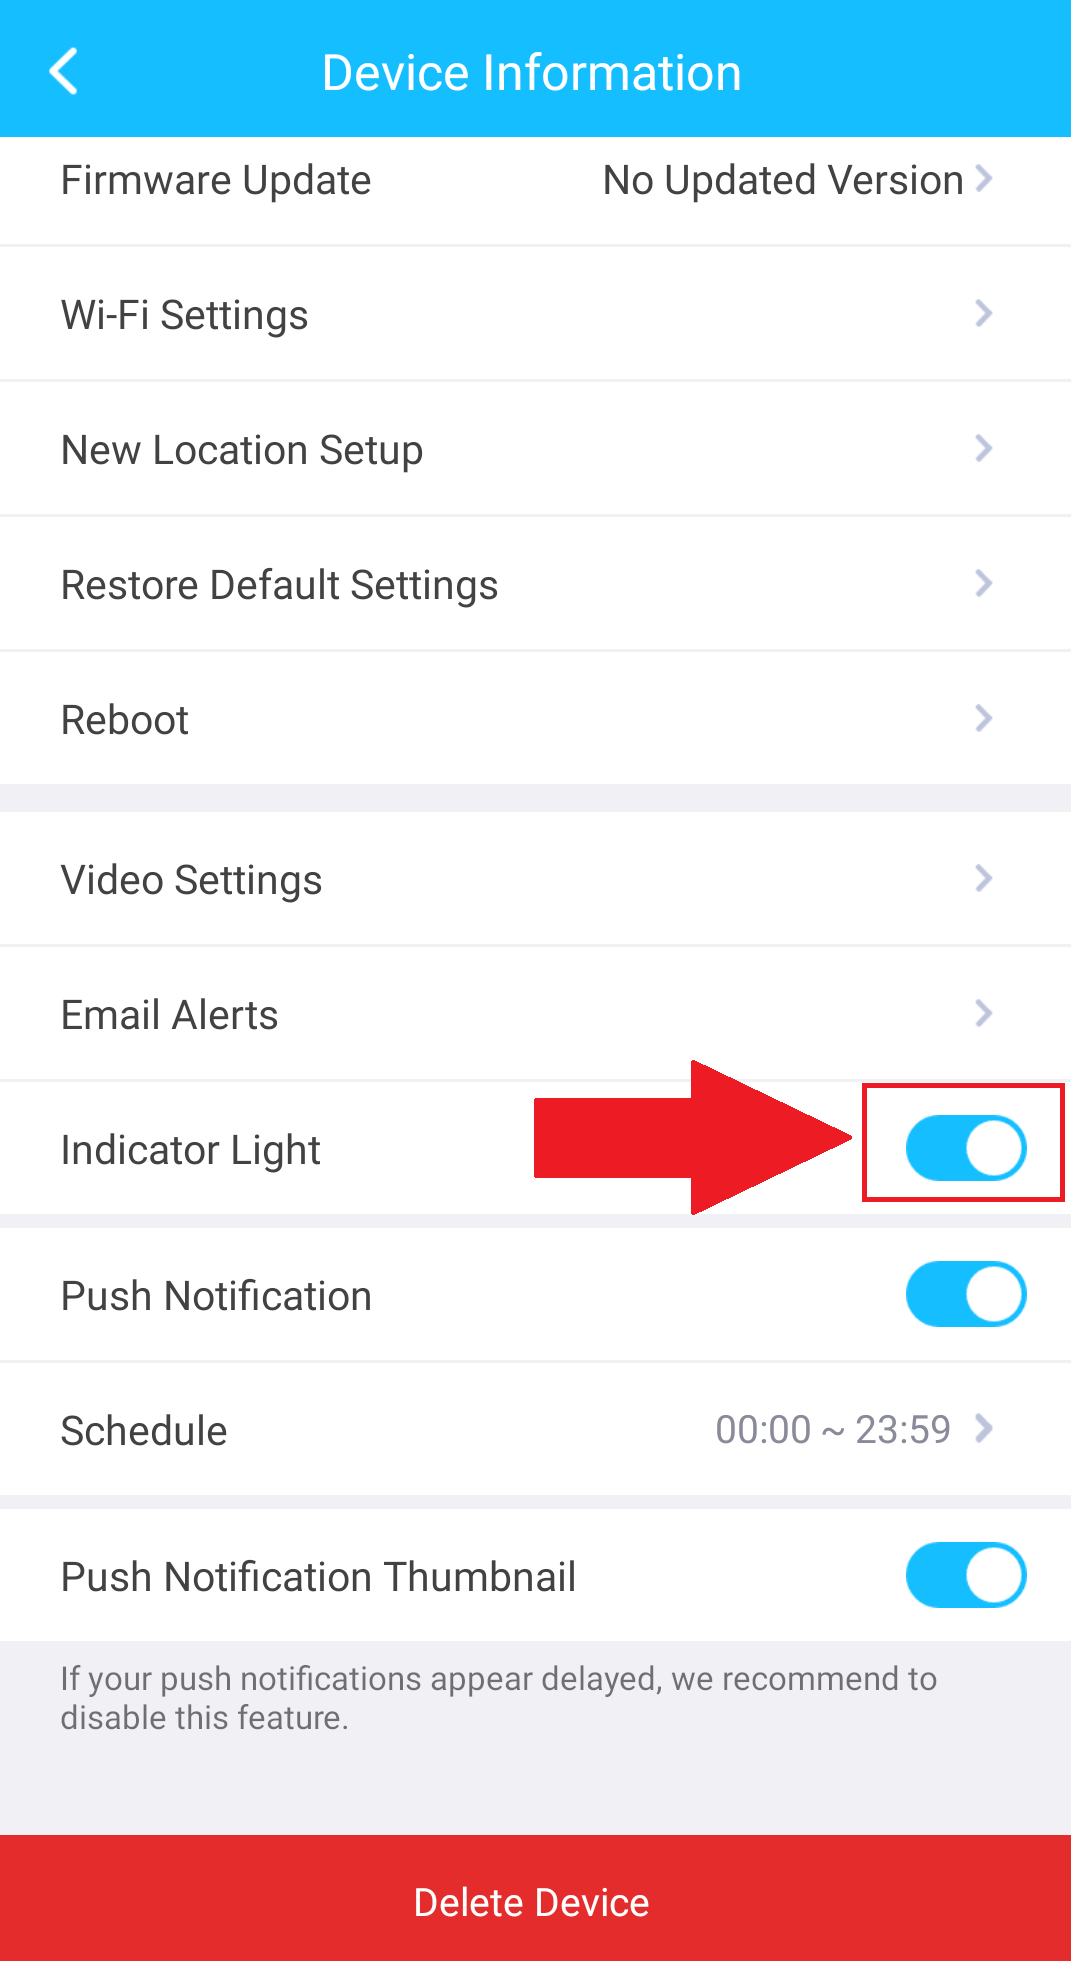
Step 3: Scroll down to the Indicator Light toggle switch and tap to disable it.
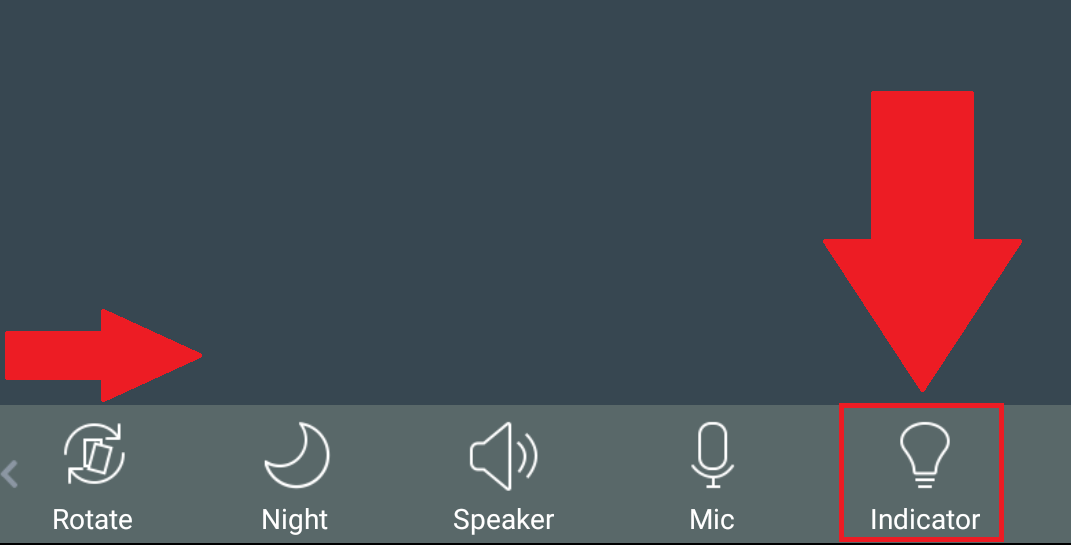
Note: If your device does not have an indicator light toggle switch, tap on Video Settings, then slide your finger on the carousel and locate the Indicator Light icon. Tap the Indicator Light icon to disable the indicator light. To enable the indicator light, tap the icon again.
How to Recover a Password for Your Amcrest Smart Home Account
If you have forgotten the password for your Amcrest Smart Home account and would like to recover the password, please refer to the information provided below. Please note, during the process, a verification code will need to be sent to the email address used for your Amcrest Smart Home account. Please make sure you have access to this email address before starting the password recovery process.
Step 1: Open the Amcrest Smart Home app and tap Forgot Password.

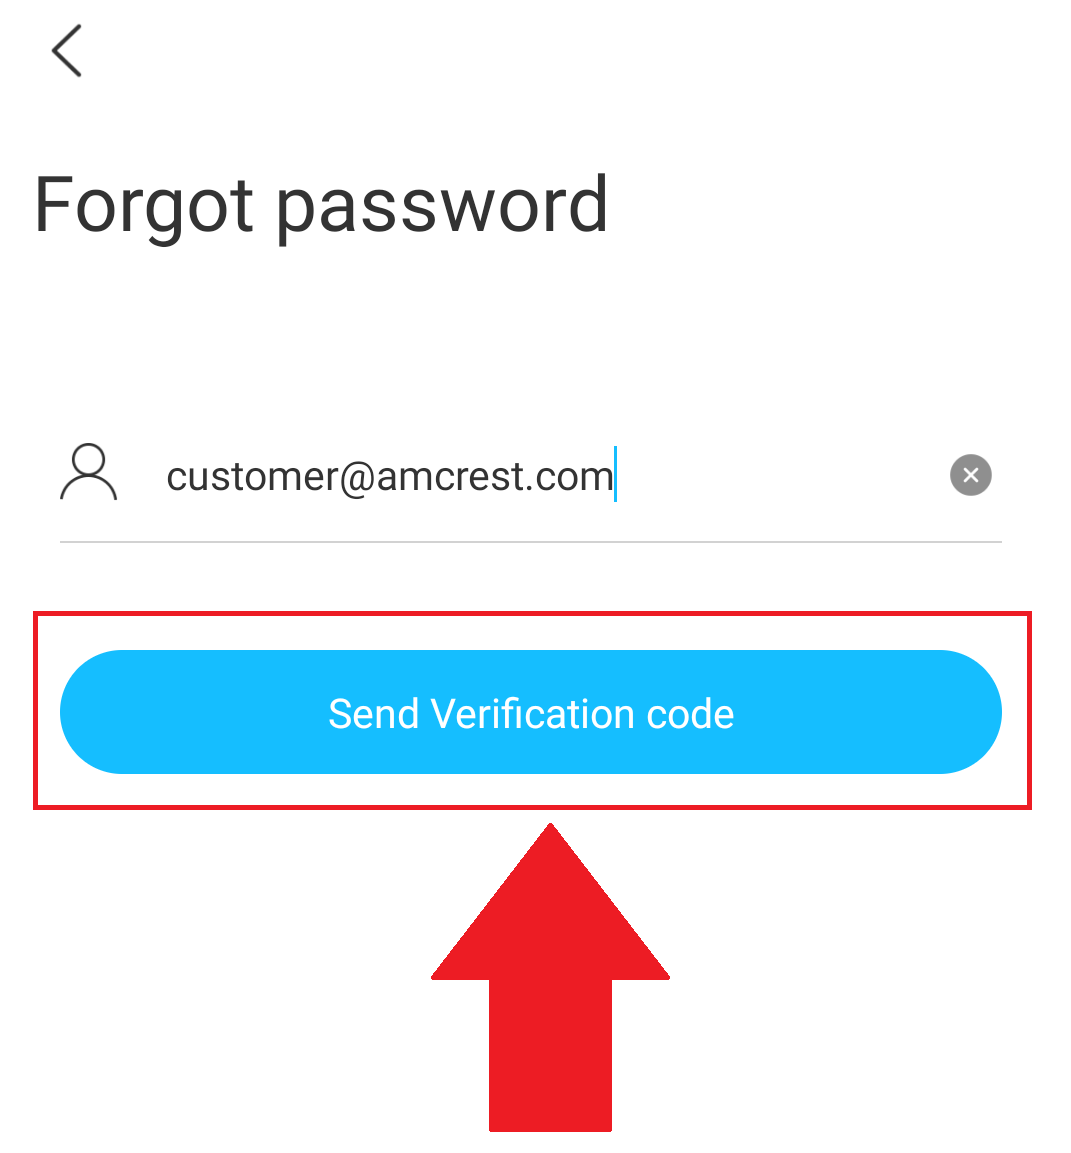
Step 2: Enter the email address for your Amcrest Smart Home account and tap Send Verification Code.
Step 3: Navigate to your email and locate the verification code email. Enter the verification code into the app and tap OK.
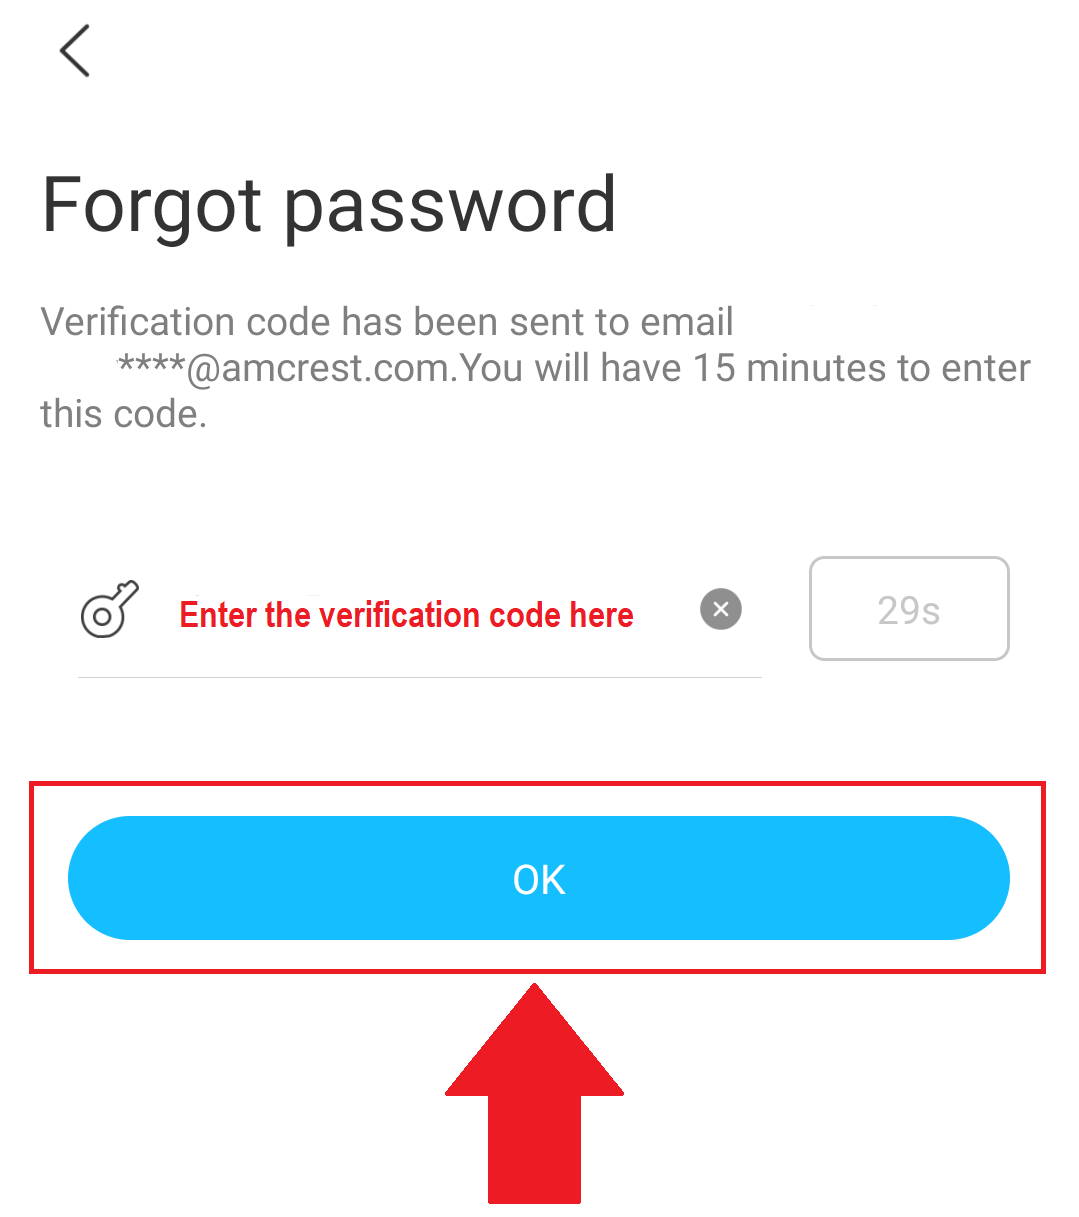
Note: There is a 60-second window to enter the verification code into the app. If a new verification code is needed, tap on the Resend button to allow the app to send another verification code to your email.
Step 4: Enter a new password into the app and confirm the password in the next field. Tap OK.
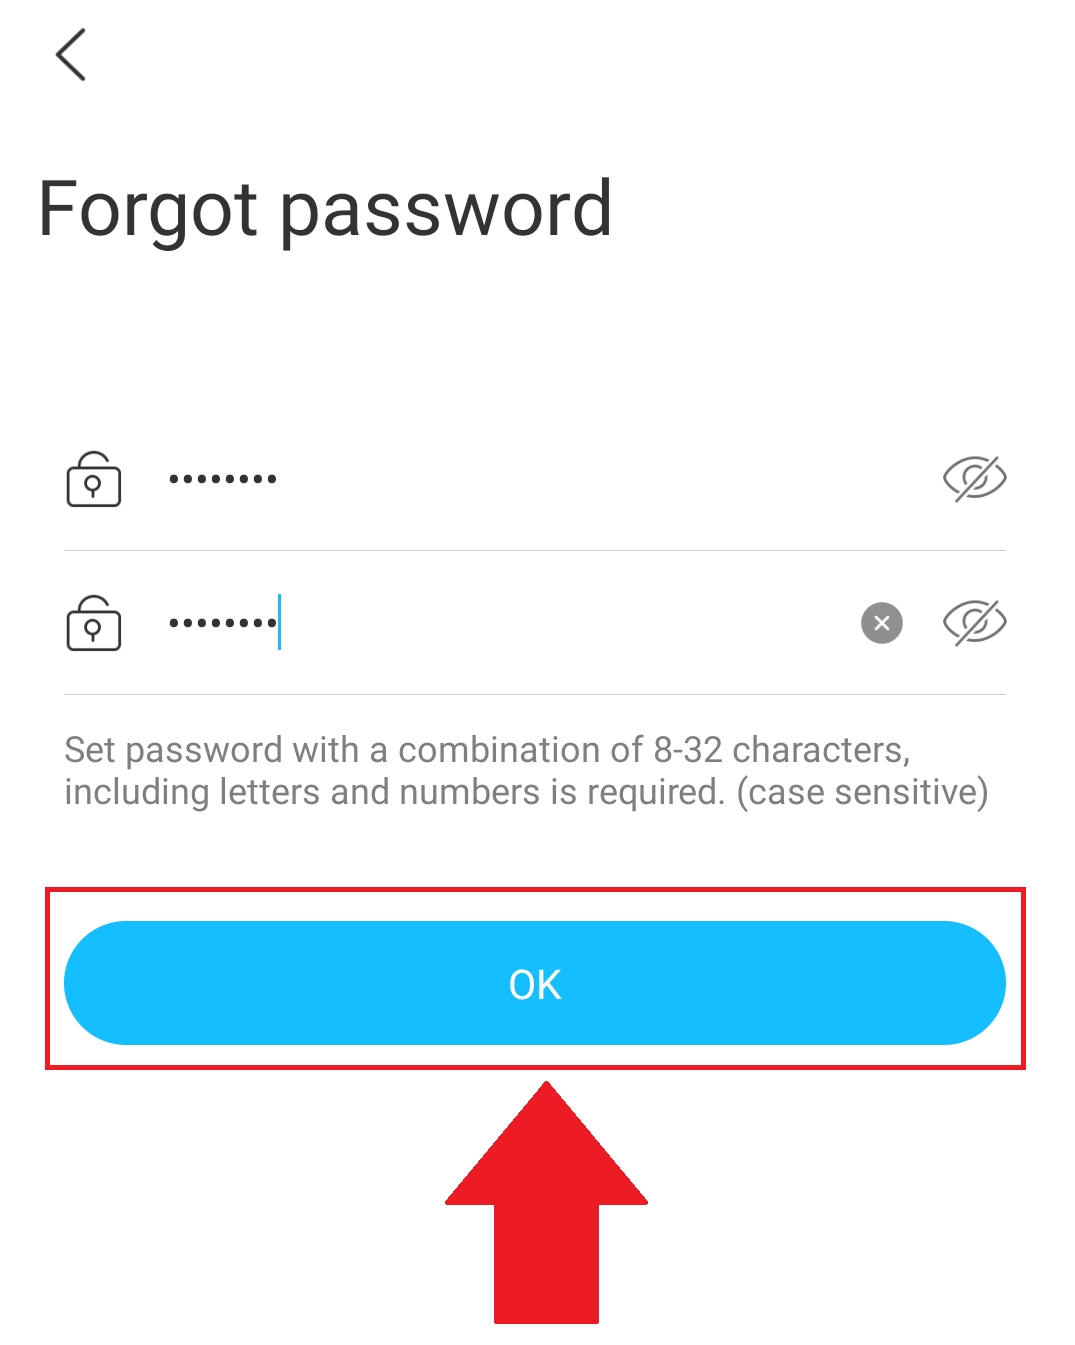
The new password has been applied to your Amcrest Smart Home account. Please remember this password as it will be required to access your Amcrest Smart Home account.
Accessing Amcrest Smart Home Products Using RTSP
Some applications or viewing tools can use Real Time Streaming Protocol or RTSP to pull a device’s stream. This requires a specifically formatted URL. Please note, not all Amcrest Smart Home devices, such as the AB2WFSET will be compatible with RTSP streaming.
URL: rtsp://admin:password@IPAddress:554/cam/realmonitor?channel=1&subtype=0&authbasic=64
Please note, the admin and password portions of the URL will be the username and password of the CAMERA not the username and password of the account.
RTSP URL Breakdown
The bracketed items are variables that you need to input according to your setup. Explanations of each variable are given below.
rtsp:// – The RTSP protocol
[admin] – username of the camera/device
[password] – password of the camera/device
[IP address] – IP address of the camera/device. If you are not on the same local network, this should be the external IP address of the device’s network.
[port] – RTSP port number
[channel] – channel number of the stream
[stream] – main or sub stream (use “main” (01) for main stream and “sub” for substream (0)
[authbasic] – basic authentication for the stream (64).
Using VLC Media Player to Access an Amcrest Smart Home Device on RTSP?
Before proceeding, please ensure the device is properly added to the Amcrest Smart Home app, powered on, and the computer you are using is on the same network as the device. For information on how to set up your device on the Amcrest Smart Home app, please refer to the quick start guide provided with your specific device.
Step 1: Download the Amcrest IP config tool. To access the Amcrest IP config tool, please visit: http://amcrest.com/downloads
Step 2: Open the Amcrest IP config tool and locate the IP address for your Amcrest Smart Home device.
Please note, the IP address represented in the above image is for reference purposes only. The IP address for your specific device may be different depending on the network.
Step 3: Lauch the VLC Media Player

Step 4: In the toolbar, click on Media, then click on Open Network Stream to display the open-source window.

Note: The open network stream menu can also be opened by pressing Ctrl-N while the VLC player is opened.
Step 4: Enter the RTSP protocol into the Network Protocol field and fill in the information into the URL.
rtsp://admin:password@IPAddress:554/cam/realmonitor?channel=1&subtype=0&authbasic=64
Click Play.
You can now begin streaming your camera live.

How to Register an Amcrest Smart Home Account
How to Register an Amcrest Smart Home Account
Registering an Amcrest Smart Home account is easy using the Amcrest Smart Home app. The Amcrest Smart Home app can be downloaded from the App Store or Google Play Store.
![]()
Registering an account allows you to begin adding your Amcrest Smart Home devices into the app. Please note, if you currently have a Zencam Security account already, registration to the Amcrest Smart Home app is not necessary as these accounts will share the same credentials. If you have a Zencam account, simply download the Amcrest Smart Home app and enter your Zencam login information into the Amcrest Smart Home app to access your account.
For more information on how to register a Amcrest Smart Home account, please refer to the information provided below.
Step 1: Download the Amcrest Smart Home app from the App Store or Google Play Store and open the app. On the main screen, tap on Register.
Step 2: Select the region in which you reside and tap Next to continue.
Step 3: Enter a valid email address and tap the “I have read and agreed” check box. The “Send Verification Code” option will appear. This will be the code needed to register your account. Tap Send Verification Code.
Step 4: Check the email address you entered for the verification code. Enter the verification code into the app and tap OK to continue. Please note, the verification code will only be valid up to 15 minutes.
Step 5: Enter a password for your account into the app and confirm the password in the next field. Set a password with a combination of 8 – 32 letters and numbers. The password will be case sensitive. Tap OK to continue.
Your Amcrest Smart Home account has been registered successfully. You will now be able to begin adding devices to your account. For more information on how to add your specific Amcrest Smart Home device, please refer to the Quick Start Guide included with your device.
How to Download a MicroSD card Recording
How to Download a MicroSD Card Recording
Recordings in the Amcrest Smart Home app can be downloaded to your phone through the Amcrest Smart Home cloud or from a microSD card. For more information on how to download recordings from the Amcrest Smart Home cloud, click here.
A microSD card must manually be inserted into the device to retain and download motion events. For more information on how to download a microSD card recording, please refer to the information provided below.
Step 1: Log into your Amcrest Smart Home account and select your device from the Devices menu.

Step 2: Tap on “MicroSD Card”.

Step 3: Tap on the File List icon ( ) located in the Cloud playback interface.

Step 4: Select the recording you wish to download from the file list.

Step 5: Tap the download icon ( ![]() ) to download the recording.
) to download the recording.

The recording will begin to download.

A blue checkmark ( ![]() ) will appear next to the download icon once the recording has finished downloading. You can also share your recordings directly to other services on your smartphone via the share icon (
) will appear next to the download icon once the recording has finished downloading. You can also share your recordings directly to other services on your smartphone via the share icon ( ![]() ) located in the middle of the download menu. Please note, the recording must be downloaded to the app first in order to share them.
) located in the middle of the download menu. Please note, the recording must be downloaded to the app first in order to share them.
Exporting the Recording to the Mobile Device
Recordings downloaded from the microSD card will be downloaded to the Downloads List folder. The Downloads List folder can be found in the Account menu.
Step 1: Exit the interface to access the main menu. Click Account.

Step 2: Click on Downloads List.
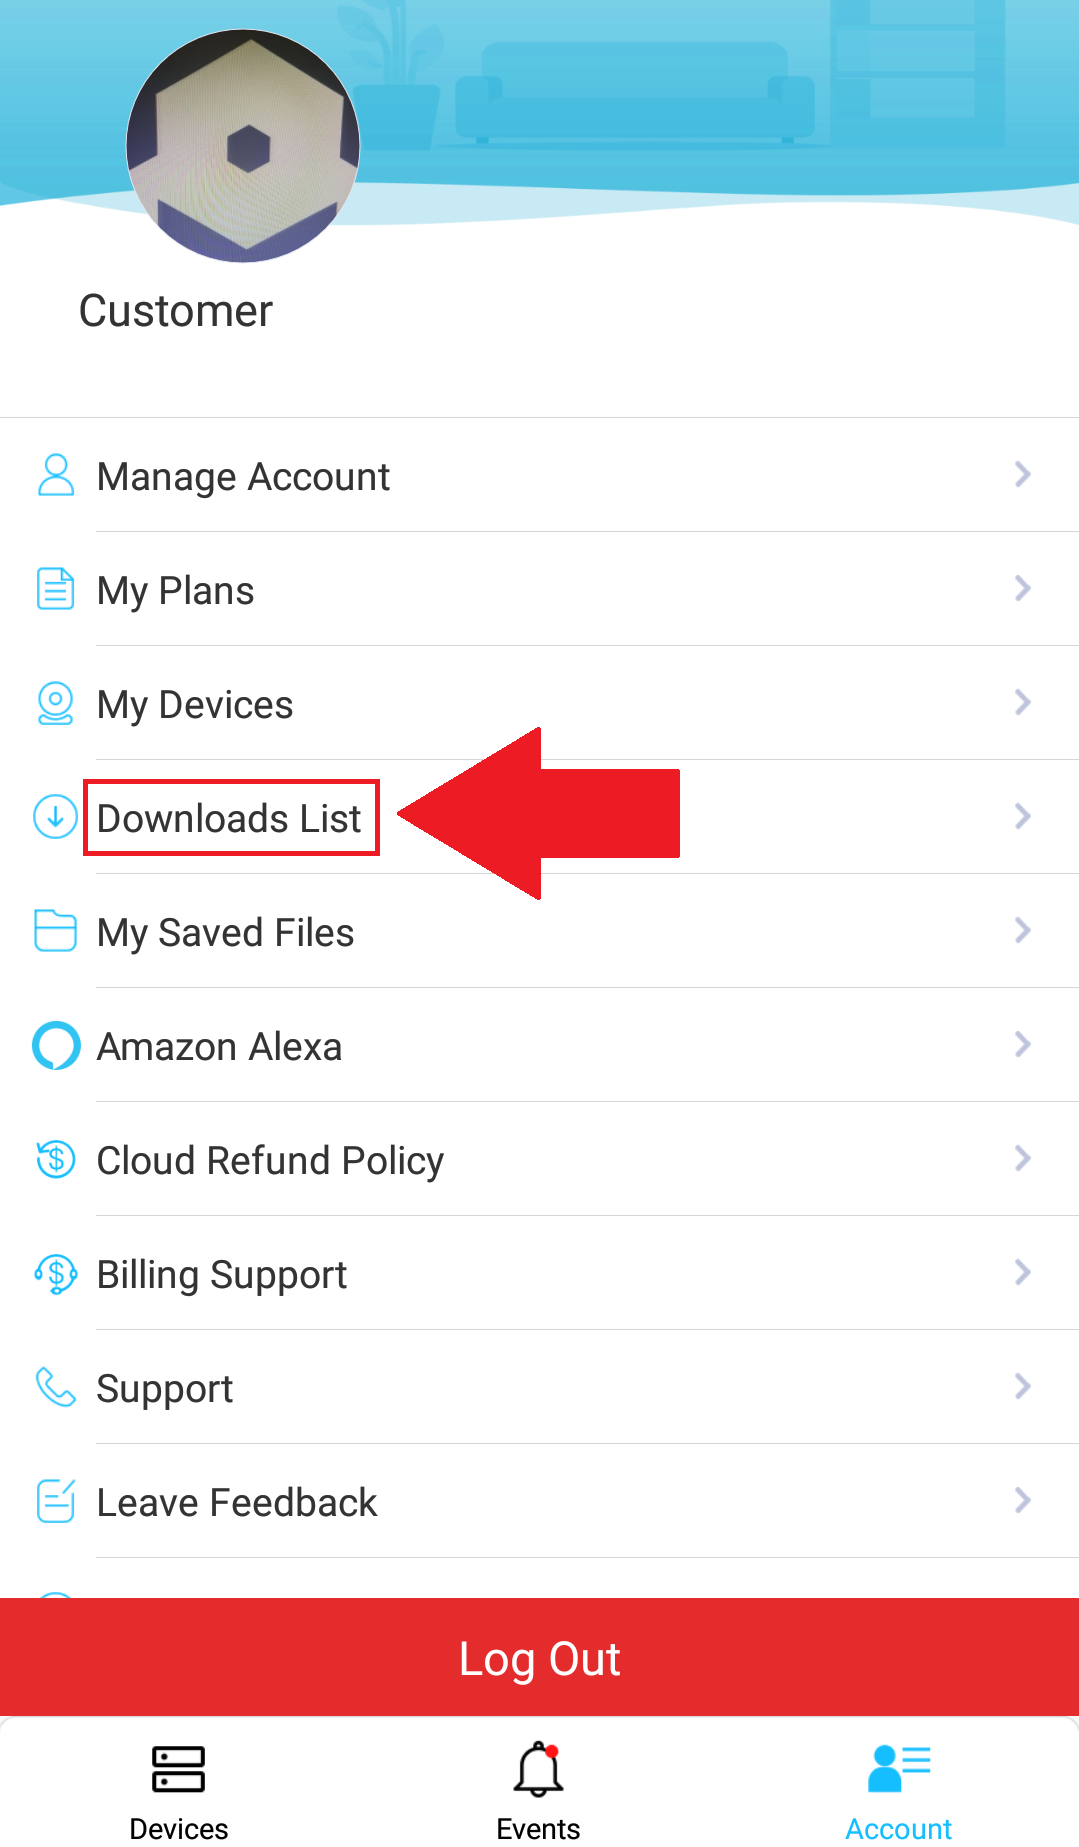
Step 3: Click on the Folder icon.

Step 4: Tap on the Export icon.

The event will be downloaded to the photo or gallery section on your phone.
How to Format a MicroSD card Using the Amcrest Smart Home App
How to Format a MicroSD card Using the Amcrest Smart Home App
A microSD card can be formatted using the Amcrest Smart Home app. This will clear all data on the microSD card and format the microSD card to FAT32. Formatting the microSD card is performed via the storage status menu in the app.
The storage status menu displays any current cloud or microSD card storage options applicable for your device. This option also allows you view current cloud subscriptions applicable to your device as well as format a microSD card right from your smartphone. For more information on how to format the microSD card, please refer to the information provided below.
Note: A microSD card can be formatted externally as well if needed. For more information on how to format a microSD card externally, click here.
Step 1: tap on the settings icon (![]() ) on the live view screen. Tap on the Storage Status option located in the settings menu.
) on the live view screen. Tap on the Storage Status option located in the settings menu.

Step 2: The microSD card storage capacity will be displayed in this menu. If no microSD card is being read by the device the status will be “Disabled”. To format the microSD card, tap on “Format Storage
Device”.

How to Set a Motion Detection Schedule Using Amcrest Smart Home
How to Set a Motion Detection Schedule Using Amcrest Smart Home
A motion schedule allows you to set the device to begin recording motion detection events at a designated time. This is useful if you would like the device to only start detecting motion during specific times of the day. If you would like the device to record motion 24/7 you can leave the schedule as default. However, for more information on how to set a motion schedule, please refer to the information provided below.
Step 1: Log into the Amcrest Smart Home app and access your device.
Step 2: Tap on the Settings icon ( ![]() ).
).
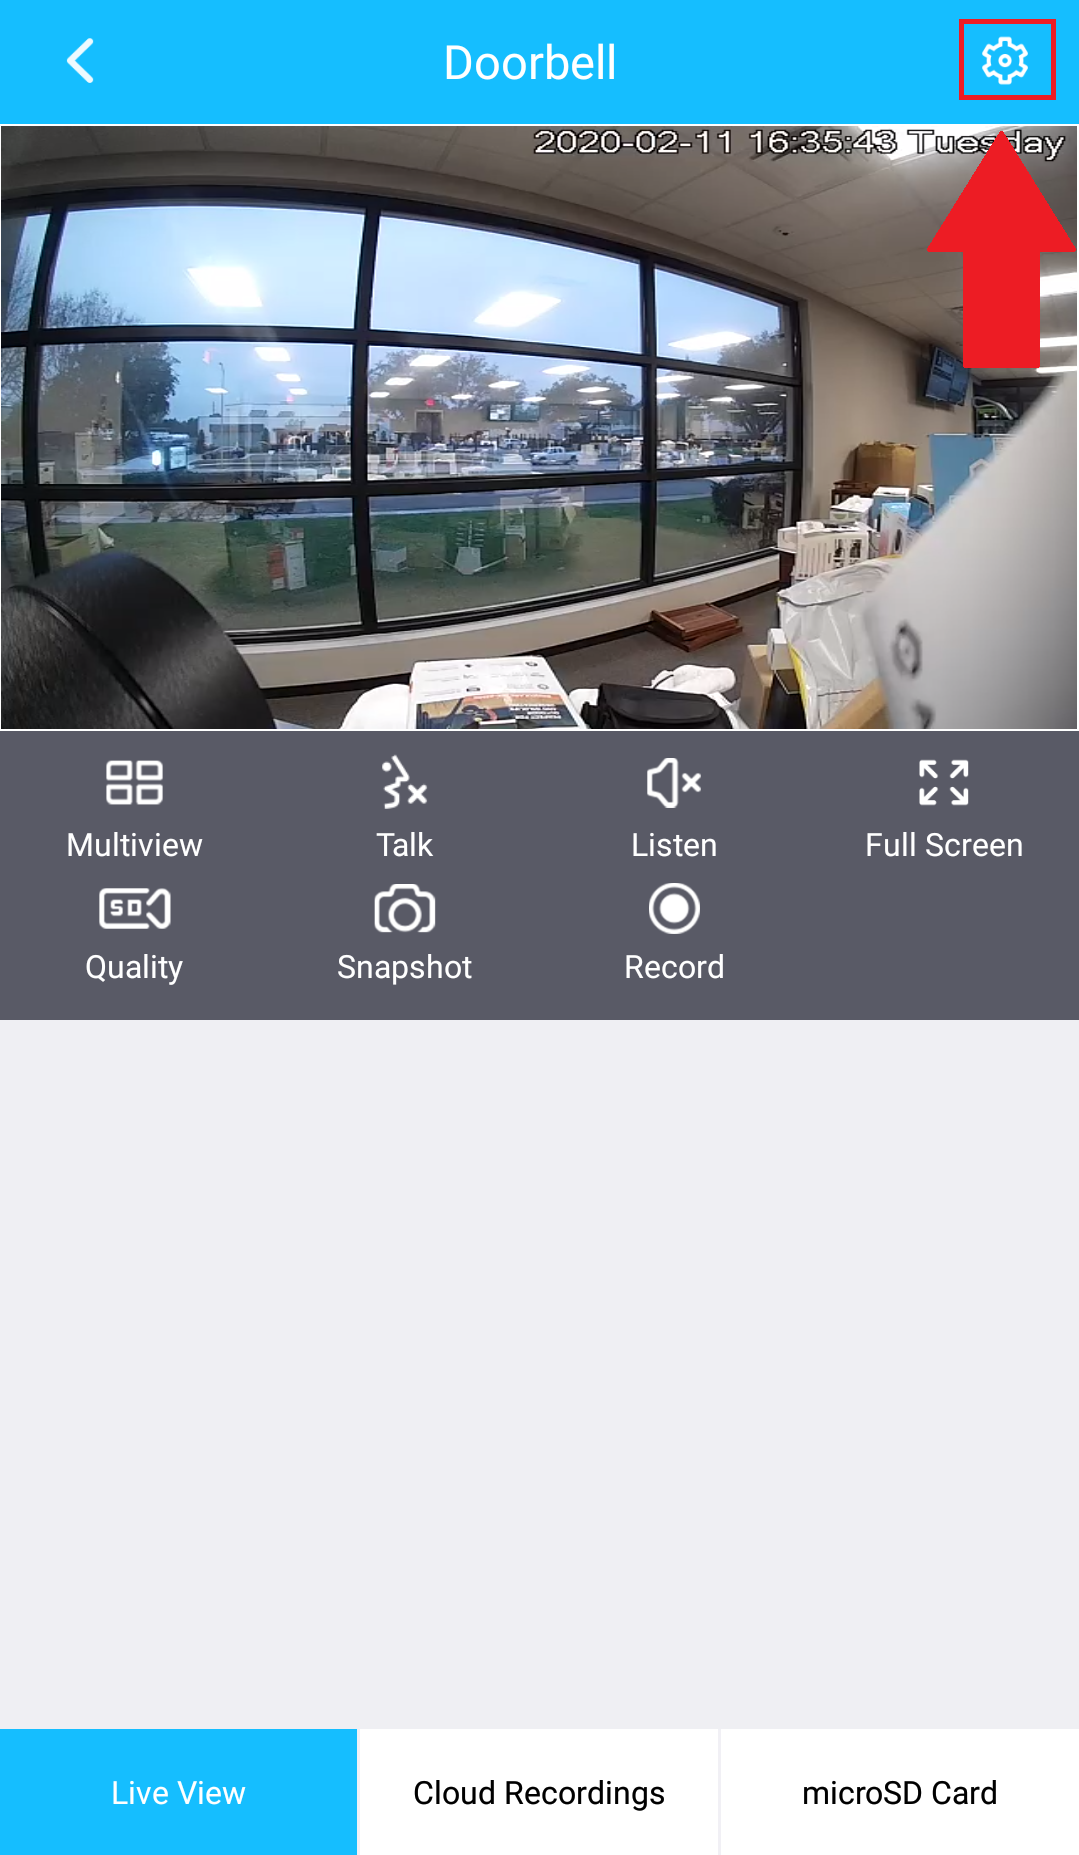
Step 3: Tap on Motion Detection.
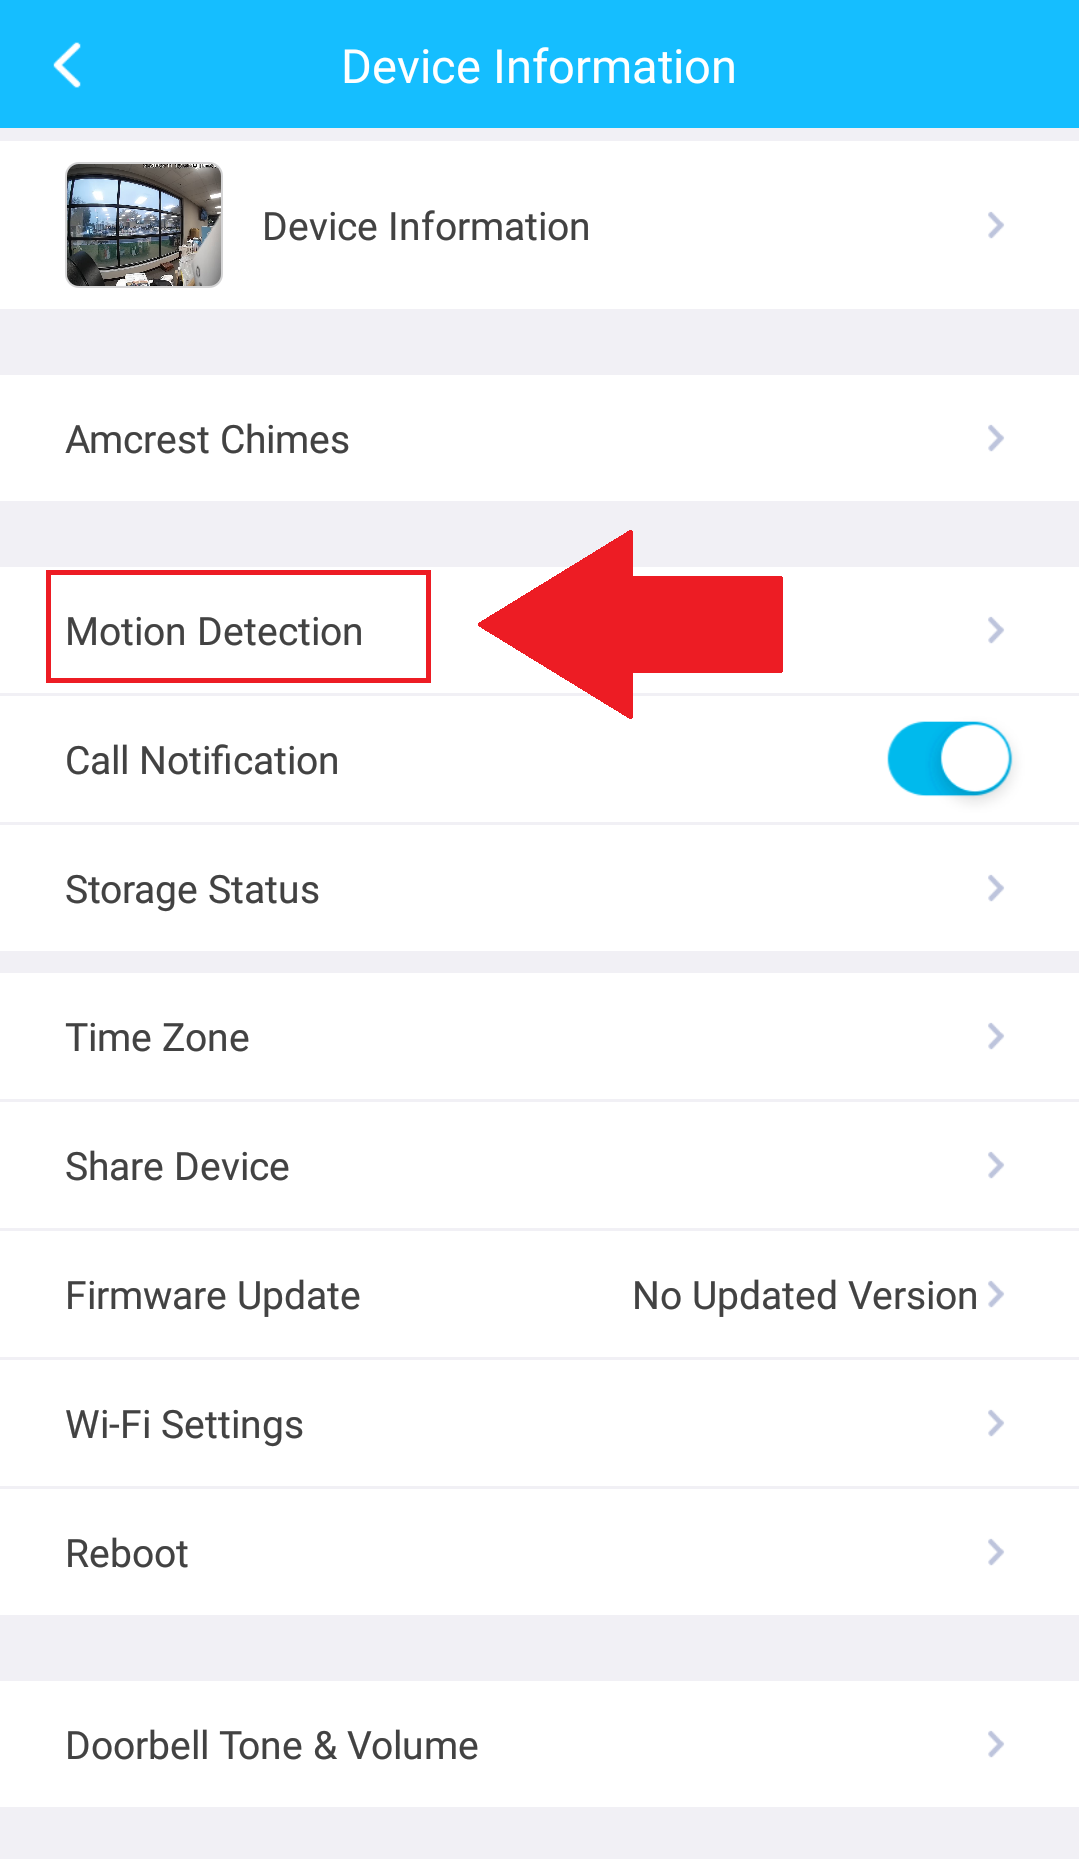
Step 4: Tap on Motion Schedule.

Step 5: Tap on the day of the week you wish to modify. If you are setting a schedule for multiple days of the week this can be done later in the interface.
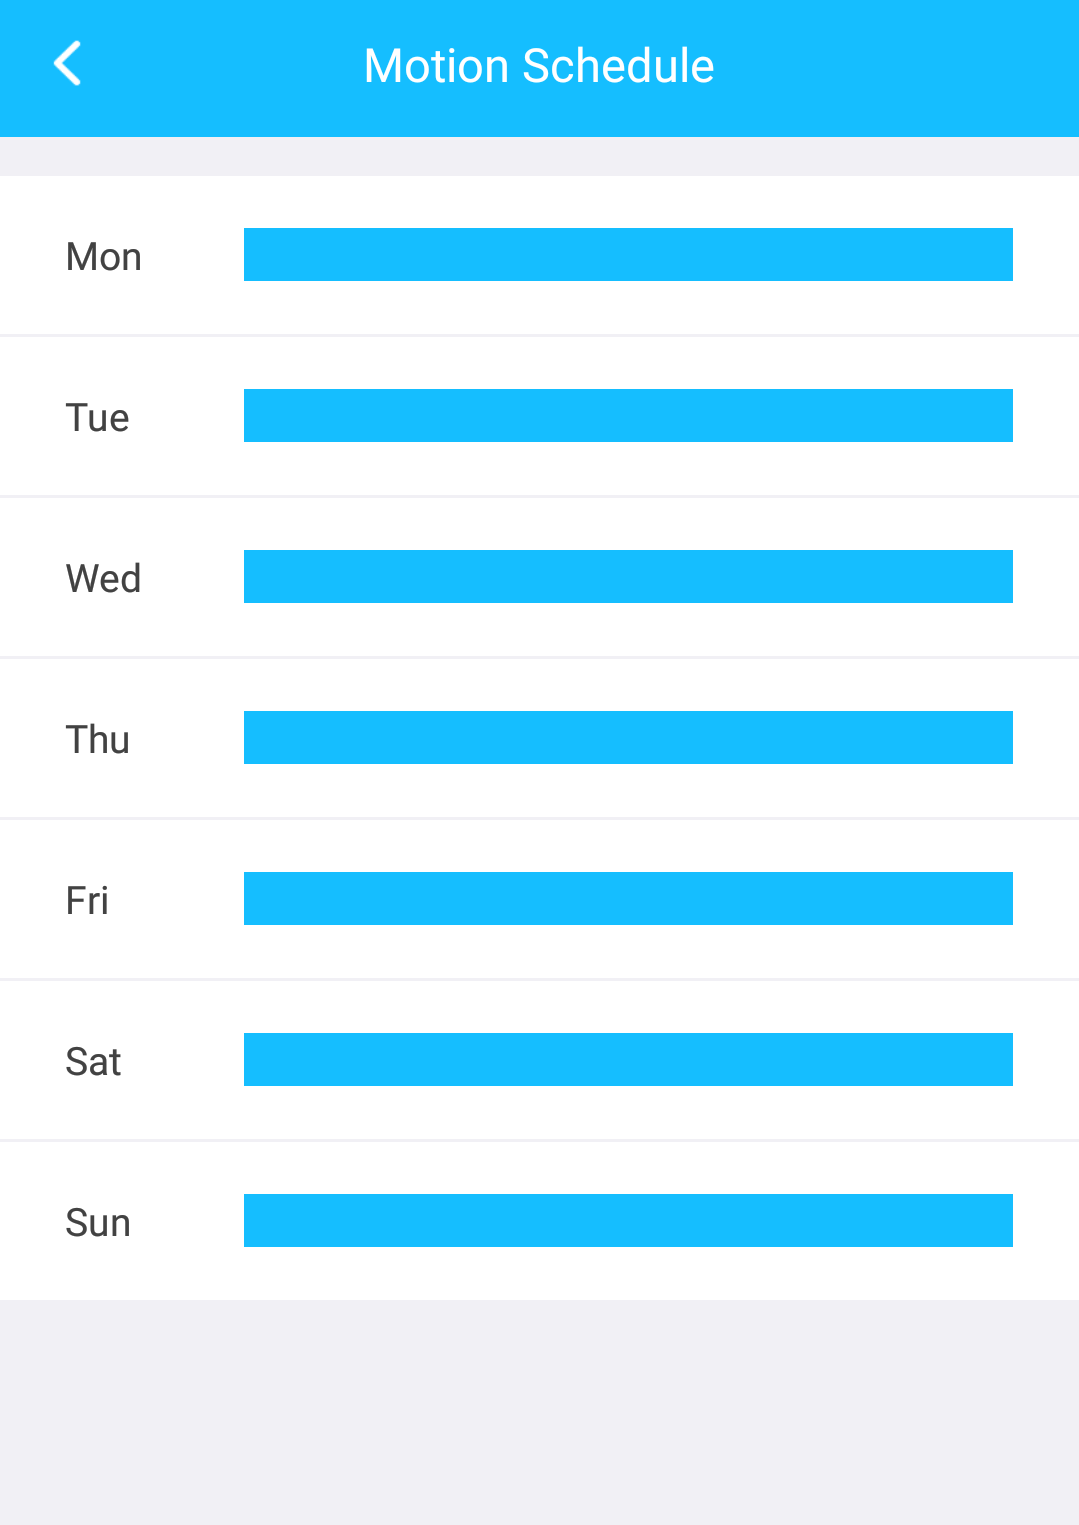
Step 6: Tap on “Add Schedule“.

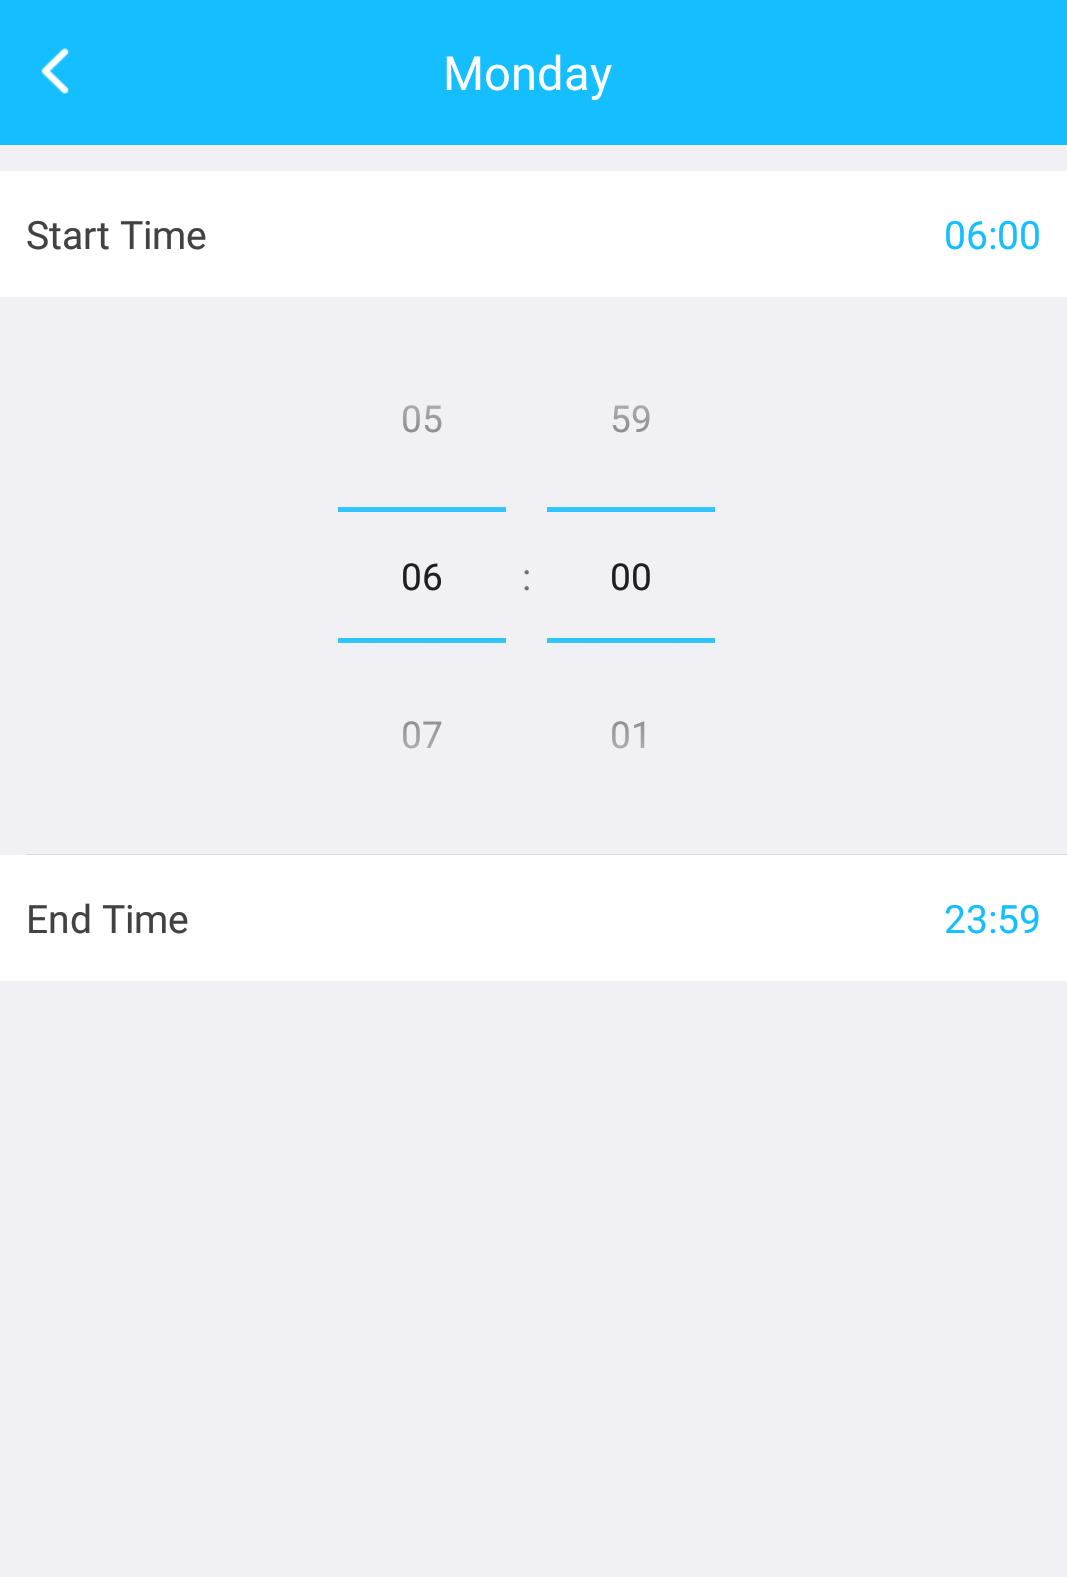
Step 7: Tap on “Start Time” and use the scroll option to select a time you want the motion schedule to start. Note: In this example we will be setting the start time to 6am (0600).
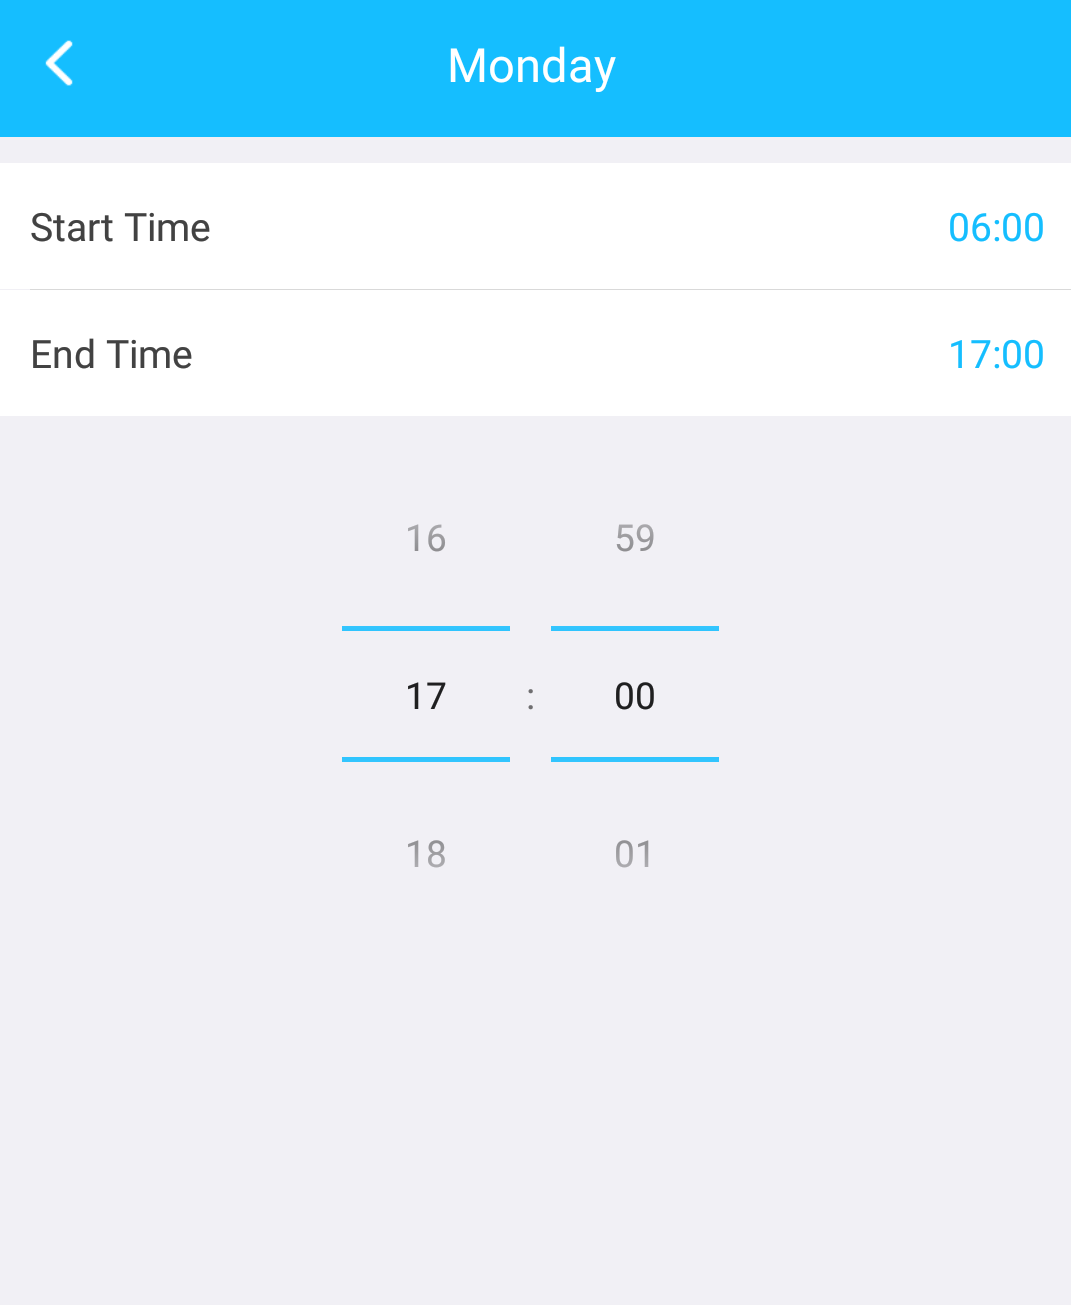
Step 8: Tap on “End Time” and use the scroll option to select a time you want the motion schedule to stop. In this example we will be setting the stop time to 5pm (1700). Tap on the back arrow ( Tap on “Repeat” to choose which days of the week you would like the motion schedule to apply. A green check mark will be displayed next to the active days. Tap on the back arrow ( ![]() ) to exit.
) to exit.
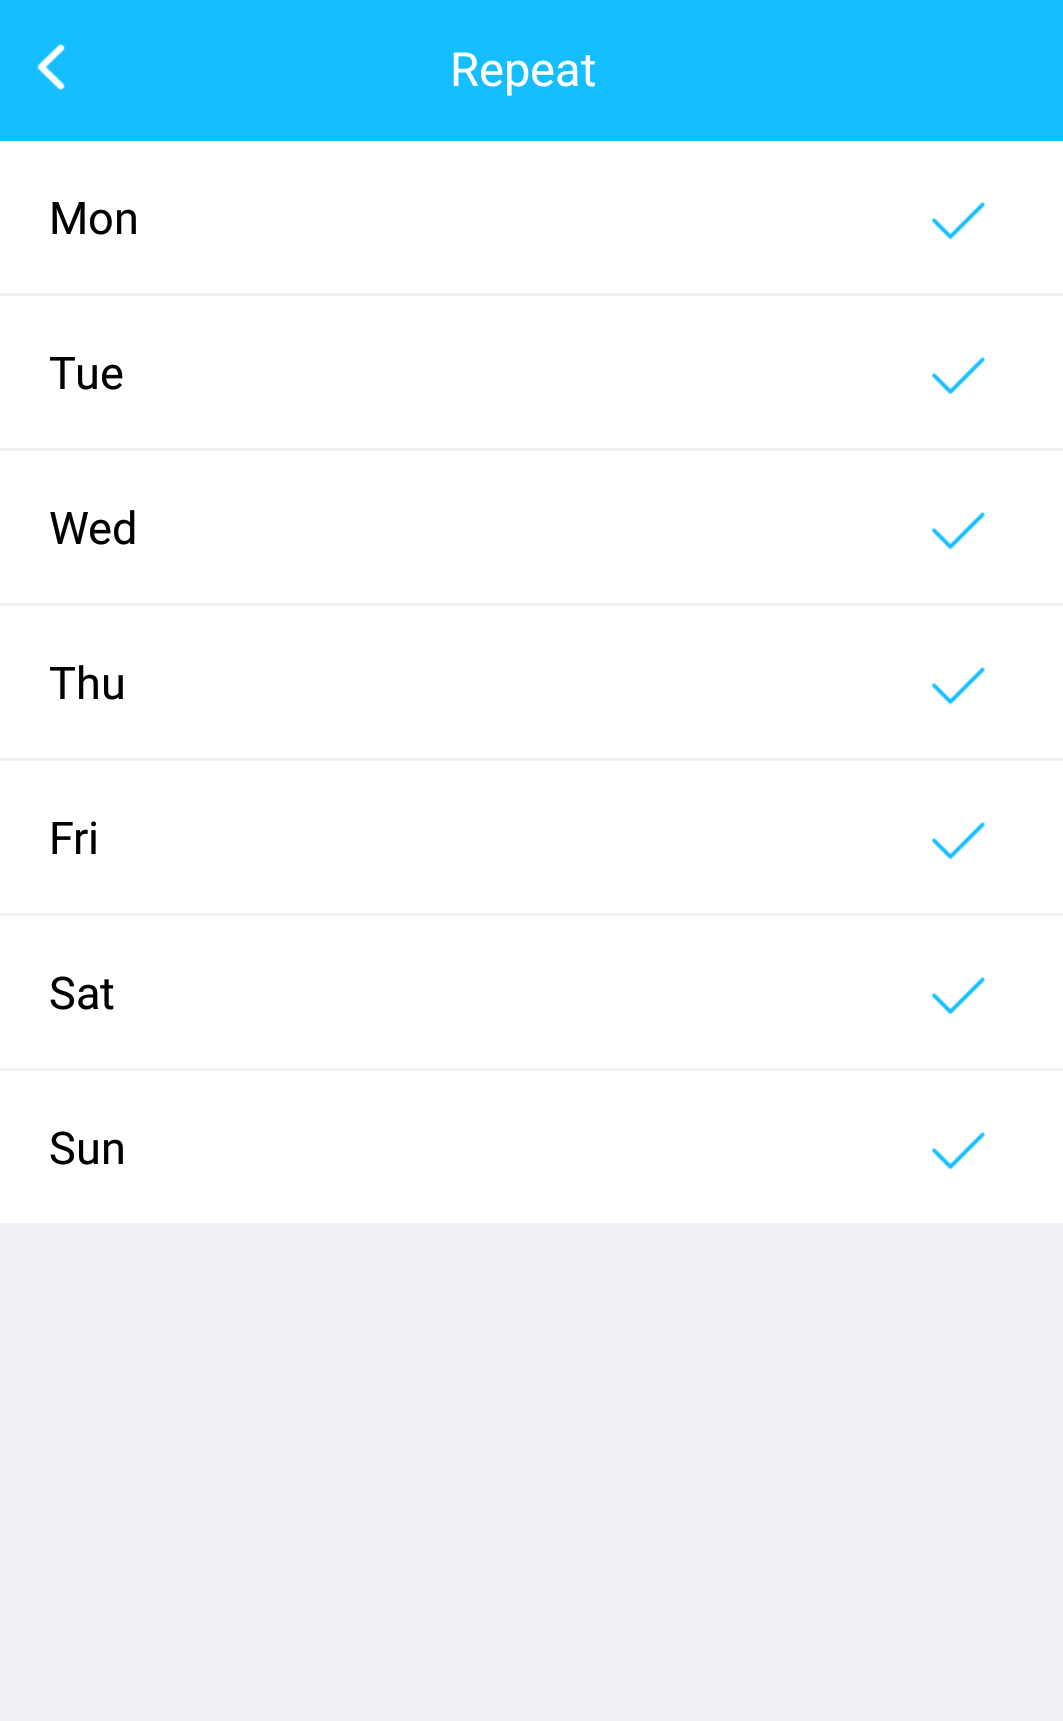
Step 9: Tap on “Repeat” to choose which days of the week you would like the motion schedule to apply.

A blue check mark will be displayed next to the active days.
Tap on the back arrow ( ![]() ) to exit.
) to exit.
Note: Motion schedules cannot overlap.
Step 10: Tap on the “Save” button to save your motion schedule. To add additional motion schedules, you can tap on Add Schedule and repeat the setup process.
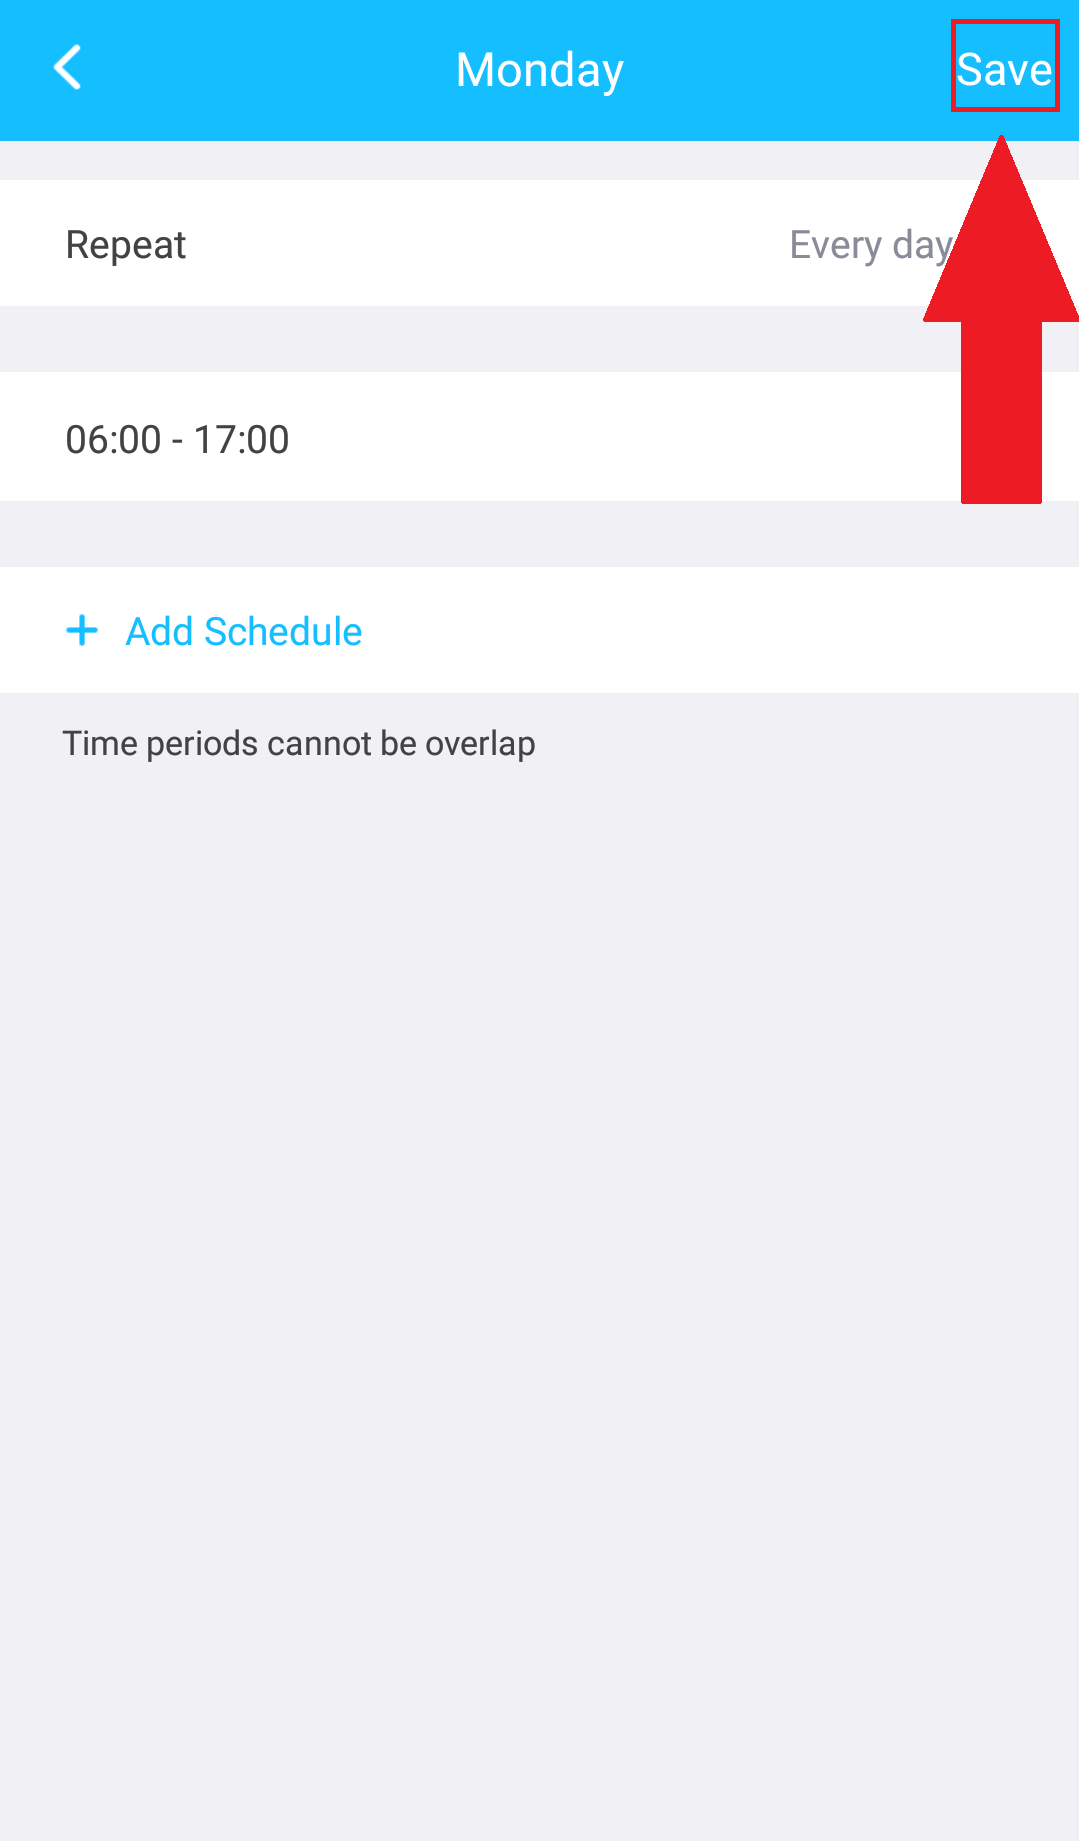
Tap on the back arrow ( ![]() ) to exit.
) to exit.
How To Turn Off the IR LEDs
How To Turn Off the IR LEDs
Disabling the IR LEDs will result in night vision being disabled on your device. This function can be enabled or disabled using the Amcrest Smart Home app. Please note, certain Amcrest Smart Home devices, such as the Wi-Fi Doorbell camera and battery camera do not support this function. For more information on how to turn off the IR LEDs, please refer to the information provided below.
Step 1: Log into your Amcrest Smart Home account via the Amcrest Smart Home app.
Step 2: Select your device from the Devices menu.
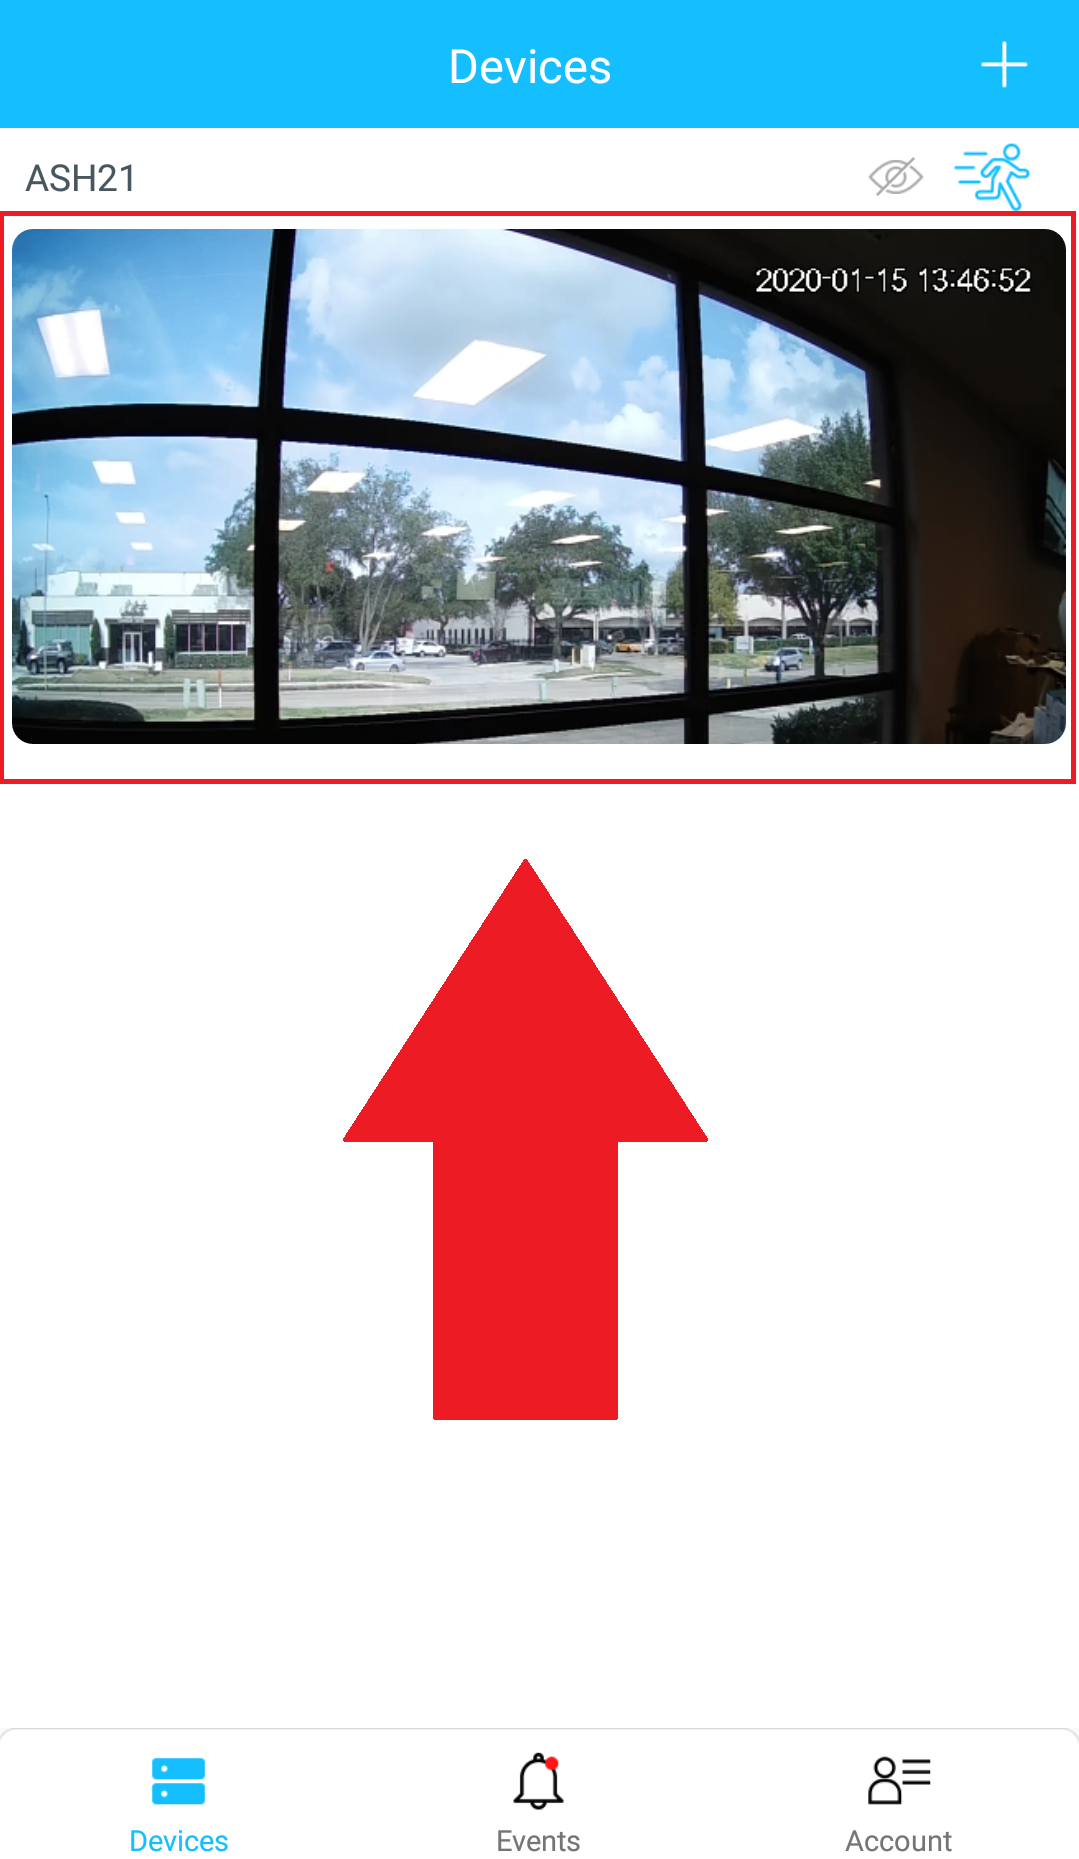
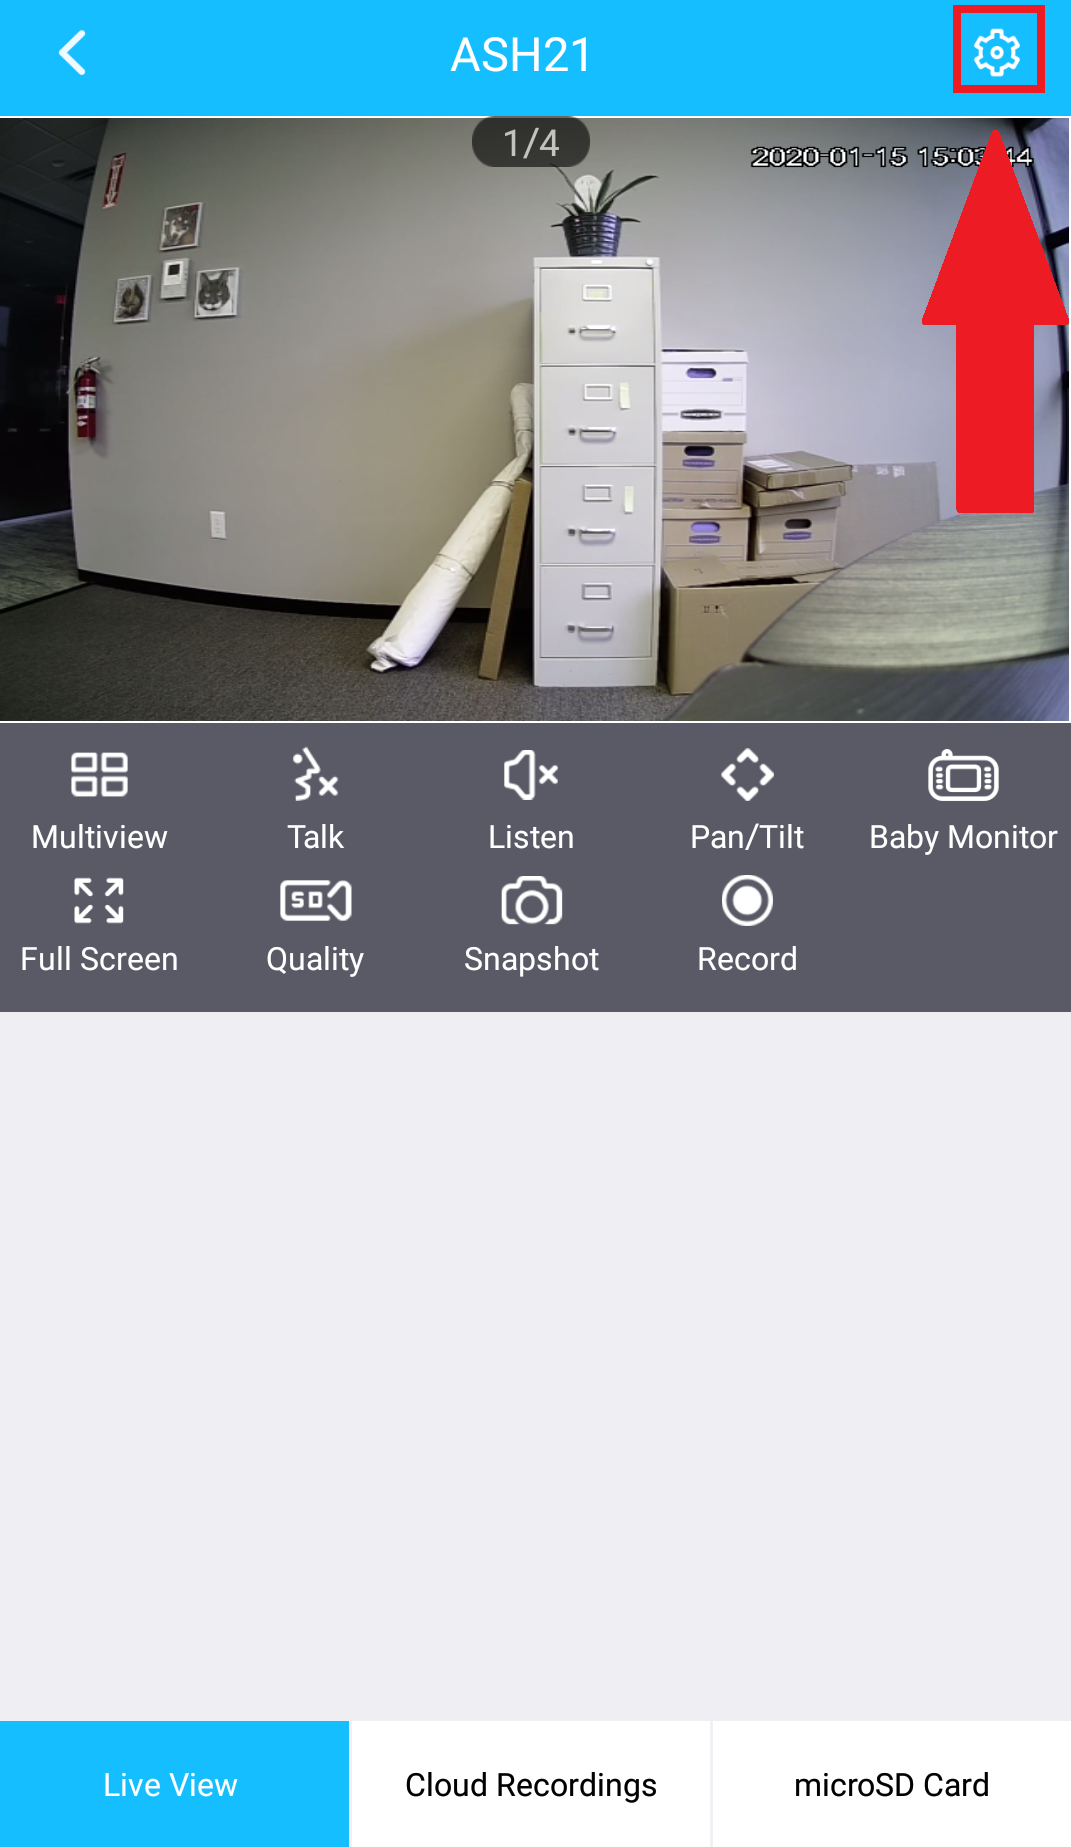
Step 3: Tap on the Settings ( ![]() ) icon.
) icon.
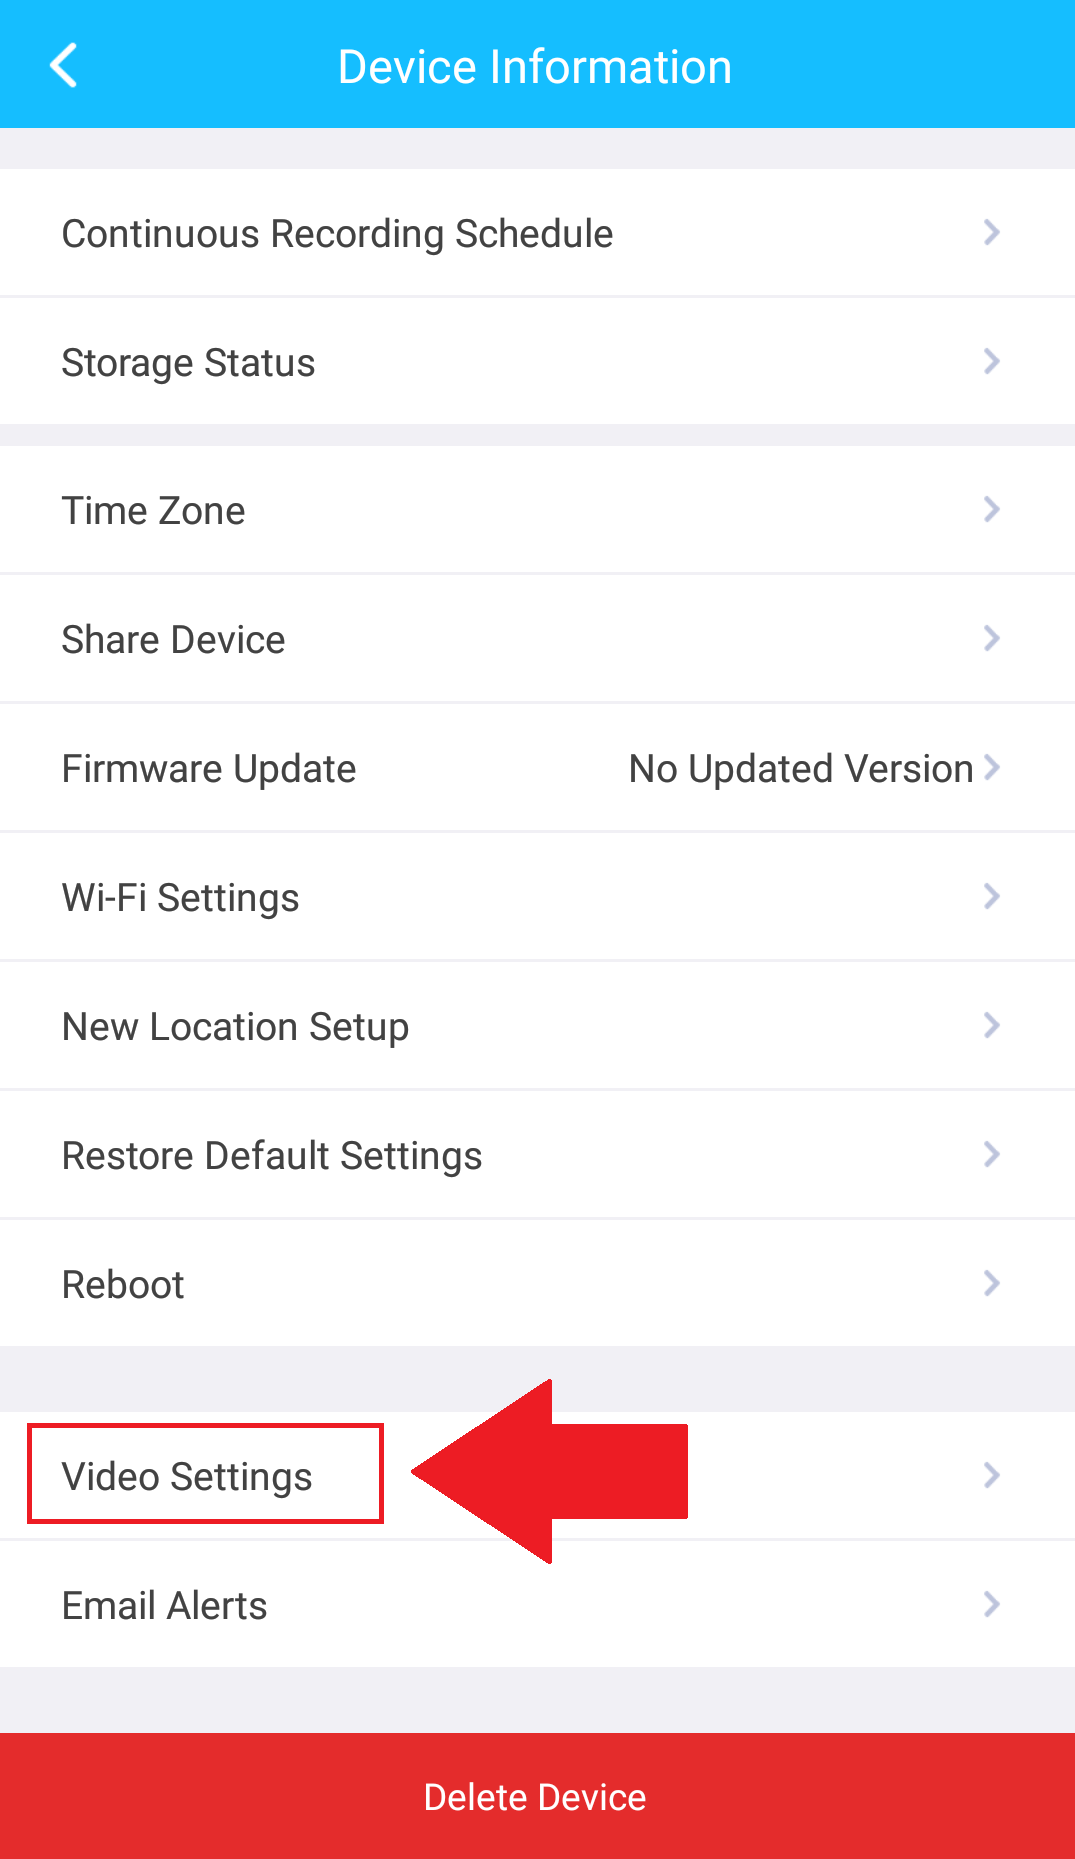
Step 4: Tap on Video Settings.
Step 5: Tap on the Night ( ![]() ) icon to turn the IR LEDs off and disable night vision.
) icon to turn the IR LEDs off and disable night vision.
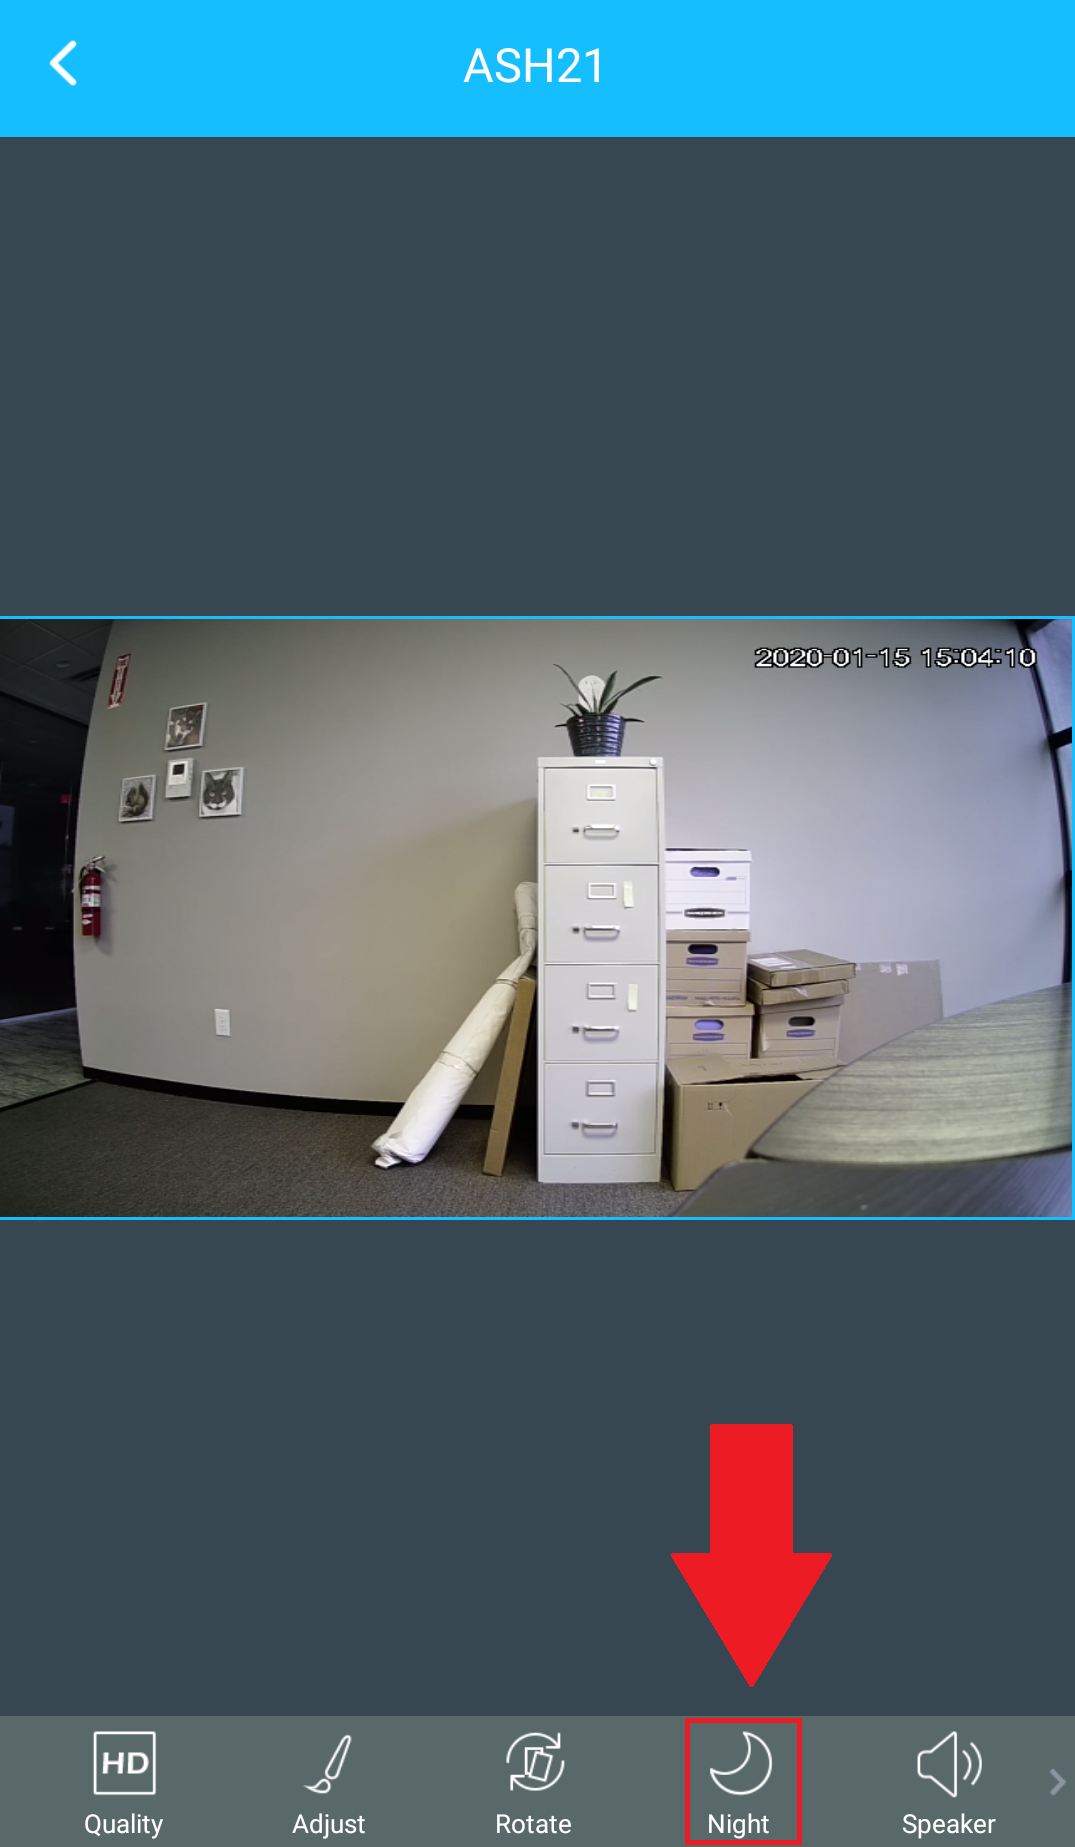
Note: To turn the IR LEDs back on, tap on the Night ( ![]() ) icon again to enable night vision.
) icon again to enable night vision.
How To Delete a Device from the Amcrest Smart Home App
How To Delete a Device from the Amcrest Smart Home App
Deleting a device from the Amcrest Smart Home app will remove the device completely from your Amcrest Smart Home account. This is highly recommended if you are performing a factory reset on your device or need to remove the device from your specific account. For more information on how to delete a device from the Amcrest Smart Home app, please refer to the information provided below.
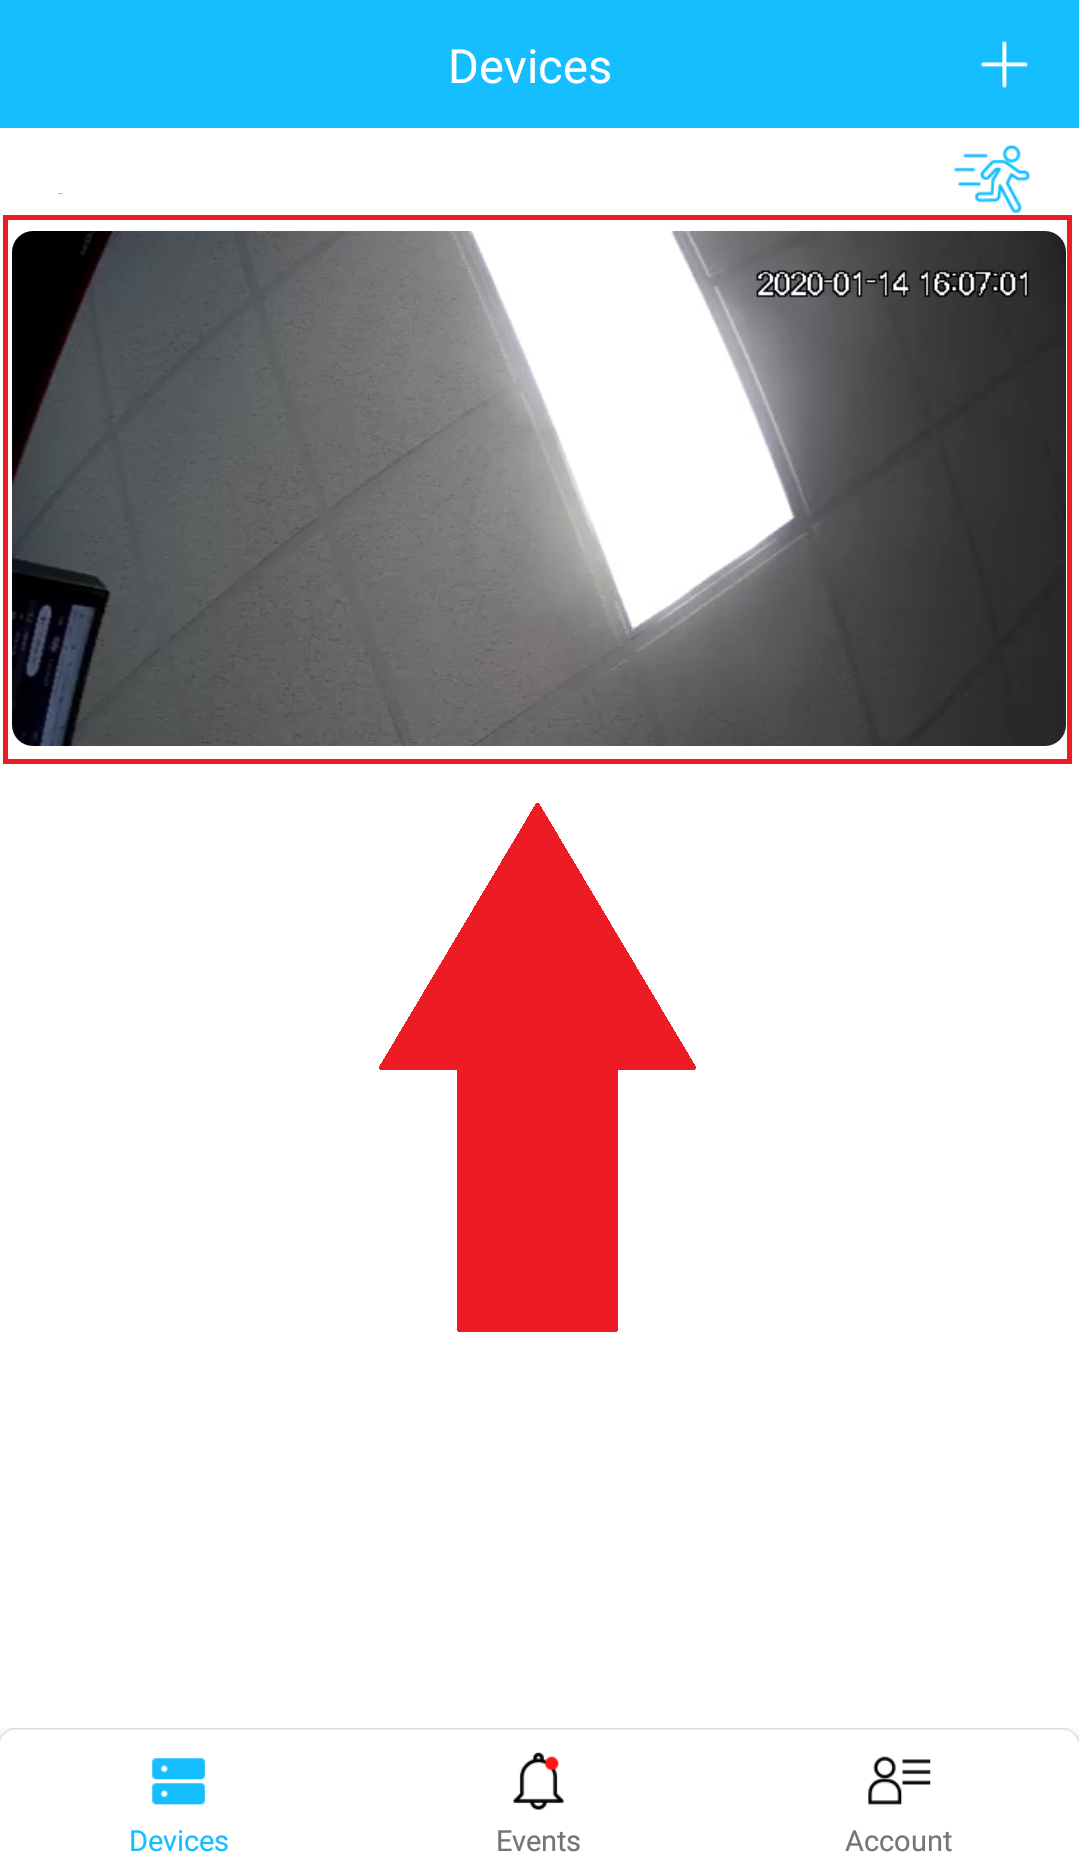
Step 1: Log into the Amcrest Smart Home app and select the device you want to delete from the Devices menu.
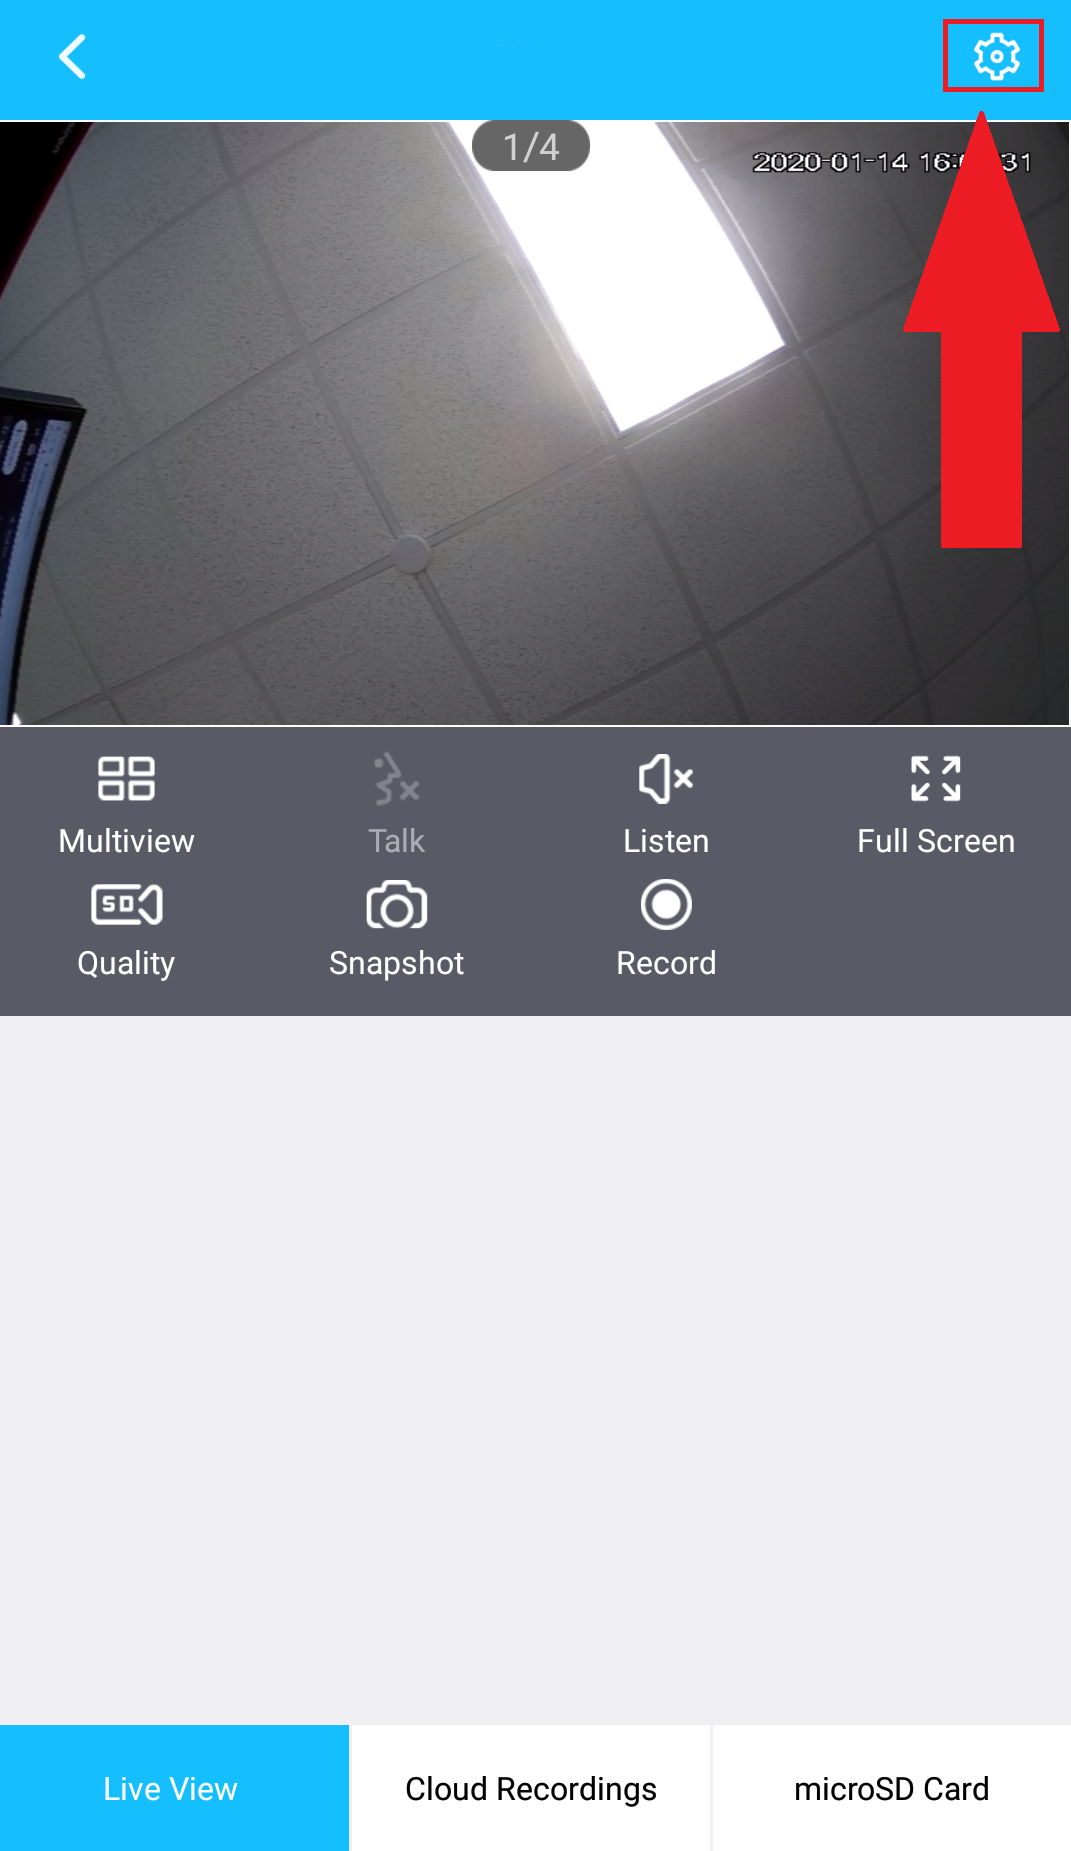
Step 2: Tap on the Settings ( ![]() ) icon.
) icon.
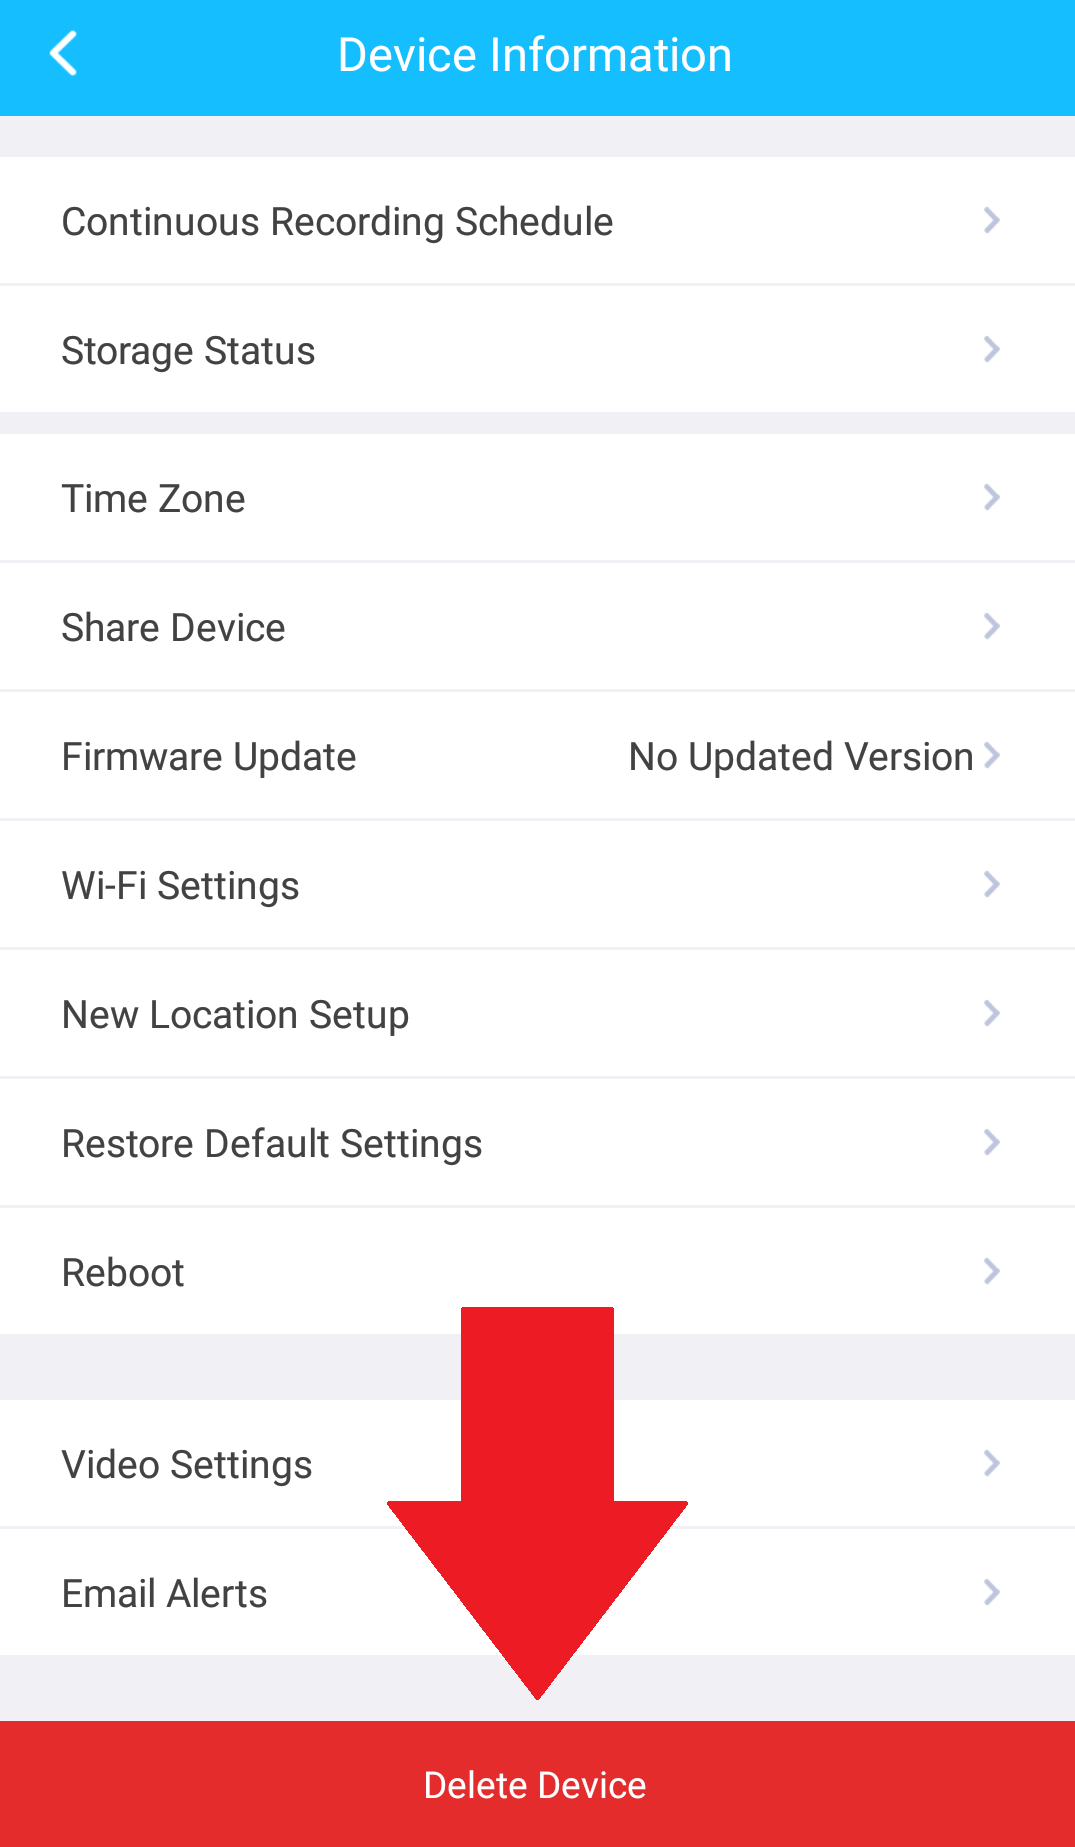
Step 3: Scroll down to the bottom of the Settings page and tap on Delete Device.
Step 4: Confirm if you would like to keep or delete your cloud recordings after the device has been deleted. To keep the recordings, tap the “Keep Recordings” check box. Tap Delete to confirm.
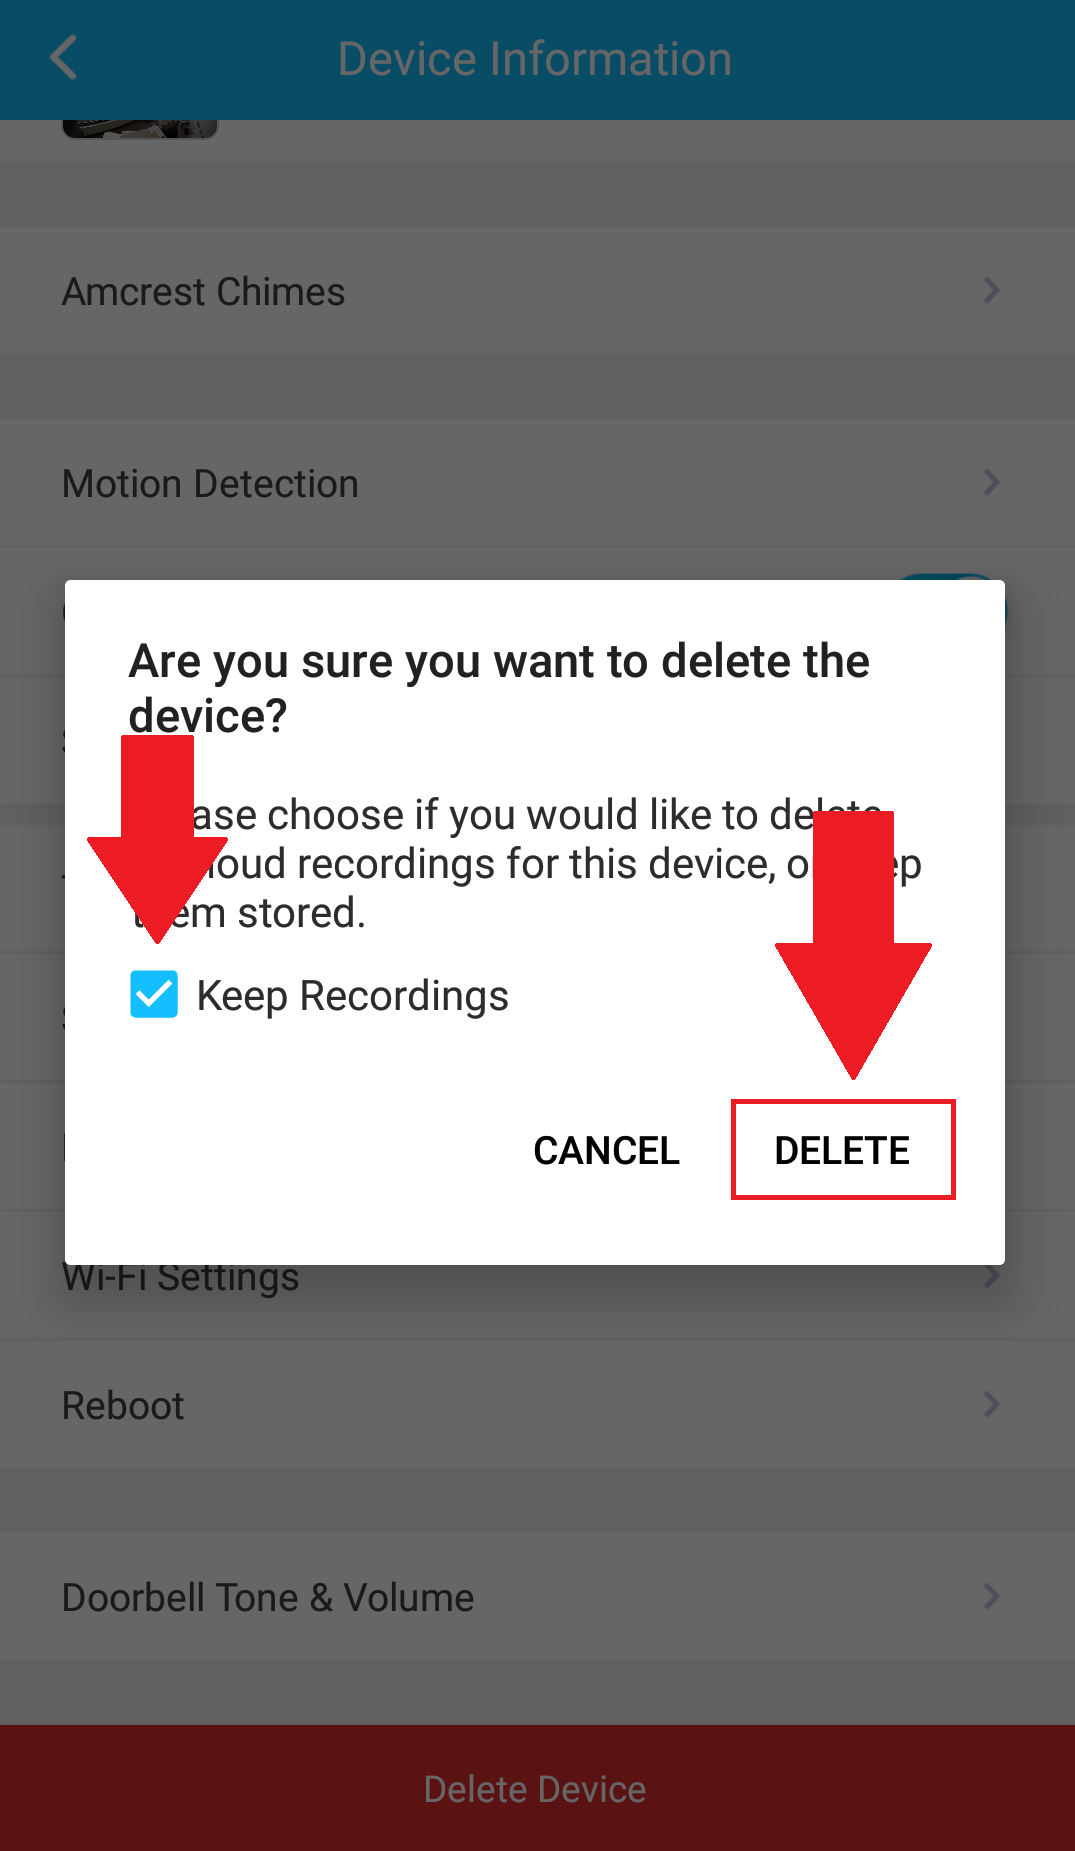
The device has now been unbound and deleted from your Amcrest Smart Home account.
Unable to Get an SSID?
Unable to Get an SSID?
If you are having issues obtaining an SSID when adding your device into the Amcrest Smart Home app there may be a miscommunication happening between the app and your mobile device. This appears to be a more common situation among iOS users and we are currently working with Apple to device a solution. There is an easy fix you can use to resolve the issue. For more information on how to resolve this issue, please refer to the information provided below.
If the SSID for your Wi-Fi network is not pulling up in the app when attempting to add your Amcrest Smart Home device, close the app completely then power your mobile device off and back on again allowing it to restart.
Once your mobile device has finished restarting, ensure your mobile device is connected to the proper Wi-Fi network, open the Amcrest Smart Home app and continue to add your device as normal. The SSID for your network should populate allowing you to complete the setup process. For more information on how to properly add your device please refer to the included quick start guide provided with your device.
How To Verify/Update Firmware
How To Verify/Update Firmware
All firmware verification and updates will be available using the Amcrest Smart Home app. For more information on how to verify/update the firmware for your camera, please refer to the information provided below.
Step 1: Log into your Amcrest Smart Home account and select your device from the Devices menu.

Step 3: Once you are logged in, tap on the settings (  ) icon.
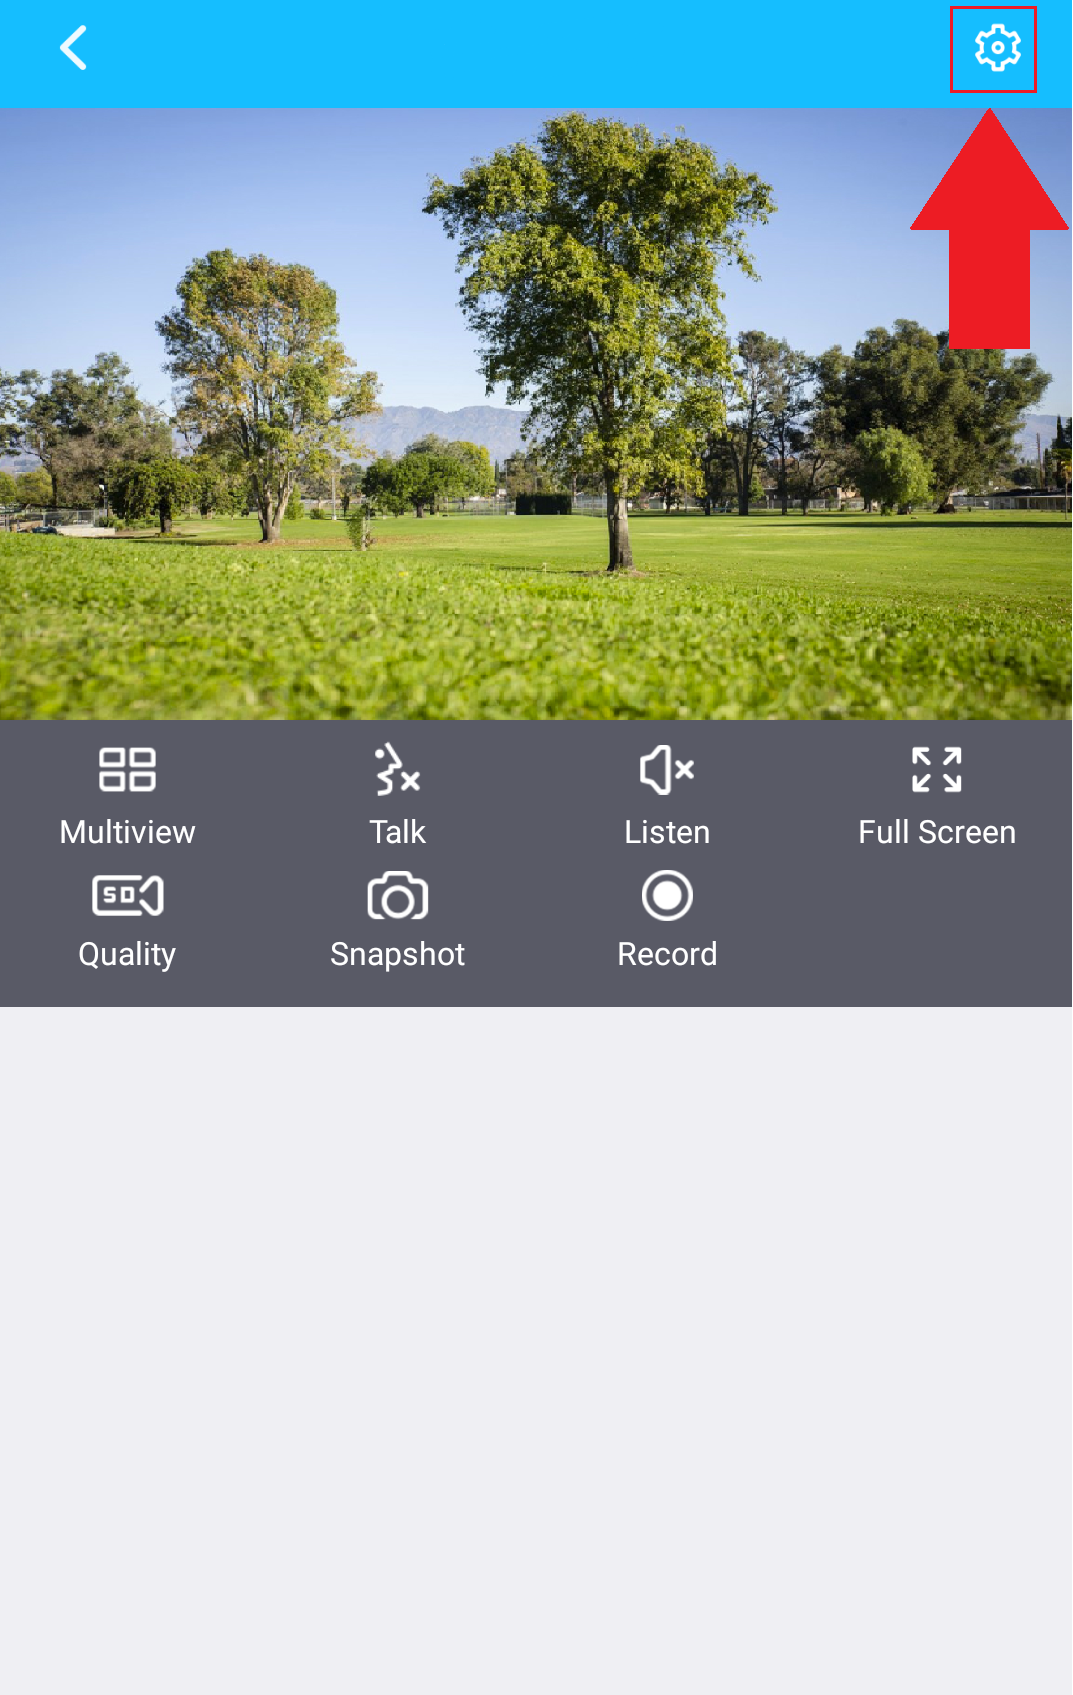
Step 4: In the settings menu, locate the “Firmware Update” tab. If a firmware update is necessary there will be a red indication identifier prompting you that a firmware upgrade is ready. If there is not a red dot, you are operating on the most up to date firmware.
If you need to update the firmware, tap on the “Firmware Update” tab to proceed with the update.
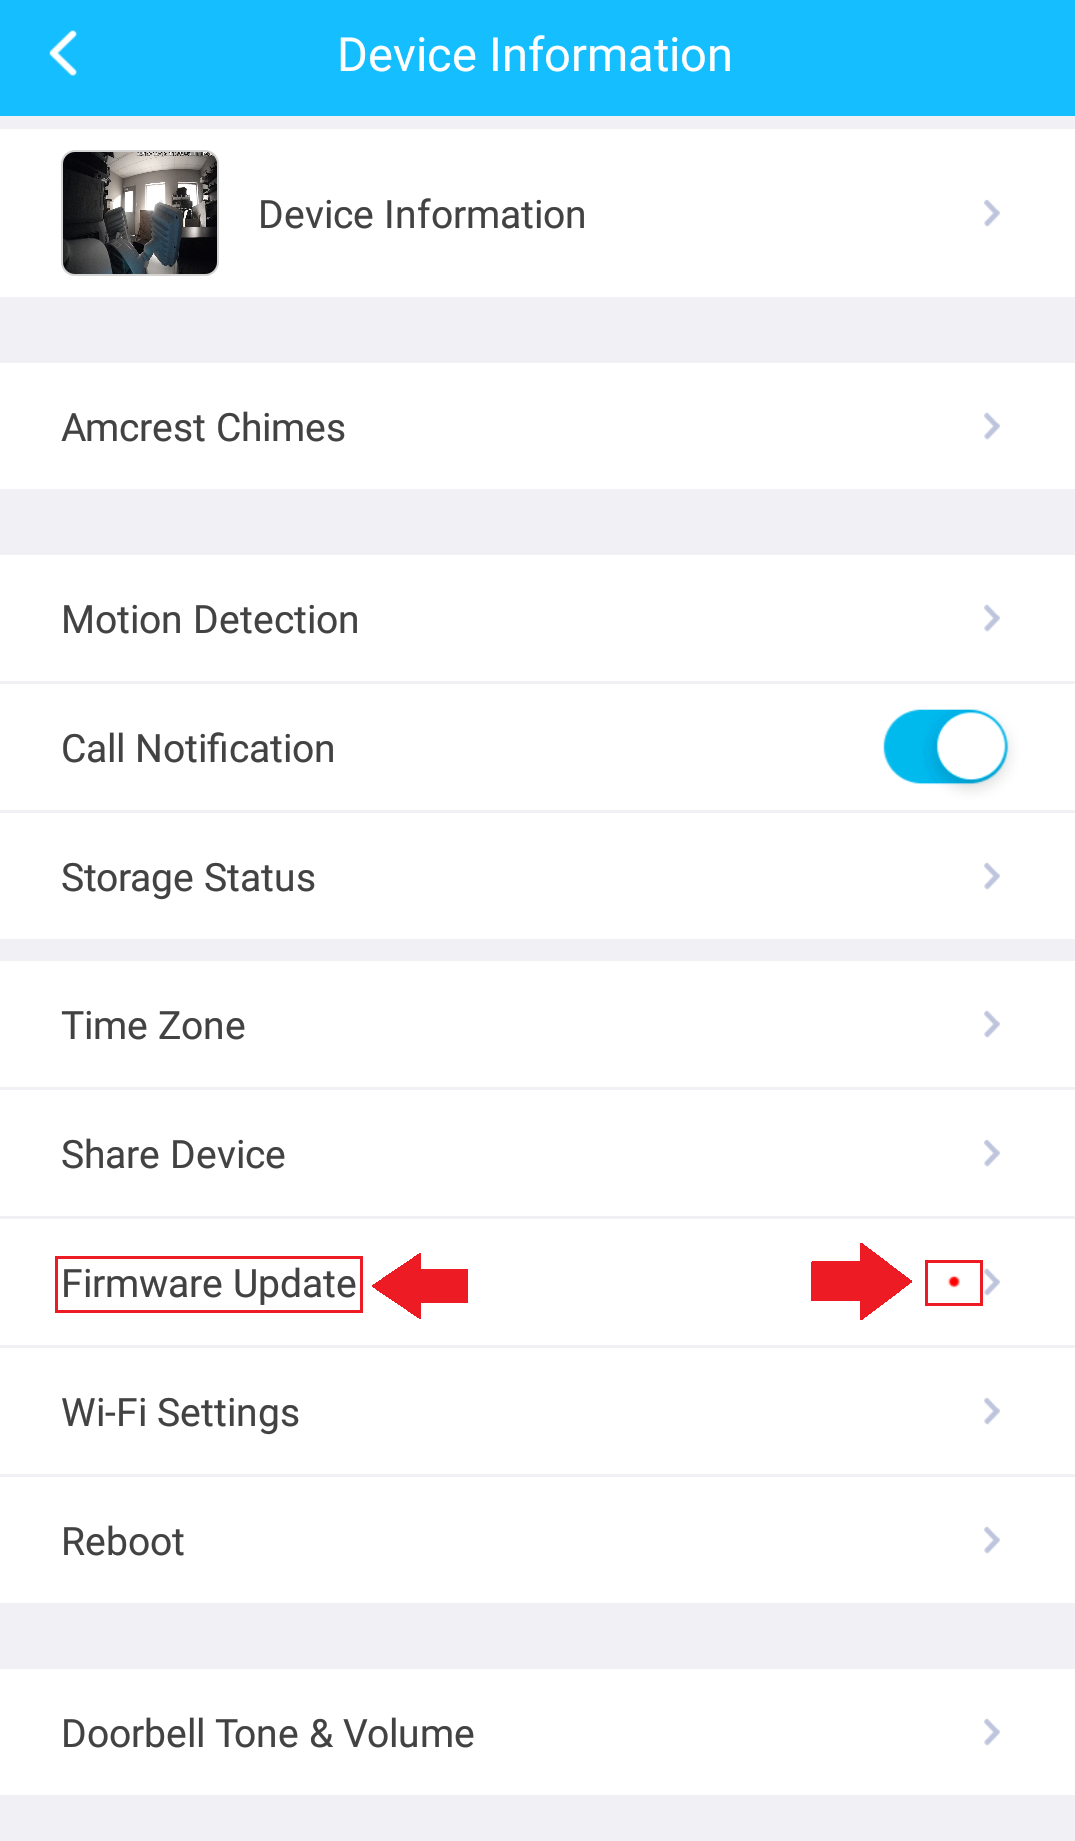
Step 5: In the firmware update menu, you will notice the current version of firmware that is on your camera, and the latest firmware file that will be downloaded to your camera. To proceed with the update, please click on “Update”.
Step 6: You will then be promoted to upgrade the firmware. Tap Cloud Upgrade to begin. If you wish to cancel to process tap Cancel.
Step 7: The firmware file will begin to download from that point. Please wait for the download and upload of the file to complete its processes.
Once the process is complete, there see a prompt letting you know that the firmware has successfully updated, and the current version is now updated on your device.
How To Activate An Amcrest Smart Home Cloud Account
How To Activate An Amcrest Smart Home Cloud Account
Amcrest Smart Home cloud is an optional premium cloud storage option provided exclusively for Amcrest Smart Home products. Amcrest Smart Home products are not compatible with traditional Amcrest Cloud accounts and will require activation specifically through the Amcrest Smart Home app. For more information on how to activate an Amcrest Smart Home Cloud account, please refer to the information provided below.
Step 1: Log into your Amcrest Smart Home app and select the device you wish to activate.
Step 2: On the live view screen tap on Cloud Recordings.
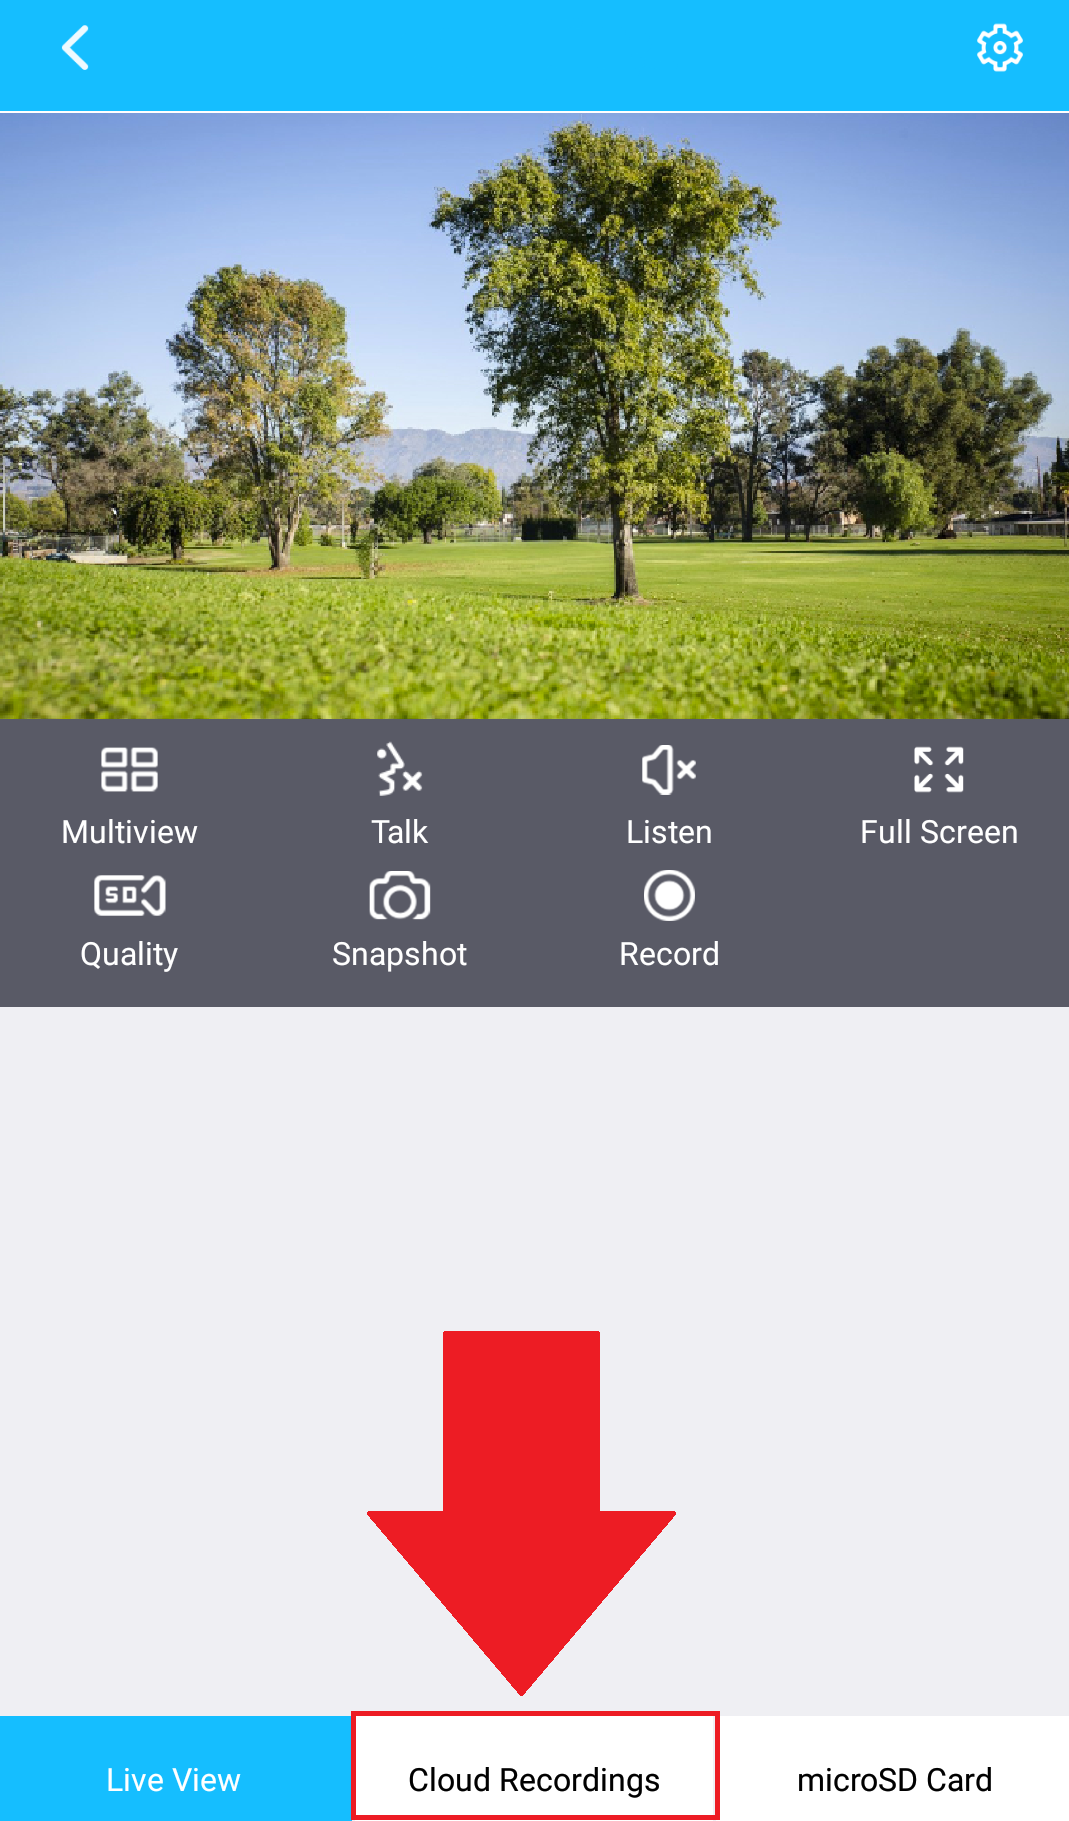
Step 3: Tap on Activate Cloud Storage.
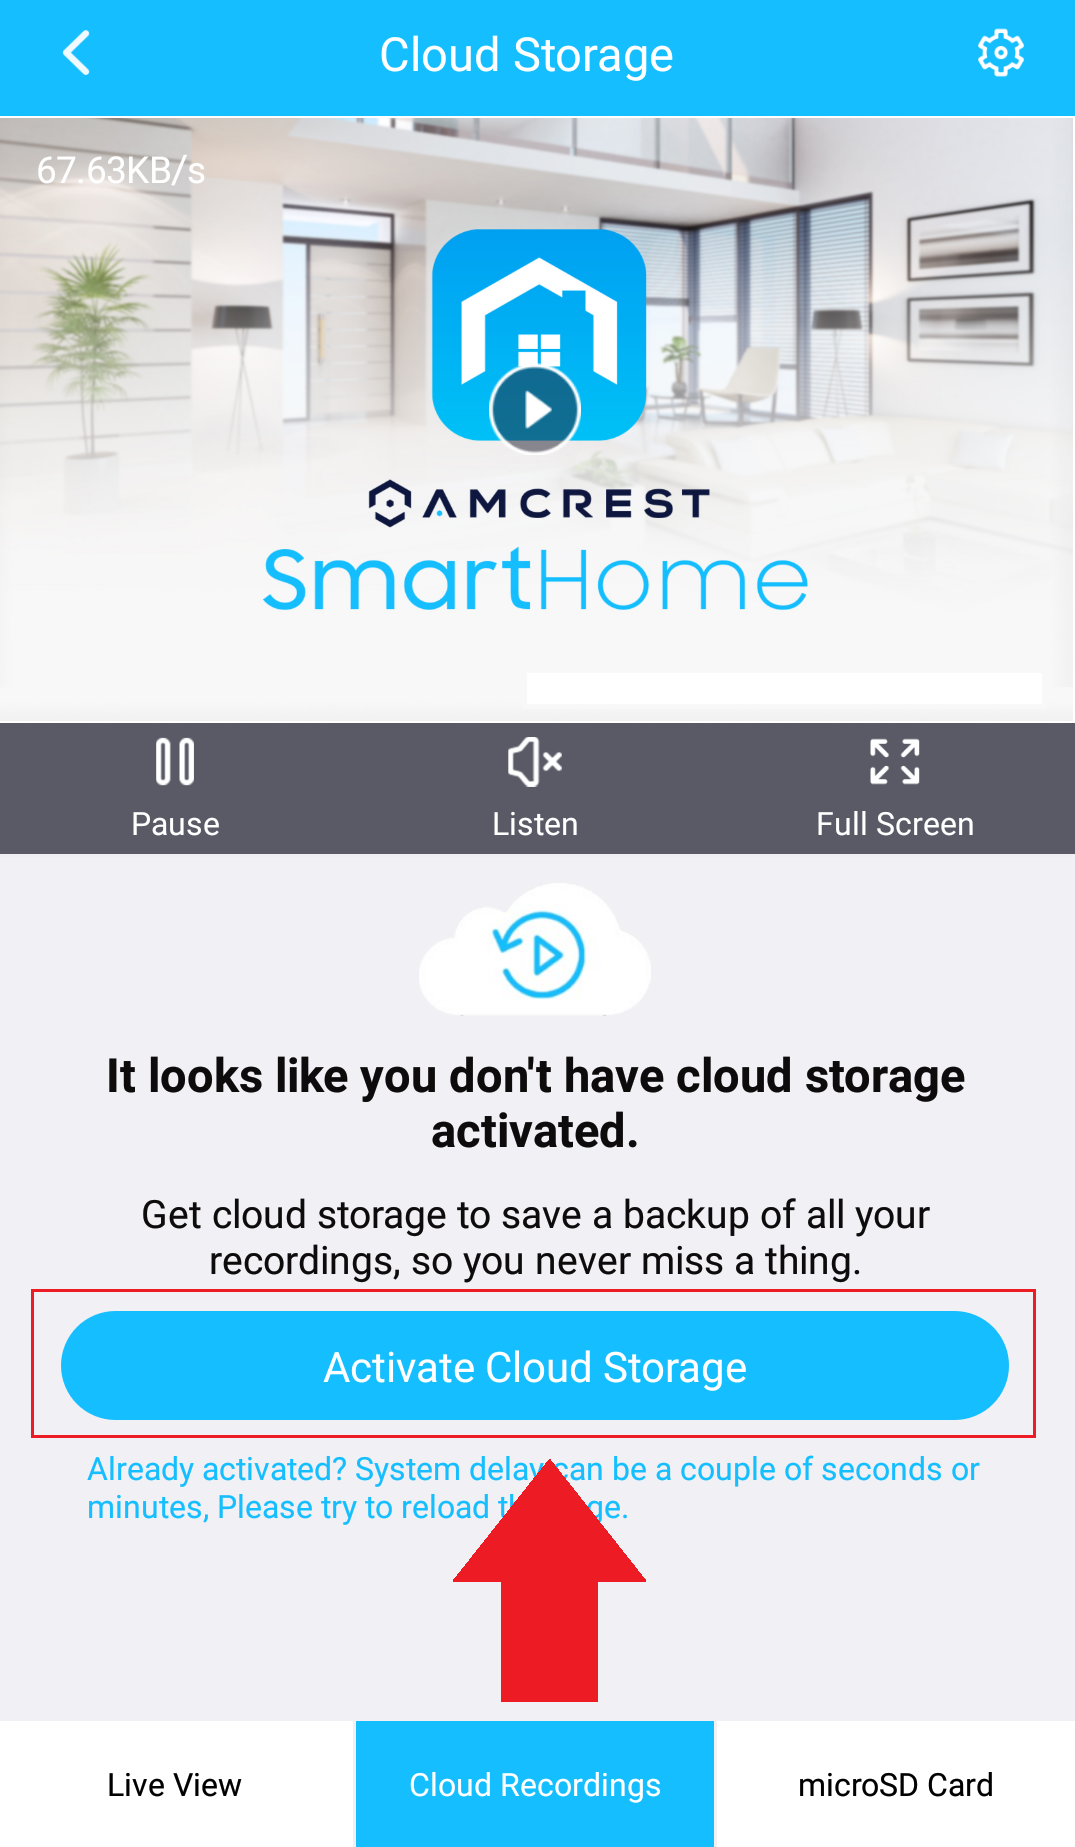
Step 4: Select a Cloud Storage plan from the list of cloud plans and tap Buy
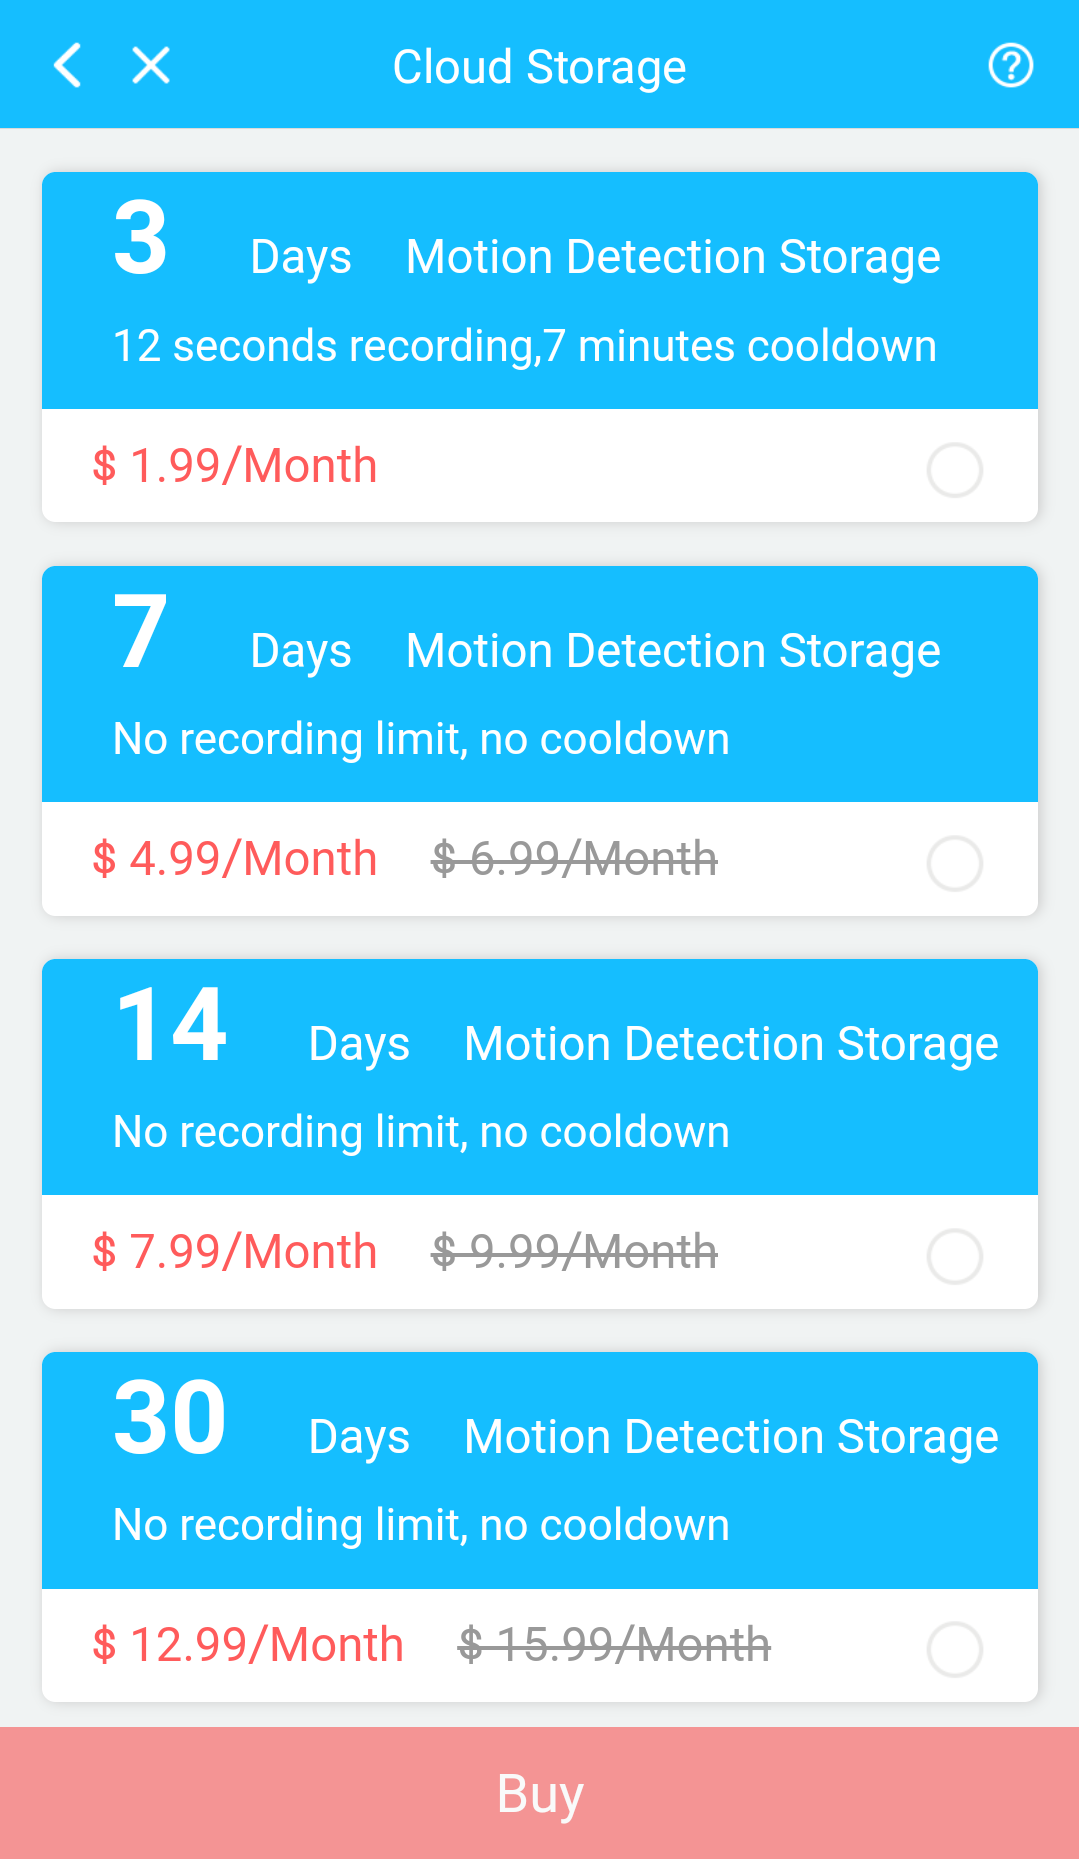
Note: Currently, we only offer motion detection storage plans. Continuous recording plans are currently not available for Amcrest Smart Home cloud plans.
Step 5: Enter your billing information into the billing form. All plans will require a credit card to process the request.
After you have purchased your Smart Home cloud account you will be able to store and view your recordings all from the Cloud Recordings menu. Additionally, you can change your plan, update your payment method, as well as cancel a subscription right from the app.

Note: Any plan changes made to your account will only take place at the end of your current billing cycle.
How To Share/Remove a User
How To Share/Remove a User
Device sharing allows you to add specific Amcrest Smart Home users to share the live feed of your added device. When you add a shared user, the shared user will have access to your camera and features such as live viewing, recording, playback, and two-way audio. If you would like to proceed with the device sharing process please follow the step by step instructions provided in this article.
Note: The maximum users allowed on a shared account is 6 users.
Step 1: Log into your camera via the Amcrest Smart Home app.
Step 2: Once you are logged in, access your device and select the settings ( ![]() ) icon in the upper right hand corner.
) icon in the upper right hand corner.
Step 3: In the settings menu, please click on “Device Sharing”.
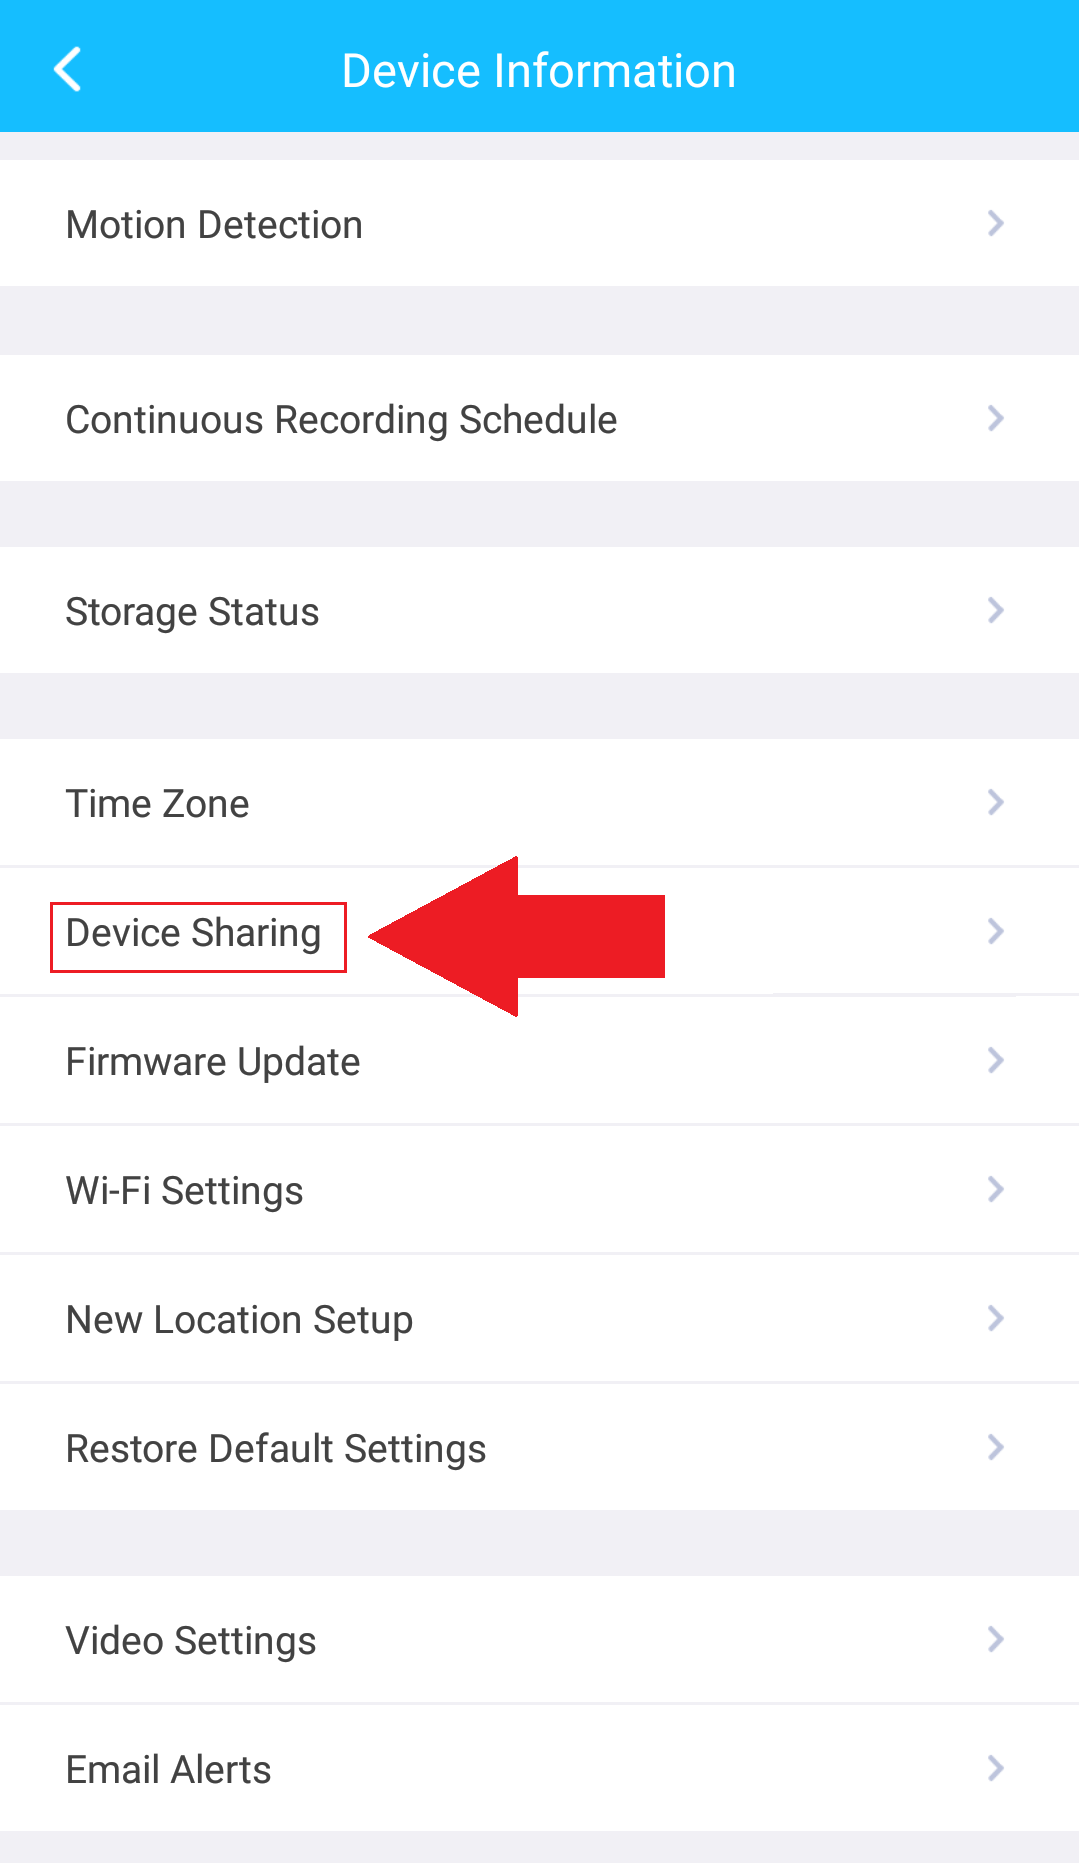
Step 4: In the device sharing menu, tap on, “Add a Shared User”.
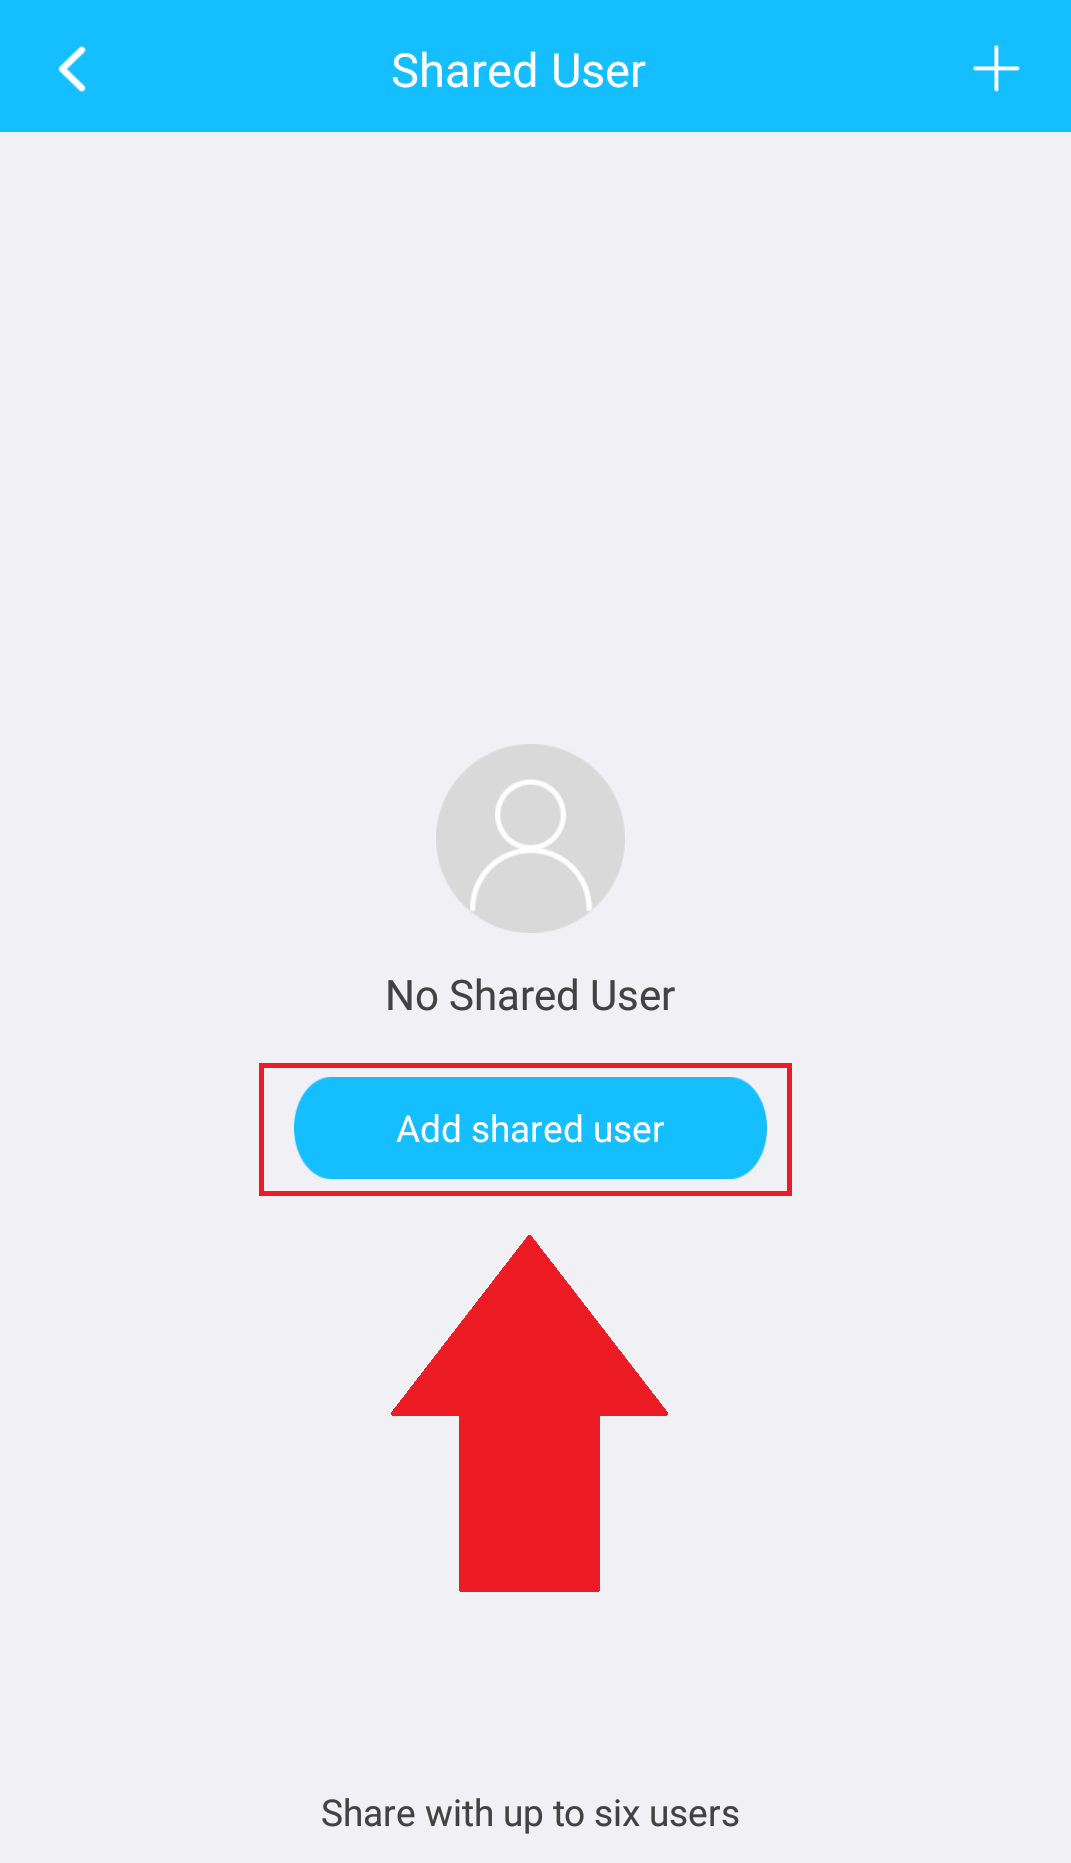
Step 5: In the Add Shared User menu, enter a registered Amcrest Smart Home account email you would like to share your device with. Once you have entered the email press the Save icon ( ![]() ) located in the upper right hand corner.
) located in the upper right hand corner.
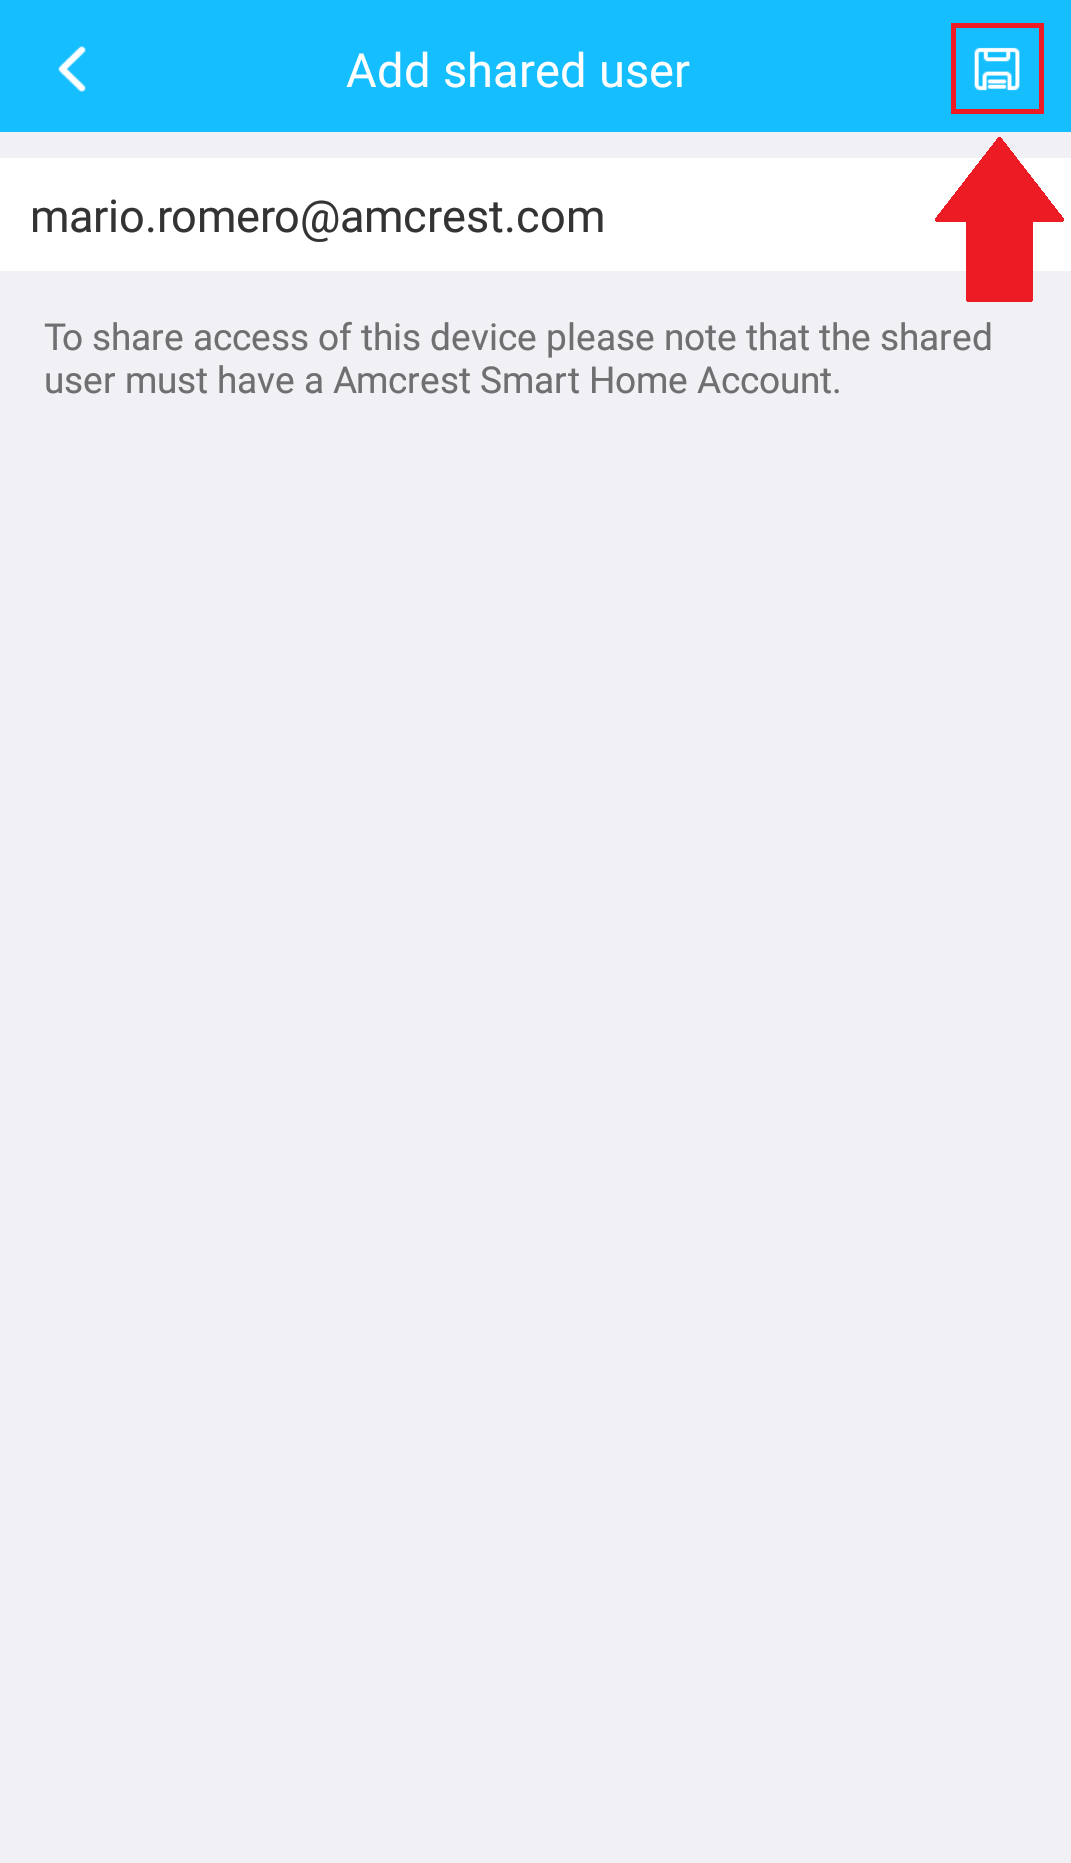
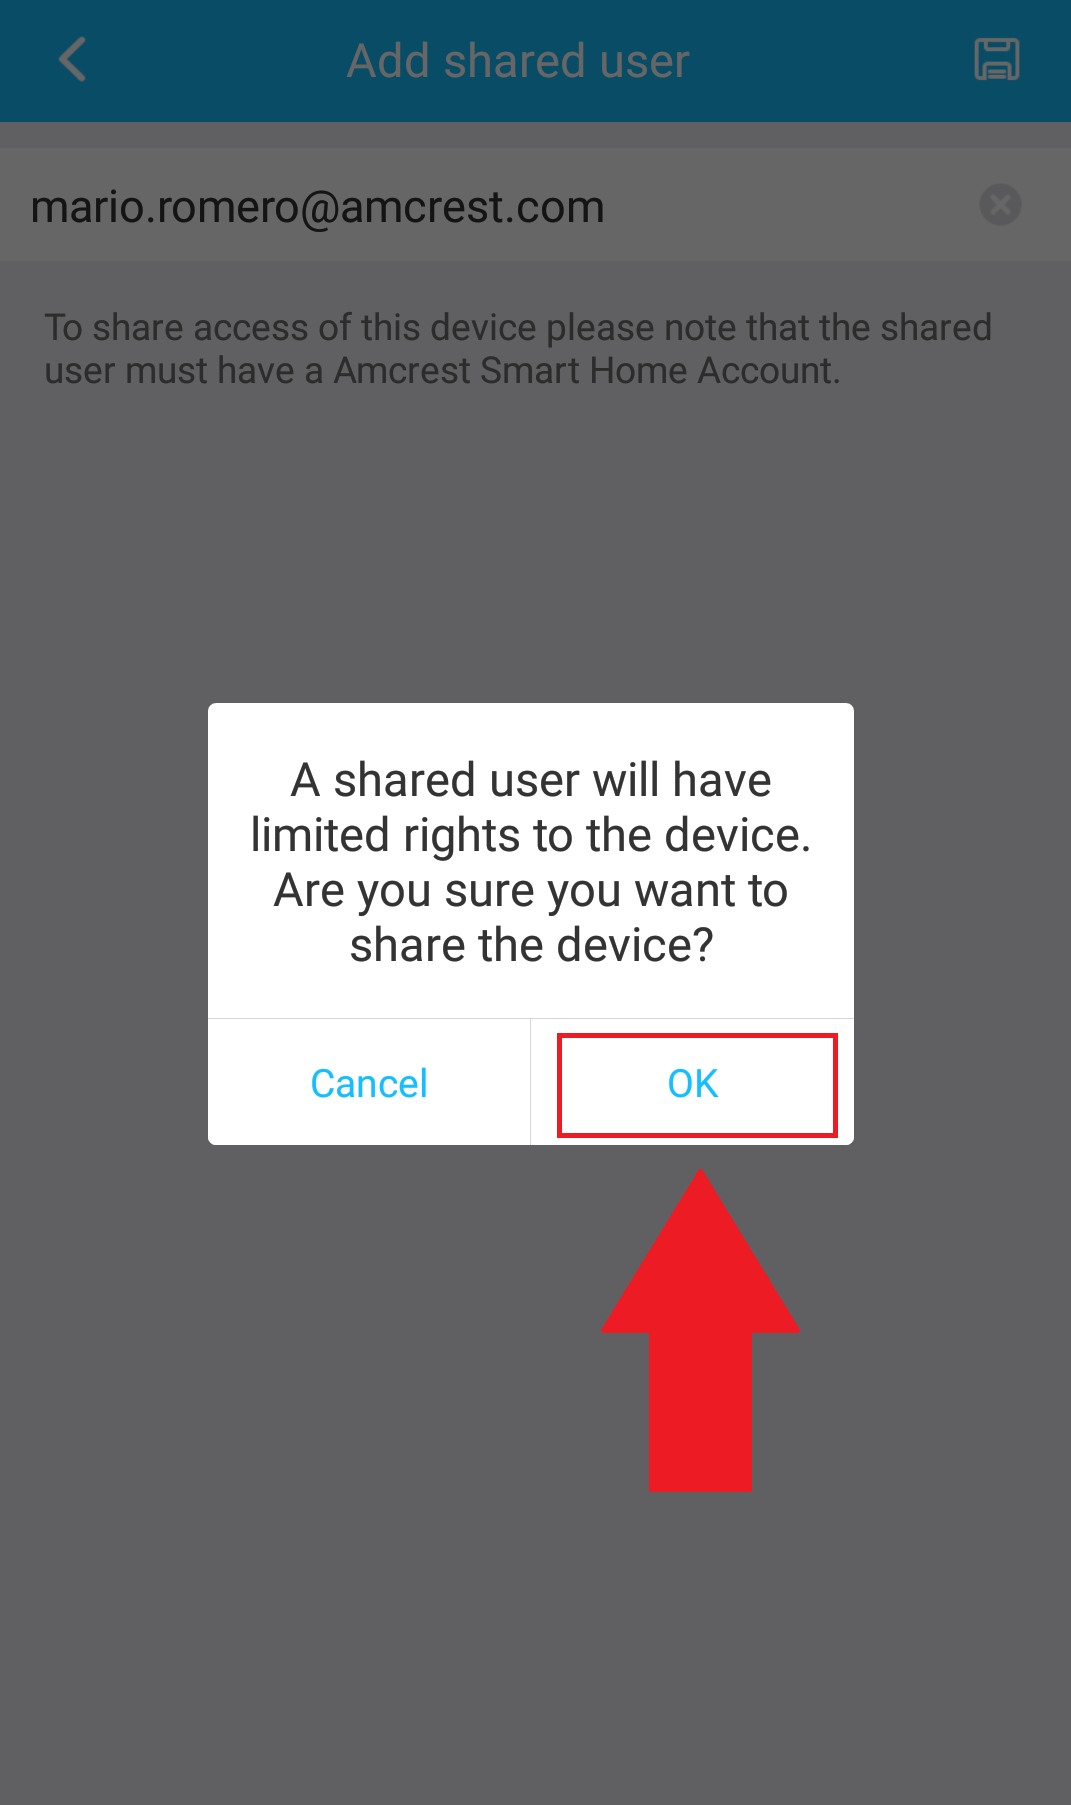
Step 6: Once you have pressed Save icon, you will be prompted whether or not you would like to add the shared user to your device. If you would like to proceed with the process, please press “OK“, if not, there is also an option to cancel the process.
Removing a Shared User
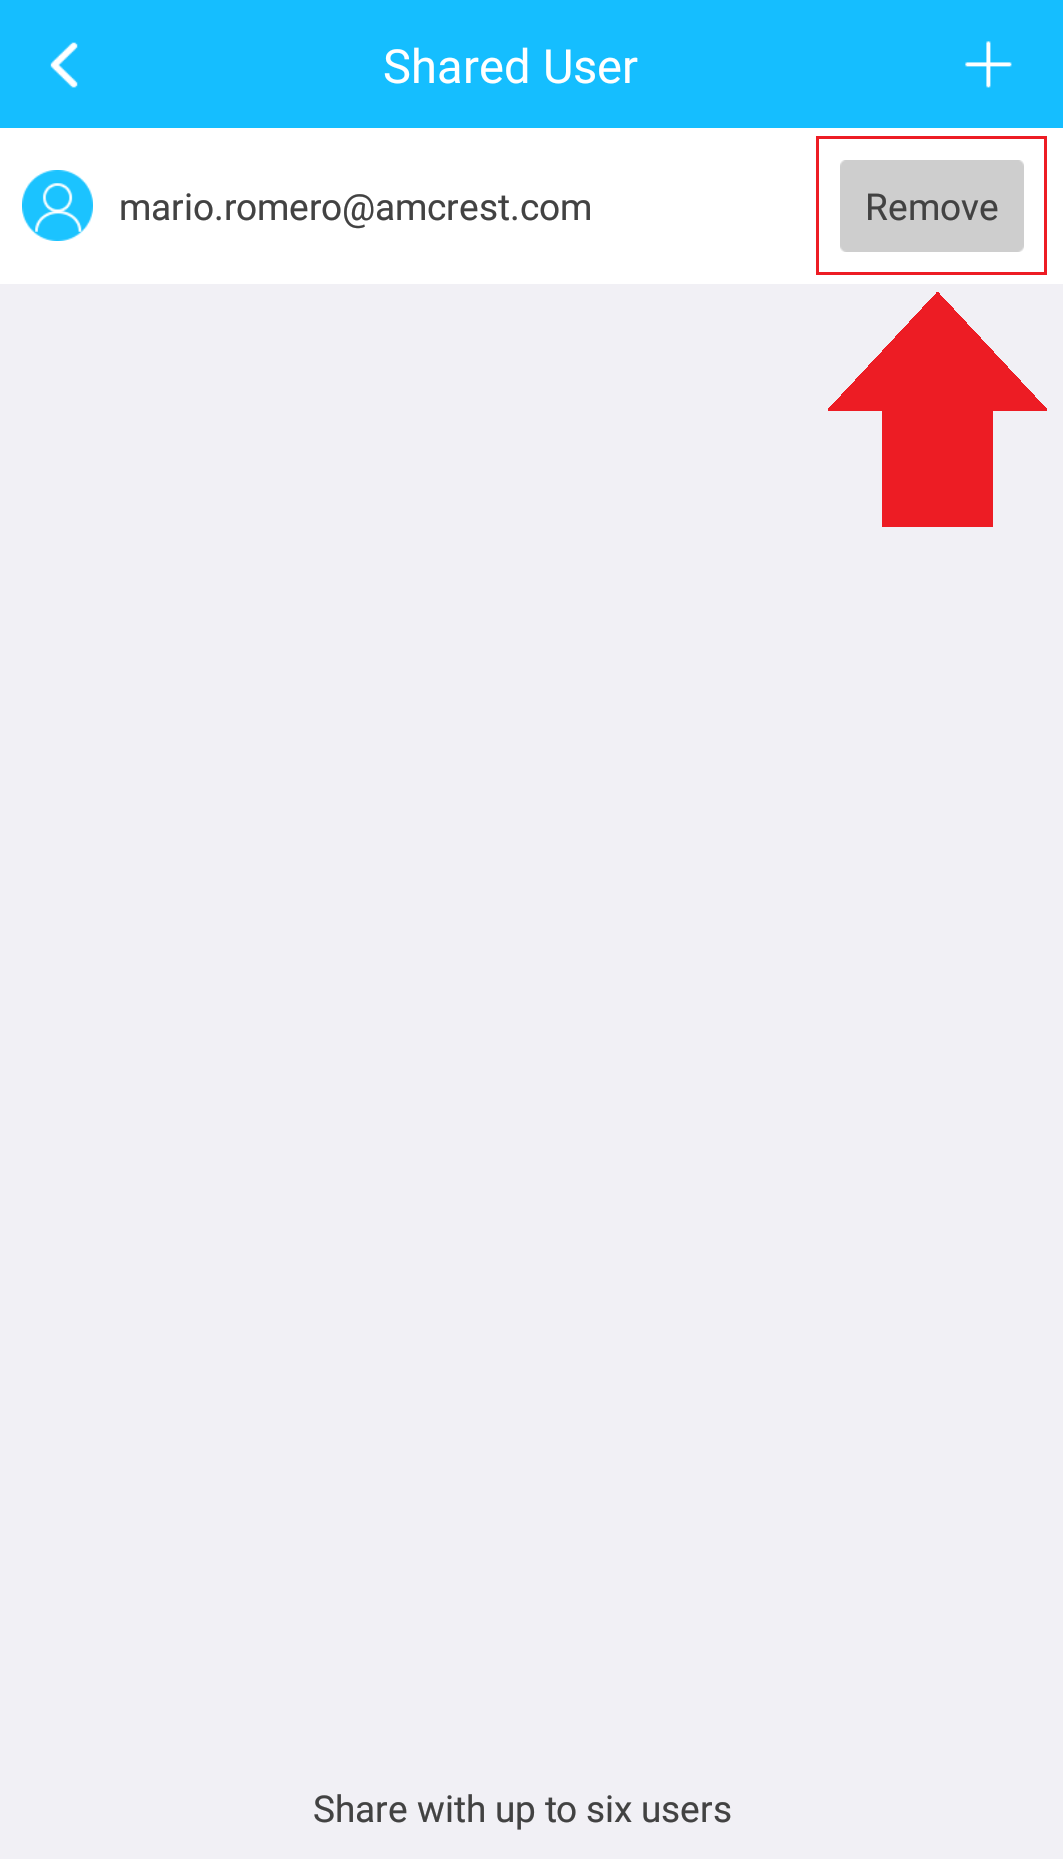
To remove the shared user from your device, tap on the “Remove” button.
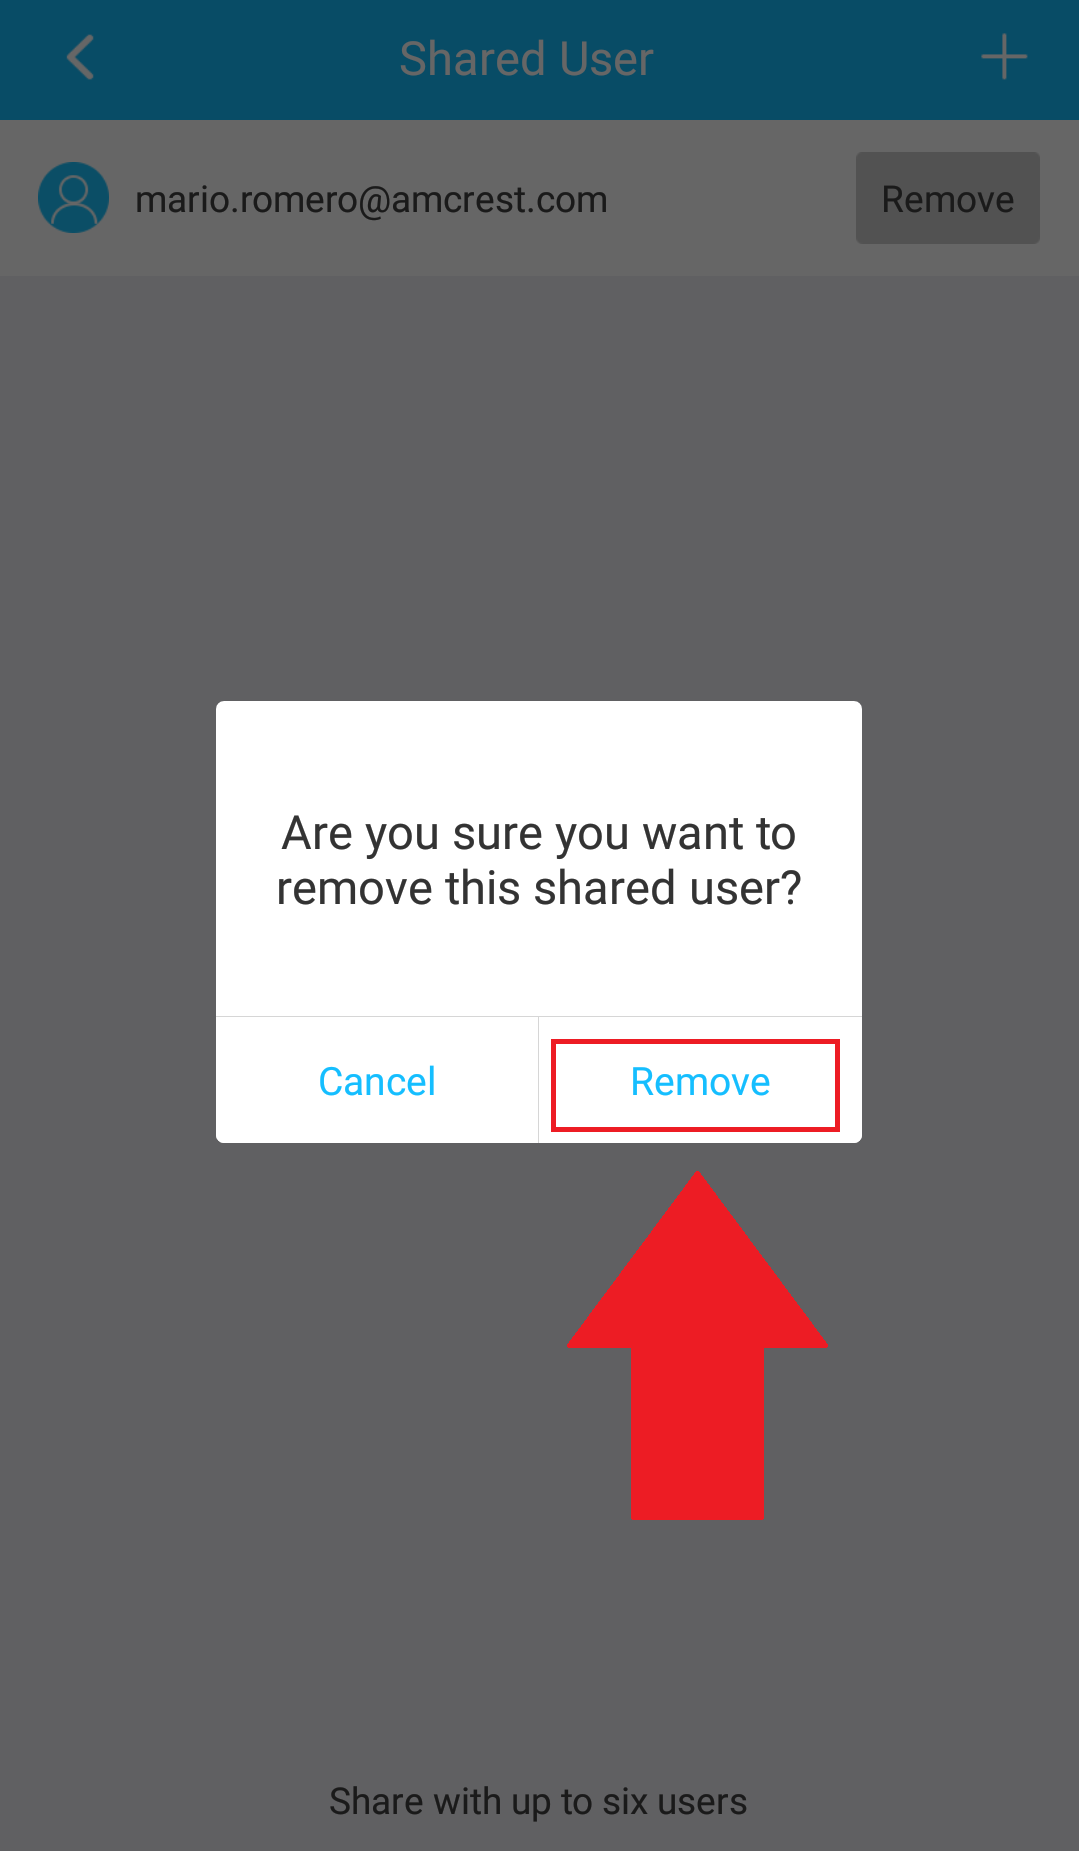
Then tap on the Remove option to remove the shared user from your device.
The shared user can then log into their Amcrest Smart Home account and view the recently shared device by tapping on the device located in their devices menu.
How To View MicroSD Card Recordings
How To View MicroSD Card Recordings
Please ensure you are using a class 10 or above microSD card that does not exceed the storage limitation of your device. The microSD card must be formatted to FAT32. This may have to be done manually as most programs do not format to this allocation automatically. For more information on how to format your microSD card to FAT32, click here
When a microSD card is inserted into the device, all motion based recordings will be stored to it. Additionally, if you have a Amcrest Smart Home Cloud account, recordings will be stored both on the cloud and microSD card. To view recordings from the microSD card, open the Amcrest Smart Home app and access your device.
On the live view screen, tap on the “MicroSD Card” menu located at the bottom right of the screen.
In the MicroSD card menu you will notice a list of recordings. Recordings can be accessed and viewed based on the date the motion occurred and can be found by tapping on the calendar menu in the app.
Select which day you would like to access from the calendar. You will notice a list of events located in the event timeline. To view the event, tap on the play button. You can also use the timeline to adjust and view specific events based on that time.
Note: All motion detection recordings will occur back to back in the interface which allows the device to capture all events without the use of a cool down period.
How To Activate Push Notifications Using Amcrest Smart Home
Push notifications, are events sent to your phone which let you know a motion or other event has been detected by the camera. These actions can range from a motion event being detected by your device by a call coming through from someone using your Amcrest WiFi doorbell.
Note: If you are adding your device in the Amcrest View Pro app, please make sure to enable push notifications using the Amcrest Smart Home app directly, not the view pro app.
Activating Push Notifications
Push notifications should be on by default, however, can be turned enabled or disabled using the Amcrest Smart Home app. These settings are device based and can be disabled or enabled per device associated with your Amcrest Smart Home account. To turn push notifications on or off, log into your Amcrest Smart app and select the device and click on the settings icon.
Scroll down and locate the push notification toggle switch. This option allows you to enable or disable push notifications for your device.
How To Setup Alexa Using Amcrest Smart Home
How To Setup Alexa Using Amcrest Smart Home
Many of our Amcrest Smart Home devices, such as the Wi-Fi doorbell camera and other devices, are compatible with Amazon Alexa devices that support video streaming. To use Alexa with our devices the device must be setup first in the Amcrest Smart Home app before you can set it up in Alexa.
Note: The name of the device on your Amcrest Smart Home account will be the name used to view your device on Alexa.
Note: Certain Alexa devices such as the Echo Show 5 only support cameras up to 1080P resolution. Cameras set at a higher resolution above 1080P may experience issues connecting to Alexa.
For a brief guide on how to connect your Amcrest Smart Home camera to a supported Amazon Alexa device, please follow the instructions below:
Step 1: Ensure your Alexa device has completed its initial setup including synchronization with your Amazon account.
Step 2: Download the Amazon Alexa app from the Apple App store or Google Play Store and sign in using your Amazon Alexa account.
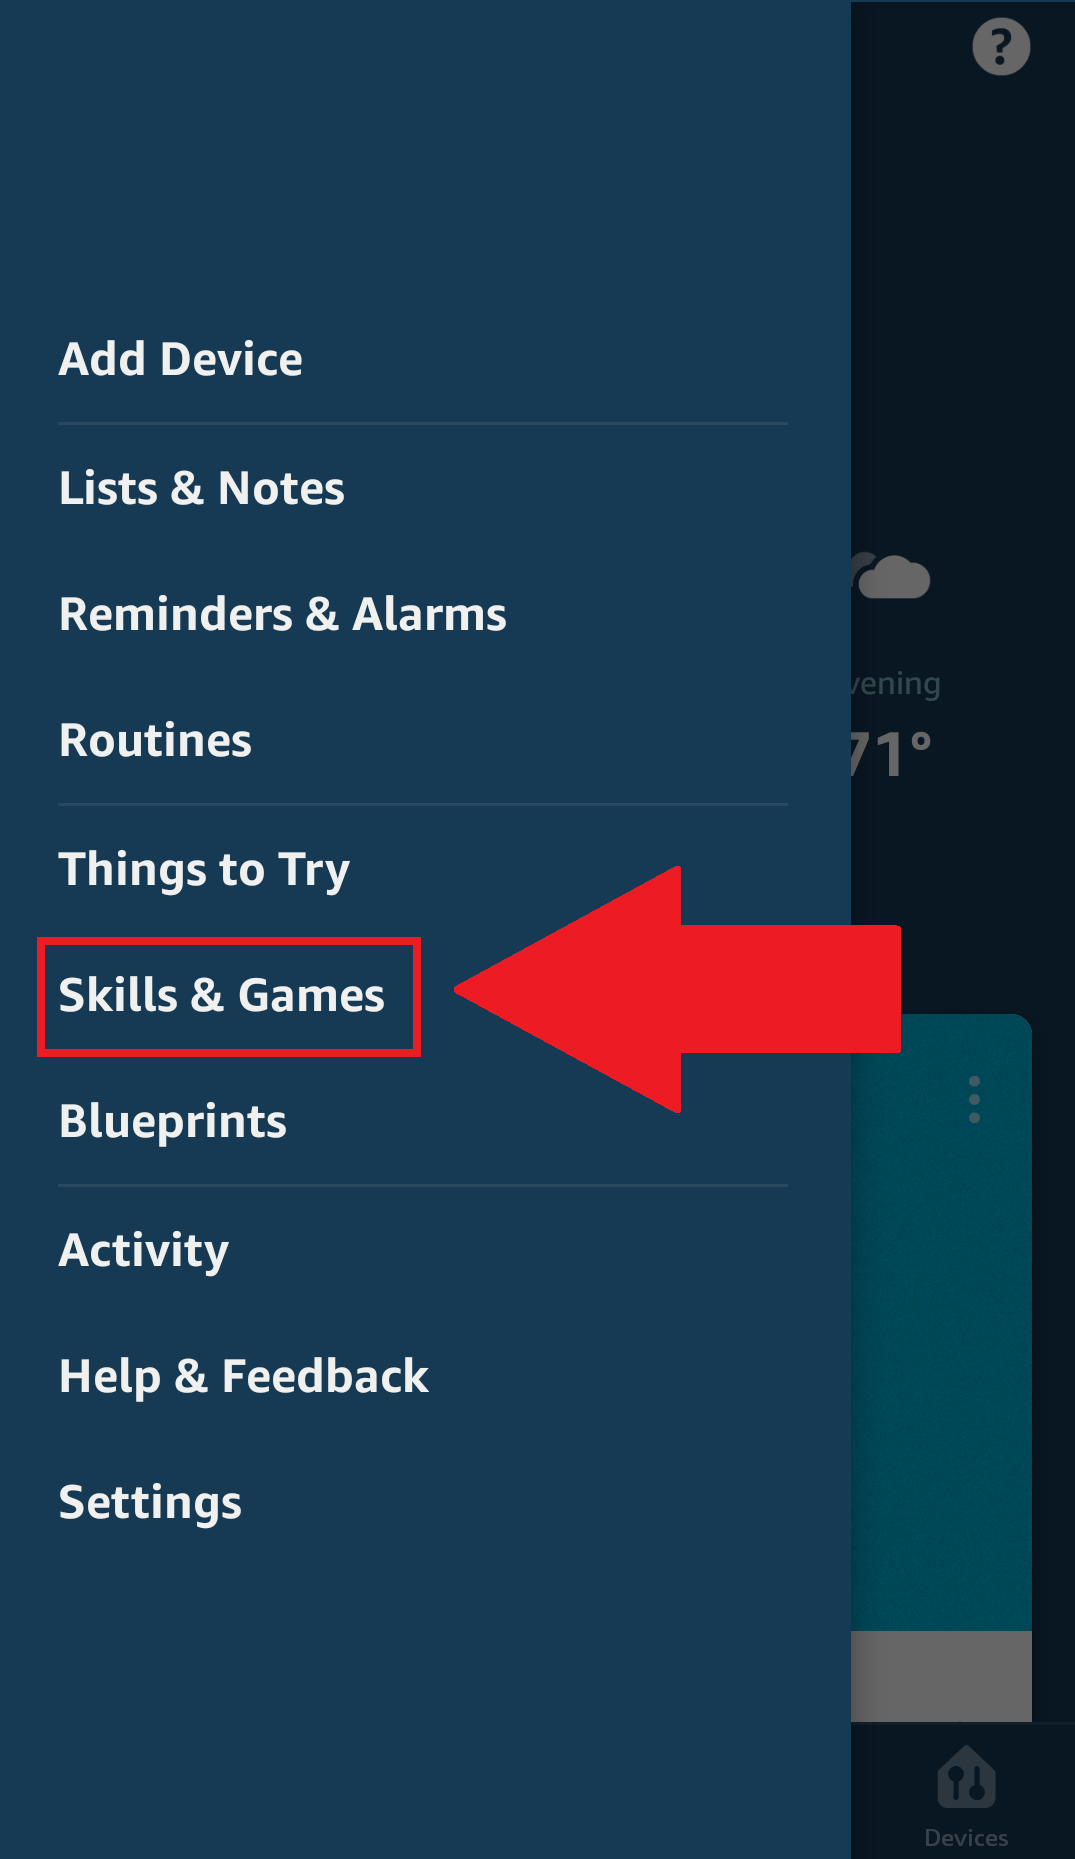
Step 3: Once you are logged into the app, from the Home menu, tap on the menu icon ( ![]() ) and tap “Skills & Games“.
) and tap “Skills & Games“.
Step 4: Tap on the search icon ( ![]() ) and search for “Amcrest Smart Home”. Download and install the Amcrest Cloud skill.
) and search for “Amcrest Smart Home”. Download and install the Amcrest Cloud skill.

Step 5: Tap on Enable To Use.

Step 6: Enter the account credentials for your Amcrest Smart Home account and tap Sign In.

Step 7: Tap “Authorize” to authorize the connection.

Step 8: Your Amcrest Smart Home account has now been properly linked to Amazon Alexa. Please close this window to proceed.

Step 7: Tap on Discover Devices
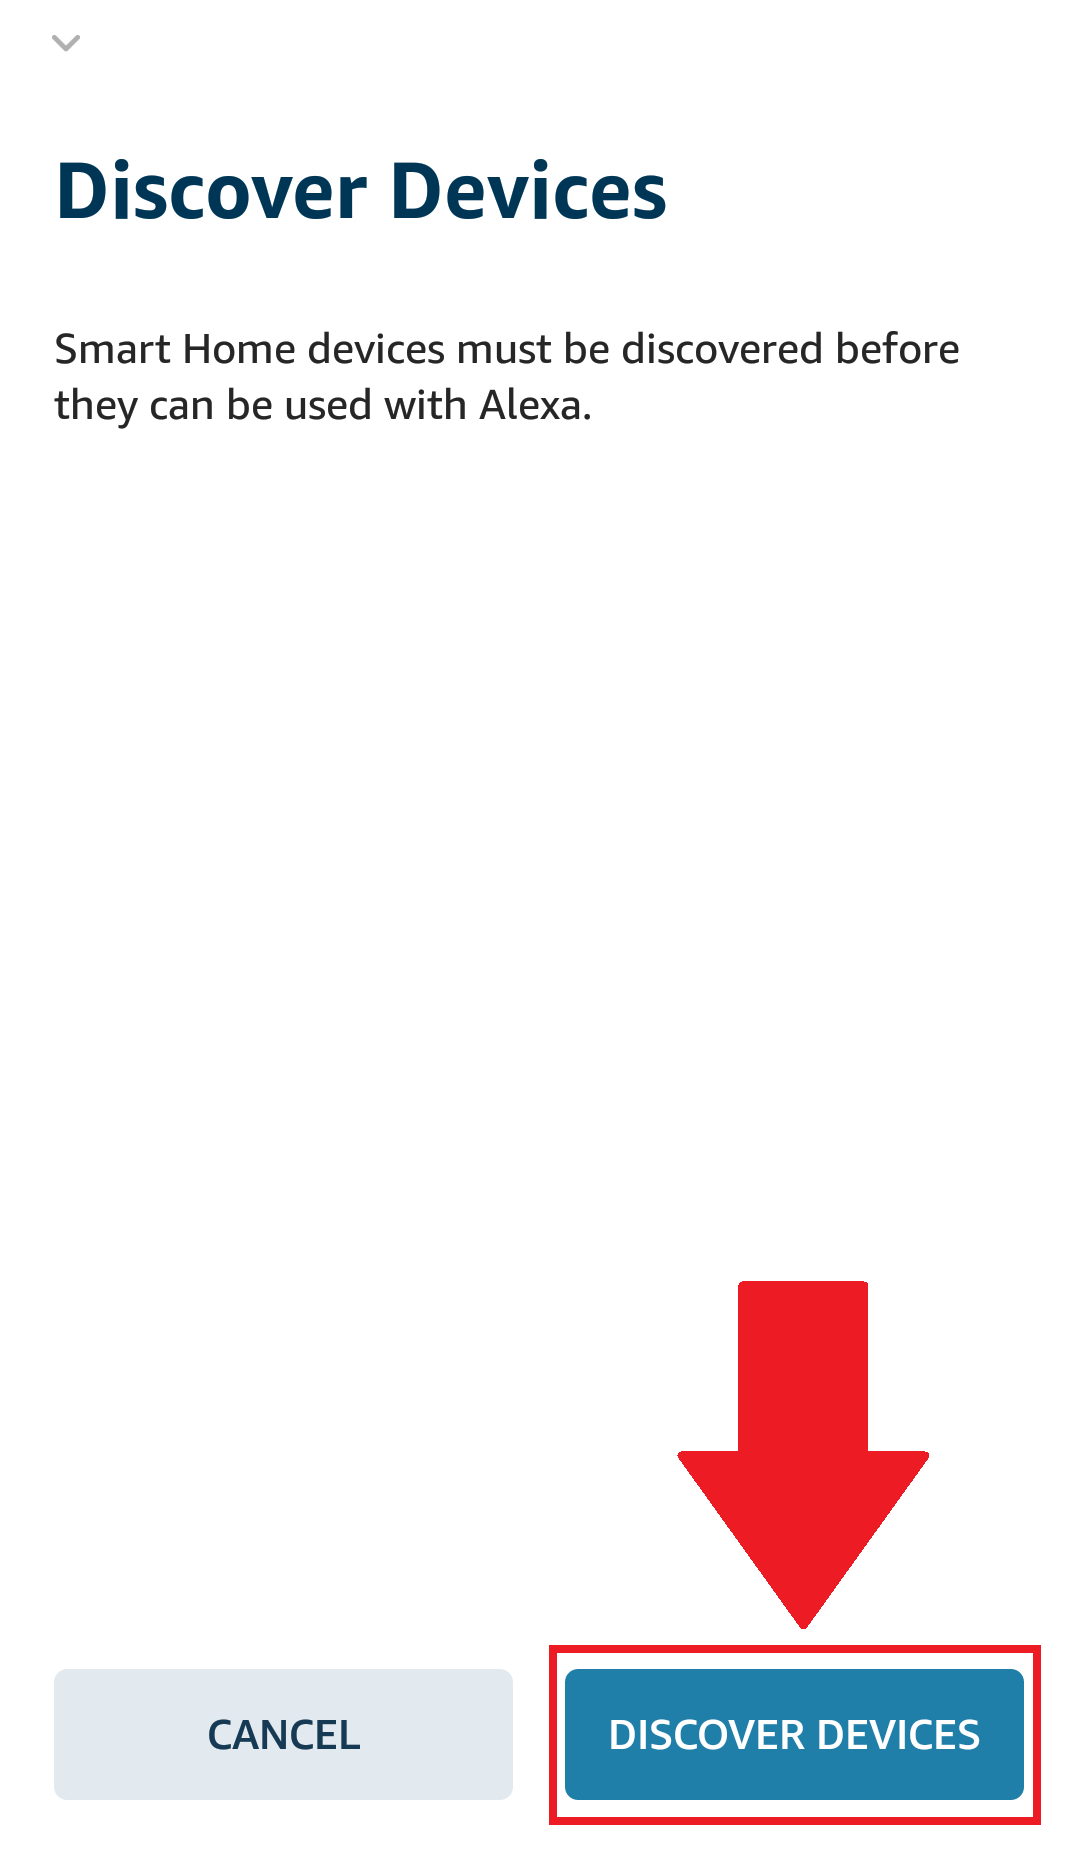
Alexa will begin discovering your connected devices. This may take up to 45 seconds to complete.
Step 8: Tap on Set Up Device.
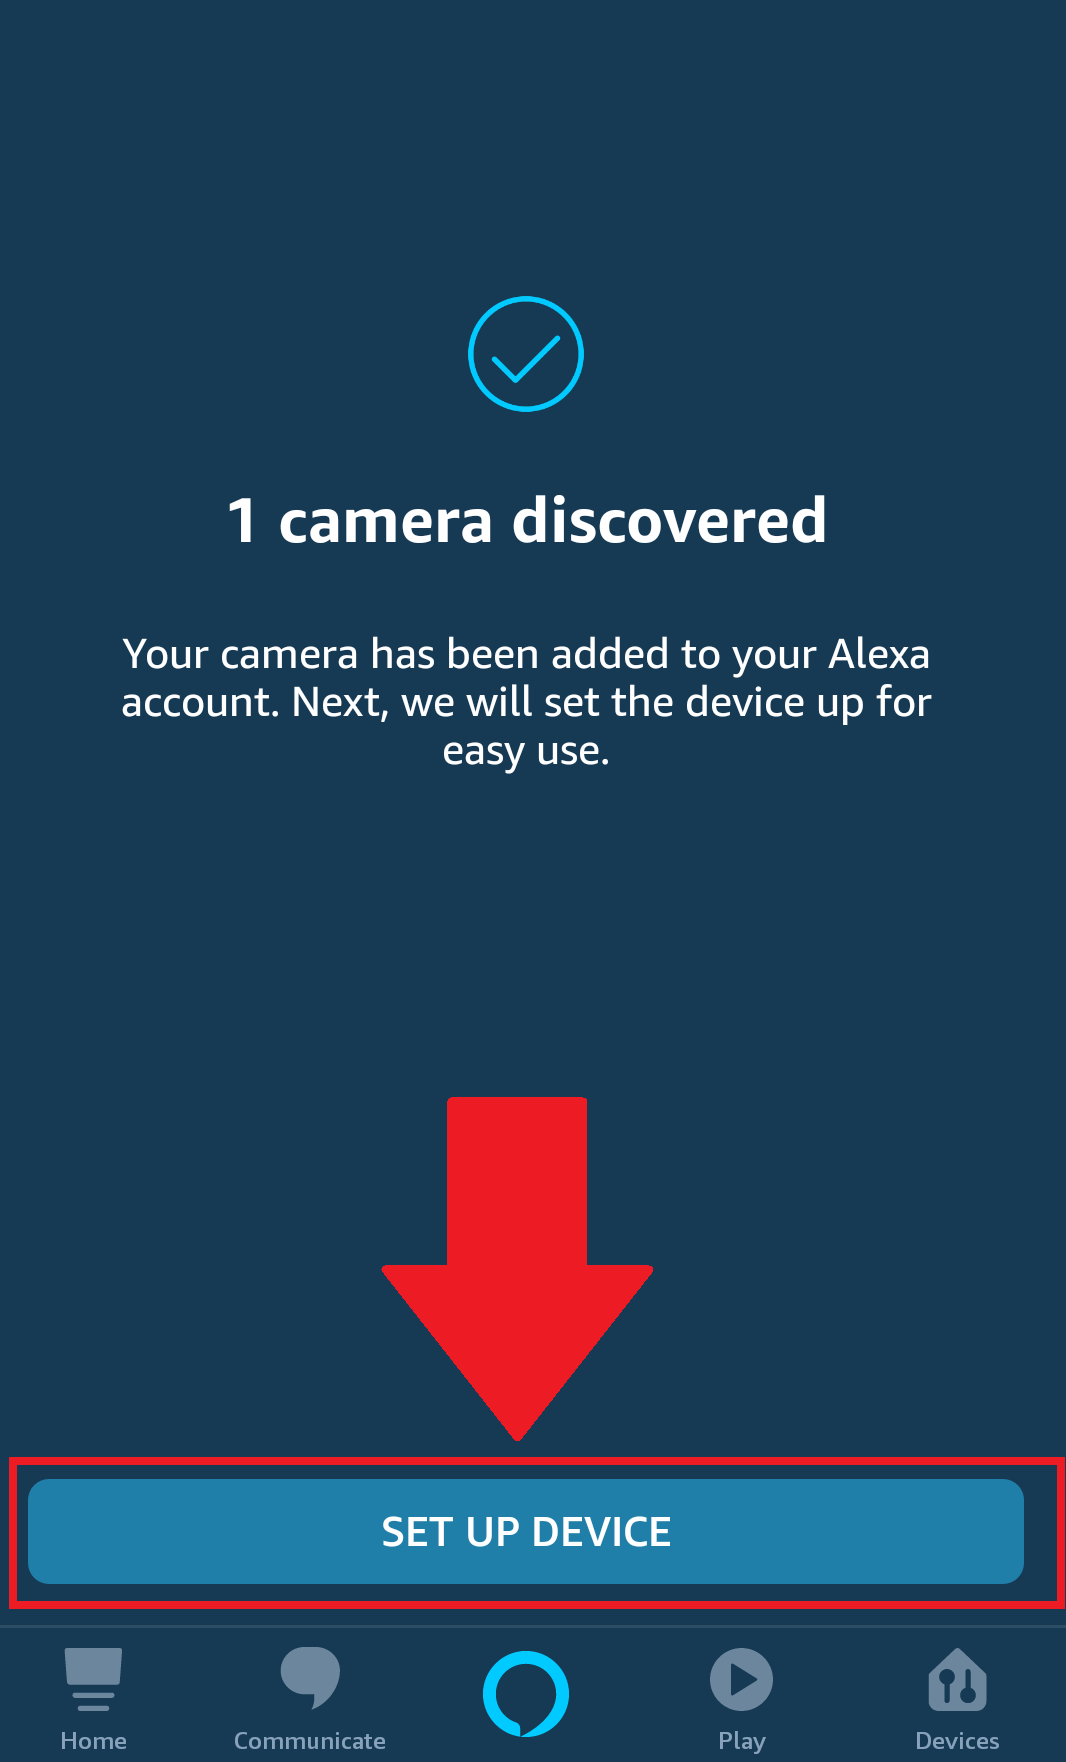
Step 8: You can then request Alexa to show you the camera by uttering a phrase. For example, if your device is named “Doorbell”, speak the phrase: “Alexa, show me the Doorbell camera.” The live stream of the device will be displayed.
As a reminder, the name of the camera on your Amcrest Cloud account will be the name used to view your device on Alexa.
