Swann DVR Troubleshooting Guide, This is a basic setup guide that you need to double check if in case your cameras are not showing any images upon first time setup. On this guide, it will show you a bit more detailed version of your Hardware QSG that came with your unit. You might see Video Loss, No Link, or No Video on your screen and if that is the case, then we need to check their connections first.
What error message do you see on the screen?
We need to identify first the error message that your screen shows.
Here are some error message because of cameras not displaying any image:
 (from a DVR-4900/8075)
 (from a DVR-5580/5680)
Here is an overview of the things we need to check:
1. Camera to extension cable connection
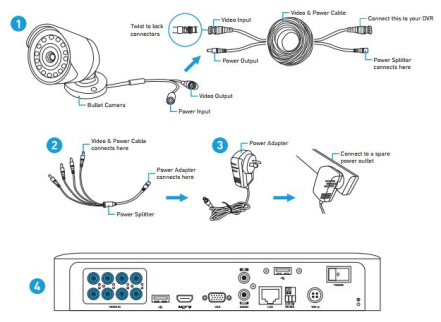
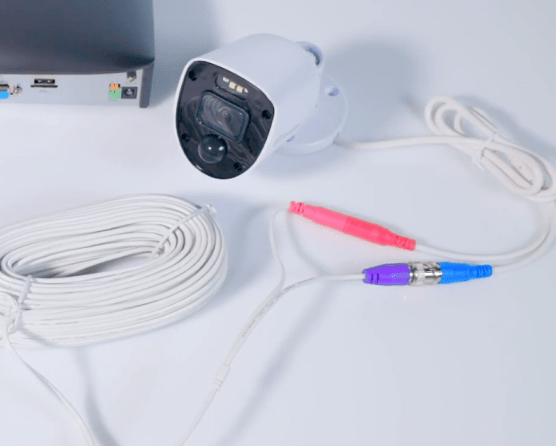
For some of you who installed the cameras already and forgot to test the cameras first, that’s alright. You can skip this step for now. You just need to make sure that the 2 connectors of your camera are both connected firmly to the extension lead; otherwise, you might end up with a powered camera but no video connection or a powerless camera with a video connection. Check the image below, that’s how your camera needs to be connected to the extension cable.
a. Connect the power connector
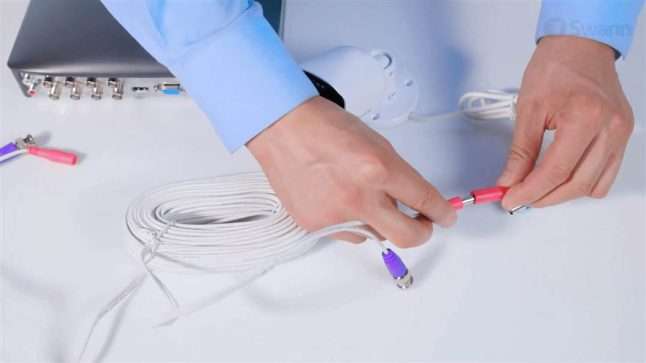
b. Then connect the BNC video connector
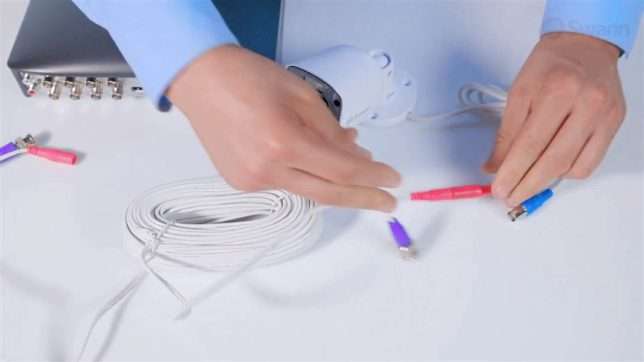
Here is what it should look like after the connection.
2. Extension cable to power splitter
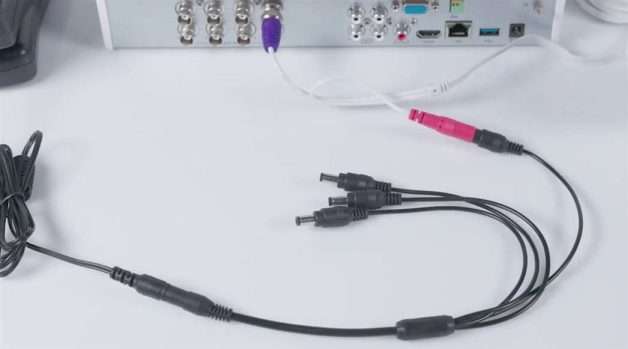
The extension will have 2 connectors on each end and you already used one end for the camera’s video and power connection. The other end of that cable needs to be connected to the power splitter especially if you have multiple cameras on your setup (disregard the splitter if you are dealing with an additional camera since it will come with its own power supply). The splitter will have 4 leads on one end and a single lead on the other. Pick one lead from those 4 and connect the power lead of the extension cable to it. See the image below on how it should be connected.
3. Power splitter to the power adapter
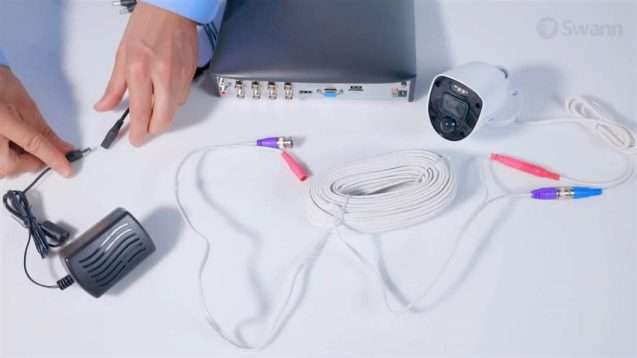
Grab the single lead from the splitter and connect it to the power adapter. Use the provided 12v power adapter from the kit. Then plug the power adapter into a working power point, wall outlet, or power board.
4. Extension cable to the DVR
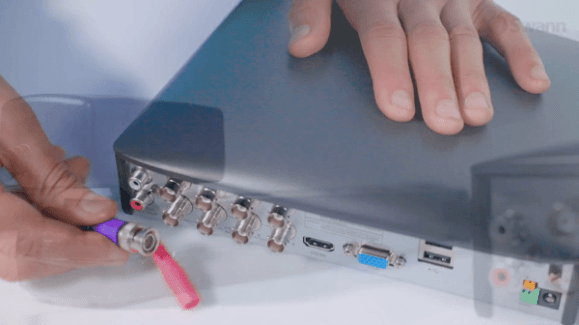
Going back to the extension cable, we are left with one connector. That connector will be connected to the ports at the back of the DVR. These ports are normally labeled as Video In or Video Input. You need to push the BNC connectors and twist them to lock them firmly to the DVR. Check below on how to connect the BNC cable to one of the video connectors at the back of the DVR.
You are all set! Live feed from the cameras should now display on the TV/monitor. If in case it didn’t, you might want to check Video Loss Troubleshooting for DVRs for some advanced troubleshooting.
Swann DVR Troubleshooting Guide
Read More : Swann Camera Troubleshooting
Hard drive warning: Unformat error / Status: Abnormal
This applies to recorders that were pre-installed with internal hard drives (HDD) and worked before. This error or warning appears when the hard drive is no longer recording or can no longer be accessed but is still detected.
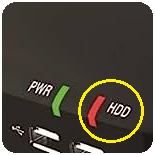
A. The HDD LED is solid, indicating the hard drive is still detected but is not reading/writing.
B. The HDD status (Menu > Device > HDD) shows “Abnormal” or “Unformat error”.
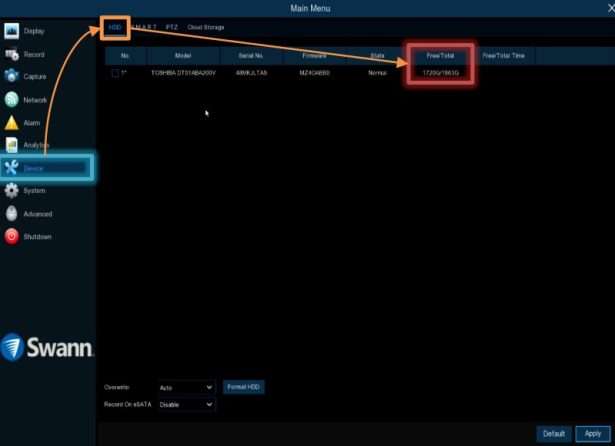
C. The HDD Free/Total capacity shows 0GB.
A. & B. If Unformat error / Abnormal error shows
Do each step in the following order to remedy the issue:
A. & C. If Total Capacity is 0GB
Do each step in the following order to remedy the issue:
Note: Formatting will not erase the Swann firmware.
No hard drive or hard disk found
This applies to recorders that were pre-installed with internal hard drives (HDD) and worked before. The following are signs that the hard drive is no longer detected in your DVR / NVR:
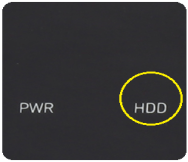
A. The HDD LED is off.
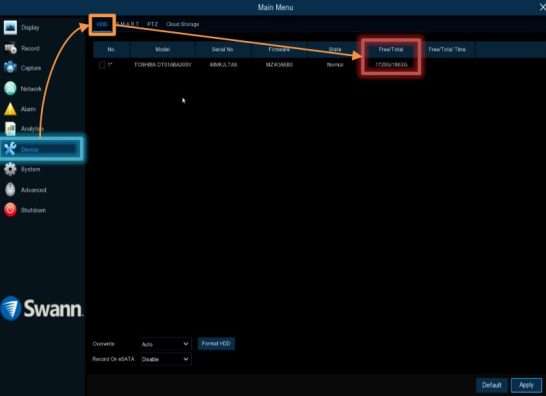
B. The HDD status (Menu > Device > HDD) is blank, meaning No. 1 is empty.
C. You may have experienced an outage or changed the power adapter.
A. & B. If you changed the hard drive recently
Bear in mind that only certain types of hard drives are compatible with CCTV security systems.
Please visit Installing an additional Internal Hard Drive (HDD) for 16-channel Recorders for an example of how to change the hard drive of your recorder.
A. & C. If you experienced an outage recently
The power adapter for your recorder was designed to protect the DVR or NVR in the event of a surge or power outage as adapters can be replaced easily unlike the whole recorder. Chances are the power adapter may be providing insufficient power for full recorder function (which includes the hard drive).
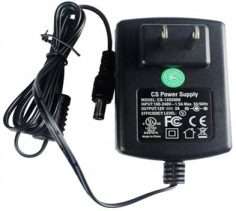
If the hard drive is detected after unplugging the cameras, chances are the power adapter is providing insufficient power and requires replacement.
If you are already using a compatible hard drive and a known working compatible power adapter, chances are the hard drive needs to be replaced. Please check What hard drives can I use with my DVR or NVR?
Swap DVR Power Adapters for Boot Issues
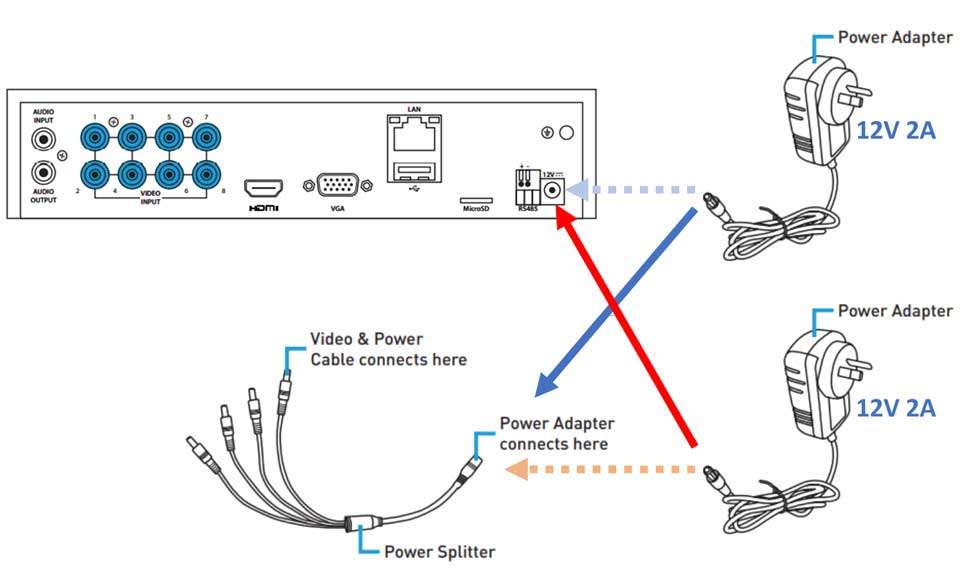
The power adapter of the DVR and the power adapter of 4 PRO- camera models are interchangeable as long as they have the same output rating of 12V 2A.
We do this to test whether the power adapter is faulty or the DVR is faulty. Power adapters are designed to protect the DVR in the event of power outages or power surges.
Warning: Do NOT use a power adapter higher than 12V on the DVR. Doing so will void your warranty.
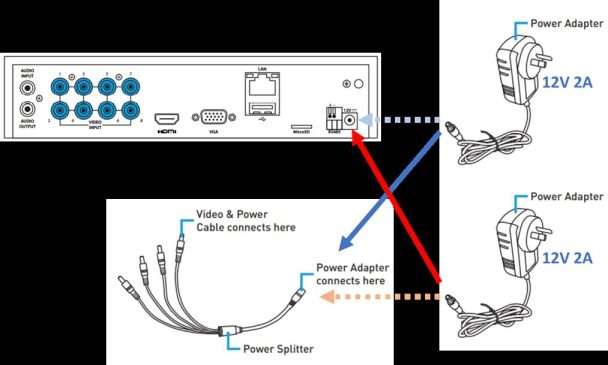
Step-by-Step Instructions
Note: If you have 8 cameras or more, you can swap the cameras’ power adapters instead of the DVR power adapter as long as both camera power adapters have the same output rating.
What hard drives can I use with my DVR or NVR?
This applies to Swann recorders with pre-installed internal hard drives for recordings. The type of hard drive compatible with Swann DVRs and NVRs are surveillance-type hard drives, which are connected via SATA cable. Before you decide to upgrade your internal hard drive, you MUST know the type, capacity, and size that your model is compatible with:
Compatible Type by Brand
The following surveillance hard drives are compatible with Swann recorders:
They vary in capacity and size, so check below to identify what is compatible with your recorder.
Compatible Capacity
This is the maximum number of storage capacity in gigabytes or terabytes that a hard drive has which varies in compatibility with your recorder.
Most Swann recorders are pre-installed with a hard drive internally. If you wish to upgrade the capacity of your hard drive, you need to check with our Technical Support for the maximum capacity that your recorder model will support. The maximum capacity varies by model number.
Customers with Swann Security and HomeSafe View app-compatible products can inquire via phone.
Compatible Size
Should you wish to upgrade your hard drive, ensure to acquire the same size dimensions as the one in your recorder. Surveillance-type hard drives come in two sizes:
If you are unsure, customers with Swann Security and HomeSafe View app-compatible products can inquire via phone.
Compatible with External Hard Drives
If your DVR or NVR has an eSATA port on the back panel, it means your recorder is capable of connecting an external surveillance-type hard drive.
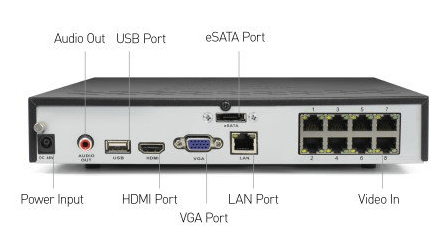
The function of the external eSATA port may either be for exporting recordings or recording depending on the chipset of your recorder model. For example: Can I use an external SATA hard drive to my DVR8-3000 to increase recording capacity?
The following recorder series have an external eSATA port for a hard drive of up to 3TB in capacity for external recording:
Compatible microSD Cards
If your recorder model contains a microSD slot, it can support up to 128GB capacity for the microSD card.
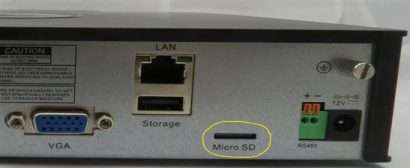
The following recorder models are compatible with up to 4TB capacity for the hard drive and 128GB capacity for the microSD card.
Note: Simultaneous recording to both the internal hard drive and microSD card is not supported. If there is a hard drive internally, recording to the hard drive will be prioritized.
Not Compatible
DVR/NVR went offline after an outage or changing routers or Internet Service Provider
This article applies to DVRs or NVRs that are hardwired to your router, and affects mobile or computer streaming, push notifications, and other features requiring internet connectivity.
The DVR or NVR going offline is a common occurrence when changes were made to the router, its settings, an outage, or changes in IP by your Internet Service Provider (ISP). In order to get it back online, you must have physical access to the DVR or NVR to check the following:
1. If there was a Power or Internet Outage
Normally, turning off the recorder and then turning it back on again will get the DVR or NVR to re-establish communication with your router. However, this will only work if its Network setup is set to DHCP by default. This ensures that the router is able to detect the DVR/NVR via ethernet and update its IP address.
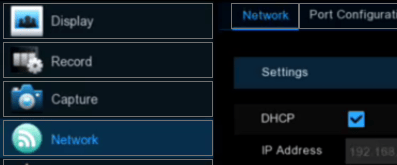
If rebooting did not work, please try additional steps from this article: Remote Access – Basic Router/Network Troubleshooting.
If the live view is blank, then the outage may have affected the power supply. Check this article to troubleshoot: Troubleshoot a Boot Failure or Rebooting issue of a Recorder (DVR/NVR/NVW).
2. If you changed or replaced the router (changed ISP)
See types of routers that may or may not work with the DVR or NVR in this article: Network Setup: What do I need for my DVR/NVR to go online?
If the router is compatible, then the connection between the recorder and the router just needs to be refreshed. See this article for the first few steps to re-establish the network connection: Remote Access – Basic Router/Network Troubleshooting.
3. If you added another router or extender
Ensure that the network connection setup has not changed. If the DVR or NVR is still connected to the same router, but that router was connected to a cable modem instead of a wall, then the setup is no longer a direct connection but a bridged connection.
See why the DVR or NVR may not work with a bridged router or particular extender in this article: Network Setup: What do I need for my DVR/NVR to go online?
How to factory reset my DVR / NVR (V8)
Default Settings VS Factory Reset
To load settings to default in recorder models, you must be logged into the recorder via TV and mouse or computer software.
How to restore settings to factory default via TV and mouse
You must know the user name and password of your recorder in order to do this method. If you do not know the password, you need to perform a password reset instead. See How to reset the password or get the recovery code of your DVR/NVR/NVW
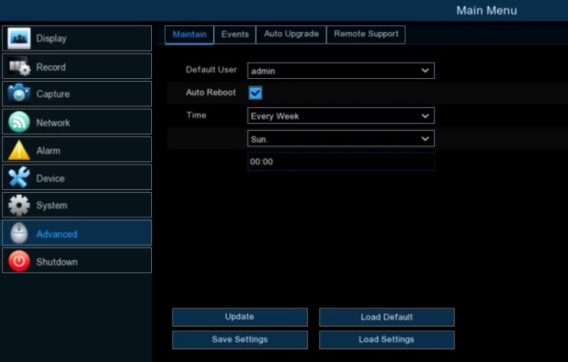
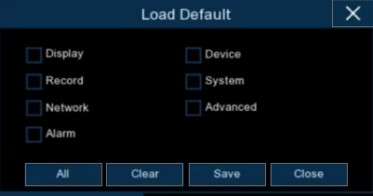
You will be taken to the Startup Wizard to set a new password. See Frequently-asked questions and tips to complete the Startup Wizard
How to restore to factory default via Windows software
The DVR or NVR must already be added in the software beforehand and is online in order to do this method. If your DVR or NVR has not been added, you need to perform a password reset instead. See How to reset the password or get the recovery code of your DVR/NVR/NVW
Via HomeSafe View software:
Go to Control Panel > Group Device Management > Devices: hover over Device > click on Remote Config (wrench icon) > Advanced > Load Default > Check the appropriate box > Save.

Via Swann Security VMS software:
Go to Device Management > Advanced > Load Default > Toggle the appropriate options > Save.

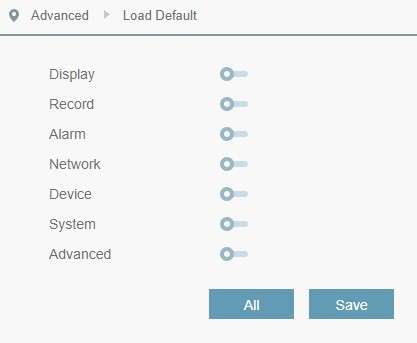
Warning: Once you have restored the recorder’s settings to default via software, you are required to set a new password via TV and mouse hardwired to the recorder. If you are unable to login to the Main Menu nor access your recorder via software, you need to do this: How to reset the password or get the recovery code of your DVR/NVR/NVW
Troubleshoot a Boot Failure or Rebooting issue of a Recorder (DVR/NVR/NVW)
If you your Swann recorder (DVR, NVR, NVW or wireless recorder) is experiencing the below issues, then your unit may have a boot failure problem:
To isolate, consider following the steps below
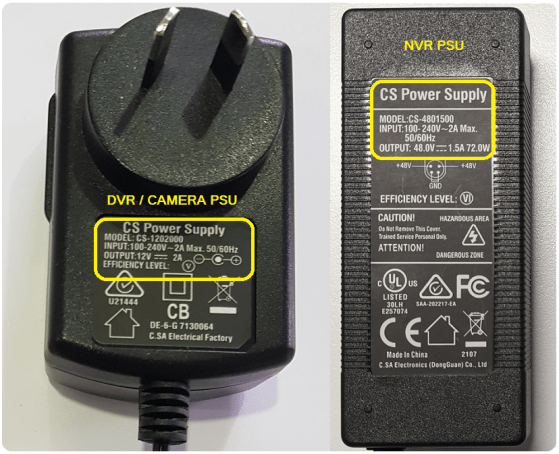
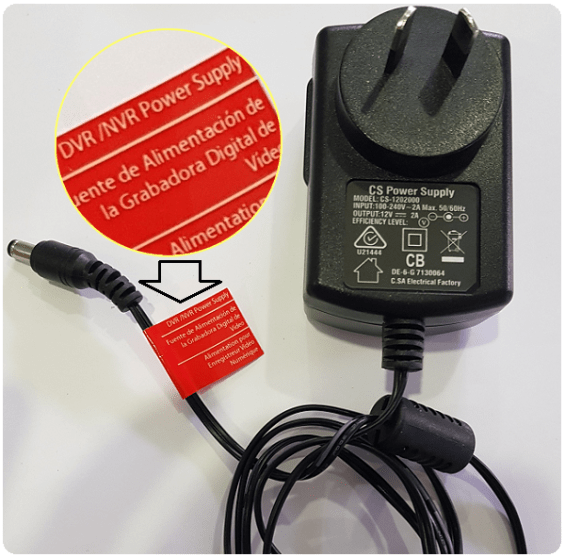
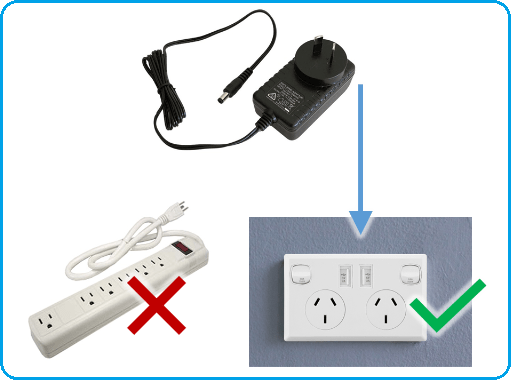
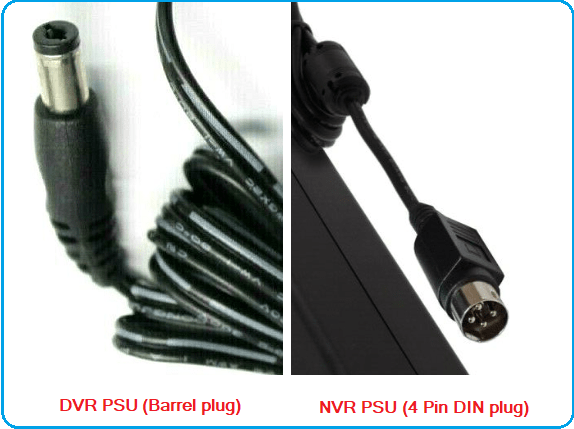
Note: Some of the older NVR PSUs use a larger Barrel plug.

Note1: If the recorder remains turned Off, check if the wall outlet where the Power Adapter (PSU) is plugged in has power.
Note2: If the recorder turned On but seeing a black screen, consider checking if your monitor support the correct screen resolution by following this guide – Video Mode Not Supported or Signal Out of Range or No Signal.
Why does my DVR / NVR / camera stop recording motion after a minute?
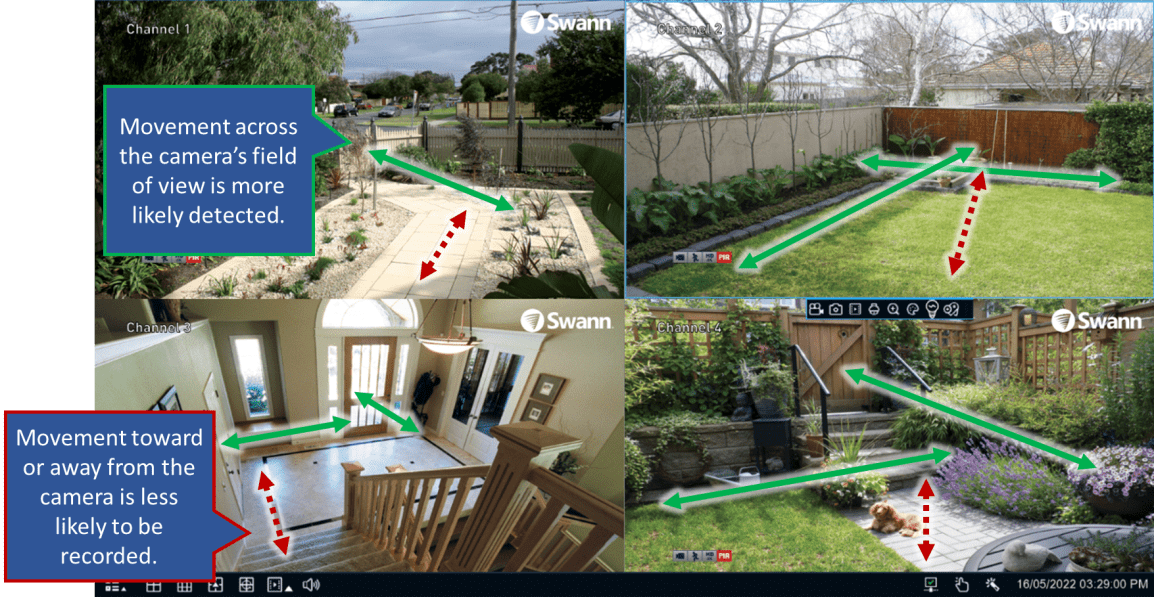
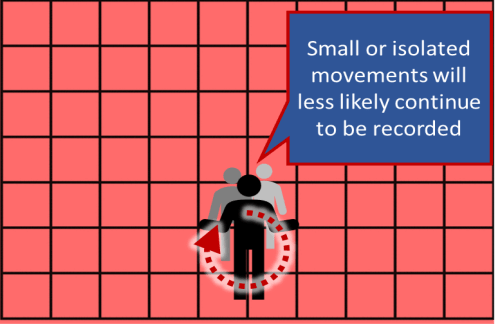
DVRs and NVRs are set to record PIR/motion by default. Wireless standalone cameras can only record by PIR/motion. Where the camera is mounted can have an impact on how effective movement is picked up and recorded.
Mounting any camera with thermal and motion sensors in the wrong location and angle can prevent recordings of certain movement. For example:
Please see the fixes specific to your model for working around PIR/motion:
Fix for DVR: Set the already-mounted DVR camera to record continuously
This setting is ideal if you mounted your camera above your front door, and you expect the camera to record regardless of motion.
See How to Set Up 24-hour continuous recording for a Camera (DVR or NVR only)
Fix for NVR with V8 firmware: Set up Analytics for your NVR camera.
Perimeter Intrusion Detection (PID) with PIR can be configured for one NVR camera if you have a V8 recorder and camera.
A perimeter intrusion region can be used to define specific areas that you want to monitor for motion. For example, a rule can be defined so that your NVR will alert you if one or more objects have entered the boxed region from a particular direction and stayed within the intrusion region for a particular time.
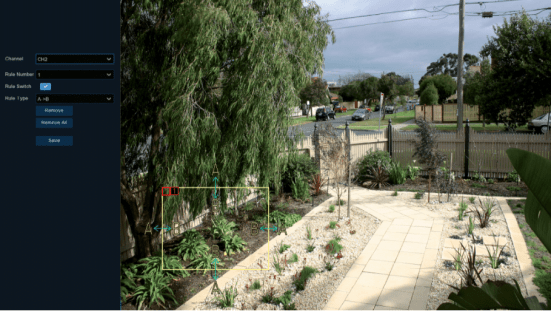
Please see the user manual for your NVR on how to set up PID: User Manual (V8 units – 8580, 8580RN, 8780, 8780RN,)
Fix for any camera, especially WiFi cameras: Reposition the camera or add another camera for a different angle of view.
The ideal position of the camera is 7-8 feet high, pointing downwards at an angle to cover the area where people will be walking across the camera’s path
