DAHUA XVR 4.0 Setup, Dahua Technology is a world-leading video-centric AIoT solution and service provider. With its ‘Dahua Think#’ corporate strategy, Dahua Technology focuses on two core businesses: City and Enterprise. The company firmly strengthens its technological strategies that include AloT and IoT digital intelligence platforms, comprehensively promoting the digital intelligence upgrading of cities and enterprises based on customer needs, and creating more value for the digital-intelligent transformation of various industries.
New GUI – Start Up Wizard (Device Initialization)
DAHUA XVR 4.0 Setup Description
This article will go over the Initialization process of the units with the New GUI.
Prerequisites
Video Instructions
Step by Step Instructions
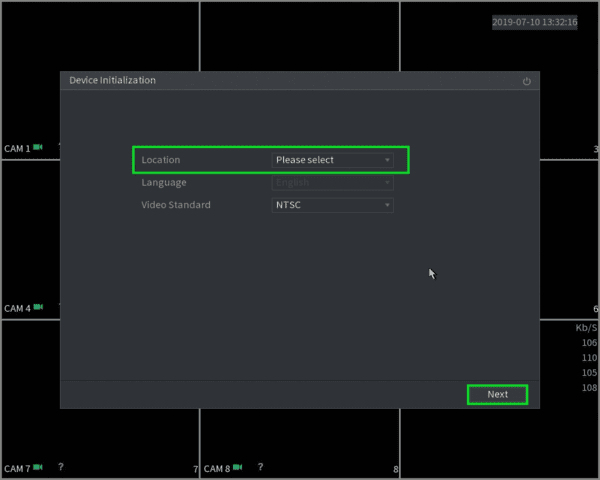
1. When you first turn on the recorder you will be greeted with the region settings. Click on the drop down menu and select “United States” and click Next.
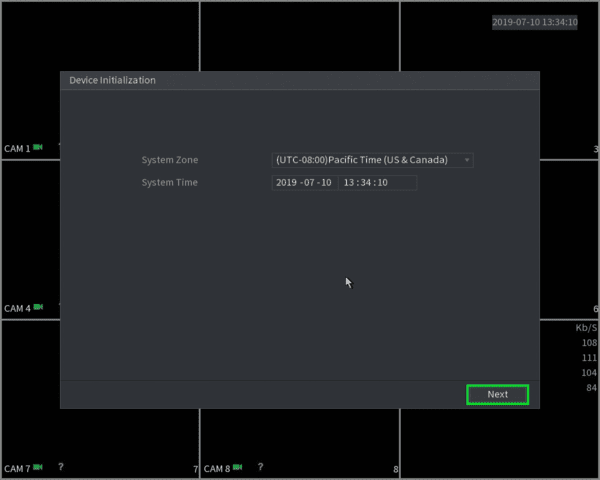
2. Select the proper time zone setting for your region.
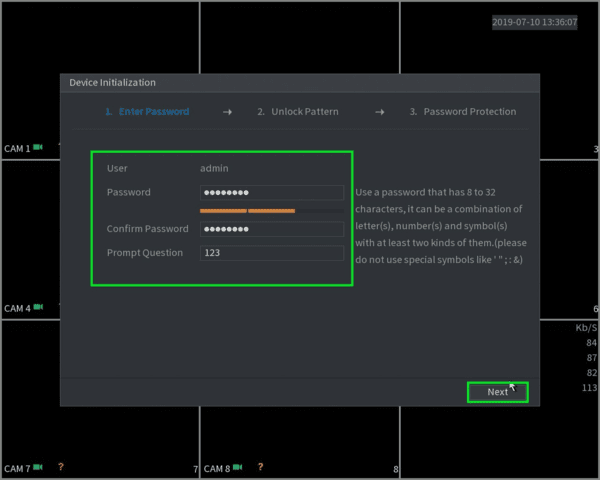
3. You will now be prompted to input a password for the admin account.
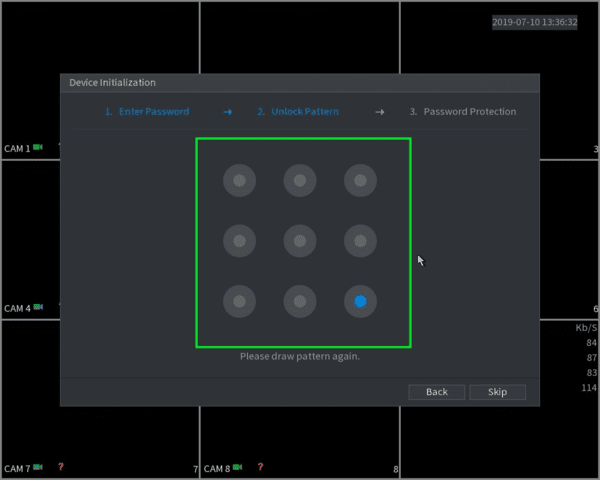
4. For easier login you can create a pattern, you will need to enter it twice to confirm.
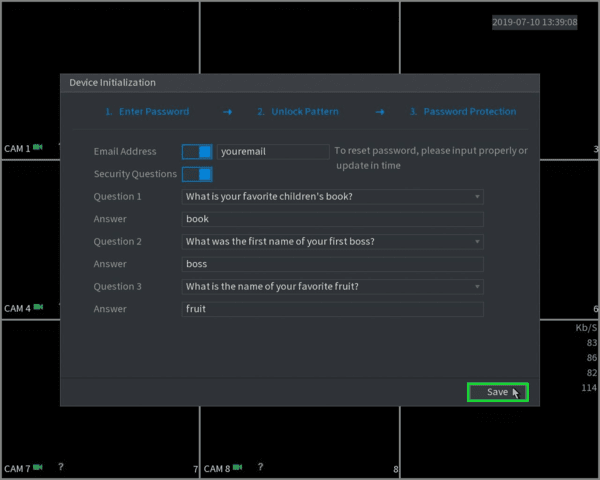
5. Enter your email in order to reset the admin password in case the password was forgotten, you may also setup security questions.
Note: This is the only method to reset the password for XVRs and NVRs. If you skip this step and forget your device’s password, you will need to replace the unit
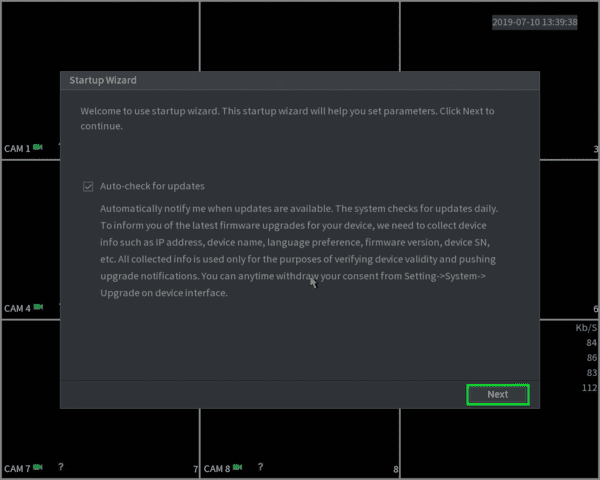
6. The Auto-check for firmware is not yet implemented in the U.S. so you can just click on next.
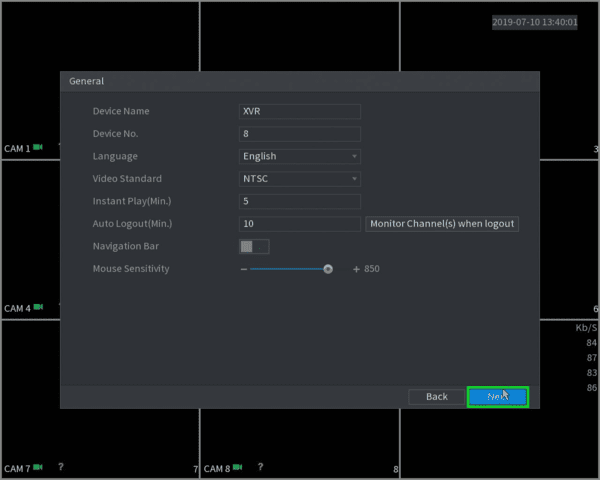
7. Make sure the video standard format is set to NTSC and click on “Next”.
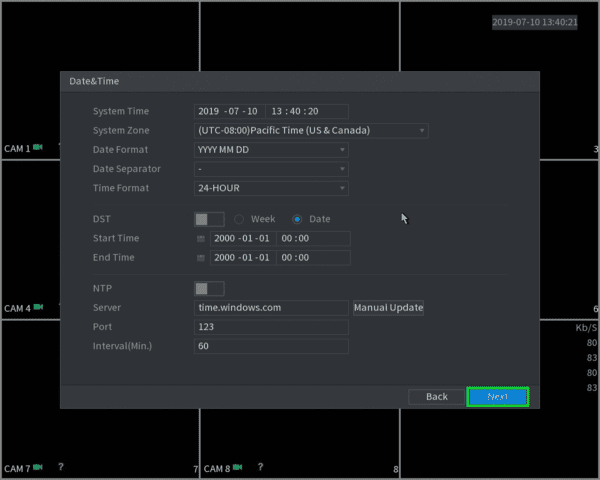
8. Here you can go in depth with the time settings. You may want to set up the DST (Daylight savings) so that it takes affect when the time comes.
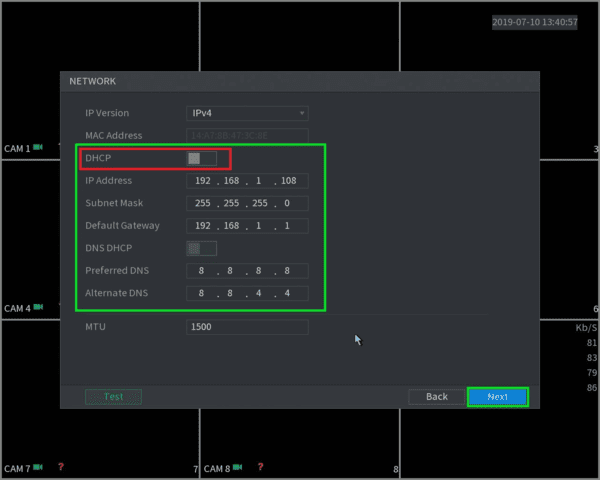
9. The recorder will be set as a static default IP address you see on the screen. Input an open local IP address and gateway from you network. If you don’t know this information you can select DHCP (highlighted in the red box) in order to automatically receive an IP address from the router.
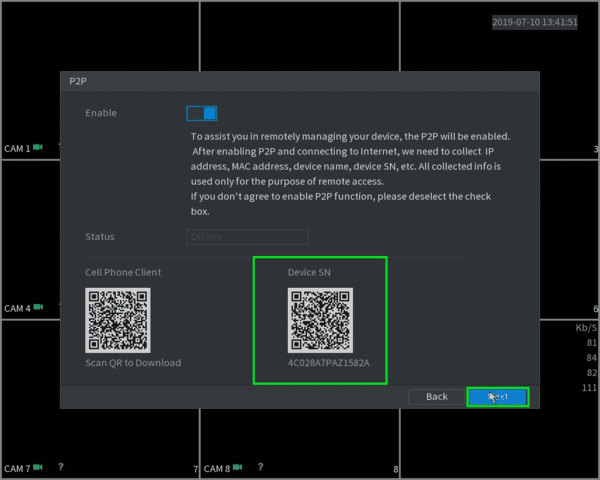
10. If you have the recorder properly connected to the router the P2P status will indicate “Online” and you can now remote in to the unit with our mobile app/PC app.
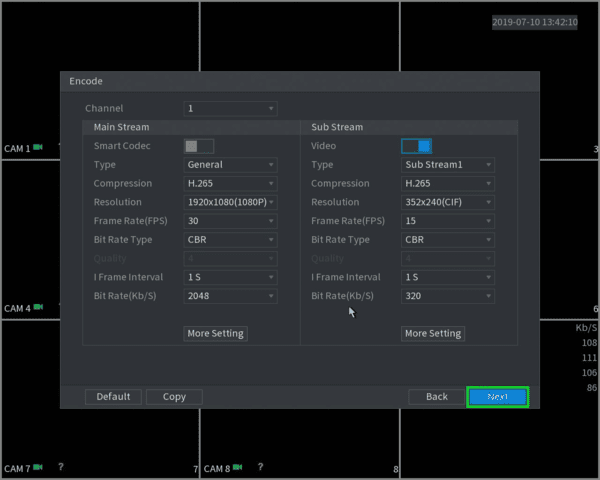
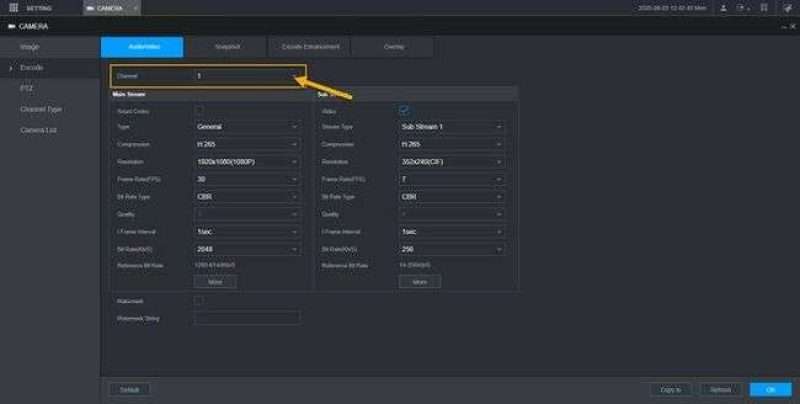
11. You can select the Encode settings for each camera by selecting the drop down menu on “Channel”.
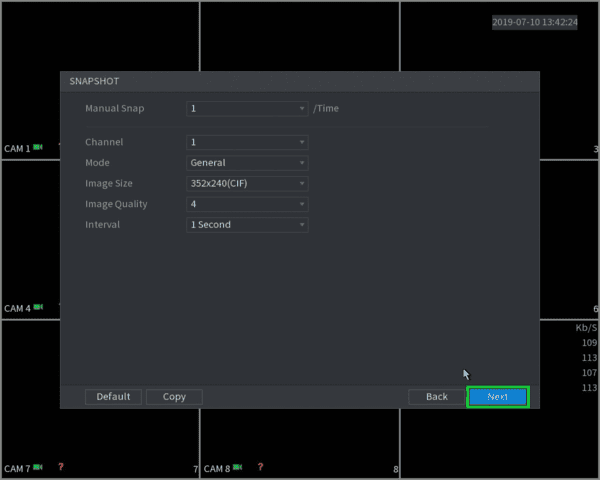
12. Select the resolution and image quality for snapshots.
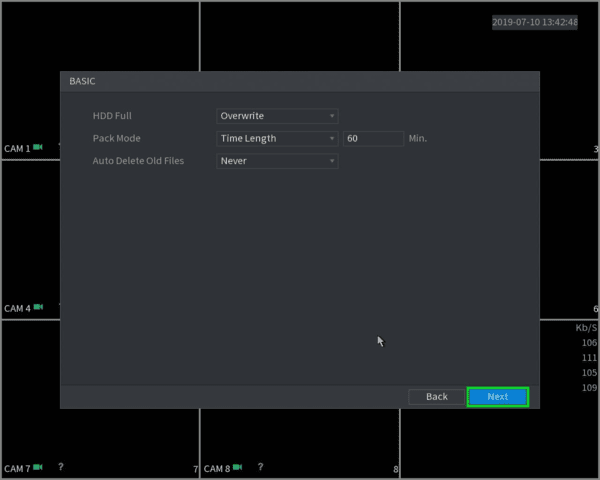
13. Select what you want to to when the hard drive fills up.
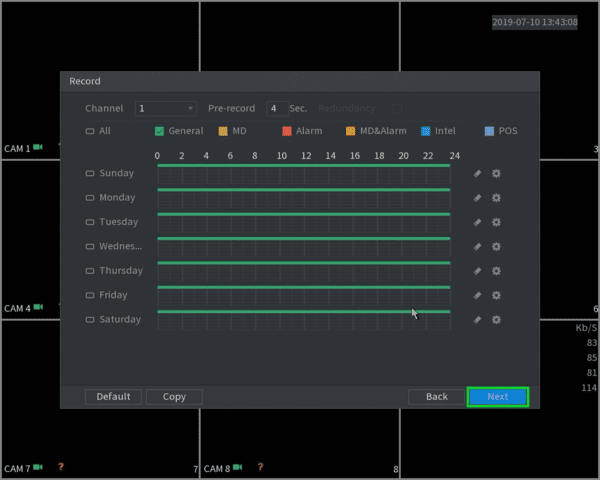
14. Here is you recording schedule, the green will indicate 24/7 recording and Yellow will be Motion recording.
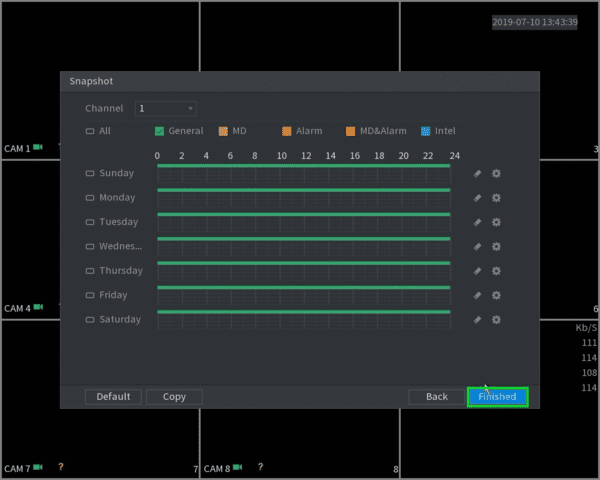
15. Here is you Snapshot schedule, same color legend as recording,
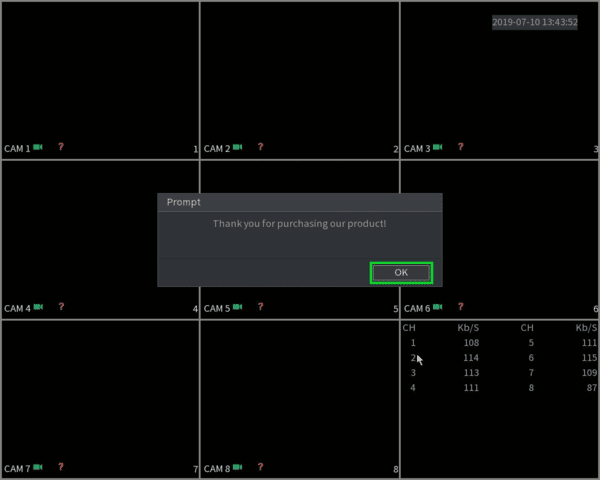
16. Once all that is setup you will be greeted with the final Prompt! You are now finished Initializing you new recorder
New GUI- Add a Dahua Device
Description
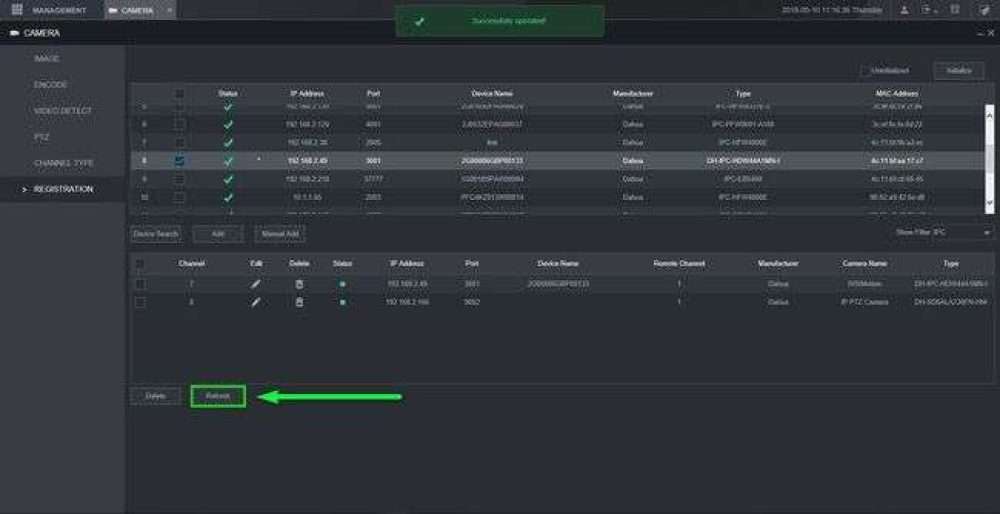
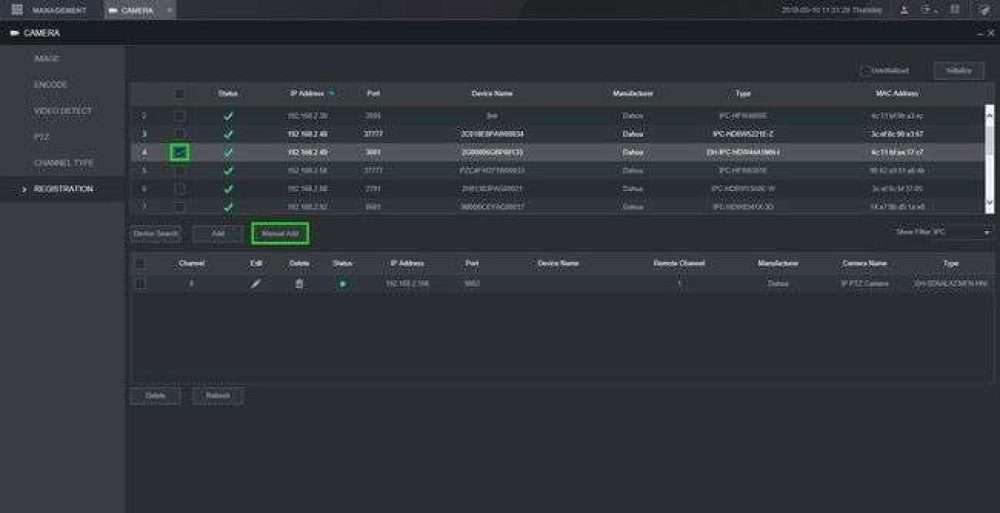
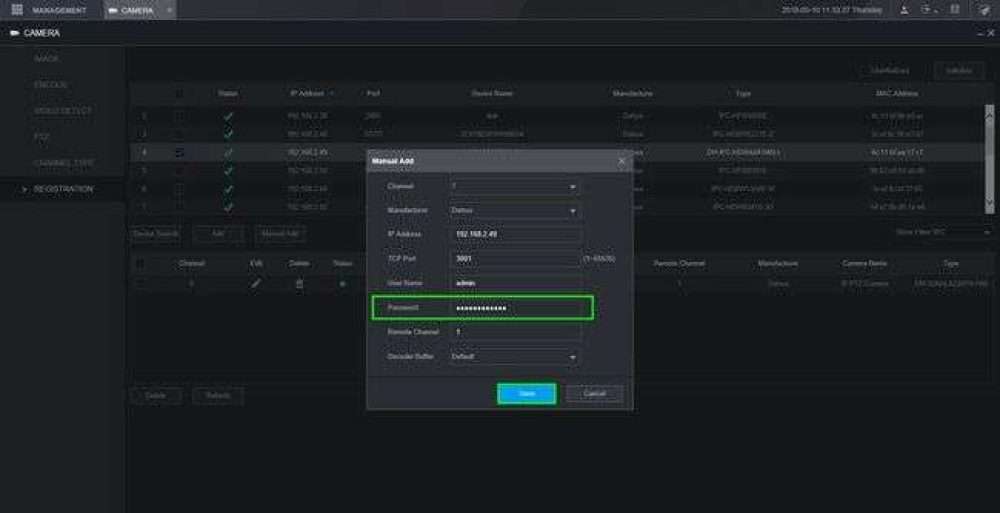
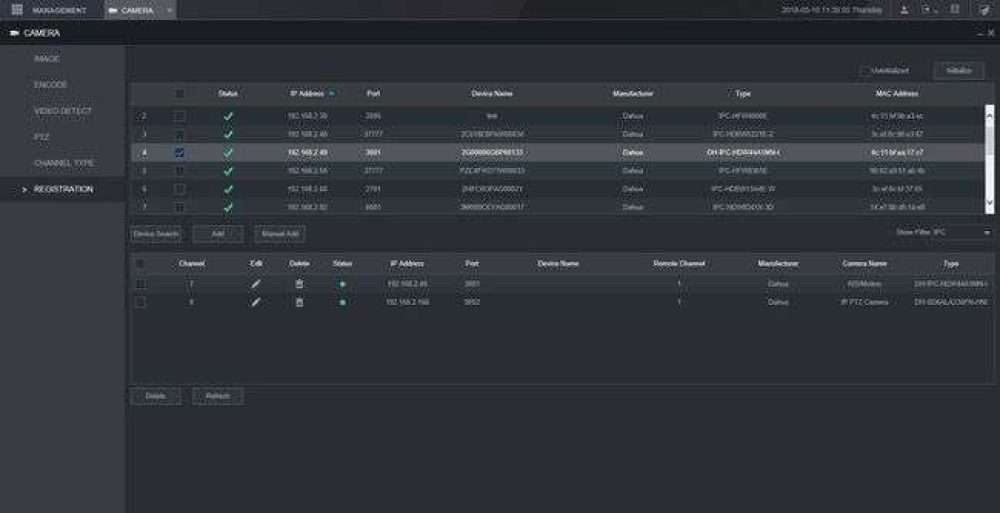
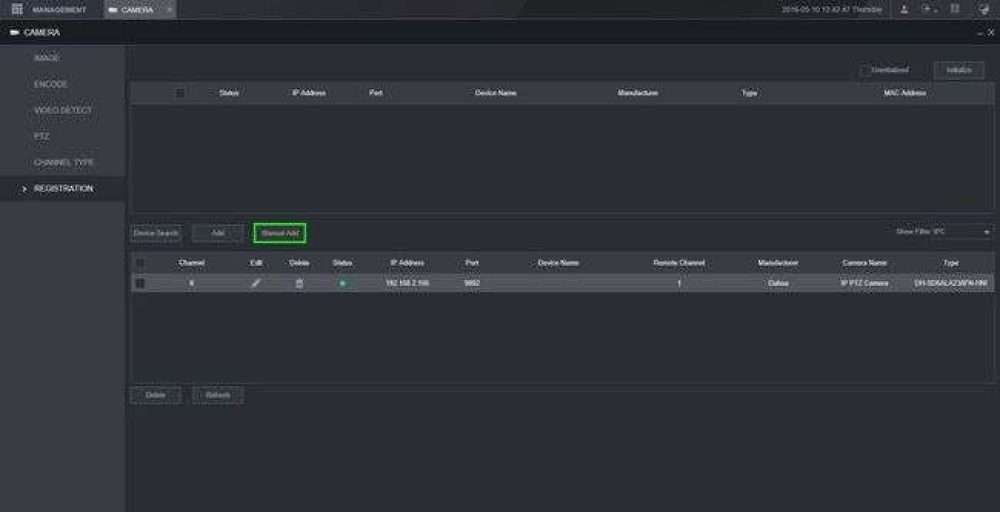
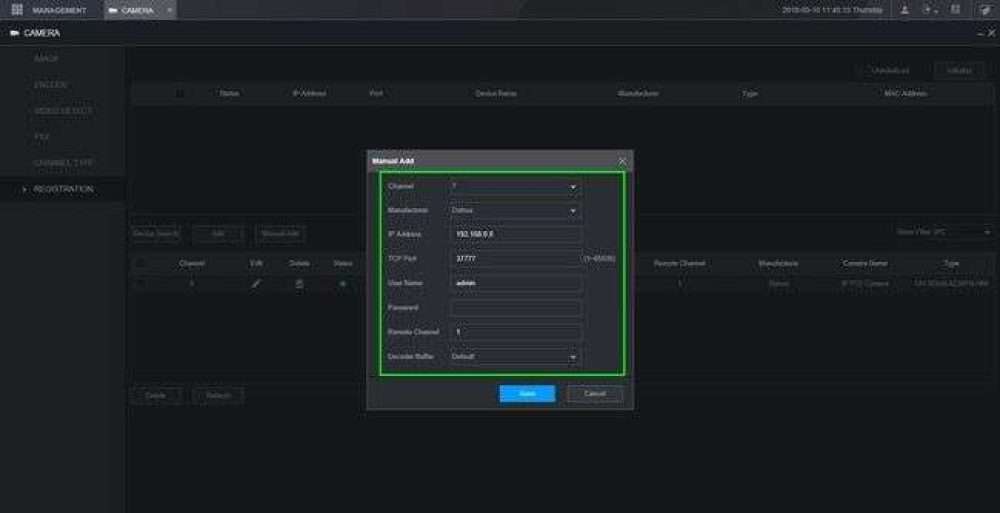
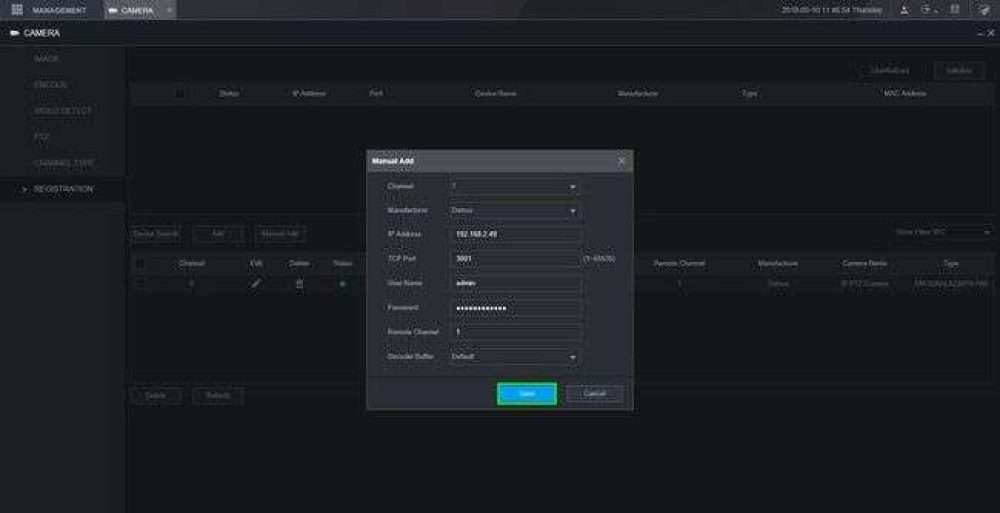
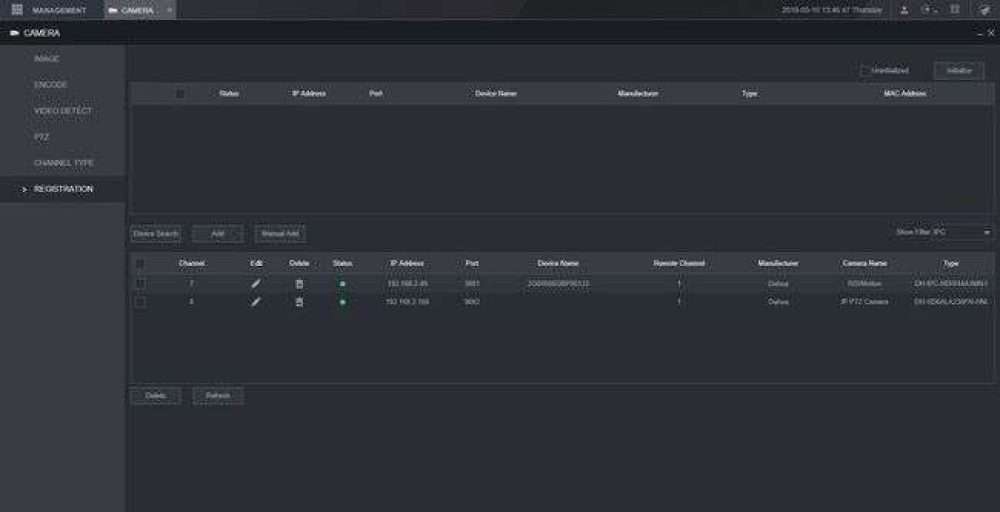
This article will show you three different methods to add a dahua device to our New GUI recorders. We will be adding a dahua camera with all three methods.
Prerequisites
Video Instructions
Step by Step Instructions
Method 1:
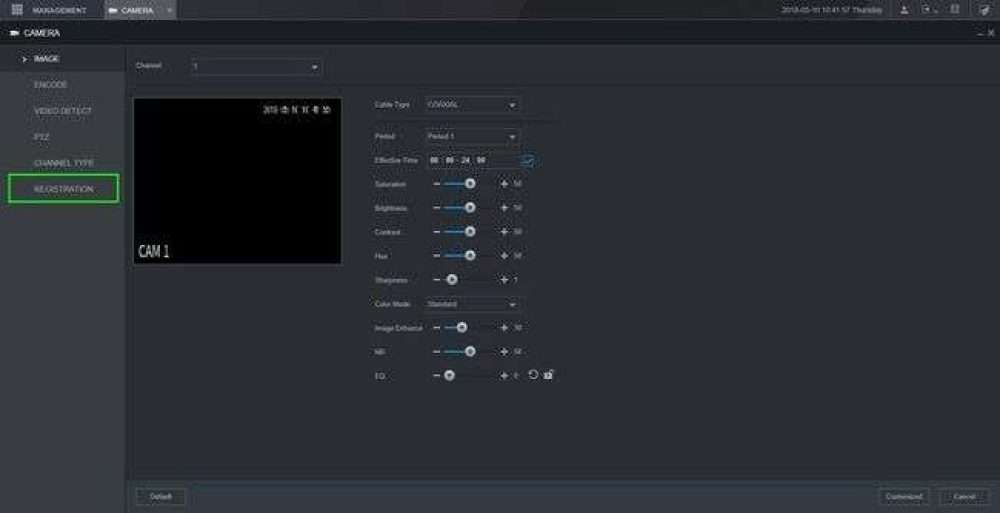
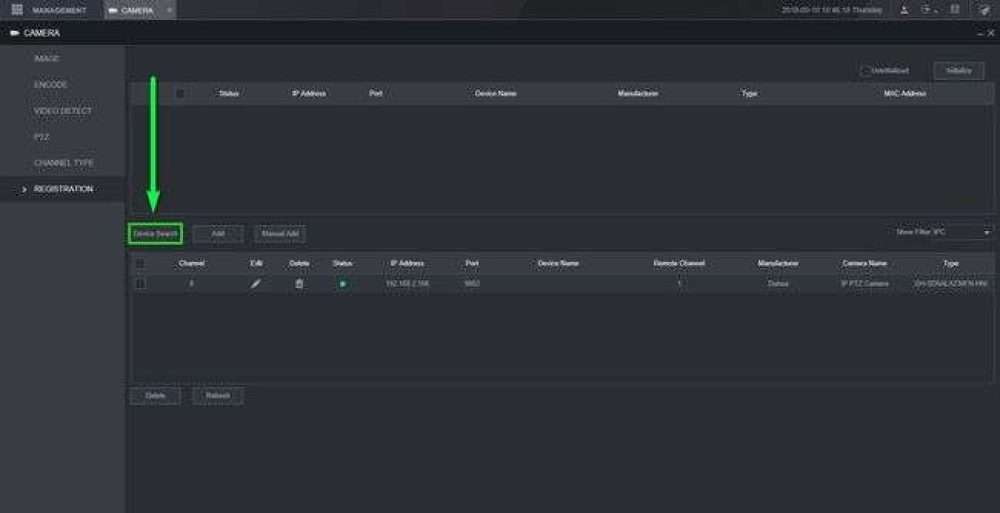
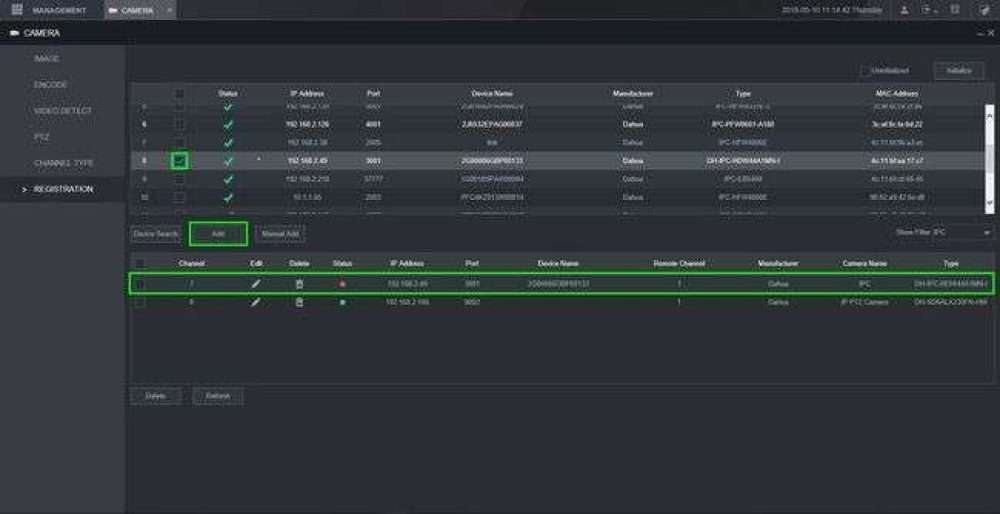
This first method is extremely simple if all the cameras are still set to default credentials and settings. We will do a device search on the network and add them with a click of a button
Method Two:
The second method is used if there’s an existing camera and it’s password was changed. You will use device search to locate the camera and then go to manual add to change the password it’s being added with
Method Three:
This last method is used when Device Search fails and cannot locate the camera on the network. You will need to type in the camera’s information manually.
New GUI – Account Setup
Description
This article will go over how to add a user on our New GUI devices
Prerequisites
Video Instructions
Step by Step Instructions
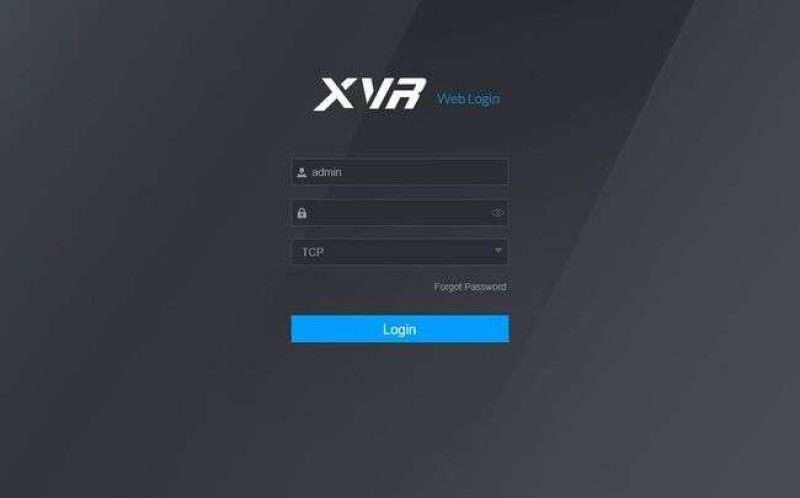
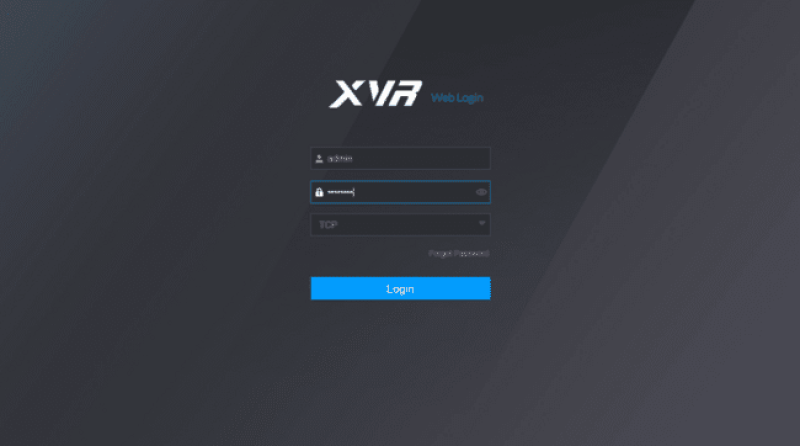
1. Log into the web interface of the device
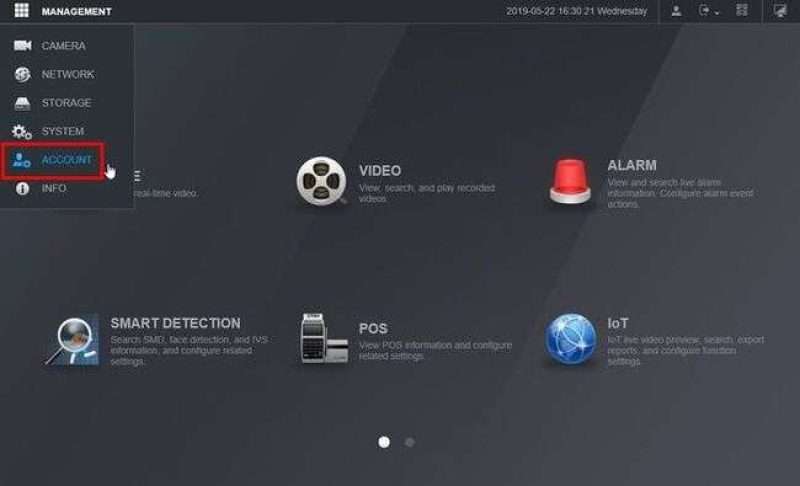
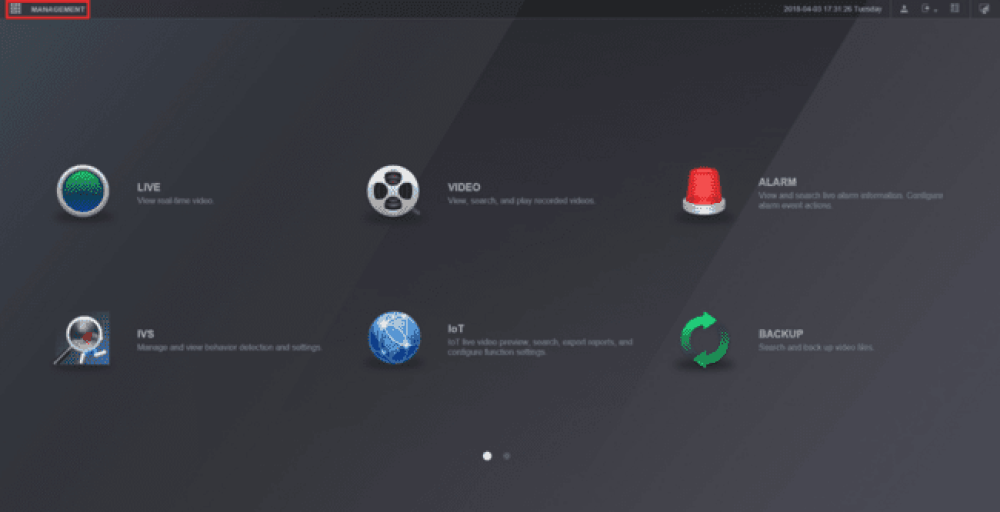
2. Click the Menu icon in the top left of the page
3. Select Account
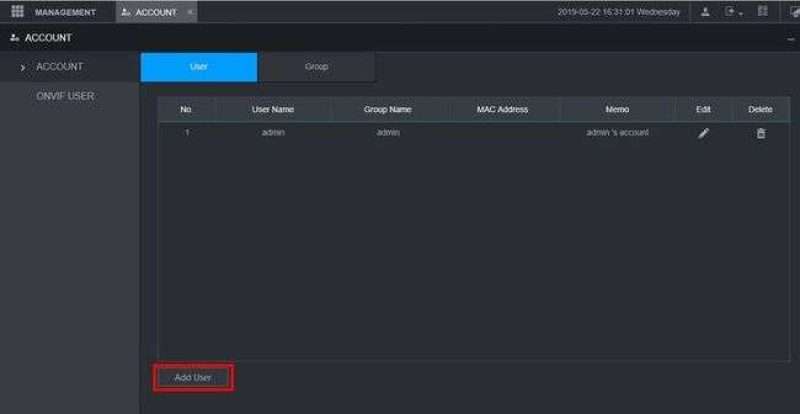
4. Click Add User
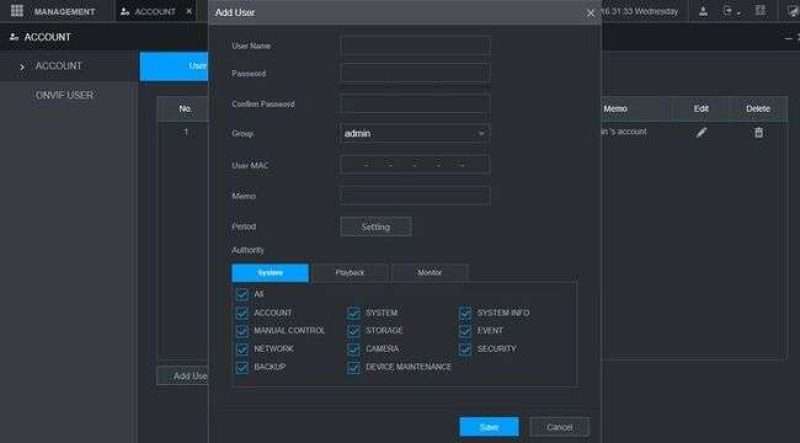
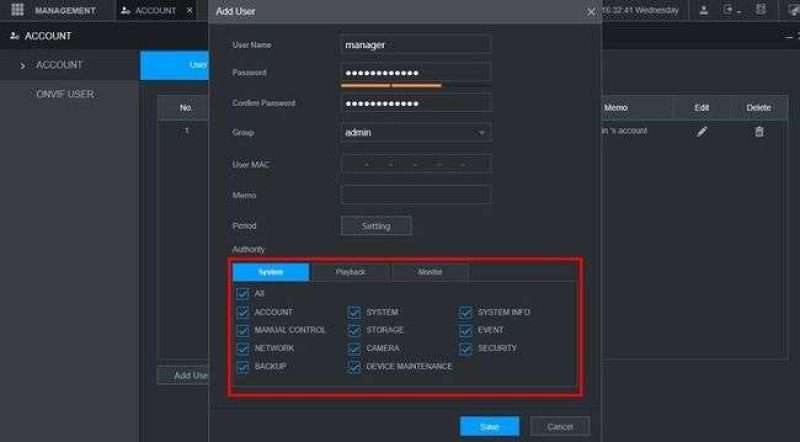
5. The Add User menu will appear. Use this window to ill out full user details
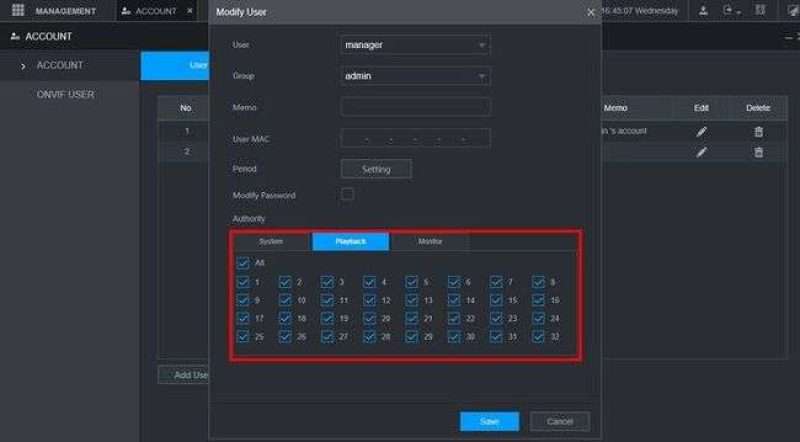
6. In the Authority menu you can define the individual rights of the User using the System, Playback, and Monitor tabs as well as which channels the user can access
Select which features you wish the user to have then click Save
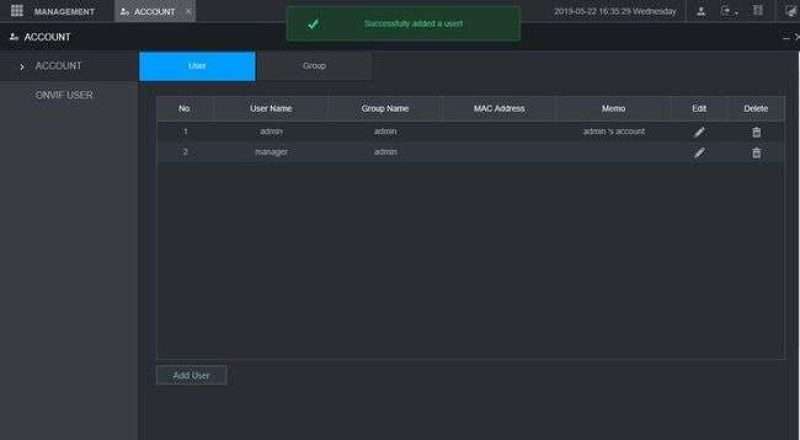
7. A message will confirm when the user is successfully added
New GUI – Schedule Record Setup
Description
Dahua NVRs and DVRs offer a variety of recording options. You can configure recording schedules based on the following methods:
These schedules can be set individually for each camera or copied to all cameras.
Prerequisites
Video Instructions
Step by Step Instructions
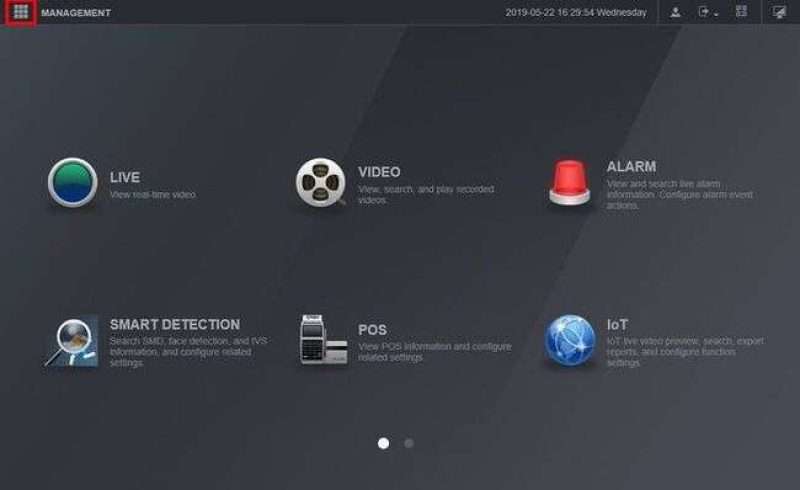
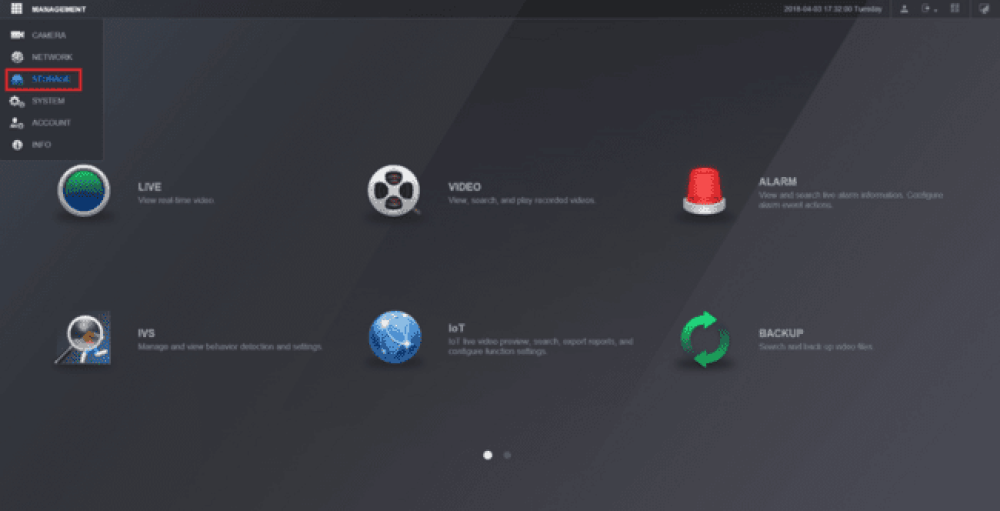
1. From the Main Menu select “Management”.
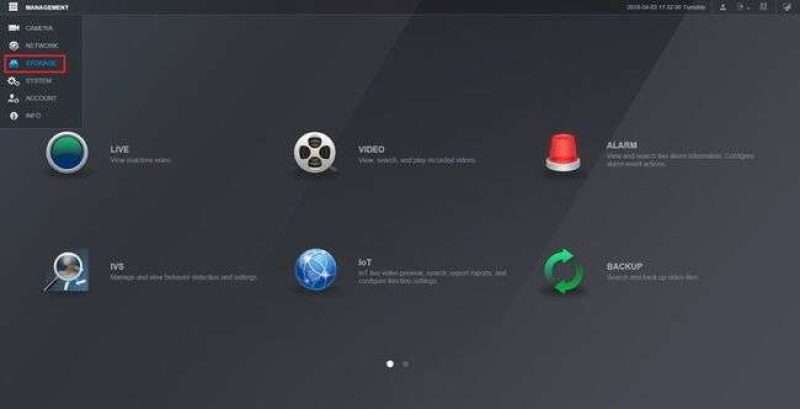
2. Select the “Storage” option from the drop-down menu.
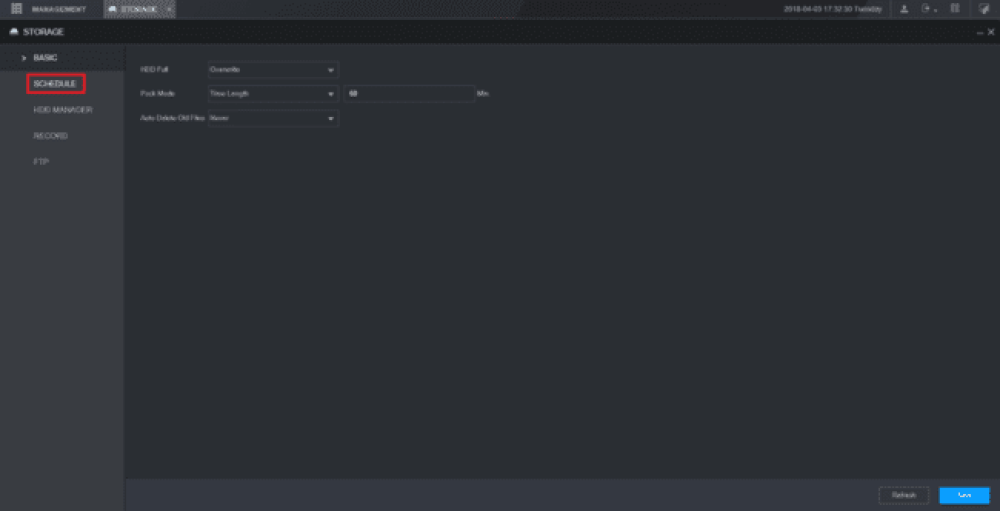
3. From the left hand side, select “Schedule”.
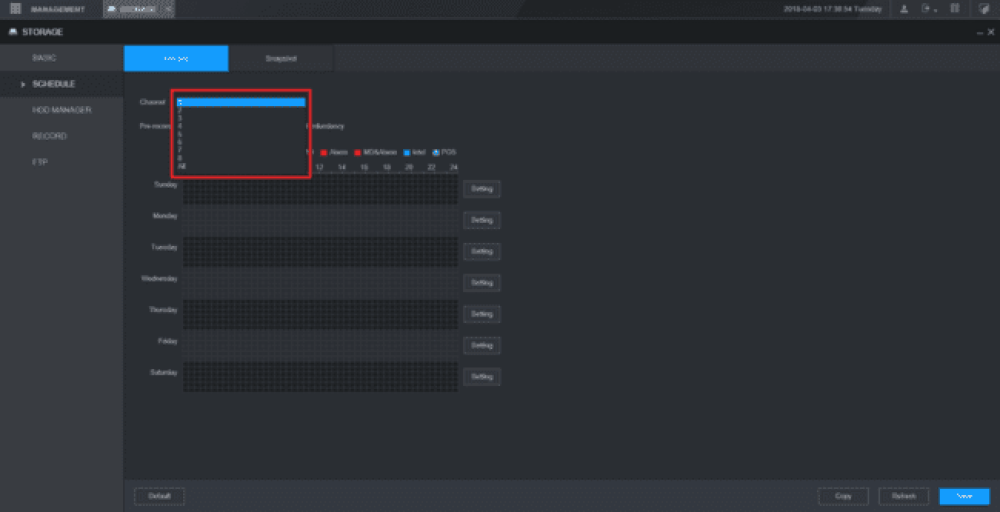
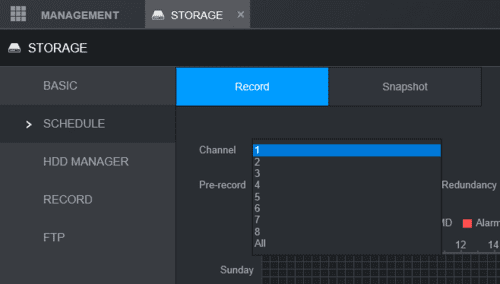
4. Select the channel drop-down menu to choose the channel that you want to adjust the recording schedule for.
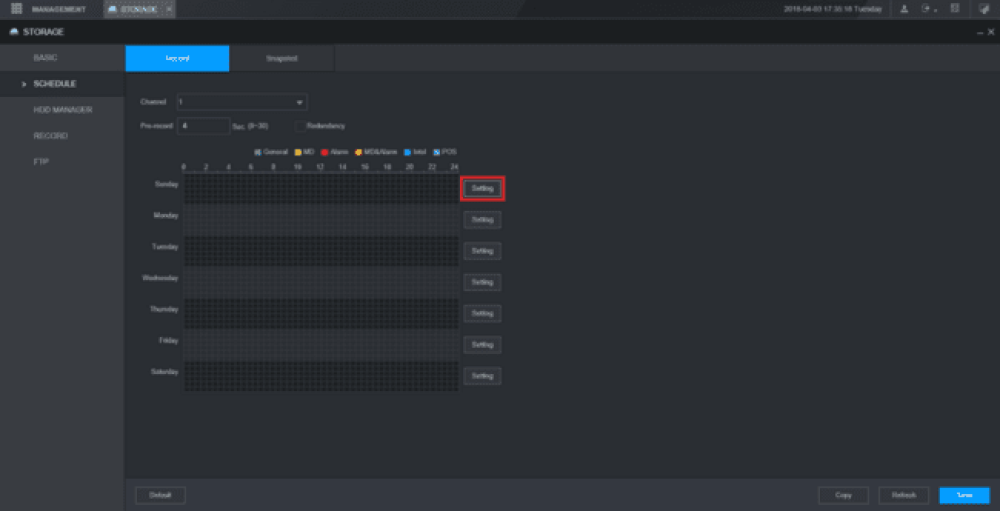
5. Select “Setting” next to any day of the week.
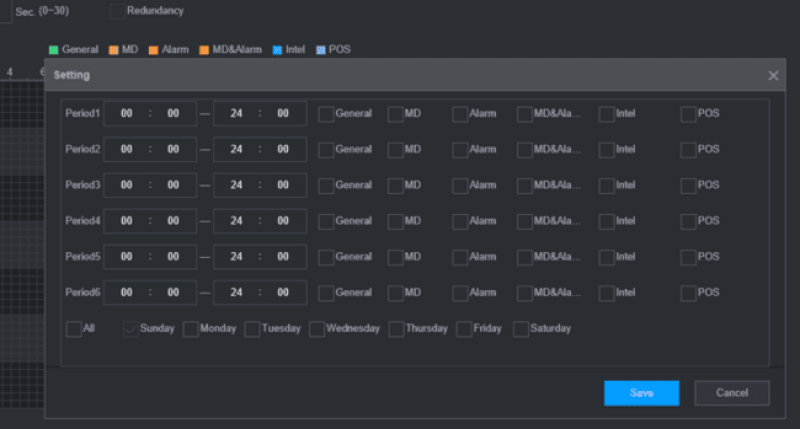
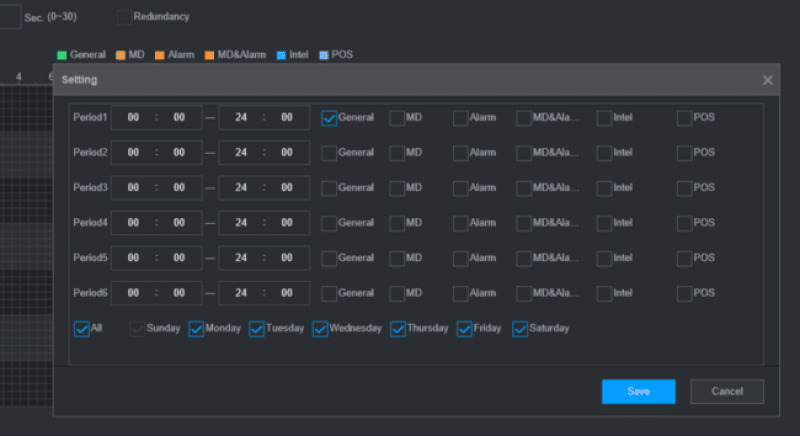
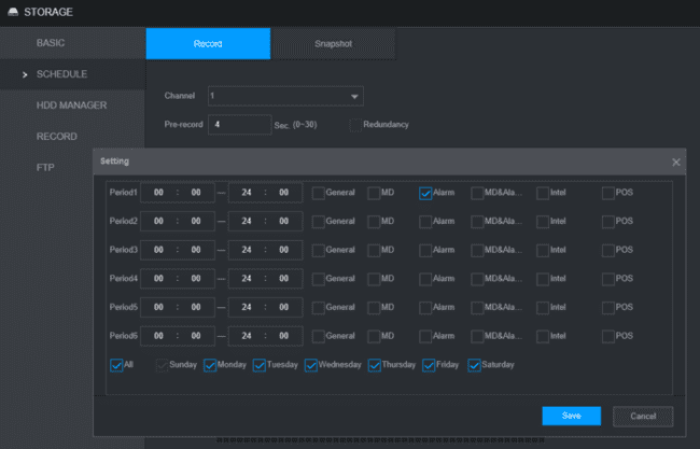
6. You will have options to set a schedule for General Recording, MD (Motion Detection), Alarm, MD & Alarm, Intel, and POS (Point of Sale). For this tutorial we are using General Recording.
7. Here you can see that you are able to set multiple periods. For this tutorial we will only be setting one period. Check the “General” box, then select the day or days you want to scheduled recordings for, and then select “Save”.
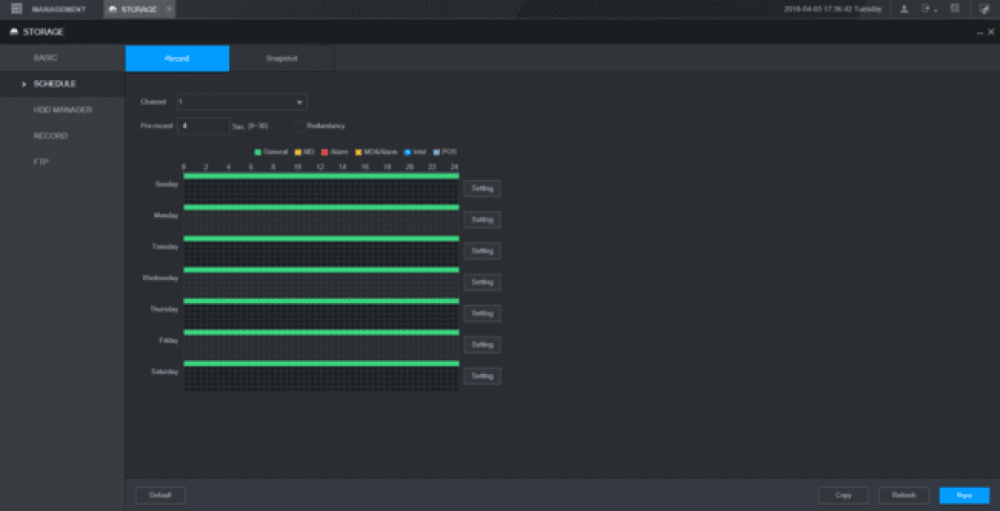
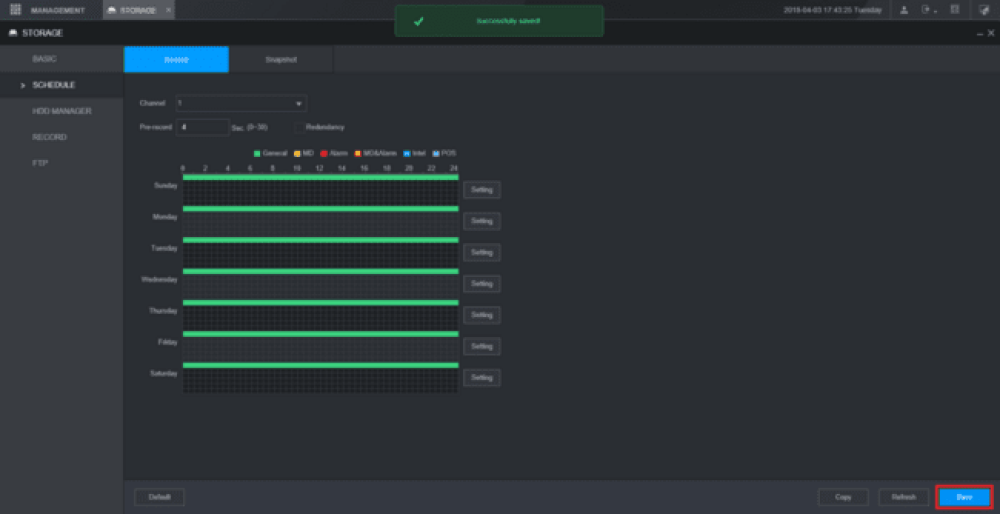
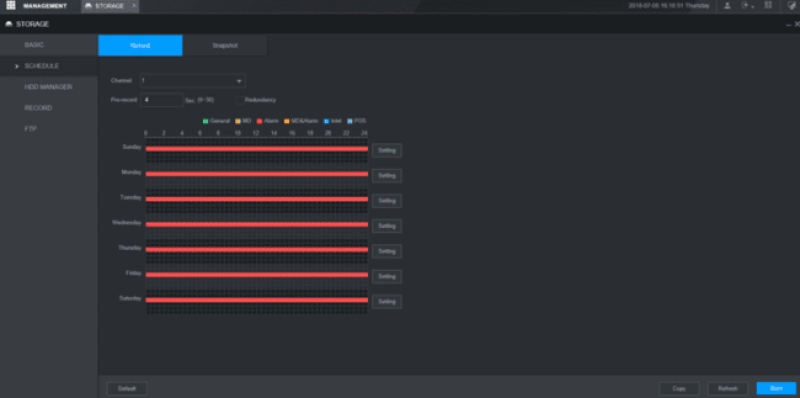
8. Depending on the days selected from the previous step, you will see green colored bars which represents general recording.
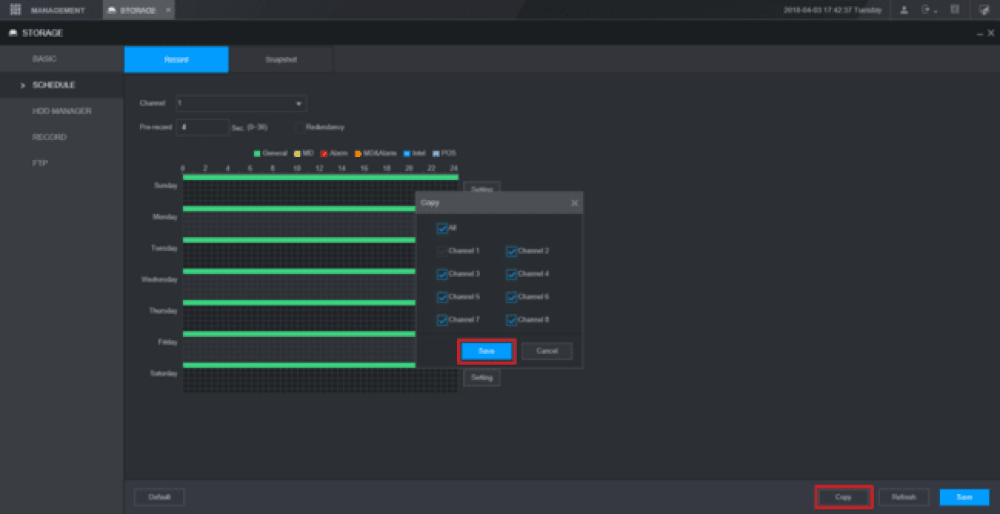
9. You can select “Copy” to mirror the same schedule to another channel/camera. Select “Save” in the Copy menu.
10. Select “Save” at the bottom to save all settings. If your changes were successfully saved, a pop-up will appear at the top notifying you as such.
New GUI – Motion Detection Recording Setup
Description
This article will go over Motion Detection Recording setup in detail on the recorder’s new GUI
Prerequisites
Video Instructions
Step by Step Instructions
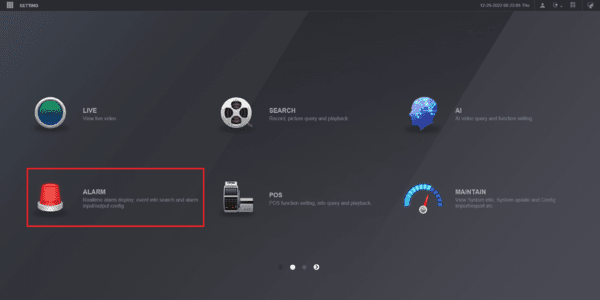
1. On the main menu select Alarm
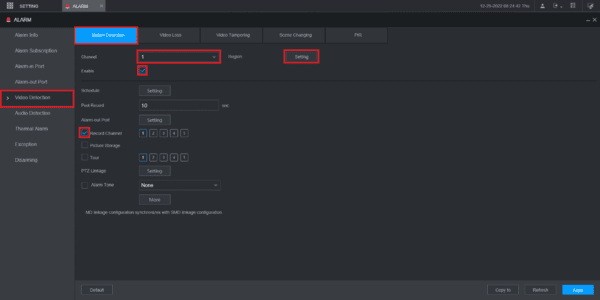
2. Select Video Detection on the left.
Then select the Motion Detection tab at the top.
Choose the channel from the drop-down next to Channel.
Check the box next to Enable.
Check the box next to Record Channel.
Click on Setting next to Region
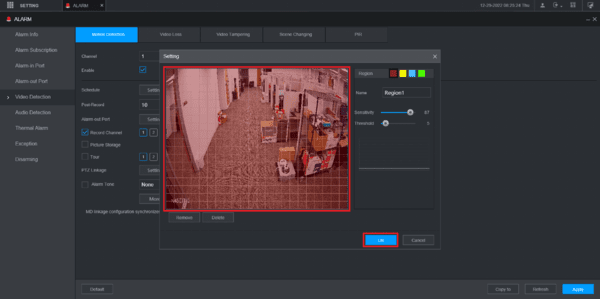
3. Highlight the areas in red where you want to track motion.
Then click OK at the bottom
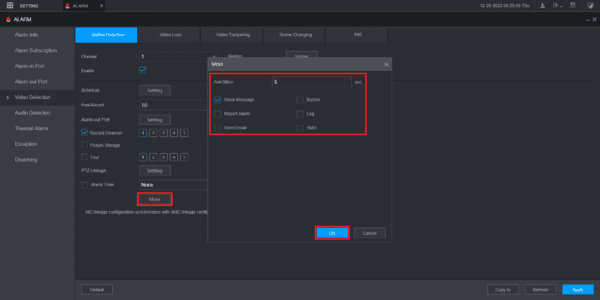
4. Select More at the bottom
Check the boxes next to any of the other options you want to activate when motion is detected.
Click on OK
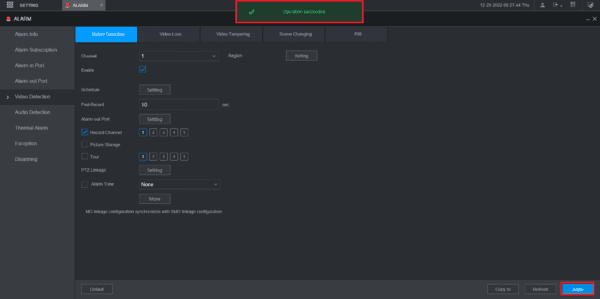
5. Click on Apply at the bottom.
You will see “Operation Succeeded” at the top when your changes have been saved
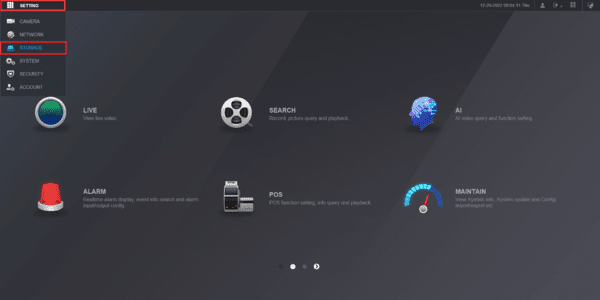
6. Click on the Setting drop-down at the top and select Storage
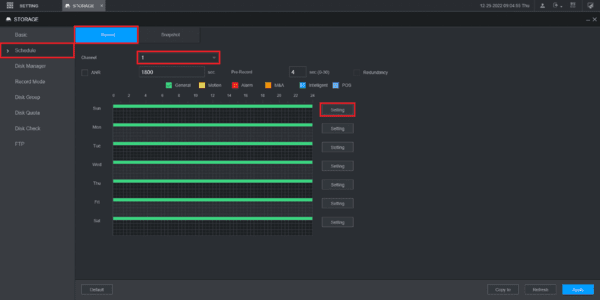
7. Select Schedule on the left.
Then select the Record tab at the top.
Choose the channel from the drop-down next to Channel.
Click on the Setting button next to any day of the week.
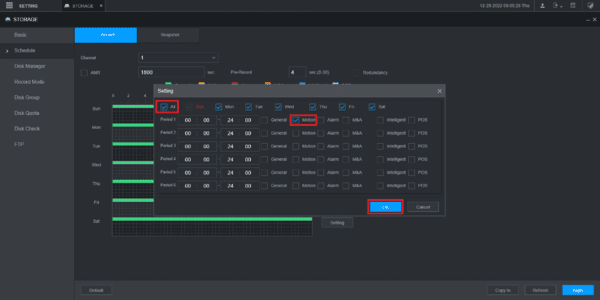
8. Check the All box to enable all days of the week.
Check the Motion box for “Period 1”.
Click OK at the bottom.
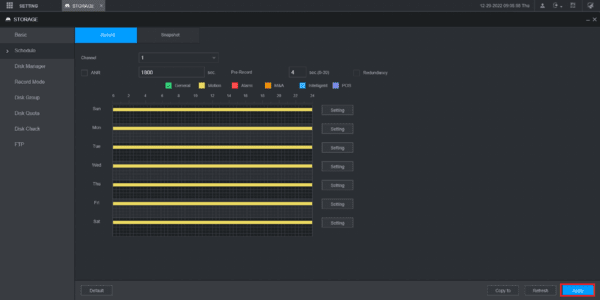
9. Click on Apply at the bottom to save the settings
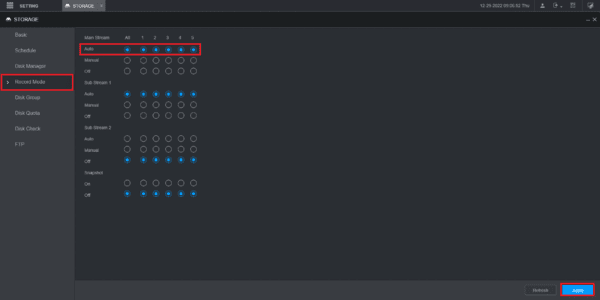
10. Select Record Mode on the left.
Then make sure Auto is enabled for the appropriate channel(s).
Click on Apply at the bottom.
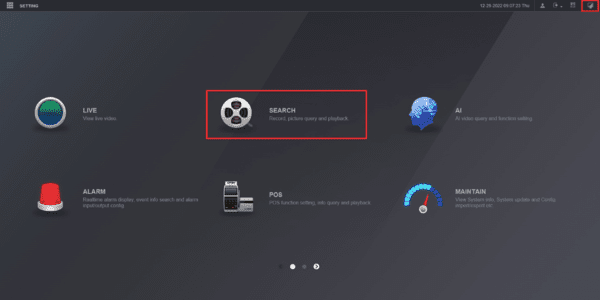
11. Click on the Main Menu icon at the top right.
Then select Search
12. Check box next to the channel on the right.
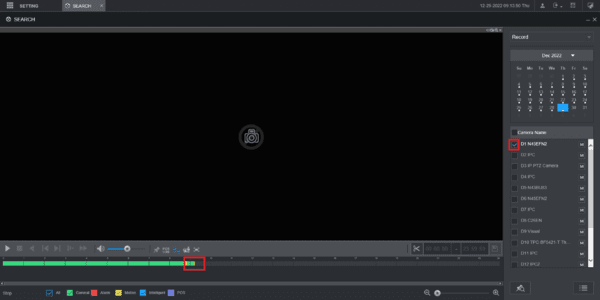
You should see yellow lines/bars for motion recording
Alarm Record Setup
Description
This article is to show you how to setup alarm recording thru new Web GUI.
Note: please refer to product spec sheet for alarm input/output availability. Not all Dahua Recorder support alarm input/output.
Prerequisites
Video Instructions
Step by Step Instructions
Setup Alarm Input
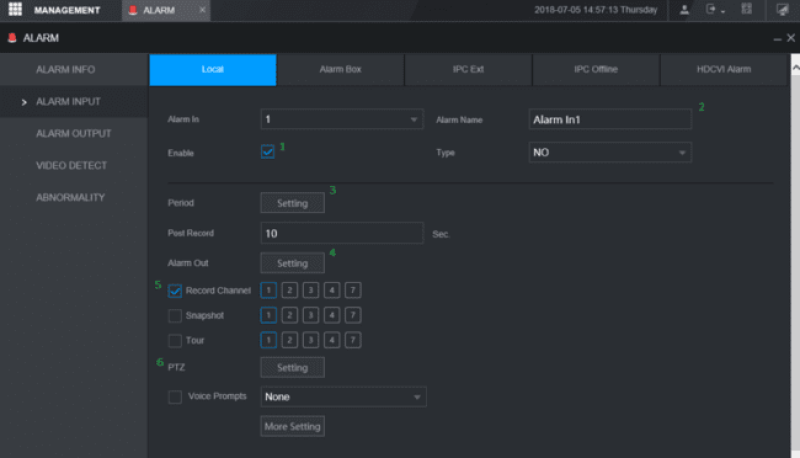
From main menu, click on Alarm. Click on Alarm input. We are using XVR 72 series for this example. The Alarm Input page will launch as shown below:
Select the Alarm input number that you like to use. This number is correspond to the alarm port on the back of recorder.
1. Click Enable to enable the alarm input.
2. Enter Alarm Name. By default is set to AlarmIn#
3. Period is to schedule your Alarm when you want to be enable.
4. With the alarm input, you can trigger recorder’s alarm output.
5. This to select which channel you want recorder to start recording when alarm is triggered.
6. You can call basic PTZ action Preset, Tour, or Pattern when alarm is triggered.
Setup Alarm Recording Schedule
1. From the main menu, click on Management > Storage > Schedule.
2. Select the channel you like to setup.
3. To enable Alarm recording, Click on Setting next to the timeline bar.
4. Set your duration (By default is 24 hour, 00-24). Then select Alarm.
You can select all days to copy the schedule to all week. Click Save.
5. Click Save.
New GUI/Instructions/IVS Record
Description
This article will cover how to configure IVS Recording on a Dahua recorder with the New GUI
Prerequisites
Video Instructions
Step By Step Instructions
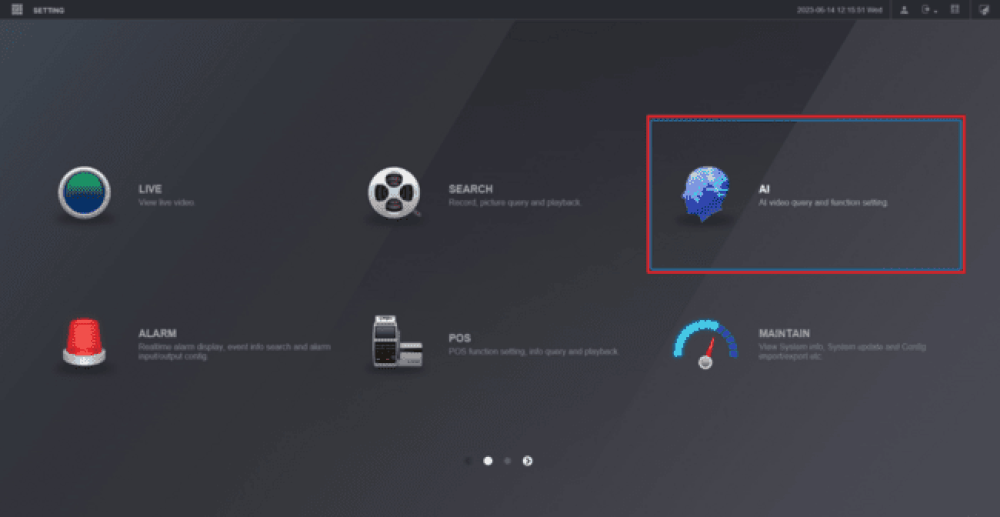
1. From the Main Menu select AI
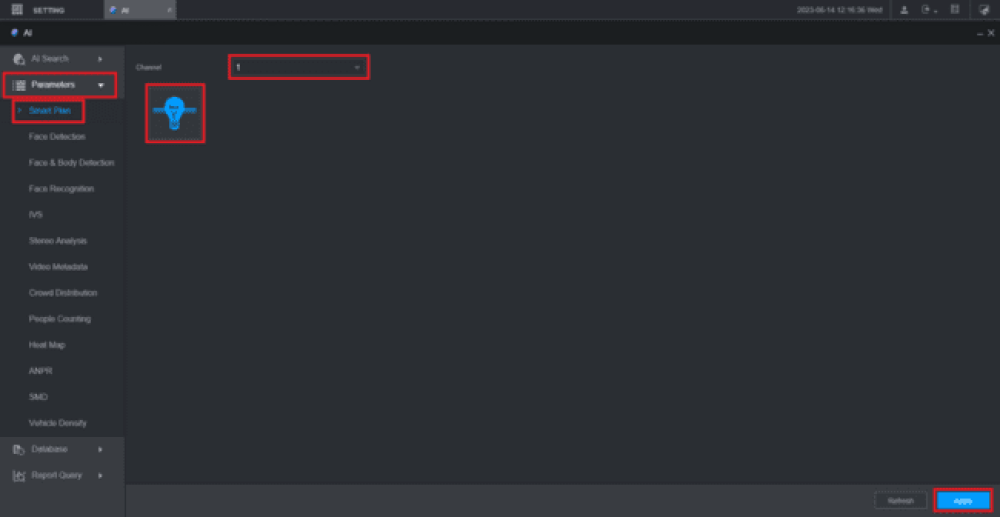
2. Select Parameters on the left.
Then select Smart Plan below it.
Choose the channel of the camera you are configuring from the Channel drop-down.
Select the IVS “Lightbulb” icon so that it highlights blue.
Then click Apply at the bottom
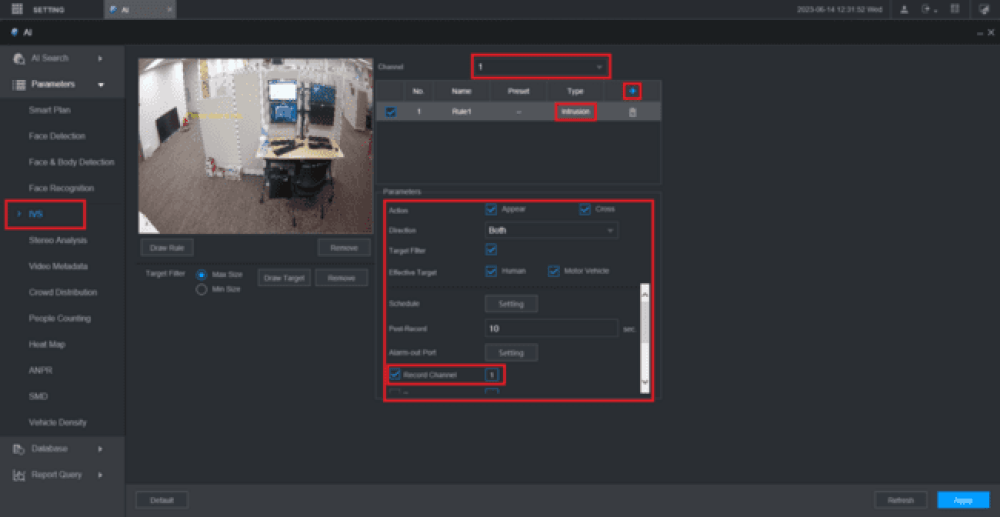
3. Select IVS on the left.
Choose the channel of the camera from the Channel drop-down.
Then click the + button.
Double-click on the rule type under the Type column to choose the type of IVS rule you want to use.
Adjust all the settings in the Parameters section.
Make sure that the box is checked next to Record Channel and the channel that camera is on is highlighted next to it
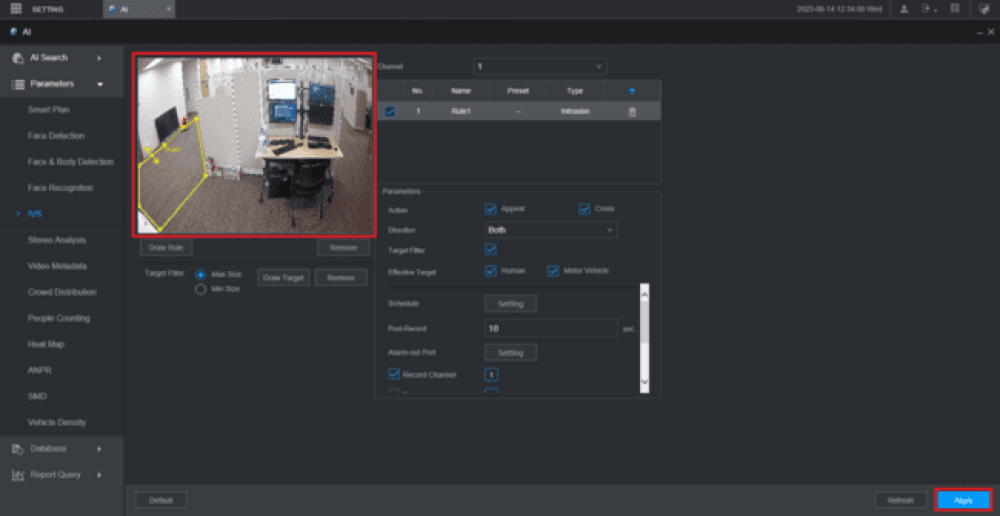
4. Draw the rule in the live view on the left by left clicking on it.
Continue to left click to add more segments.
When you are done, right click to finish drawing the rule.
Then click Apply at the bottom
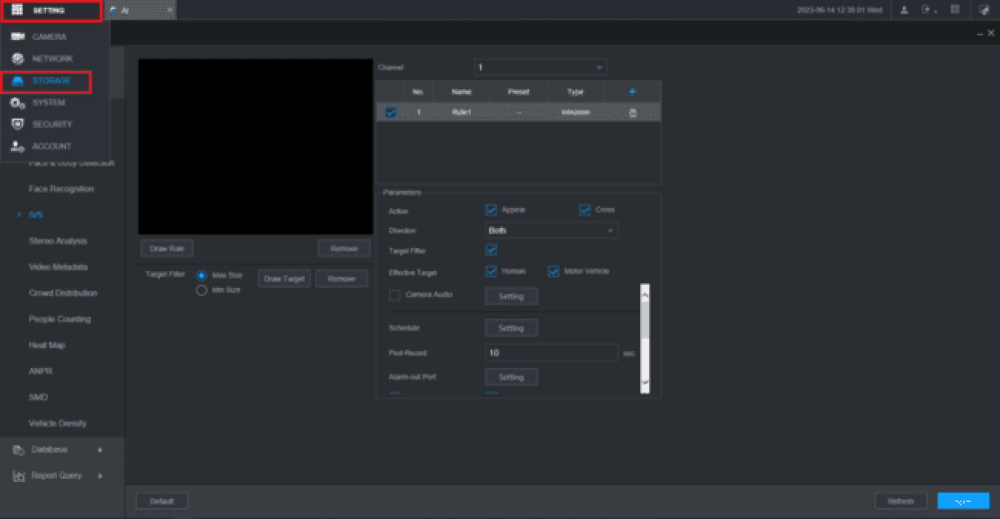
5. Select Setting at the top left.
Then select Storage from the drop-down
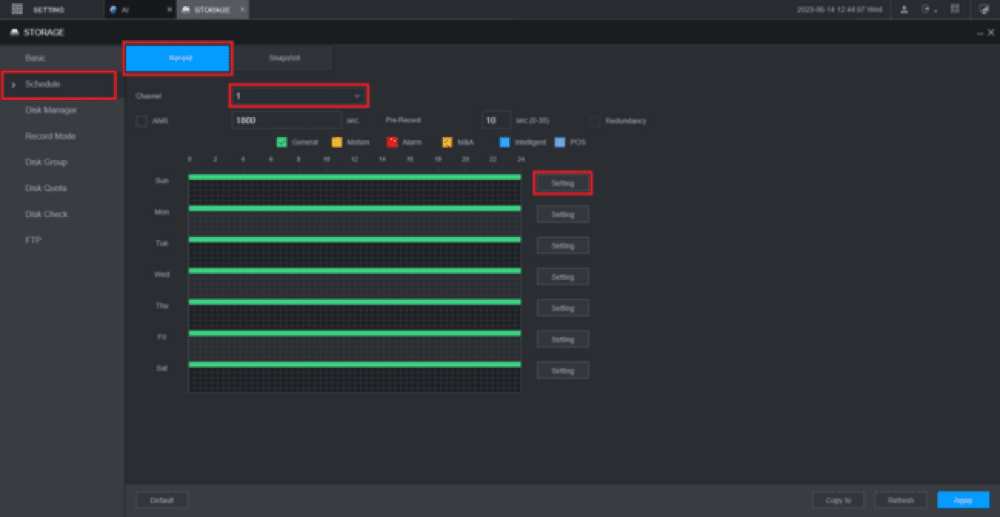
6. Select Schedule on the left.
Then select the Record tab at the top.
Choose the channel of the camera from the Channel drop-down.
Then click on Setting to the right of any day of the week
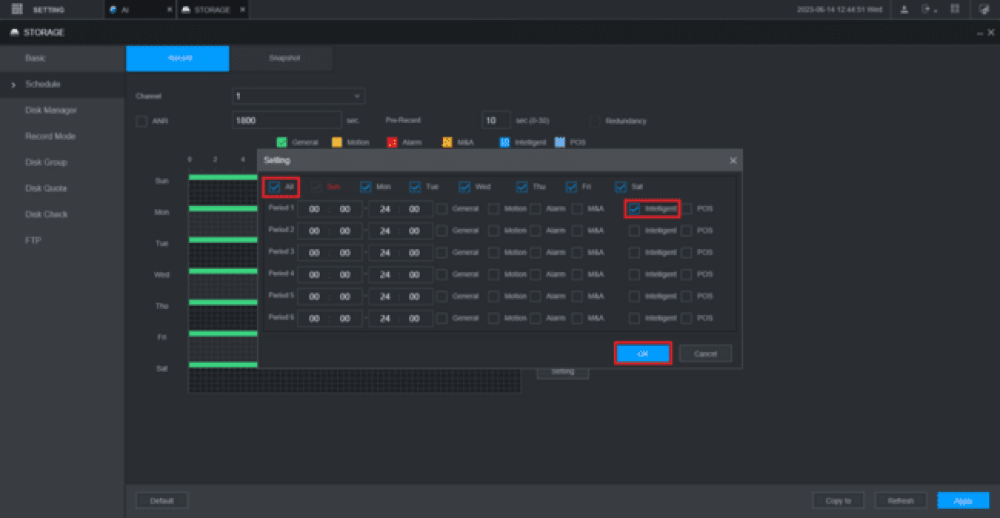
7. Check the box next to All to select all days of the week.
Check the box for Intelligent to the right of Period 1.
(Feel free to adjust the days of the week and the time period for when you want to record IVS events).
Then click on OK
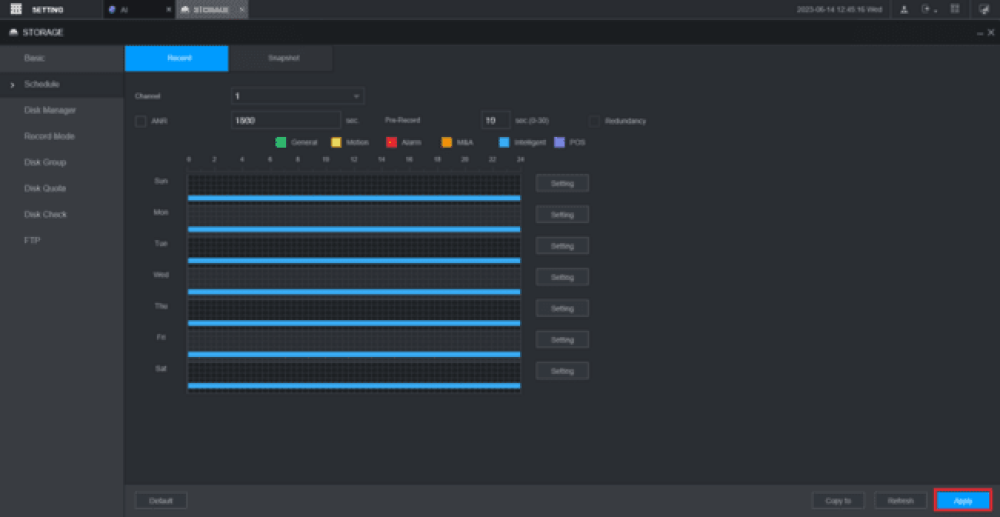
8. You will see blue bars on the schedule representing when IVS events will be recorded, when they are triggered.
Click Apply at the bottom
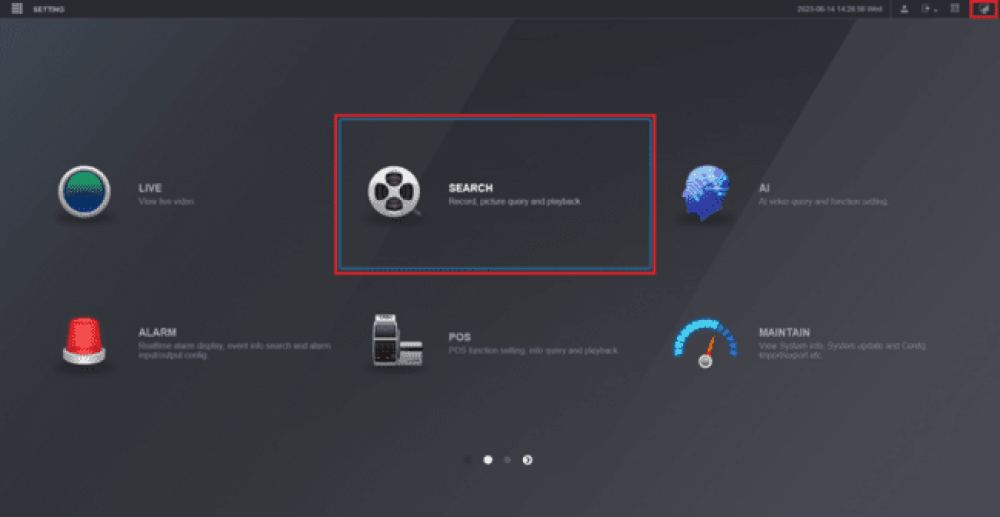
9. Click on the Menu icon at the top right to go back to the Main Menu.
Then click on Search
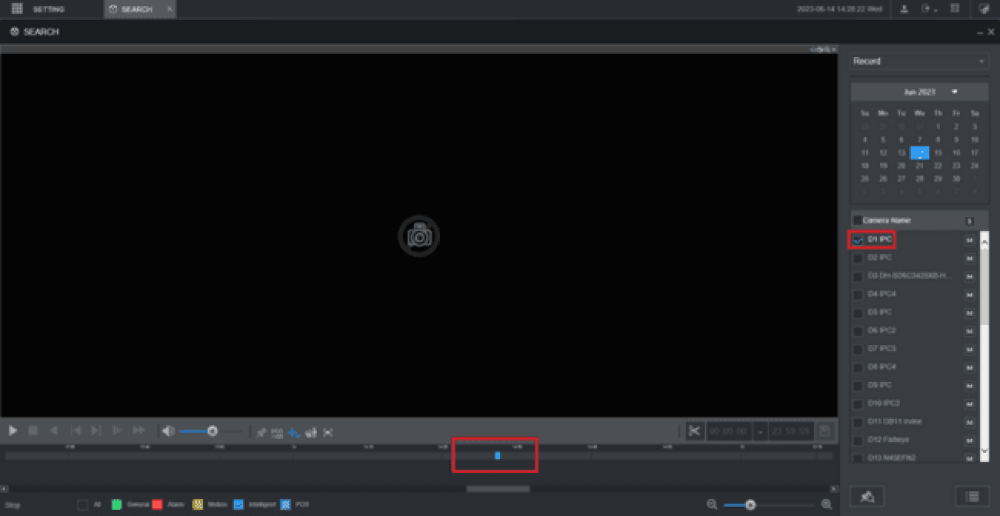
10. Check the box next to the camera channel on the right.
Once IVS events have occured they will appear as blue bars on the timeline at the bottom.
Click on the timeline on one of the blue bars to start playing that IVS event
New GUI – Audio Record Setup
Description
This article will go over setup for audio recording on our New GUI devices
Prerequisites
OR
Note: Please reference the specification sheet for the device to confirm which audio features it supports, this can vary between models of recorder
Video Instructions
Step by Step Instructions
Enable audio source
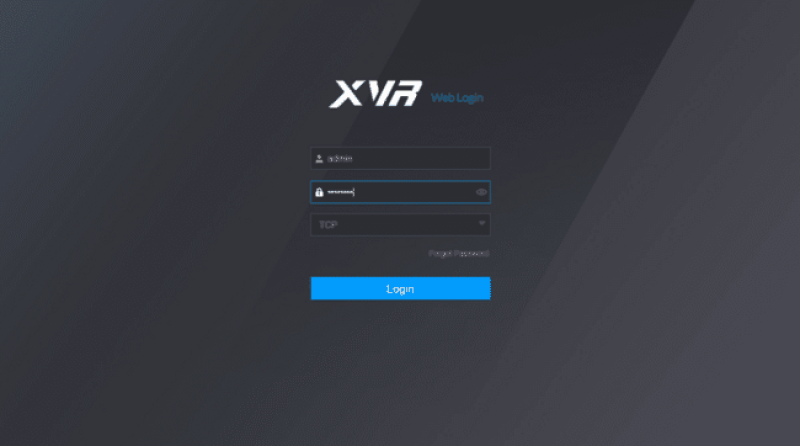
1. 1. Login using a web browser.
2. Click on Setting > Camera.
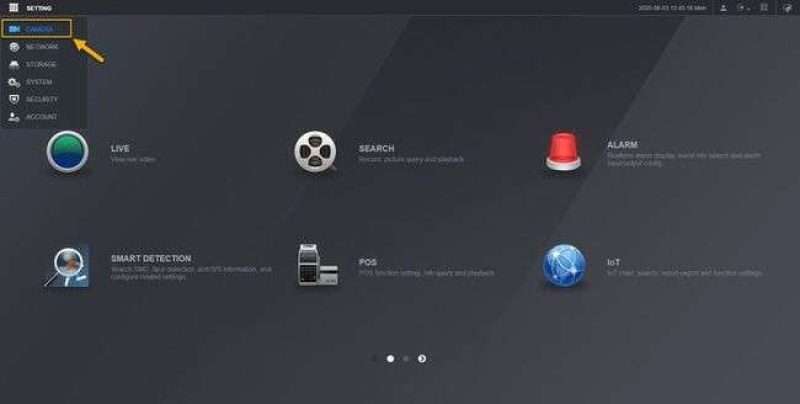
3. Click on Encode. And then select the camera channel that support audio.
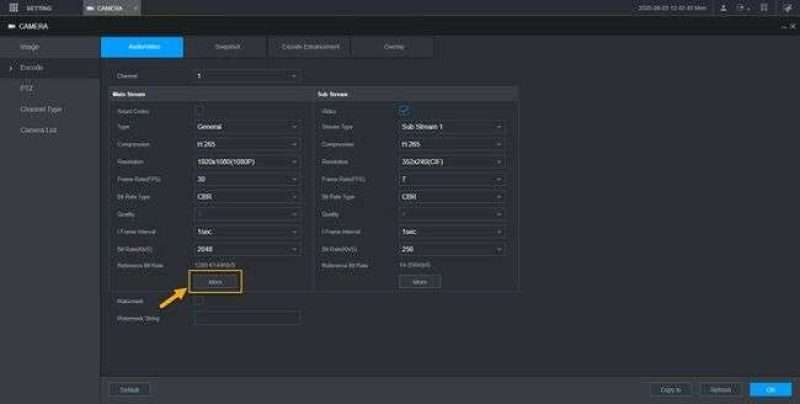
4. Click on More.
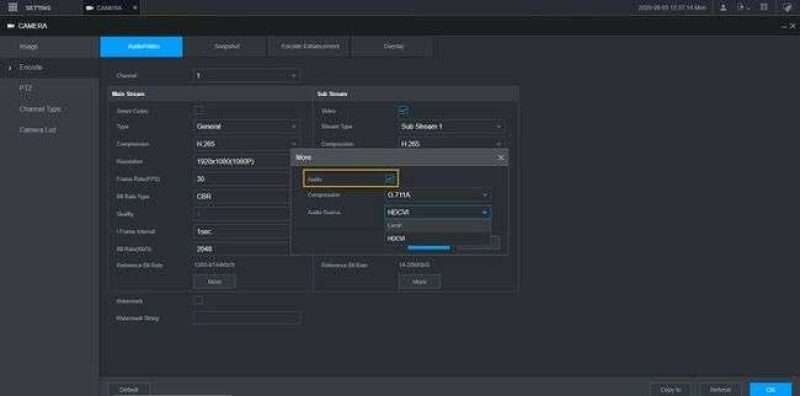
5. Click on the checkmark to enable Audio.
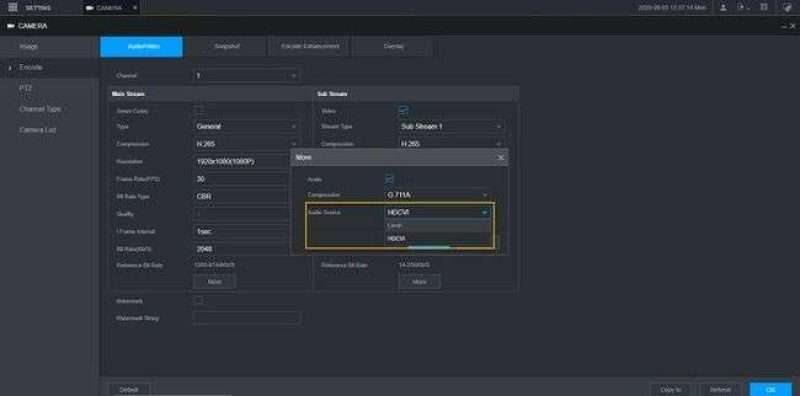
6. Select the Audio source for your HD-CVI camera. If your HD-CVI camera has built-in Microphone, select HDCVI as the audio source. Local option is if you are connecting external microphone to the recorder.
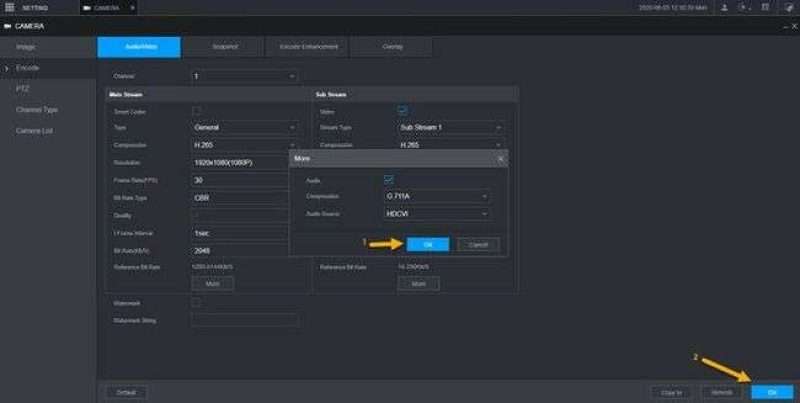
7. Click OK, and then click OK again on the bottom right hand corner.
Setup audio recording
1. Login using a web browser.
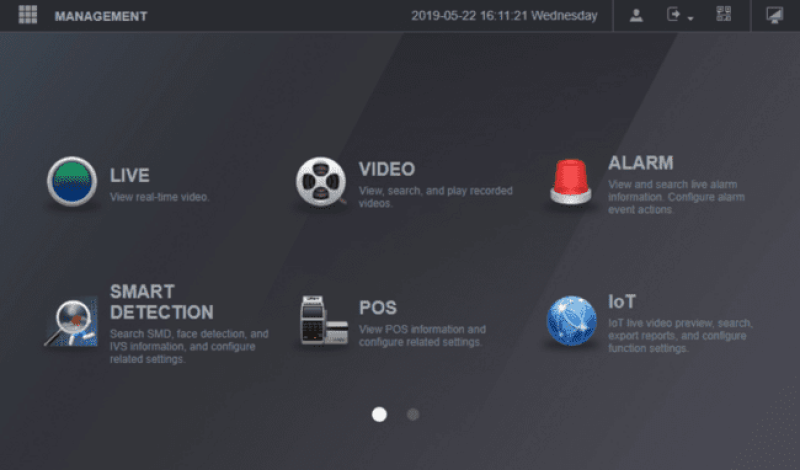
2. Main menu 1st screen.
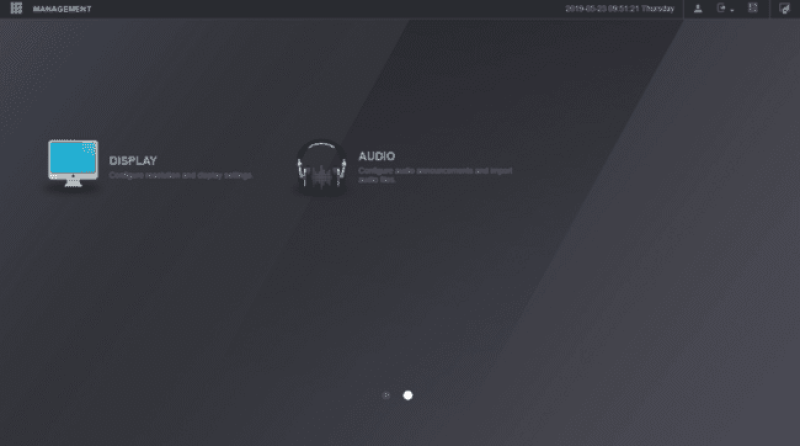
3. Main menu 2nd screen.
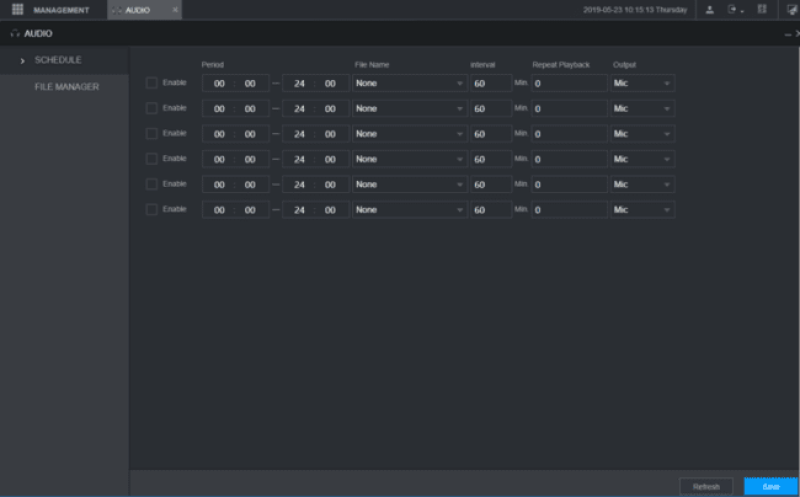
4. Click on the Audio Option.
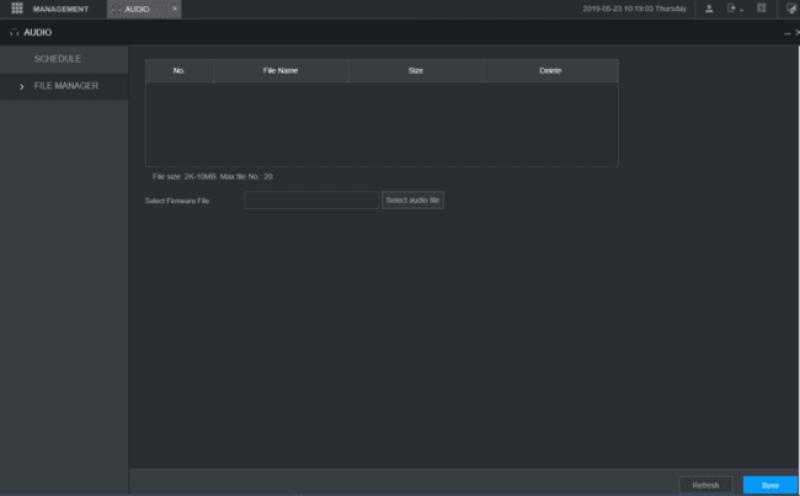
5. Audio File Manager Option.
New GUI – Playback
Description
This article will cover how to play back recorded video on an NVR or DVR with the New GUI
Prerequisites
Video Instructions
Step by Step Instructions
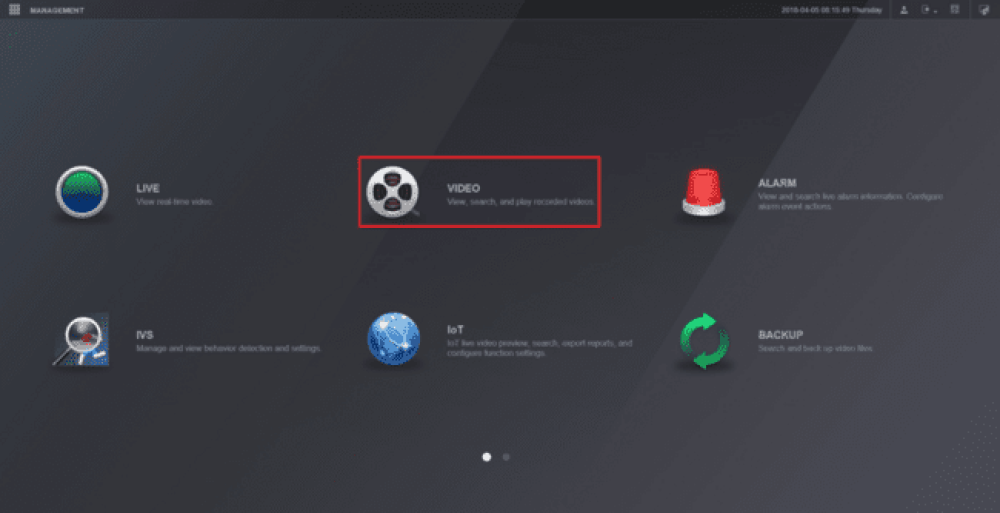
1. From the Main Menu select “Video”
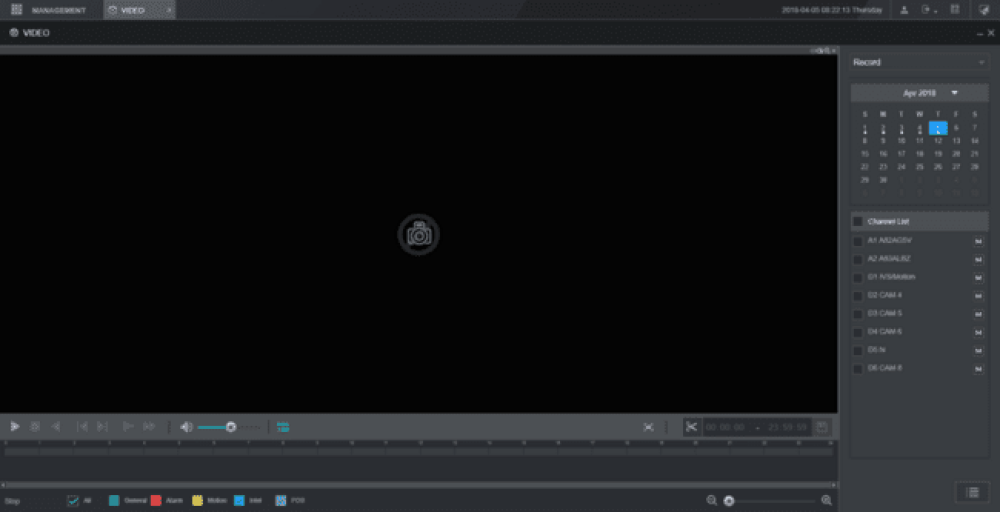
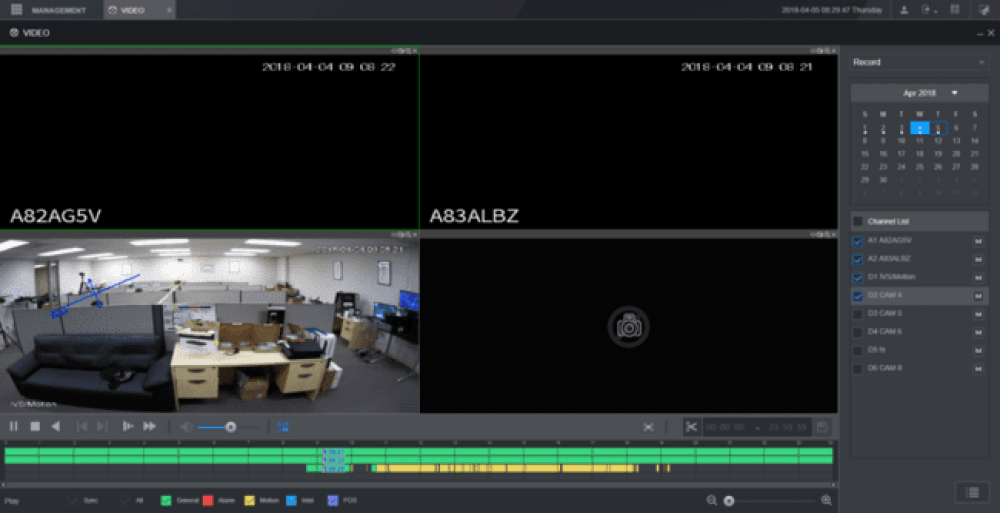
2. The Playback menu should open up and look like this:
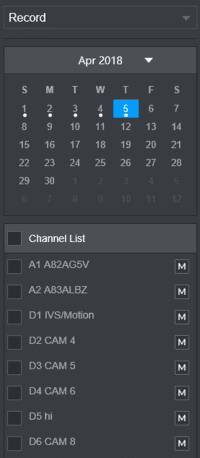
3. On the right hand side, there will be a calendar. Select the day that you wish to play back video.
Below the calendar is a list of all the cameras/channels. Check the box next to all the cammeras/channels you would like to play back video from.
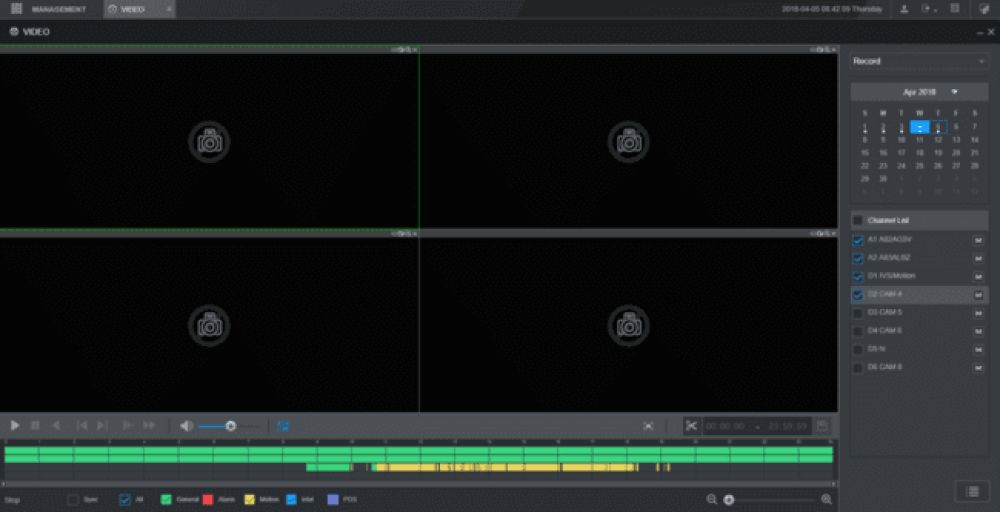
4. The video footage willl appear on the timeline at the bottom of the screen. It will be color coded to match the types of video that were recorded.
(See the Legend at the bottom of the screen.)
5. Check or uncheck each type of recording that you want to view. Check the Sync box if you would like to sync playback up on all channels you are viewing.
6. Double click on the graph at the bottom to begin playing back video.
=How to back up video files on new UI
Description
This article is to show you how to back up the video file from new system UI.
Prerequisites
Video Instructions
Step by Step Instructions
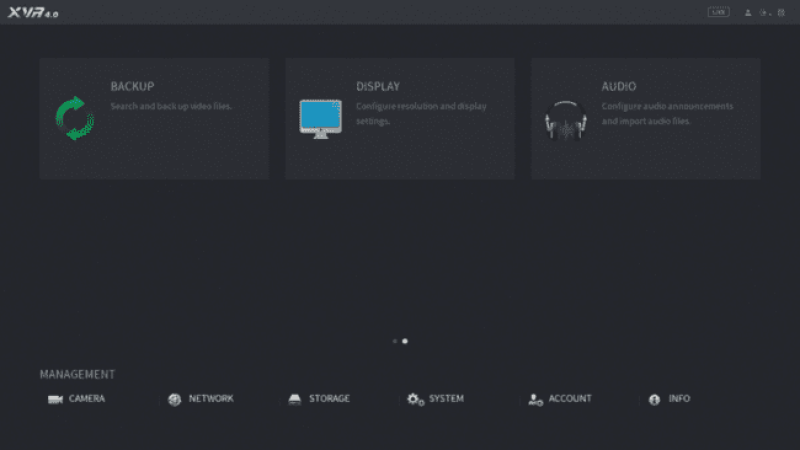
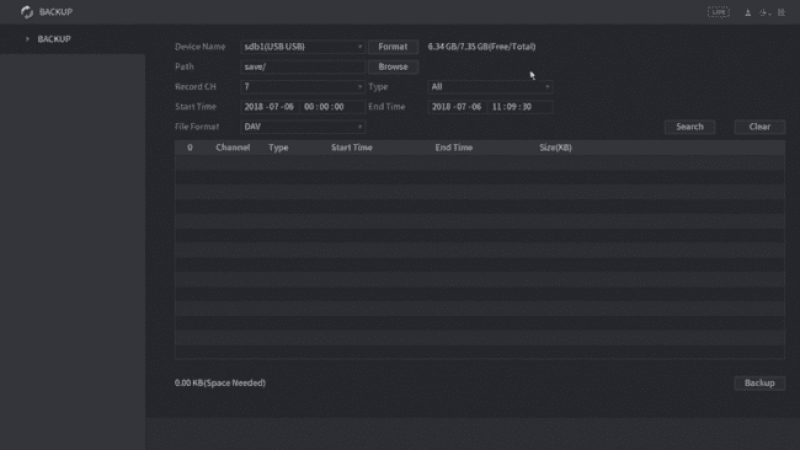
1. From the main menu, go to the second menu page, and click on Backup.
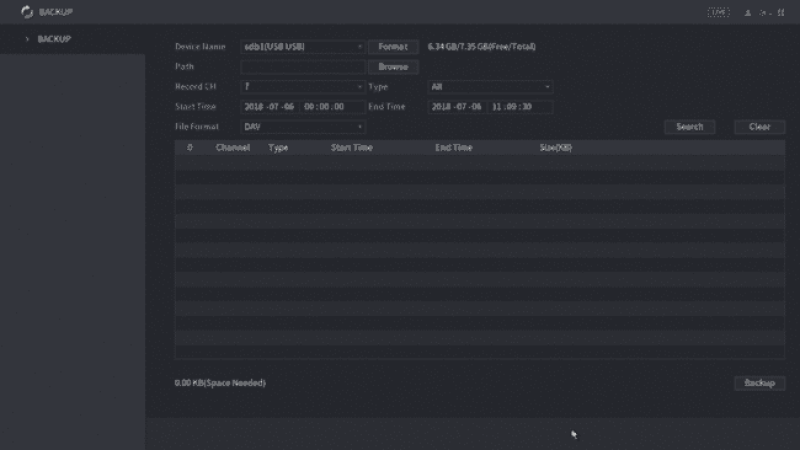
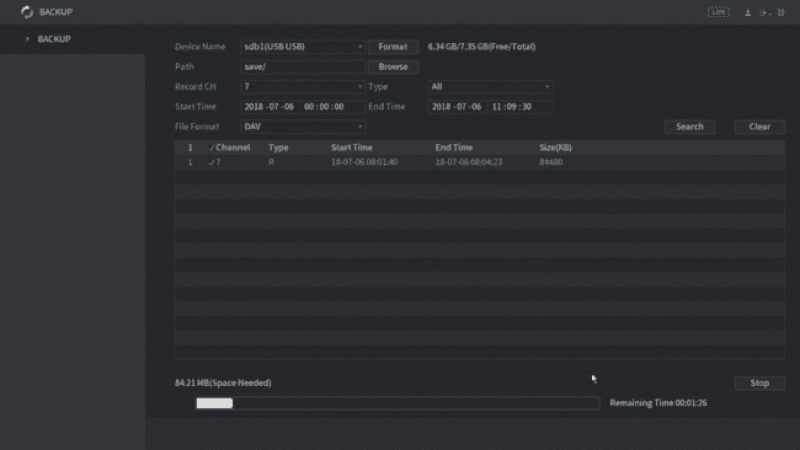
2. Backup page will launch as shown below:
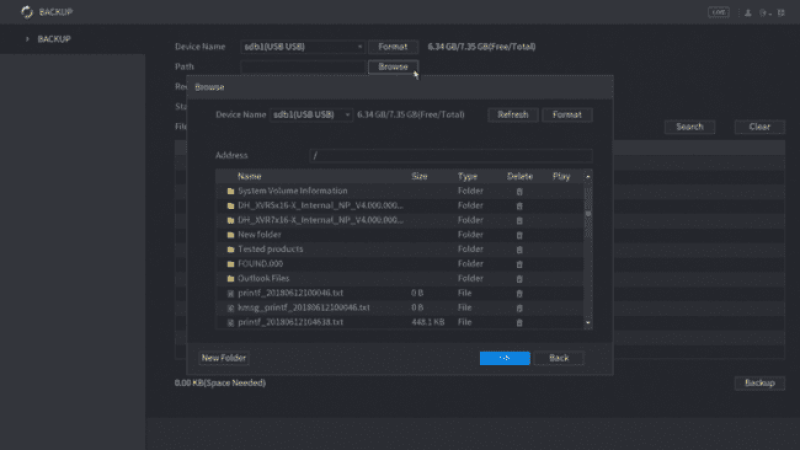
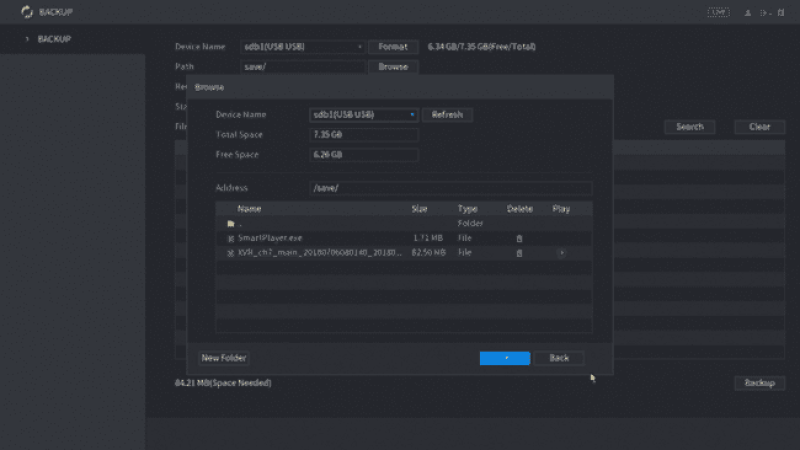
3. You must plug in an external drive to save your downloaded file. Select the path where you want to save the file at. From this pop-up screen, you have an option to create new folder. After you select, click OK.
4. Select the Record Channel you like to search. You can only search 1 channel at a time.
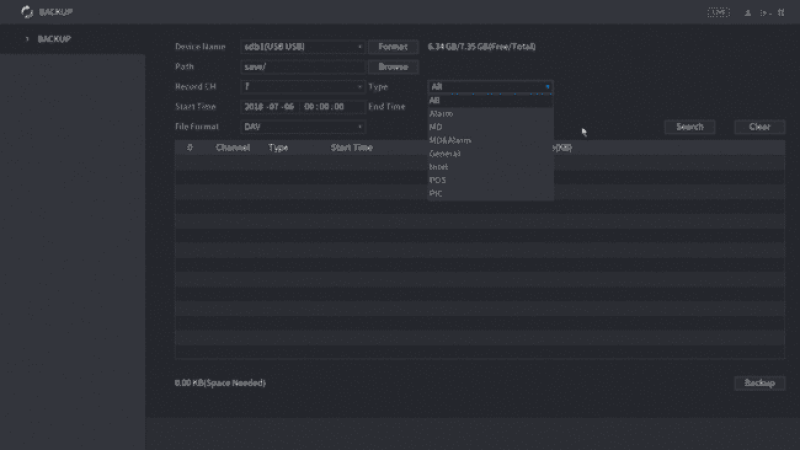
5. Select the Recording Type you like to search.
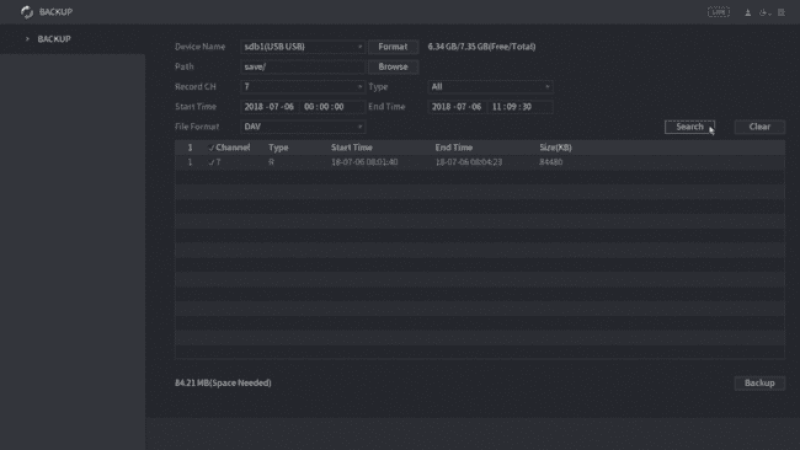
6. Set the start and end time for searching. Then click Search. All recorded files that meets your search criteria will shown on the list.
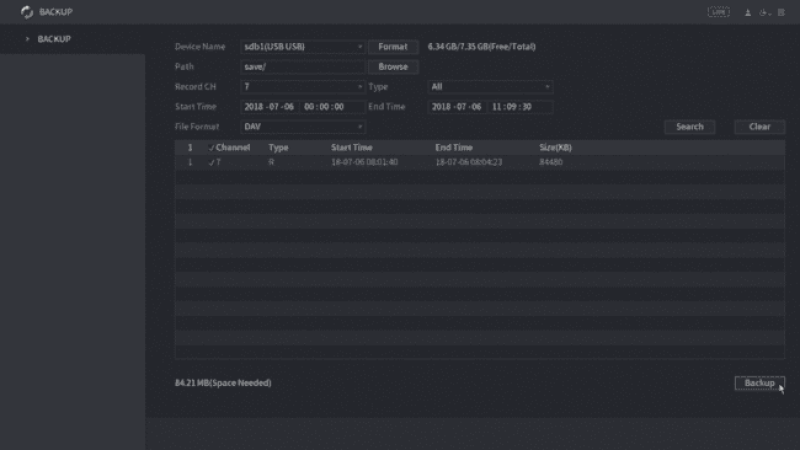
7. Select the files, and click Backup.
8. Downloading process start.
9. Once finished, the folder information will pop up, then click OK.
New GUI – P2P Setup
Description
This article will go over initializing P2P on our New GUI devices
Prerequisites
Video Instructions
Step by Step Instructions
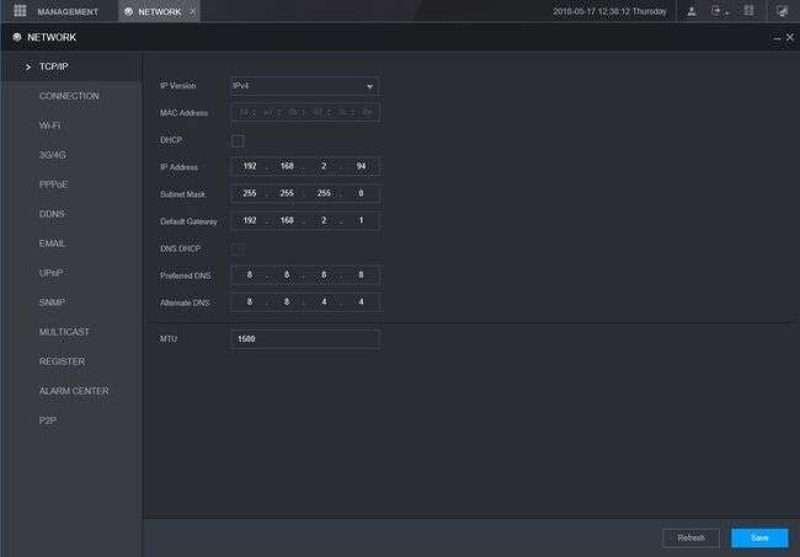
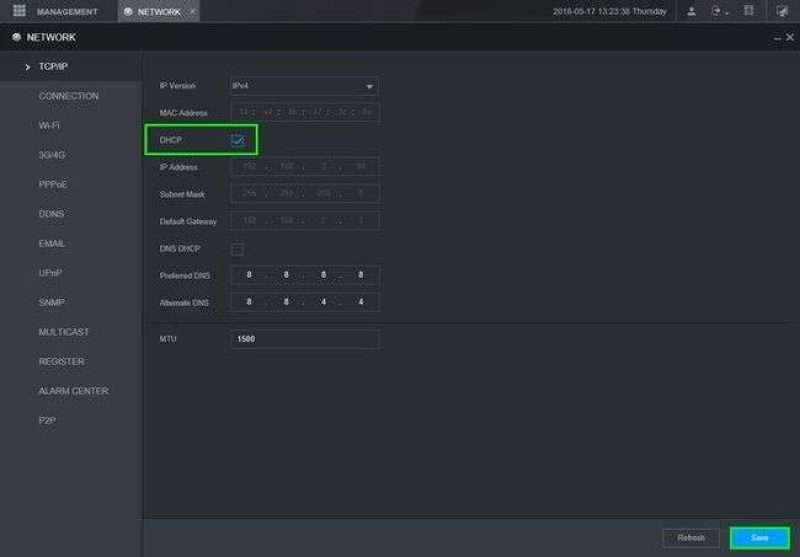
1. Under “Management” go to Network>TCP/IP
2. You can either set the device on a static ip or turn DHCP on to automatically grab an IP from the network. Save any changes
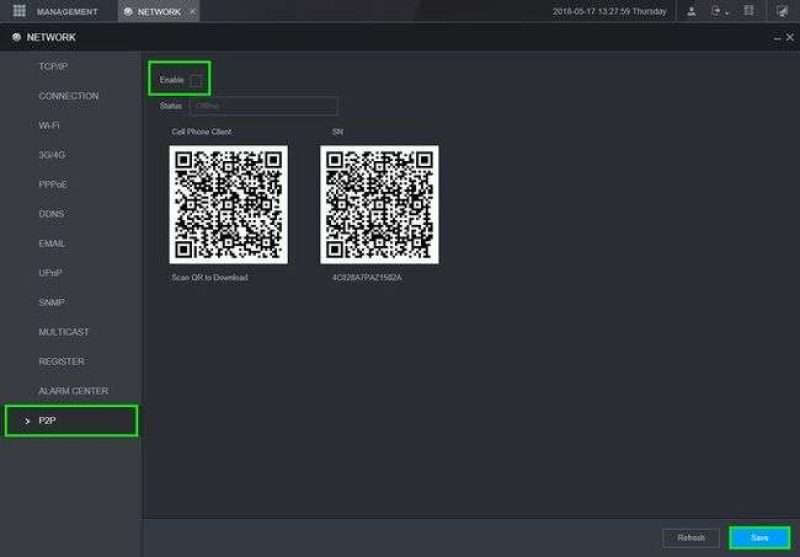
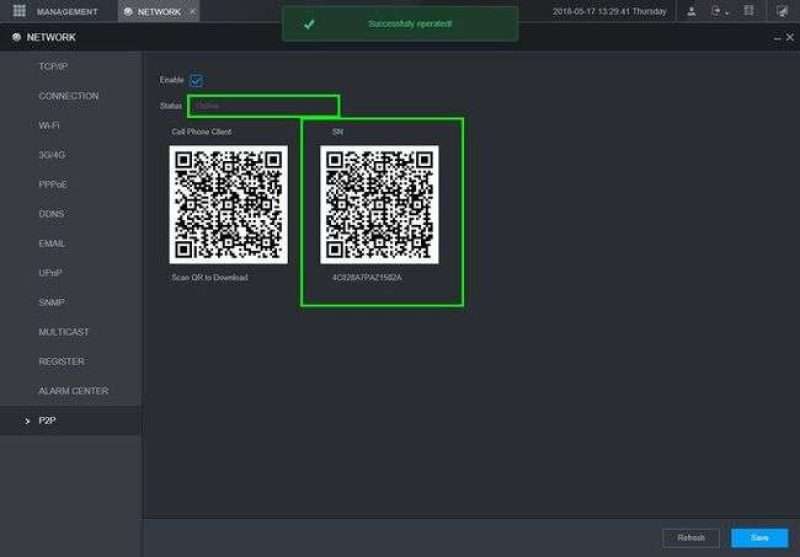
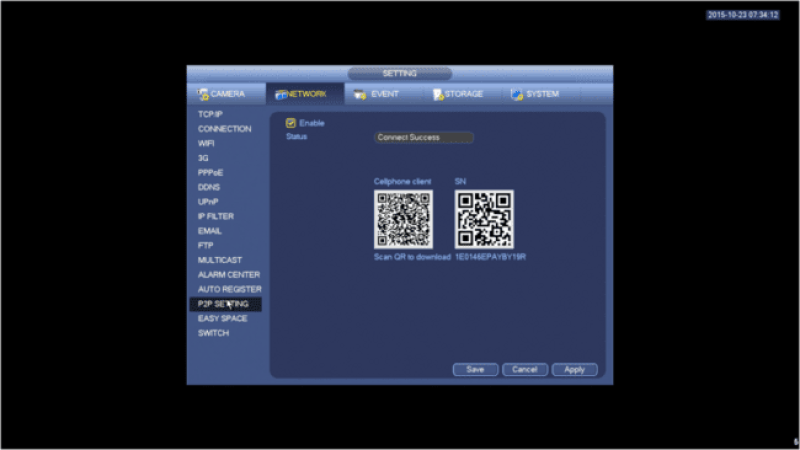
3. Locate P2P tab on the lower left and enable P2P
4. After saving it you should see the the status change to “Online”, You can now use this device for remote viewing on our software
Remote Access/Remote Access Setup Port Forwarding
Create port forwarding rule in the router
Description
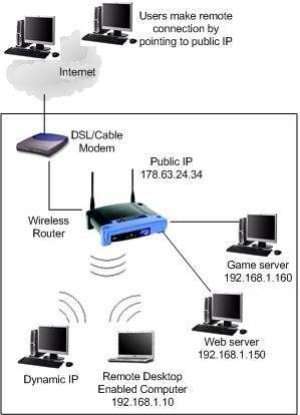
Port forwarding is a function of network routers that allows a user to configure specific communication ports to be routed to devices on an IP (Internet Protocol) network, such as a computer, DVR, or IP camera.In this case for CCTV equipment, it allows the user to view and control CCTV equipment remotely. Follow the step by step instructions and the instructions your manufacturers hardware to setup port forwarding, or try PortForward.com to search for your routers settings.
Prerequisites
Video Instructions
Step by Step Instructions
1. Connect NVR to network with a CAT5 cable.
2. Download and install ConfigTool from DahuaSecurity.com, under Support->Download Center->Software
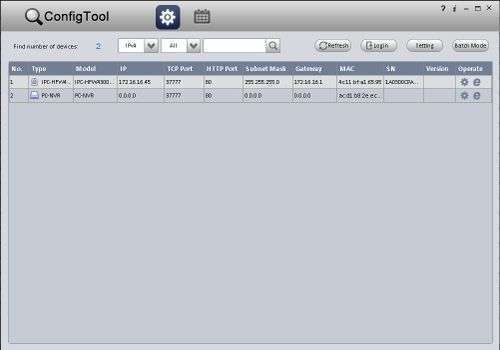
3. Run the ConfigTool.
4. The ConfigTool should display your IP Camera. Click the, “![]() ” icon to open Internet Explorer and access your NVR.
” icon to open Internet Explorer and access your NVR.
5. Configure Internet Explorer security settings to allow the plugs to work. Link to Internet Explorer Setup
6. Login with the default credentials: User Name: admin Passsword: admin
7. Under, Main Menu -> Setup -> TCP/IP Change the IP Camera to, “Static” if the camera is currently set to, “DHCP”
8. Open another tab and enter the, “Gateway” address listed under your NVR’s Network settings. Example: 192.168.1.1, 192.168.0.1, 10.0.10.1
9. Login to your gateway and locate the, “Port Forwarding” section.
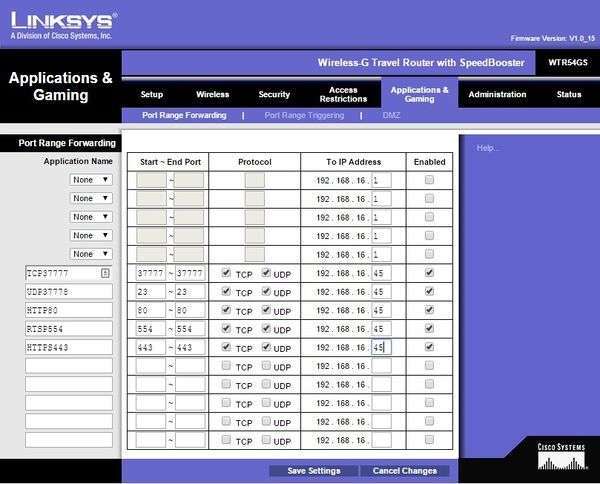
10. Create port forwarding rules for each port you wish to forward for the NVR. (Usually you will only need to forward the HTTP and the TCP port.) Default Ports: TCP: 37777 UDP: 37778 HTTP: 80 RTSP: 554 HTTPS: 443
11. The end result should look like the below image. We used a Cisco router for this example.
12. Hit, “Save” in the gateway interface, and open another tab.
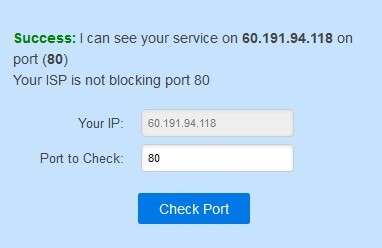
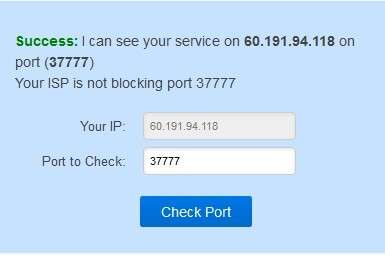
13. Go to, “www.canyouseeme.org” and check that the ports you opened on the gateway.
How to Access System Using P2P via Mobile Application
Description
View your recorder and cameras on the go. With Dahua’s mobile application IDMSS(IOS)/GDMSS(Android) allows you to add Dahua recorders and cameras to the mobile app using P2P.
Prerequisites
Video Instructions IDMSS/GDMSS version 4.50.000
Step by Step Instructions iDMSS/gDMSS version 4.50.000
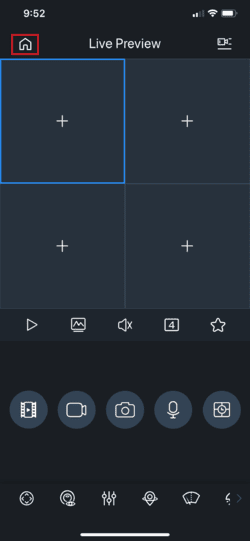
1. Open iDMSS/gDMSS on the phone, and select the home icon located on the top left corner.
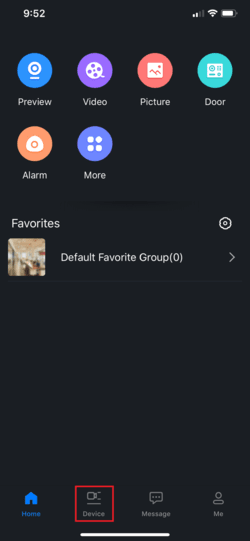
2. Select the “Device” button/icon on the bottom to add the recorder/camera.
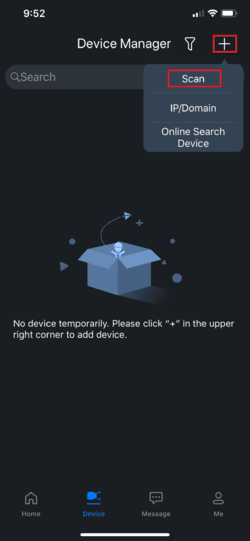
3. Select the “+” sign then select “Scan” to add the device.
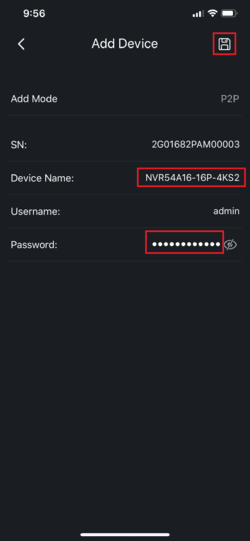
5. Input the device for easy identification. It’s required to input the password for the added device then select the save icon located on the top right corner.
Step by Step Instructions IDMSS/GDMSS version 4.20.000
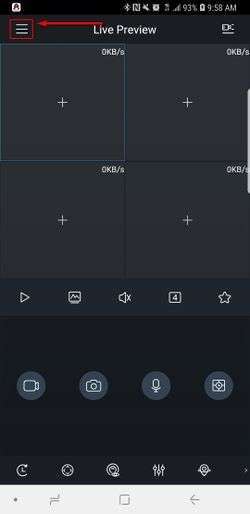
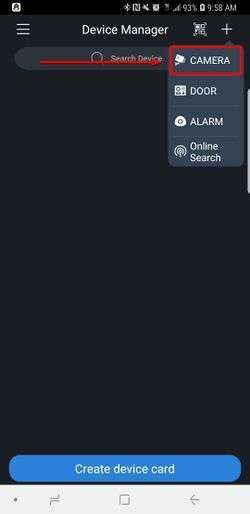
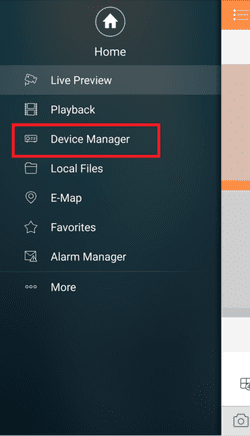
1. Select the Menu Icon
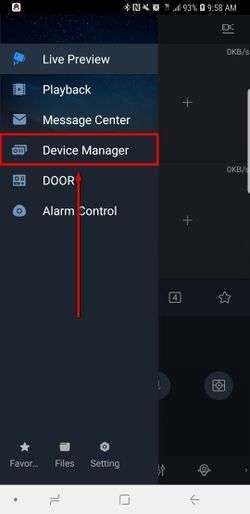
2. Select “Device Manager”
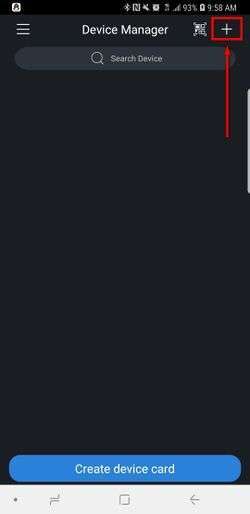
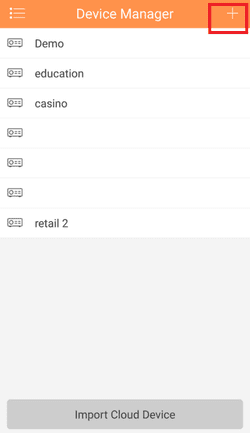
3. Select the Add Icon
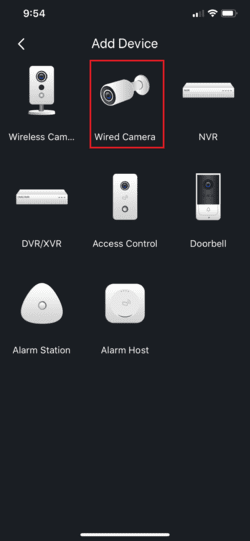
4. Select “Camera”
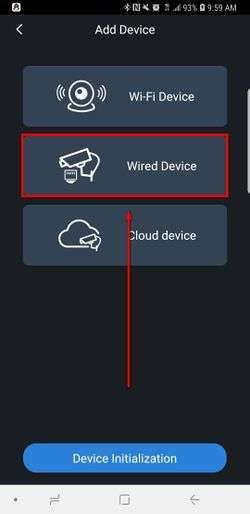
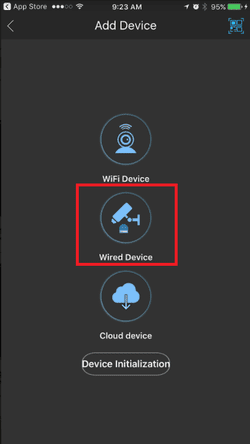
5. Select “Wired Device”
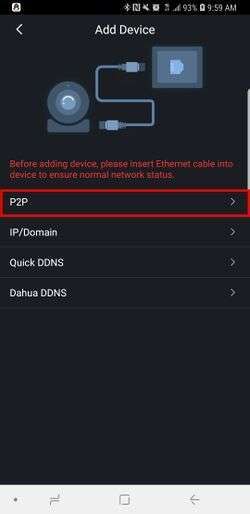
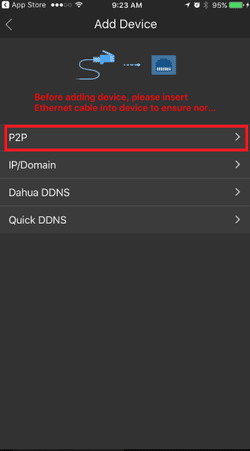
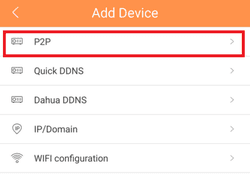
6. Select “P2P”
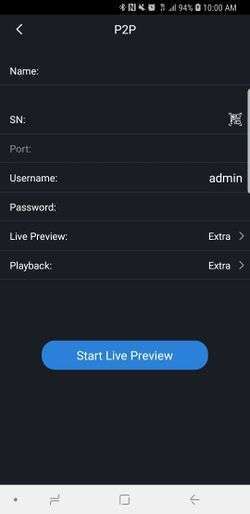
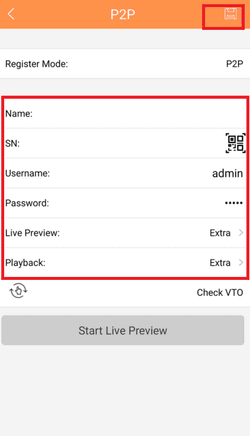
7. Input Info and select “Start Live Preview”
Video Instructions IDMSS/GDMSS version 3.50.000
Step by Step Instructions IDMSS/GDMSS version 3.50.000
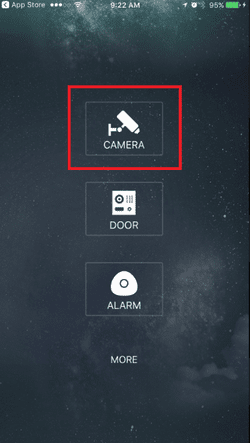
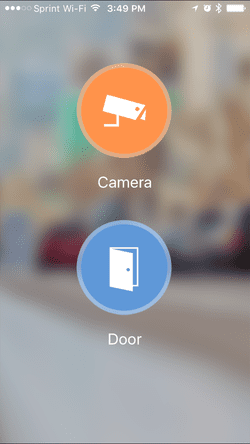
1. From the home screen of the mobile application select “Camera”.
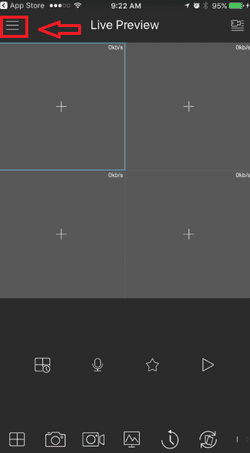
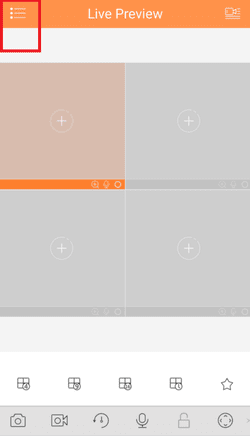
2. Select the menu button.
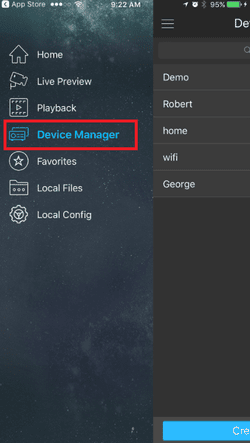
3. Select Device Manager.
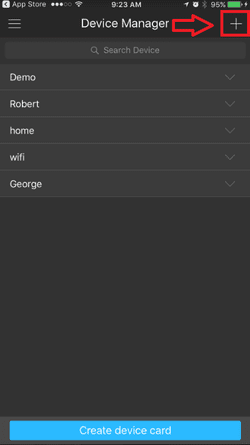
4. Select add button to add device.
5. Select Wired Device.
6. Select P2P.
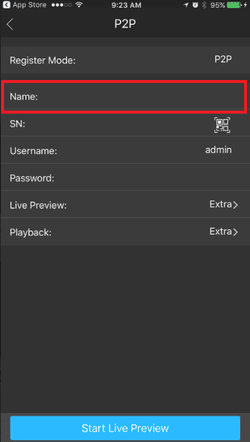
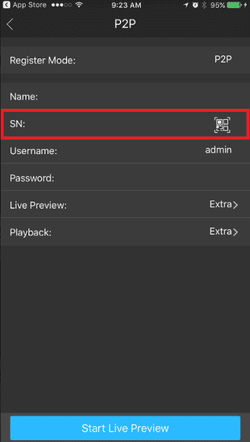
7. Name your device -> tap the QR code to bring up QR code scanner.
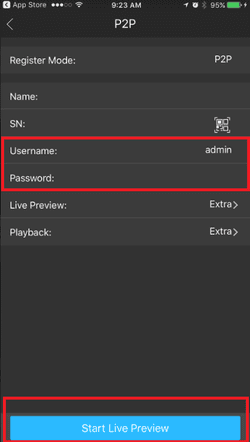
8. Input the username -> password -> and select live preview. By selecting “Start live preview” device will be automatically saved into the application.
IDMSS/GDMSS Version 3.40.003
Video Instructions Version 3.40.003
Step by Step Instructions Version 3.40.003
1. Click, “Camera”
2. Select the Menu Icon
3. Select “Device Manager”
4. Select the Add Icon
5. Select “P2P”
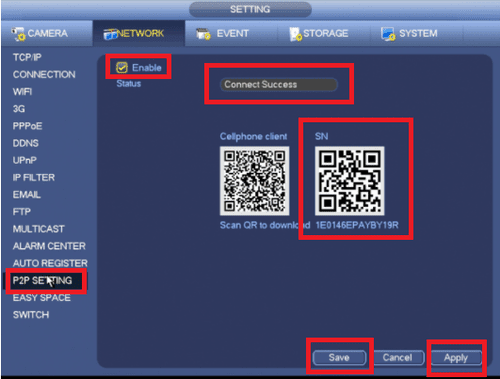
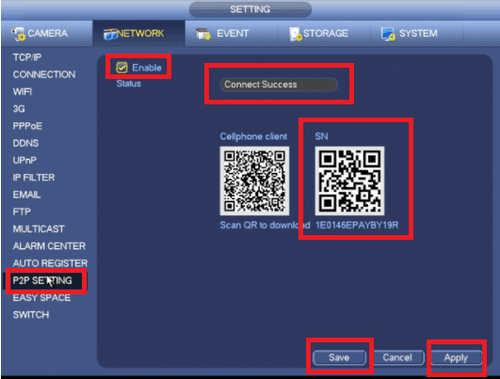
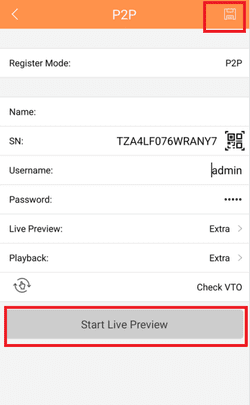
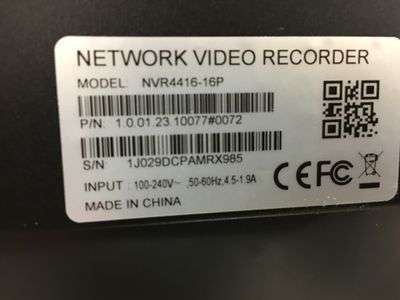
6. Choose a name for the device → Scan in QR code for SN number which you can access from the physical recorder under the main menu → Setting → Network → P2P. You may input SN number manually which can also be found under the recorder. → Enter Username and Password. For best results , leave Live Preview and Playback on the Extra Stream.
7. Select the Disk Icon to save → Select Live Preview, At which time the app will connect to all cameras.
Setup Remote Access via P2P using SmartPSS
Description
This allows you to view cameras on SmartPSS using P2P.
Prerequisites
Video Instructions
Step by Step Instructions
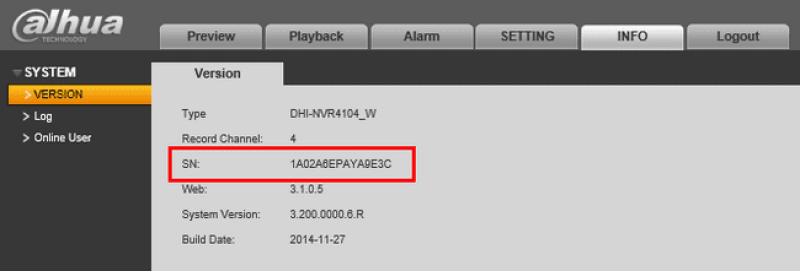
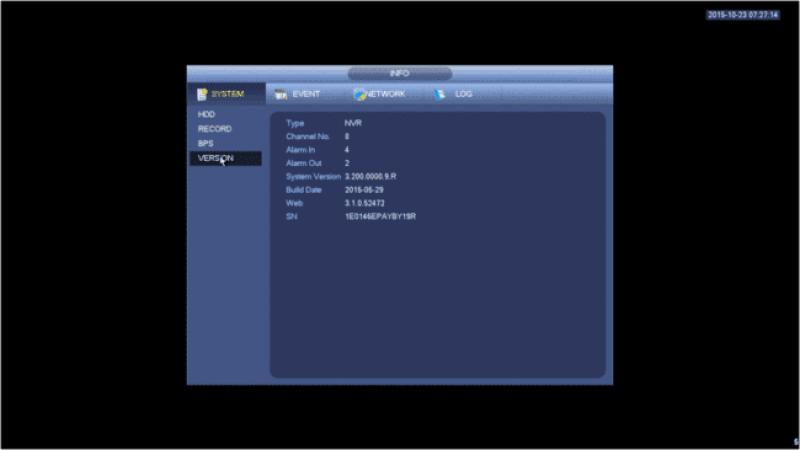
1. Locate the serial number of your NVR or DVR. The serial number can be found at the following locations:
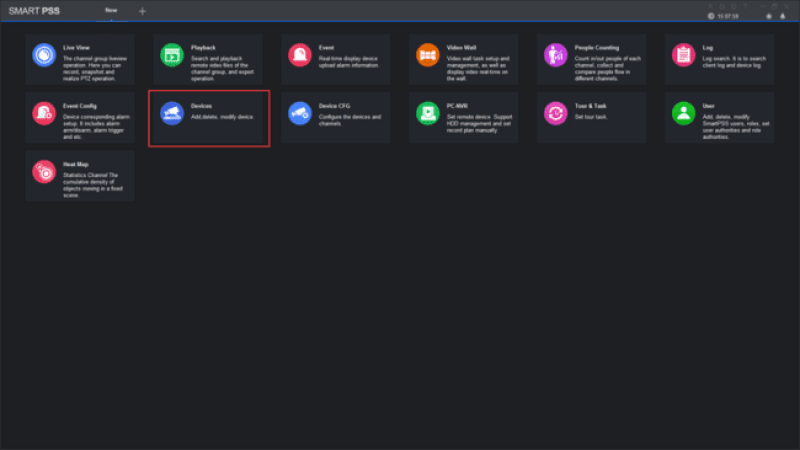
2. Launch SmartPSS and select Device.
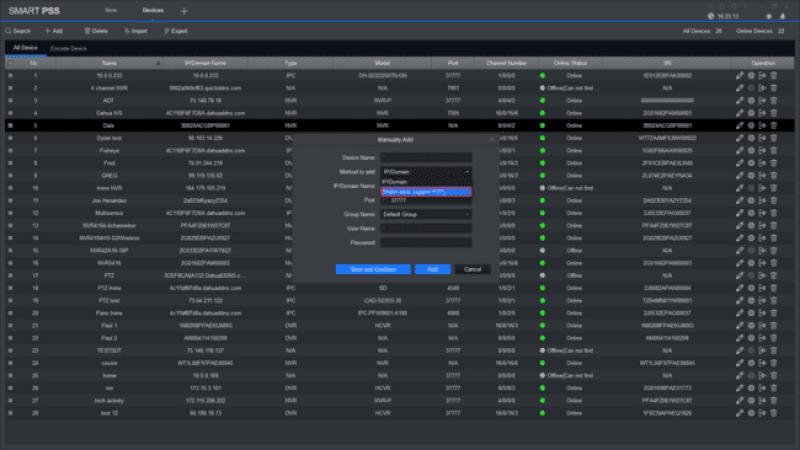
3. Click Add, change method to P2P.
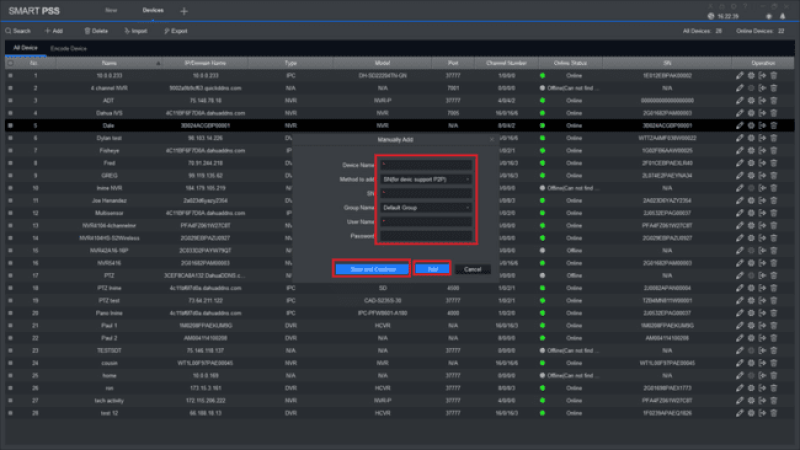
4. Enter credentials, save and then add.
