How to Setup iCSee cameras all models
iCsee – How to reset the camera
1. Power on the camera, the red indicator light will lit up.

2. Using a pin to hold on press the reset button for 10 seconds until you hear the voice:
Restore factory settings, pls don’t power up. And the red indicator light will flash which indicator the camera is ready to connect to the phone app.


How to View the Camera on Your Phone by Wave Sound?
1. Power on the camera, the red indicator light will light up.
2. Using a pin to hold on press the reset button for 10 seconds until you hear the voice:
Restore factory settings, please don’t power up. And the red indicator light will flash which indicator the camera is ready to connect to the phone app.


3. Search the app “iCsee” on google play or the app store.

4. Sign up for an account and log in with this account.

5. Please click the “+” icon at the right top.

6. Please click ” Set up my device to Wifi”.


If connected to the phone app by the wave sound failed, you can also click the QR code at the right top, then place the QR code in front of the camera lens, the camera will recognize the QR code.


What to Do if Phone Can’t Connect Camera?
1. Download and install the APP
Go to “Google Play” or “App Store” on your mobile phone, search for “iCsee Pro” or “iCsee”, and then download and install it on your phone.

2. Confirm your Wi-Fi status
A. Check if your wireless router has enabled DHCP and if it is the 2.4 GHz network. (The device does not support 5GHz Wi-Fi currently.)
B. Ensure your smartphone has been connected to the wireless router.
C. Ensure there is no special character in the Wi-Fi name and password, and their length does not exceed 30 digits.


How to Add the Camera to APP iCsee?
This article will tell you how to connect the cameras to the APP iCsee. If you order a camera I41ES/I41ED, please follow below instruction to add it to the APP step by step.
- Please download the APP iCsee from Google Play or APP Store
- Then, please connect the 2.4GHz wifi on the mobile phone.
Note:
When configuring the wifi for the camera, the APP will pick up the wifi automatically, and it won’t allow the users to change it. Thus, please make sure the mobile phone is connected to the wifi you want to configure for the camera. - Please use an email address or a mobile phone number to register the APP.
- Firstly, please click Sign Up on the APP

- Then, please input the username, password, email address/phone number, and the verification code and click Sign Up:

- Firstly, please click Sign Up on the APP
- Next, please log into the APP by using the username/email address/mobile phone number:

- After login the APP, please click the screen to add the camera:

- Next, please click Set Up My Device To Wi-Fi:

- Please input the wifi password of your wifi network:

- Next, please click the QR code icon and click I see, and put the QR code to face the camera lens part so that the camera could scan the QR code:

- Next, please set up a password and a name for the camera.
Note:
The password is very important. When you share the camera with other users, you also let him/her know the password, so please keep the password.
If you forgot the password, please reset the camera to the factory default settings.

- Finally, the camera will be added to the APP successfully, and you could view it on the APP:

How to Setup 24 Hours Recording for the Camera?
The camera supports recording constant videos for 24 hours. Please follow below instruction to set it up step by step.
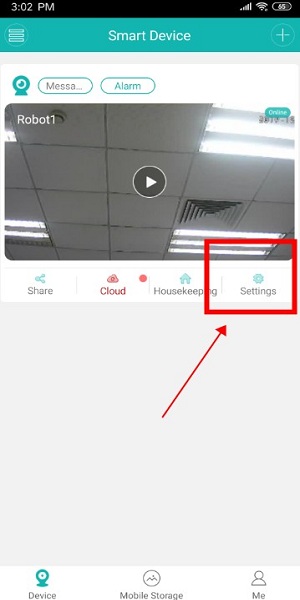
- Before you set up the recording, please make sure an SD card has been inserted into the camera, and the SD card is recognized. Please go to the Settings of the camera.
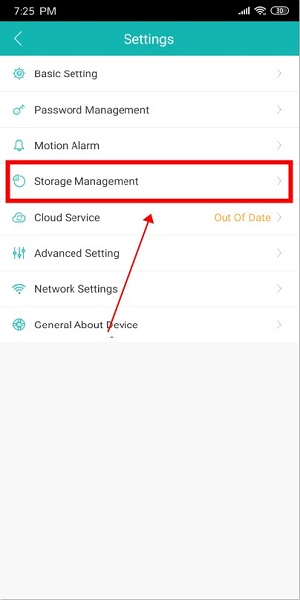
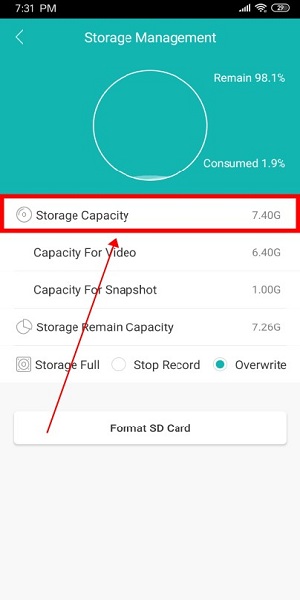
- Then, please go to Storage Management to check the Storage Capacity. If the SD card is recognized, the capacity won’t be 0.
- Next, please go to Advanced Settings.
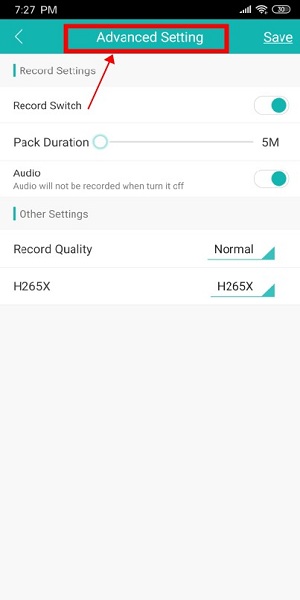
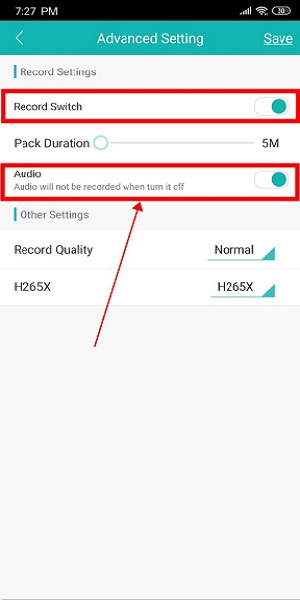
- Finally, please turn on the Record switch.
Once the Record Switch is turned on, the camera will record videos for 24 hours.
Pack Duration: it means that each recording file will be 5 minutes. The users could adjust the length of the recordings files manually.
Audio: the camera will record audio for the video if it is turned on.
If you have a concern about the instruction, please submit a request to the help centre.
How to Set Up the Motion Detection Recording for the Cameras
- Before you set up the recording, please make sure an SD card has been inserted into the camera, and the SD card is recognized. Please go to Settings of the camera.
Then, please go to Storage Management to check the Storage Capacity. If the SD card is recognized, the capacity won’t be 0.

- Next, please go to Motion Alarm to enable the motion detection settings.

- On the Smart Alarm section, please turn on the Open option. If you need, you could also turn on Human Shape Detection.
Finally, please go to Alarm Action to select Take a Video for the Alarm Action so that the camera will record a video when it has motion detection.

- For motion detection, you could set up the alarm sensitivity and the alarm time and alarm area on the Other Settings section.

On the Rule Setting, the users could adjust the alarm area for motion detection.

The Alarm Time is 24 hours as a default, and the users could also custom the Alarm time based on their own requirements.

If you follow the instruction to set up the recording, the camera will record videos for motion detection. If you have a concern about it, please submit a request to the technical support.
How to playback videos on the phone APP
If the camera record videos, the users could playback the videos through the phone APP.
- On the APP, please open the camera for previewing and then select the Playback button.

- It will have three options for playback: Video, Cloud Service, and Photos.

- Here, we select Video for playback as an example.
- Please click on the date to select the date for the recording:

- If you set up the recording for both constant recording and motion detection recording, you could playback the recording at the same time. Or you just select one recording type to playback.
If you have a concern about how to playback the recordings, please kindly submit a request to the technical support.
Can you write your contact number?
I am having trouble with the installation
please provide support for me i leave my email address
I can’t upload
my recorder is not working
I really love you
I sent an e-mail from the communication channel. Can you help?
I sent an e-mail from the communication channel. Can you help?
I am having trouble with the installation