How to make Cat5, Cat5e and Cat6 (simply referred to as Cat5 cable throughout this document) cables have particular standards to make sure your network is all cabled in a compatible way.
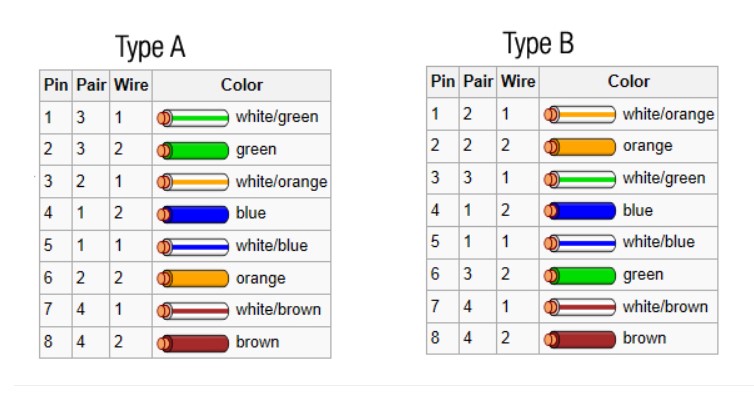
There are two standards when making your own cat5 cable. These are commonly known as Type A or Type B. Please see image below to show the different wire configuration for both types.
 |
 |
Having two standards of compatible wiring will allow for 2 different variants of cable. These are known as Patch and Cross over.
A patch cable is used for connecting a network infrastructure device such as a switch, hub or router to a non network infrastructure device like an IP camera, computer or printer.
A cross over cable is used when connecting a non network infrastructure device to another non network infrastructure device such as an IP camera directly to a Laptop or a Laptop to Laptop or an infrastructure device to another such as a network switch to another network switch.
Patch cables must be made with both ends of the cable being made using the same type either both Type A or Type B. To successfully make a Cat5 cable you will require the following tools.
1 x Length of appropriate cable (Cat5, Cat5e or Cat6)
1 x RJ45 crimping tool
2 x RJ45 end plugs (RJ45 ends cannot be reused once they have been crimped, so a few spares may be advisable)
1 x RJ45 network cable tester (this is not essential but a VERY useful tool for fault finding should your cable not do what you expect)
To make your cable, simply decide which type of end you will be wiring (Type A or Type B). Arrange the colours of the cable according to the diagram above. Get the RJ45 plug so the clip on the plug is facing away from you. Insert the cables in the order you have arranged them (be careful with this), cat5 cable has a habit of mixing the colour cores up when inserting the cable into the plug. Once the cables are insert and the correct colour order has been verified, please use your RJ45 cable to crimp the RJ45 plug firmly to the end of the cable.
Once your RJ45 end is attached, simply move to the other end of the cable and repeat the process. Please make sure you use the same end type as your original connection. Failure to do so will result in making a cross over cable.
To make a cross over cable, please follow the instructions above but purposely make one end of the cable a Type A and the other a Type B.

I sent an e-mail from the communication channel. Can you help?
It was a great sharing
problem not solved thanks
please provide support for me i leave my email address
my recorder is not working
It was a great sharing
I really love you
problem not solved thanks