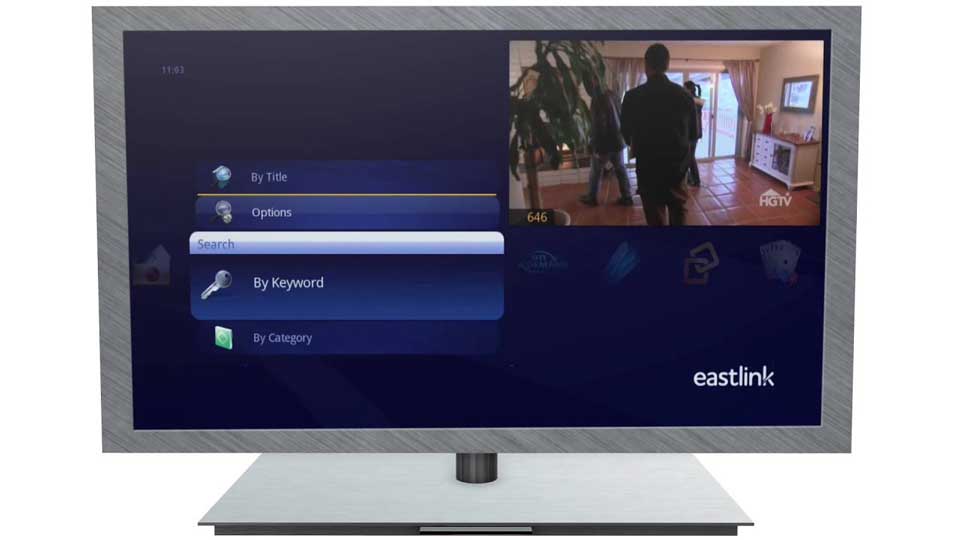
Eastlink DVR Setup Guide, Record, pause, rewind, and fast forward programs – including Pay Per View movies and events – using the innovative technology of the DVR (Digital Video Recorder). The Eastlink DVR is an easy-to-use digital receiver that gives you the ultimate control in watching TV. Instead of recording programming on video cassettes, it records to a hard drive inside the DVR allowing for easier use and flexibility when watching your favourite shows.
Features
Control live TV
A DVR makes a temporary recording of whatever you’re watching. This means that if you’re temporarily distracted from your program, even if it’s live, you can rewind the part you missed and fast forward up to the live programming. Also, you can pause a live program and restart it when you are ready to start watching it again.
While watching your show you can press record on your remote control, and the program will be recorded from the moment you started watching it, as long as you haven’t changed channels since then. Once you pause or rewind you can fast forward until you have caught up to live TV.
Recording shows
With just one touch of your remote control you can record current programs or schedule recordings for future programs. All you need to do is select what you want from the program guide and press record – no tapes or extra equipment required.
I want to record the program I am watching.
While watching your program, press the “Record” button on your remote control.
I want to schedule a recording of a program that is on later.
On the remote control press the “Guide” button
Highlight the program you want to record
Press the “Record” button
I want to record two programs at the same time.
No problem. With Eastlink’s DVR you can easily record two programs at the same time, or you can record one program while watching another one at the same time.
While watching a show:
Press “Record” on the remote to record the program you are watching.
Press “Swap” and find the second program you want to record.
Highlight the second program you want to record and press “Record”.
From the Guide:
Highlight a program you want to record from any listings screen.
Press “Record” to set up the first recording.
Highlight the second program.
Press “Record” to set up the second recording.
I want to record a series
Record and save up to 8 episodes of a series when using the series recording function.
Highlight the TV series you want to record and press “Info” to view the overlay screen. Select the Set up a Series Recording icon and specify your preferences from the following options:
Record:
Only new episodes
New and repeats
All with duplicates
Save no more than:
All
1 episode
2 episodes
Up to 7 episodes
Save until:
Space is needed
I delete
I want my recording to start early.
To access advanced setup features like adding minutes to the start and end times or specifying which channels to record, select View all settings under Create a Series Recording.
Record programs on:
This channel only
All channels
Start recording:
On time
1 minute early
2 minutes early
3 minutes early
Up to 15 minutes early
Stop recording:
On time
1 minute later
5 minutes later
10 minutes later
Up to 2 hours later
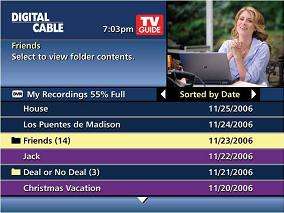
Your Series Recordings will appear in your My Recordings list with the show title as its label. To access your My Recordings list press the “Menu” button on your remote, then select the “DVR” option.
Multiple recordings of the same show will have the same label and will be listed beginning with the most recent recordings first as default.
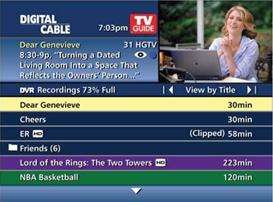
To change your view, use the left and right arrow buttons on your remote to View by Date, View by Channel or View by Title.
Eastlink DVR Setup Guide
Read More : KBVISION XVR Firmware
Can I quickly swap between two programs?
The SWAP feature lets you switch back and forth between two live channels while giving you full control of both.
While you are watching a program, press the SWAP button on your remote.
Now you can select a second program by changing channels or using the iGuide.
Press SWAP again to switch back and forth between the two programs.
Note: The SWAP button is the key to maintaining control over two programs. If you change channels without using the SWAP button, you will lose the ability to record, pause, rewind and fast forward the program you were watching.
How can I get more storage space for my DVR?
Do you record endless numbers of programs? Are you finding it difficult to manage all of your recordings? Deciding what to keep and what to erase is always a difficult decision – but now you don’t have to decide.
DVR Expander functionality gives you all the added storage you need. Simply buy an external hard drive and hook it up to your Eastlink DVR. Best of all, this functionality is available to you at no additional monthly charge.
In order to function properly, the external hard drive must have the following specifications:
Must be an “eSATA” hard drive – it cannot be firewire, or USB 2.0
Minimum 16 MB buffer and 7200 RPM
It must have an “eSATA” cable, not firewire, or USB 2.0
Please note: Eastlink does not sell external hard drives. You can purchase an eSATA drive at many popular electronics retailers.
Installation:
OK – I’ve got my external hard drive. How do I set it up?
Turn off your DVR.
Use the eSATA cable that came with your external hard drive to plug into the eSATA port on the back of your Eastlink DVR – a flat opening labeled eSATA. On most receivers, it is under the HDMI port.
Once the hard drive is plugged into the DVR, turn on the receiver.
Using your remote control, follow the prompt from the iGuide to format the external hard drive.
What is Whole Home DVR?
Whole Home DVR allows you to access your recorded shows from any other receivers in your home. The DVR can record two programs simultaneously, play a third recorded show, while up to three secondary receivers play other recordings at the same time.
Frequently Asked Questions
How do I keep my recordings from cutting off the end of sports events?
Make sure that you fully record the entire sporting event by extending the length of the recording past the scheduled end time. This will ensure overtime or late games are fully recorded.
To set your DVR to record an extended period of time after the program’s scheduled end time:
Select the program from the iGuide
Select the record button (button with a red circle) on the TV screen
Select Modify recording options for this program
Set End time to up to 2 hours late
Select Record with these options
What is the recording capacity of the DVR?
Series Recordings: Up to 7 episodes will be saved when using the Series Recordings function.
Digital TV Shows: 90 hours
High Definition TV Shows: Up to 12-20 hours. This is not exact because the type of HD programming you record can impact the storage requirements. For example, sports programming or action films will take up more storage than a talk show.
Where can I purchase an eSATA hard drive?
You can purchase an eSATA hard drive at most electronics retailers.
Which digital receivers support DVR (Storage) Expander technology?
DVR Expander is available with the following DVR models: DCX 3400, DCT 6412, and DCT 6416.
Are USB 2.0 or Firewire hard drives compatible?
At this point eSATA hard drives are the only ones that work with Eastlink DVRs.
Can I watch programs that are on my eSATA drive from any TV?
Once the external hard drive is formatted, it is only compatible with that DVR. If the hard drive is connected to a different DVR, it will re-format itself for that DVR. Re-formatting erases any programs stored on the drive.
If you are subscribed to Eastlink Whole Home DVR, and have an external hard drive attached, any secondary receivers in your home linked to the DVR can view the programs stored on the hard drive.
How much content can a 1 TB hard drive hold?
A 1 TB hard drive can hold approximately 200 hours of HD 1080i video content.
With an eSATA drive, how do my programs get stored?
Your programs will be stored on your eSATA external hard drive. Once the hard drive is full, programs will then start being stored on your Eastlink DVR.
If my DVR is off, will my scheduled recordings still happen?
The DVR will turn itself on at the time of the scheduled recording as long as the power cord is plugged in and there is access to electricity.
Whole Home DVR Features & FAQs
Watch recordings, pause, rewind, and fast forward from any TV in your home.
What is Whole Home DVR?
The Whole Home DVR environment lets you play your DVR recordings on multiple set-top digital receivers in your home. The DVR functions as a host server – known as the “Media Hub” – for up to seven, additional non-DVRs – known as “Media Terminals.”
Recordings saved to the Hub’s hard drive, including recordings in progress, can be played back from any or all Terminals in your home.
DVR Listings
All digital receivers on the Whole Home network will be able to display the My Recordings list with the same layout and functionality as seen on the DVR.
Recording in Use” Indicator
While viewing the Recordings List on the DVR, recordings that are currently being viewed from any of the receivers in the home will be marked with an “eye” icon, reminding the user that those programs cannot be deleted until they are no longer being viewed. The “eye” icon will also be seen if checking the Program Info for any recording that is currently being watched.
Reduced Information for DVR Recordings
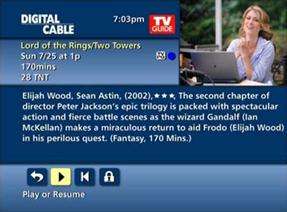
Although digital receivers are capable of displaying Program Information screens for recordings in the same manner as the DVR, the Program Info screens will have fewer action icons than the DVR – omitting the buttons for “Modify Settings” (the ! icon) and “Delete This Program” (the X icon).
Frequently Asked Questions
Do I need to upgrade my Digital TV equipment to be Whole Home DVR-ready?
During your Whole Home DVR installation, the installer will swap out your current receiver equipment with our latest DVR and HD-ready receiver technology; the DCX 3400M DVR & DCX 700M HD-ready receiver(s). You may also swap your current equipment for the DCX 3400M & DCX 700M at one of our retail kiosks for free prior to your installation.
How many recordings can I watch at the same time?
Four recorded programs can be viewed simultaneously (3 in HD, 1 in SD or 4 in SD), one of which must be viewed on the TV connected to your DVR
Why was I unable to delete a recording from my DVR?
If a recording is being viewed on a networked receiver, you will not be able to delete the recording on the DVR until the recording is no longer in use. If a recording is being viewed on another receiver, it will be indicated by an “eye” icon on the recording information screen.
Why did the recording I tried to play not play from the beginning?
If the recording was previously viewed on the primary DVR, it will resume from the point at which the playback stopped. You can play the recording from the beginning by selecting the ‘Restart from the Beginning’ icon on the Program Information screen.
Why do I see different menu options on my networked receivers than on my DVR?
Pressing the “List” button on your remote will display the DVR Main Menu on the primary DVR, allowing access to all DVR functions. Pressing the “List” button only displays the list of DVR recordings on the networked receivers; networked receivers are not DVRs.
Why does the guide on my receivers not show my future recordings?
Scheduled recording information can only be obtained from the primary DVR.
Can you have more than 1 DVR when you subscribe to Whole Home DVR service?
Yes, but only 1 DVR will be connected to the receivers in the Whole Home network. Any additional DVRs function on their own, without the ability to share their recordings.
Can I have more than one Whole Home network in my home?
No, this is not yet possible.
If I remove the Whole Home DVR service, but keep my Digital TV service, will I be able to keep my current equipment?
Yes, you will keep the same equipment.
If I’ve had the Whole Home DVR service in the past and want to re-add it, does an installer still need to come to my home to install?
If the answer to any of the following questions is yes, then we will need to have an installer visit your home in order to re-install Whole Home service:
1. Have you changed addresses since the last time you had Whole Home DVR?
2. Have you moved/relocated any of the TV equipment in your home since the Whole Home service was removed?
3. Have you had new services installed in your home since the Whole Home service was removed?
If the answer to all of the above questions is no, however, we can reactivate the Whole Service in your home without needing to send out an installer.
Can I add an additional receiver to my Whole Home network on my own (from Pick-Up at Retail, or Self-Install Mail-Out)?
No. Due to the network cabling and filters required for the Whole Home network, a professional install is required to add additional receivers.
Why do I need a professional install for Whole Home DVR?
In addition to making sure that the DVR and digital receivers are installed in the correct order and networking configuration, special filters are required to be installed in your home to prevent the Whole Home signal from interfering with other services such as phone and internet.
iGuide Troubleshooting
Troubleshoot your picture, sound and Whole Home DVR concerns with our guide below.
Picture Troubleshooting
My TV says “No Signal” or only displays a blue screen or snow.
There is a large black box covering my picture.
I am getting an error message, such as “One Moment Please”, or my picture is pixelated.
Sound Troubleshooting
I have a picture but no sound.
Make sure the volume on your TV is not muted or too low.
Make sure the volume on your digital receiver is not muted or too low.
If your digital receiver is connected to your home theatre system, ensure that it is set to the appropriate input and the volume is not muted or too low.
Unplug the power cord of your digital receiver and plug it back in, turn the receiver on and check the sound again.
Need further assistance? Please contact us by calling 1-888-345-1111 or click the online chat button for instant help.
The sound does not match what is showing on the channel and/or is in a different language.
Locate the Audio Settings of your TV. (Usually through the TV Menu or Setup)
Change the Audio Setting to either Stereo or Mono
Change the SAP (Secondary Audio Programming) setting to Disabled or Off
Consult your TV owner manual for more information
Need further assistance? Please contact us by calling 1-888-345-1111 or click the online chat button for instant help.
How do I turn off/on Closed Captioning?
Both your TV and the Eastlink digital receiver have Closed Caption settings.
First, check the Closed Caption setting of your TV Menu/Settings. Consult your TV owner’s manual for more information.
For the digital receiver, to enable/disable closed captioning on High Definition channels:
Turn off your digital receiver, but leave your television on.
Within two to three seconds, of turning the digital receiver off, press the Menu button on your remote control. The Menu screen (white with black text) should appear on your TV screen. If the Menu screen does not come up on your TV within a few seconds, repeat steps 1 and 2.
Press the down arrow button on your remote control until you get to Closed Caption
Press the right or left arrow button on the remote control to change Closed Caption to Enabled.
Press the Power button to exit the menu
Press the Power button again to turn the digital receiver back on
Need further assistance? Please contact us by calling 1-888-345-1111 or click the online chat button for instant help.
Whole Home DVR Troubleshooting
When I try to play a recording, it says “Recording Not Available”.
The first thing you should do is check to see if the recording has been deleted from the DVR.
If you can see it in the list of recordings on the DVR, try playing it again.
If it still does not play, turn off your digital receiver and unplug the power cord for 10-15 seconds. Then plug it back in and turn it on. Wait 2 or 3 minutes for it to reconnect to the Whole Home network and then try playing the recording again.
At this point, if the error message still shows up, contact us by calling 1-888-345-1111 or click the online chat button for instant help.
When I try to delete a recording, it says “Cannot be Deleted”.
This usually occurs when you try to delete something that is currently being watched. Check the other receivers in your home to see if any of them are viewing the recording. Once the recording is no longer being viewed, you should be able to delete it from the DVR.
If the problem persists, contact us by calling 1-888-345-1111 or click the online chat button for instant help.
I’m getting the error message “Service is Unavailable”.
This message occurs when the receiver has lost its connection to your Whole Home Network. These interruptions are rare and usually brief. Pressing exit to close the error and trying again is usually all you need to do.
If the problem persists, contact us by calling 1-888-345-1111 or click the online chat button for instant help.
At the end of a recording, I get the message “Unable to Process Request”. What should I do?
This is harmless and can be ignored. Simply press Exit on your remote control to close the message and proceed with your viewing as normal.
When I try to play a recording from one of my receivers (not the DVR), the recordings list is empty.
Exit out of the Recordings List screen and go back in again. Sometimes this is all it takes to restore the full list.
If that doesn’t work, go to your DVR and check the Recordings List on it. Is it empty on the DVR as well? If so, the good news is that DVR’s cannot erase their own hard drive. The bad news is that someone in your home has deleted all the recordings recently.
However, if the Recordings List is full on the DVR, you should turn off all your other receivers and unplug their power cables for 10-15 seconds. Then plug them back in again, turn them on, and wait 2 to 3 minutes for each one to re-establish its connection to the Whole Home network. Then try to access the Recordings List again.
If it still shows empty, contact us by calling 1-888-345-1111 or click the online chat button for instant help.
The sound on my recordings is muffled/muted.
This can be corrected by exiting out of the recording and playing it again.
My receiver locked up while watching a recording.
This occurs when the receiver loses its network connection to the DVR mid-playback of a recording. Within a few moments, the receiver should change to the last channel you were watching before you began the recording.
If it does not, unplug the power cord from the back of the receiver for 10-15 seconds and then plug it back in again. Wait 2 to 3 minutes for the receiver to re-establish its connection to the Whole Home network and then resume your viewing as normal.
If the receiver is still locked up or frozen after this, please contact us by calling 1-888-345-1111 or click the online chat button for instant help.
The DVR button is missing from the menu on one or more of my networked receivers.
Turn off the receiver and then unplug the power cord from the back of it for 10-15 seconds and then plug it back in again. Wait 2 to 3 minutes for the receiver to re-establish its connection to the Whole Home network and then check your menu.
If the DVR button is still missing, please contact us by calling 1-888-345-1111 or click the online chat button for instant help.
My HD recordings won’t play on my standard definition TV.
If it still does not play, unplug the power cord from the back of the receiver for 10-15 seconds and then plug it back in again. Wait 2 to 3 minutes for the receiver to re-establish its connection to the Whole Home network and then try playing the recording again.
My recording has scrambled/pixellated picture, is missing audio, or is missing video during playback.
Check the channel that the program was recorded from. Is the problem occurring on the channel as well?
If yes, please contact us by calling 1-888-345-1111 or click the online chat button for instant help.
If the problem is only occurring on your recording, exit out of the recording and try playing it again. This will often resolve the problem.
If this does not solve the problem, unplug the power cord from the back of the receiver for 10-15 seconds and then plug it back in again. Wait 2 to 3 minutes for the receiver to re-establish its connection to the Whole Home network and then try playing the recording again.
How to Install Your iGuide DVR
Follow our step-by-step instructions to install your Digital Video Recorder. Online chat is available for instant help.
Before You Begin
Installing Your DVR
1. Locate the cable going from the cable wall outlet to your TV (or other device). This is called the coaxial (or coax) cable. Disconnect it from your TV (or other device)
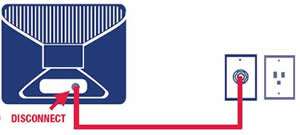
2. Take the coax cable that you disconnected from your TV (or other device) and connect it to the [CABLE-IN] port on the DVR
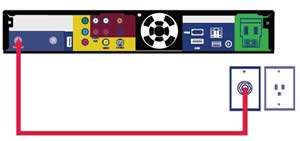
3a. Connect one end of the HDMI cable (provided in your installation kit) to the HDMI port on the back of the DVR. Take the other end of the HDMI cable and connect it to the [HDMI 1] port on the back of your TV OR
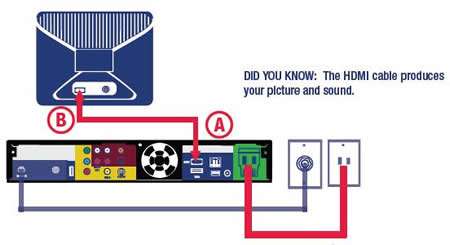
3b. Connect your video & audio cables to the relevant ports on the back of the DVR and your TV
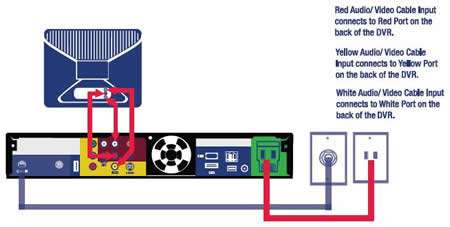
4. Attach the power cord to the back of the DVR. Plug the other end of the power cord into the electrical outlet. Turn it and your TV on. The DVR will display the number 0
5. Put the provided batteries in the Eastlink remote control (the remote is automatically programmed to work with your DVR). Then follow the instructions on the back of the remote to program it for your TV
6a. If you connected the DVR to your TV with an HDMI cable: On the remote control, press TV and then “Video Source” to cycle through the different video inputs of your TV until you see “HDMI 1” displayed on screen. You will not see picture or sound yet OR
6b. If you connected the DVR to your TV with video & audio cables: On the remote control, press TV and then “Video Source” to cycle through the different video inputs of your TV until you see the input displayed on screen that corresponds to the type of video cable you’ve used. You will not see picture or sound yet.
7. To activate your DVR, please call 1-866-238-2390. Remember to have your EastLink account number and the serial number of the DVR handy.
