Getting started with your Gamut recorder or IP camera

Purpose of the guide
Whether you have a single camera, or a recorder and multiple cameras, this guide will help you set up your Gamut equipment, show how to view it on mobile devices and configure the settings, along with any other information that may be useful.
We have tried to provide the most comprehensive set of instructions possible, but if you find anything is missing please get in touch and we will be able to assist.
If you have purchased a kit intended for use on a farm, please see these articles instead.
How to disable the audible alarm/beeping noise on a Gamut recorder
Purpose of the guide
By default, most recorders come with all the audible alarms enabled. This can cause the system to start making a loud beeping noise, often when everything is working correctly.
The most common reason people get this alarm sound is because they are setting up their recorder for the first time, with a hard drive that has not been ‘formatted’. This is the process of wiping off the hard drive (destroying all the data in the process) and preparing it to be used by a new device. This needs to be done even with brand new hard drives.
Keep reading to find out how to do this, or if your recorder alarm is going off for a different reason then scroll down to the ‘Disabling all alarms’ section.
Before you begin
You will need a Gamut recorder connected to a TV or monitor, with a computer mouse to navigate the menu.
Formatting the hard drive
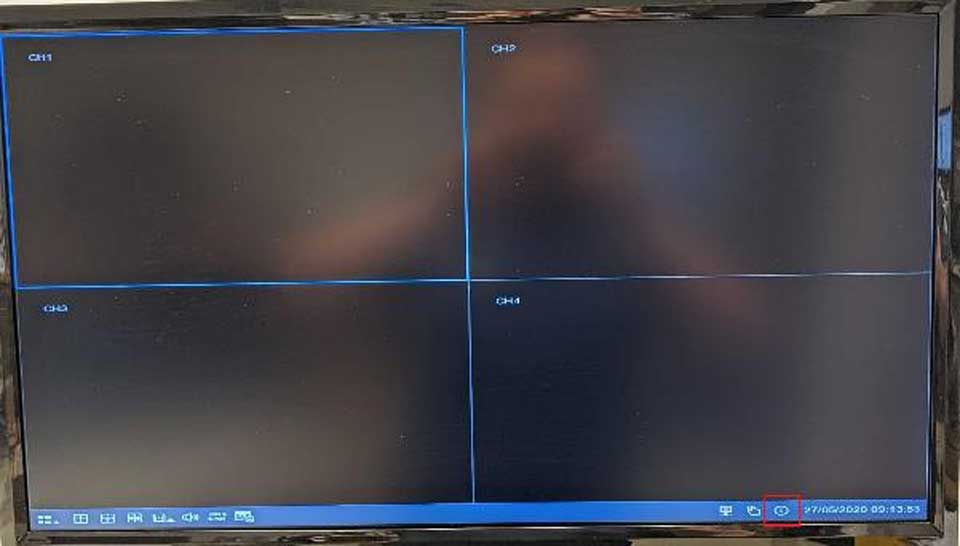
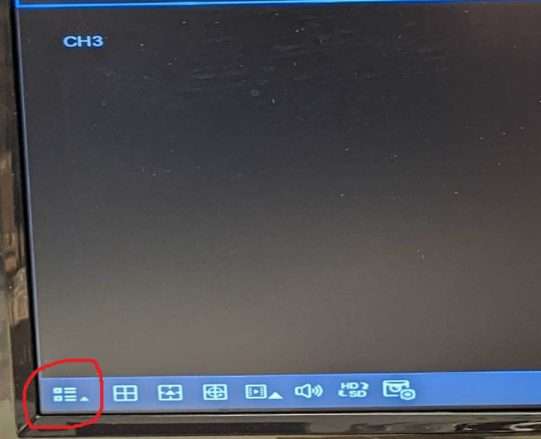
You will be prompted to format the hard drive during the initial set up wizard, but let’s assume that you are starting from the main live view menu. Select the bottom left icon and click ‘Setup’ to enter the settings menu.
Now go to Device > Disk and select the hard drive listed, then click ‘Format HDD’. Depending which version of firmware you have this may look slightly different but the layout will be the same:
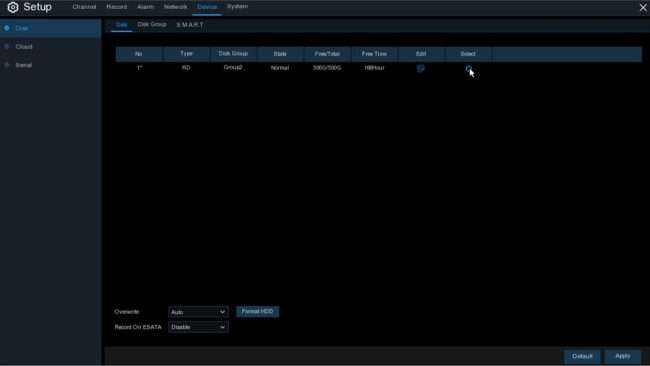
It will take five minutes or so to format, during which time the recorder must not be turned off or disturbed at all. If the beeping stops, then the hard drive was the cause of the alarm. If it carries on, continue below to disable the other alarm settings.
Disabling all alarms
Now go to Alarm > Exception in the recorder settings menu:
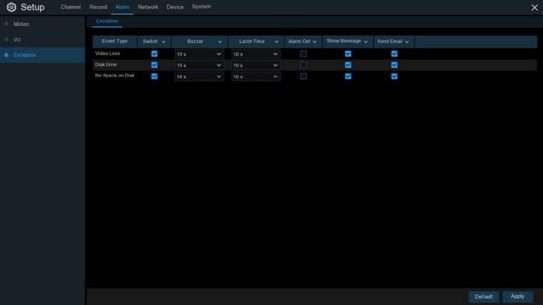
To disable an alarm, untick the box next to it in the ‘Switch’ column and click ‘Apply’ at the bottom. Disk error is good to leave enabled but the other options are not essential for most users.
How to upgrade the firmware on your Gamut recorder
Purpose of the guide
This guide will show you how to upgrade the firmware in your recorder. This guide only applies to Gamut recorders released in 2019 or after, primarily the WLNVR, 4/8NVRGT1 or 4/8DVRGT1 recorders. If you are unsure which model you have, check your original order invoice.
Firmware updates can damage a recorder if the system is turned off during the update process. Only perform this update at a time when you know the recorder will not be turned off. If you are updating using a memory stick, do not remove the memory stick during the upgrade process.
Before you begin
You will need to download the latest firmware file from our website:
http://downloads.spycameracctv.com/WLNVR/software/Firmware_V8.1.0.1.zip
Now open up the firmware file linked above and open the ‘hdvrupgrade’ folder.
If you want to upgrade the firmware using the recorder and a TV, insert a memory stick into the computer. Now take the file named “H2106_V191216V181220V191226V200318V200318V200318V191118.sw” and copy it onto your memory stick.
If you want to upgrade the firmware using a Windows or Mac computer, simply copy the file named “H2106_V191216V181220V191226V200318V200318V200318V191118.sw” and save it somewhere on your computer that you can find. Also, make sure you have the Surveillance Client program set up on your Windows or Mac computer as this will be needed to perform the update:
How to access your Gamut camera or recorder using a Windows or Mac computer
Let’s get started
Upgrading via recorder and monitor
Insert the memory stick into the USB port on the back of the recorder.
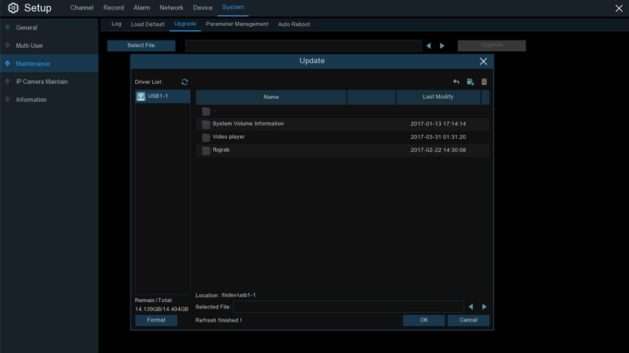
Enter the setup menu of the recorder, then select System > Maintenance > Upgrade.
Click on ‘Select File’ and find the firmware update file on your memory stick, then click ‘OK’. Click ‘Upgrade’ to start the process which will take 5-10 minutes; do not turn off the NVR or remove the memory stick during this time.
Upgrading via a Windows or Mac computer
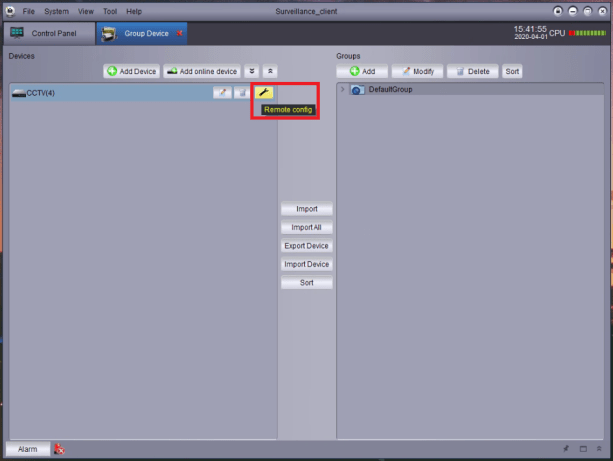
Once you have Surveillance Client installed and have added your recorder, go to Group Device, then select the Remote Config button:

Then go to Advanced and select Firmware Update:
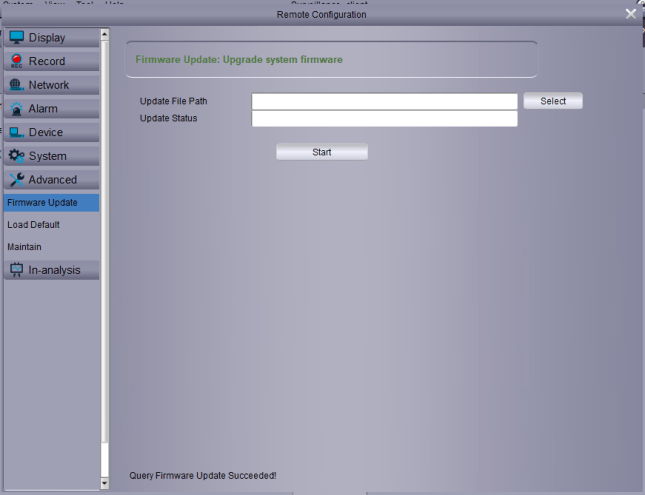
Then just click ‘Select’, find the firmware update file in the location where it was saved and click Start. It’ll take 5-10 minutes to finish, so don’t disconnect the recorder from the power supply or the internet connection during this time!
My Gamut device doesn’t work remotely
Purpose of The Guide
This guide will show you how to change some of the network settings for you Gamut recorder or camera to allow it to work remotely as well as locally.
Before You Begin
Your Gamut device will need to be turned on and connected to your internet router. You will need to add your device to your phone (follow this guide) after you are done, and you will need some mobile data on your phone so you can test whether the device can be accessed remotely when you are done.
Let’s Get Started
If the recorder/camera does not work remotely, only when you are using a device connected to the same internet router, you may need to edit the network settings.
First you will need to download some software called Device Config Tool, which will allow you to find out the IP address of the camera/recorder and edit some of the settings.
Download it from here if you are using Windows, and here if you are using a Mac.
Follow this guide to find out your default gateway and note it down, then open up the Device Config Tool and make sure that the Gateway of the device matches what you noted, and change it to match if not.
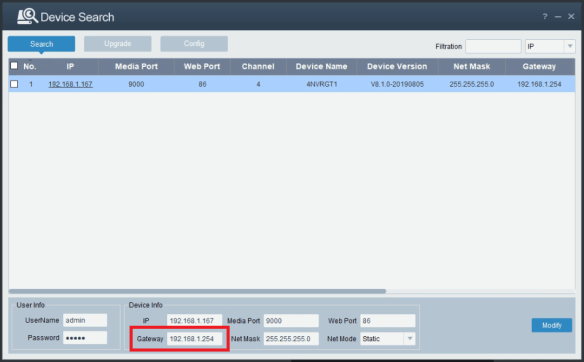
If this doesn’t work, or the default gateway was already correct, please get in contact with us and provide any information you think may be useful.
Using the PTZ controls on a Gamut PTZ camera
Purpose of The Guide
This guide will show you the basics of how to operate the PTZ function on your camera through both your computer and your phone or tablet.
Before You Begin
Let’s Get Started
Controlling via a computer
The first thing we need to do is log in to the camera on your computer. Open Internet Explorer, enter the IP address of the camera in to the address bar near the top and when prompted log in. On most cameras the username is “admin” and the password field is left blank. However if you have previously followed our guide for connecting the camera to the HiSee mobile app you should have your own password set at this point. If you are prompted to install any software when you log in please allow it to install.
Please make sure that you are using Internet Explorer and not any other browser. The reason for this is that most CCTV systems require the use of software called Active X to be able to display your live video and that software is only supported by Internet Explorer.
On the live view page you will see a range of PTZ controls on the left hand side. First we have the main PTZ Control section, this section covers manual control of the camera.
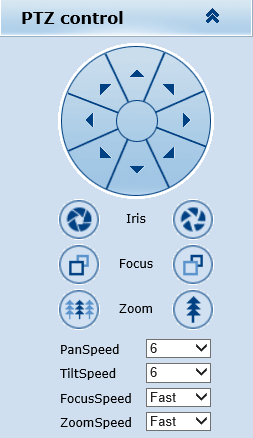
The 8 directional buttons at the top allow you to change where the camera is pointing.
The Focus and Zoom options are used together to adjust the zoom of the camera and correct the image if the camera is out of focus after zooming.
The four controls below that all determine how fast the camera moves around. If you want to have a bit more fine control you can change the Pan and Tilt speed to a lower number or if you want to move the camera by large amounts then you can increase the speed by setting it to a higher number.
Next we have the PTZ Function section. This section is to do with automated camera movement.
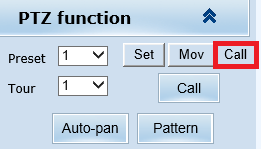
Auto-pan will simply cause the camera to slowly pan from side to side, the camera will cycle from fully turned to the left to fully turned to the right and back.
If you wish to have the camera move between more specific points we need to look at the Preset settings. What we can do is set two points and then tell the camera to move back and forth between those two points. First we need to define the two points. Set the Preset to 1, move the camera to the first point you want it to stop at and press the Set button. Then move the camera to the other point you want it to move to, change the Preset to 2 and press the Set button again.
Now to start the camera moving between the two points we need to change the Preset to 92 and press the Call button that is highlighted in the above image. The camera will then start moving between the two points we have just created.
If you wish to take over manual control of the cameras again you can either press the Mov button in the PTZ Function section or use any of the manual controls in the PTZ Control section
Controlling via a phone or tablet
First open up the camera on the HiSee mobile app. If you swipe from right to left on the controls at the bottom of the page you will see all of the PTZ controls as shown below.
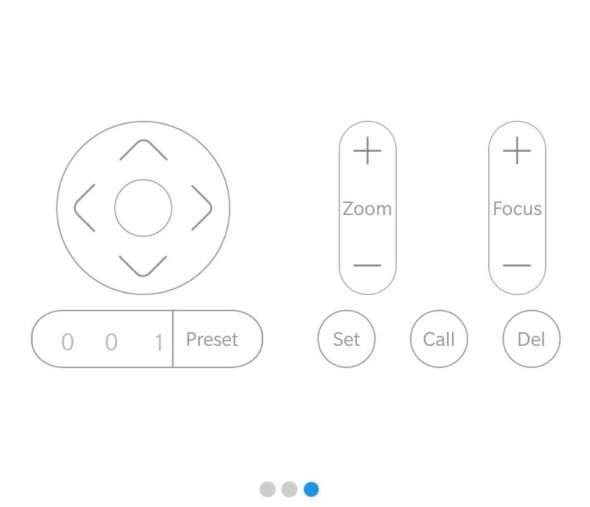
For manual control over where the camera is pointing you have the 4 way buttons on the left hand side.
Zoom and Focus are controlled using the two buttons on the right.
The Preset and three buttons to the right of it are for setting up the camera to automatically move between two predefined points.
If you want to have the camera move between two points we first need to define those two points. Move the camera to the first place you want it to point at, change the Preset to 1 and press the Set button. Now move the camera to the second place you want it to point at, change the Preset to 2 and press the Set button again. Now change the Preset to 92 and press Call. The camera will now automatically move between the two points that you have set.
If you wish to take over manual control again simply use the manual 4 way control button in the top left to take control of the camera.
Viewing Your Gamut PTZ on a Mobile Phone or Tablet Using HiSee
Purpose of The Guide
This guide will show you the process for connecting your Gamut PTZ to the HiSee app which will enable you to view and control your camera when you are away from the property.
Before You Begin
Let’s Get Started
The first thing we need to do is log in to the camera on your computer. Open Internet Explorer, enter the IP address of the camera in to the address bar near the top and when prompted log in. On most cameras the username is “admin” and the password field is left blank. If you are prompted to install any software when you log in please allow it to install.
Please make sure that you are using Internet Explorer and not any other browser. The reason for this is that most CCTV systems require the use of software called Active X to be able to display your live video and that software is only supported by Internet Explorer.
Once you are logged in click Settings, then Manage Users. We are going to set a password on the camera for added security at this point. Click the Operation button highlighted in the image below.

On the next screen enter an old password of “admin” before filling in a new password of your choosing and clicking OK. Please make a note of this password as you will need it in future.
Next click on Network then P2P and make sure that the settings on the page match those shown in the image below.
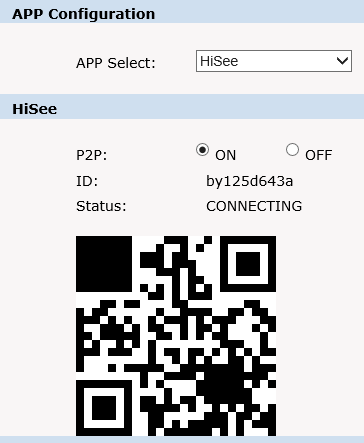
There are a couple more steps we need to complete on the PC before we move on to the app. Open your start menu and search for Command Prompt. Open this and type in IPCONFIG and press enter. This will show you a range of details about your network. What we are looking for is the Default Gateway. The information you see will be along the lines of the following:

Switch back to Internet Explorer and go to the Network sub-menu on the main Network settings page. Enter the Default Gateway that you just found in both the Default Gateway and Primary DNS Server fields.
At this point we can move on to the phone or tablet. Open HiSee and click on Register. On the registration page fill in your email address then click the Get Verification Code button, this will email you a 6 digit code that you need to enter in the next box, before filling in a password and clicking Register.
Log in using the details you registered with above and you will be taken through to the Device List. Click the Add Device button, then Wired Device and then Scan QR. This will open your camera, use this to scan the QR code that you found by logging in on your computer in the steps above. On the next screen enter the password that you set on the camera earlier and click Add.
You should now be taken through to your cameras live view. At the bottom of the screen you will see 3 buttons, if you swipe from right to left you will see the following screen which will allow you to control the PTZ functions of the camera.
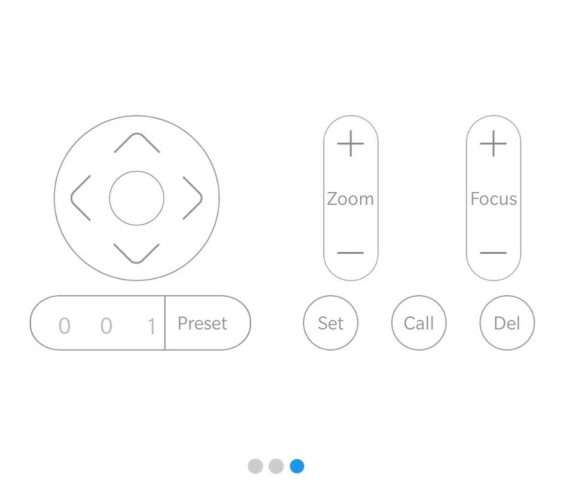
At this point if you wish to view the camera on any other phones or tablets you simply need to install HiSee on the new device and log in using the details you registered with earlier and you will be able to access your camera straight away.
How To Manually Add A Camera Via Surveillance Software
Purpose of The Guide
This guide will show you how to manually add your Gamut camera or recorder, using a Windows or Mac computer.
Before You Begin
Your Gamut device will need to be turned on and connected to your internet router. You will need to use a TV to set up the recorder for the first time, follow the quick start guide to do so. After the initial setup, a TV or monitor is not necessary when accessing the recorder via a network connection.
If you are using a Wi-Fi bridge system with your camera, make sure that the bridges are turned on, wired correctly and communicating before you begin.
Let’s Get Started
Now that you have connected your recorder/camera to your internet router and turned it on, you will be able to view it using a program called Surveillance Client.
You will need to get the device added first to the Surveillance Client, if you have done this, then follow the guide below, if not then you will need to follow this guide Here
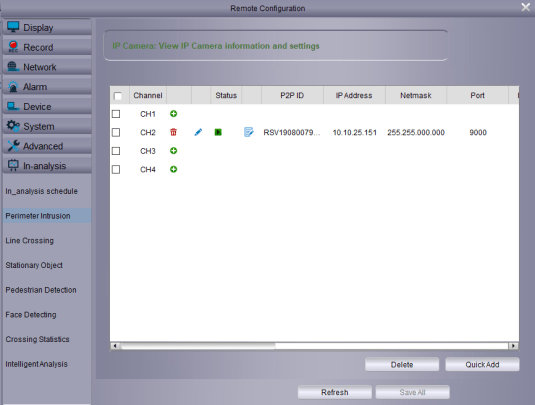
Once it has been added, to access the settings of the recorder/camera itself, go to the Control Panel, click on Group Device, then click on the spanner icon next to your recorder.
Then your page will look like this, we need to be in the channel option on the left, it is the default first page once you have clicked on the spanner.
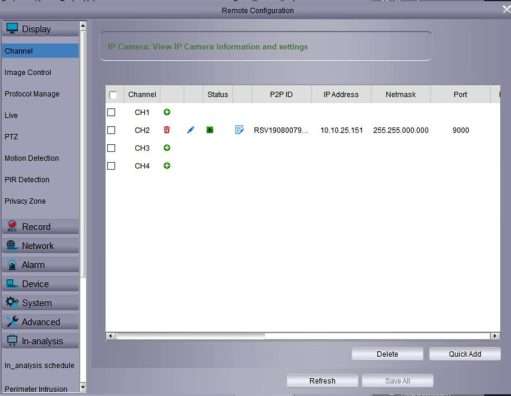
Click on Quick Add
![]()
Then depending on how many cameras you have on your network, if you only have 4 cameras, 4 devices should pop up in the list, however within our network, we have quick a lot of cameras on site, you just need to locate the right camera and add manually add the camera.
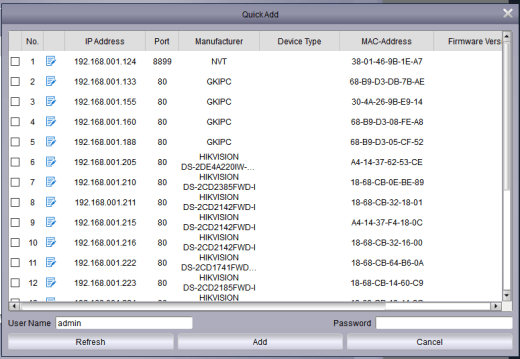
In our case, we are adding this camera, make sure you tick the camera and then click add.
![]()
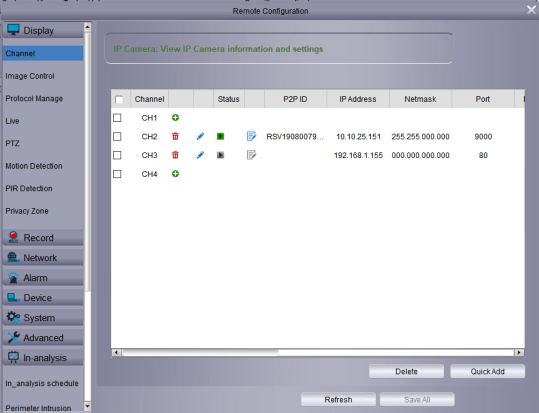
You need to concentrate on making the status green, this will indicate the camera is added, if it doesn’t turn green![]()
Click on![]()
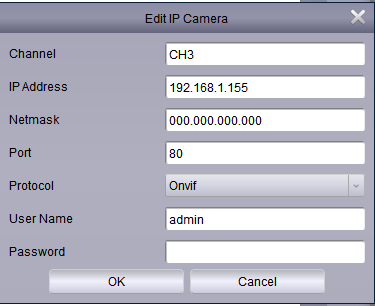
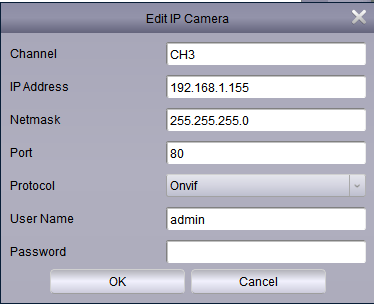
You need to change the subnet mask manually to 255.255.255.0 and input the password for the camera if there is a password for the camera, depending on what camera and model you are adding, once the information is input, click OK.
If you are not using one of our cameras you may need to change the port which will be dependent on the manufacturer.
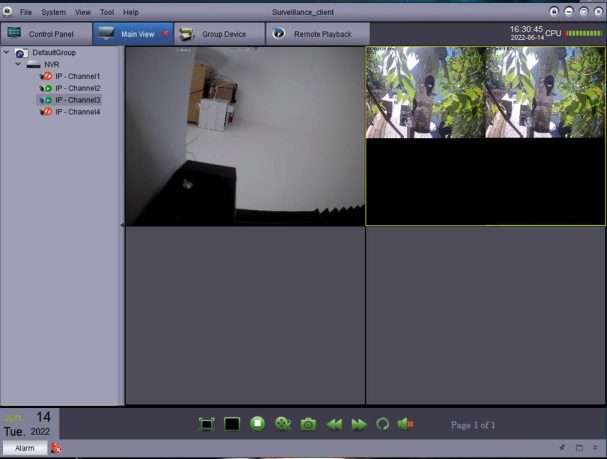
 As you can see both status lights are showing green which will indicate you have added the camera correctly, now go into the live view to see the camera.
How to Setup Push Notifications For Gamut/DVR/NVR
Purpose of The Guide
This guide will show you how to access playback recordings of your Gamut camera or recorder, using a Windows or Mac computer.
Before You Begin
Your Gamut device will need to be turned on and connected to your internet router. You will need to use a TV to set up the recorder for the first time, follow the quick start guide to do so. After the initial setup, a TV or monitor is not necessary when accessing the recorder via a network connection.
If you are using a recorder and cameras, make sure that the cameras are connected and working.
If you are using a Wi-Fi bridge system with your camera, make sure that the bridges are turned on, wired correctly and communicating before you begin.
Let’s Get Started
Now that you have connected your recorder/camera to your internet router and turned it on, you will be able to view it using a program called Surveillance Client.
You will need to get the device added first to the Surveillance Client, if you have done this, then follow the guide below, if not then you will need to follow this guide Here
Direct through TV.
Through Surveillance Client.
Alarm -> Motion -> make sure the buzzer is turned on the amount of time setting you want it to trigger off.
![]()
For more information on the settings of the recorder, please refer to the quick start guide or the manual.
How to configure the Recording Schedule and Some Basic Setting in Surveillance client.
Purpose of The Guide
This guide will show you how to access some of the settings and how to set up recording schedules and basic settings of the recorder.
Before You Begin
Your Gamut device will need to be turned on and connected to your internet router. You will need to use a TV to set up the recorder for the first time and follow the quick start guide to do so. After the initial setup, a TV or monitor is not necessary when accessing the recorder via a network connection.
If you are using a recorder and cameras, make sure that the cameras are connected and working.
If you are using a Wi-Fi bridge system with your camera, make sure that the bridges are turned on, wired correctly, and communicating before you begin.
You will need to also have the NVR/DVR added to the surveillance client.
The guide can be found Here
Let’s Get Started
To access the settings of the recorder/camera itself, go to the Control Panel, click on Group Device, then click on the spanner icon next to your recorder.
All the settings for NVR/DVR cameras can be found here.
You will be able to find all of your settings within the panel above.
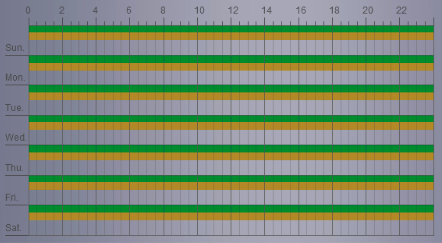
To schedule, recording click Record -> Schedule, you can either have motion and continuous record or just one of them. If you select the recording option you want to use and then click on the day and drag across the time period you want it to record.
This will then create a bar as you can see in the image below which you will want to do for each day.
![]()
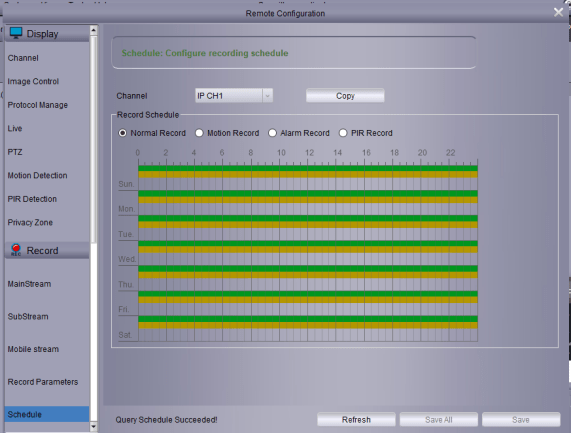
Once you have set the recording schedule you need to click copy and then select all other channels on the recorder, if you want them to have the same schedule, if not you can change the channel from IP CH1 to IP CH2.
![]()
Masking Areas out in Motion Settings.
If you getting false alarms and want to mask certain areas if you go into Display -> Motion Detection.
(You can mask certain areas out)
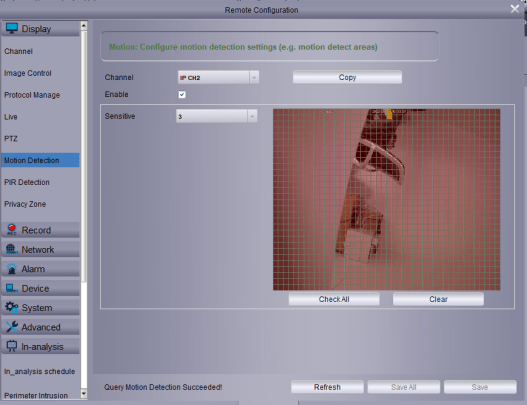
The red squares are where the camera is looking to detect motion, you can mask certain areas to stop false triggering by clicking in boxes to make it clear, as I have shown in an example below.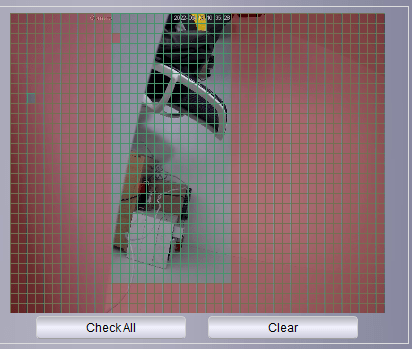
Please make sure enable is ticked and you click save to save the settings.

Sensitive is the sensitivity of the motion, the lower the sensitivity the less likely it going to trigger off, high is more likely to trigger motion off, try adjusting the activity, if you were getting false alarms, you can adjust the sensitivity to suit your needs.
Changing Resolution and FPS on cameras.
This can be found in Record – Main Stream.
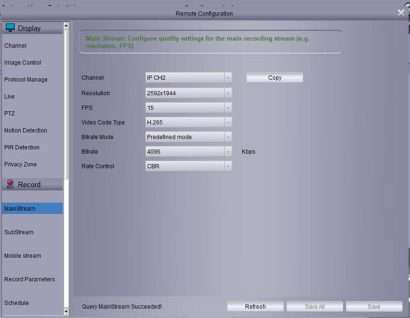
Channel – Select which camera.
Resolution – Resolution of the camera.
FPS – Frames Per Seconds
Video Code Type – either H.246 or H.265.
Bit Rate – Useful Article
Date and Time.
System -> General, all date and time and NTP services can be found here.
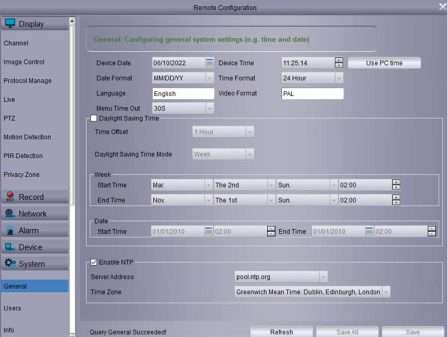
Push Notifications On When Motion Is Triggered.
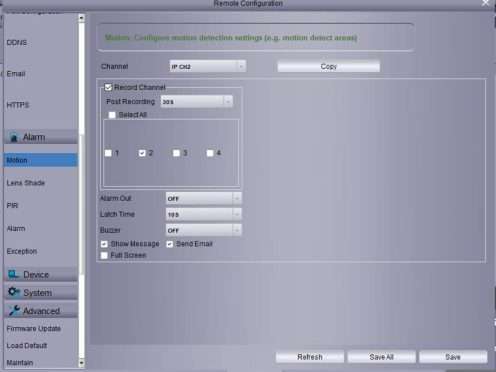
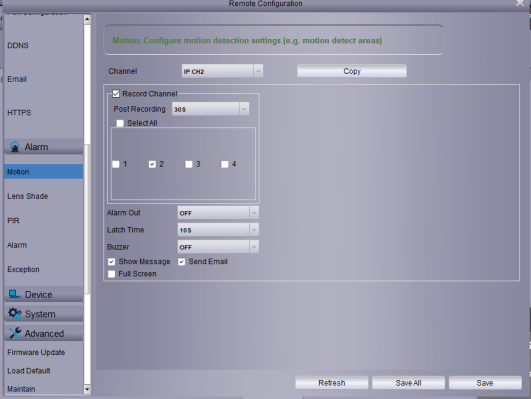
To change these settings go to Alarm -> Motion. If you want your recorder to beep when motion is detected you can turn the buzzer on.
![]()
![]()
If you have any alarm system like a PIR sensor that you have linked to the recorder then you want to enable this option.
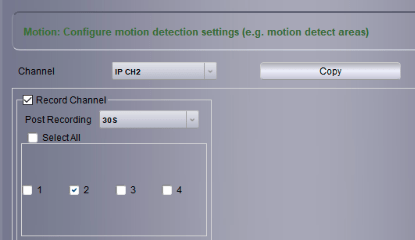
In the example above we have IP CH2 (camera 2) selected, you want to tick the record channel option and tick the number 2 box to have this record for channel 2. The post-record option is how long the camera will record after the motion has finished.
Changing Password for Recorder.
System -> Users
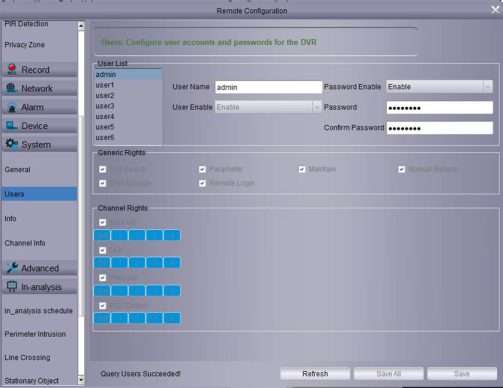
You can change your password here and also turn off the password function if you did not want to use a password.
If you forgot your password, then please follow this guide How to Reset Gamut Recorder Password

System Information and QR Code to Acess Remote Viewing on RXCAMVIEW.
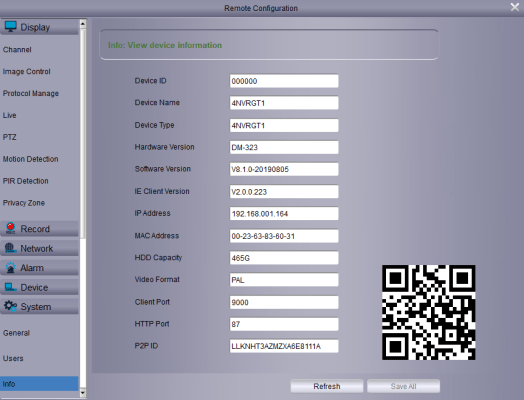
For more information on the settings of the recorder, please refer to the quick start guide or the manual.
