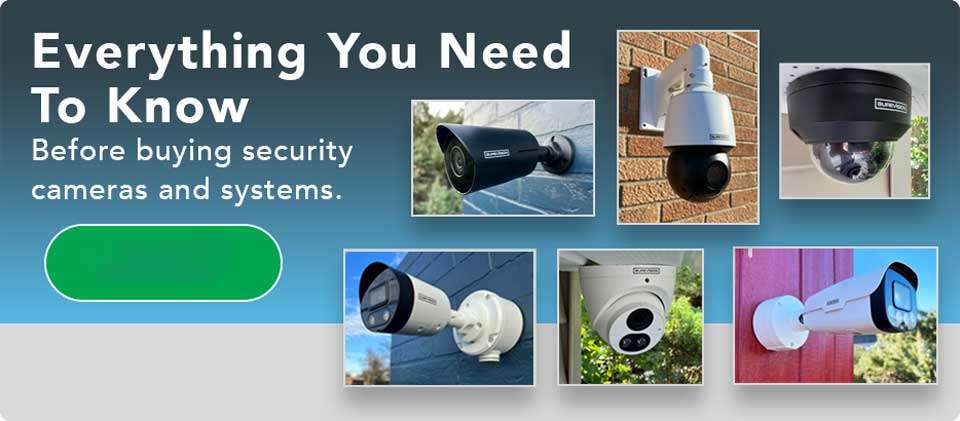
Blue Line IP Camera Troubleshooting v2, Experience the latest in IP security camera technology with our “Blue Line” Pro Series. Our cutting-edge IP cameras offer video resolution ranging from 1080p to 4K, ensuring that every detail is captured with exceptional clarity. Whether monitoring your home, business, or any other property, our “Blue Line” IP cameras provide the highest level of video quality available on the market. We offer a wide variety of IP cameras including bullet, domes, PTZ cameras, and more. All of our commercial-grade security cameras can be used both indoor and outdoors.
Unlimited Access Anywhere, Anytime
When you combine our “Blue Line” IP Cameras with one of our compatible IP camera network video recorders you can keep an eye on your assets no matter where you are. Take advantage of the free remote viewing app to view on your cell. Use the free software to view and control you cameras on your tablet, or computer. Stay connected and have peace of mind knowing you can monitor your cameras remotely, without any additional monthly fees.
LATEST FIRMWARE UPDATES FOR YOUR DEVICE
UPDATING YOUR SECURITY CAMERA FIRMWARE
Firmware Updates
In order to do a firmware update you must first identify the EXACT model number of your DVR or NVR unit. The model number can be found on the sticker located on the bottom or side of the unit. All CCTV Security Pros model numbers begin with the prefix “CSP” (Example, CSP-XXXX). Please match your model number to the list provided below. You will also need to locate your order confirmation email to determine when the unit was purchased. Once you have identified the correct model number and firmware please continue by following the instructions below.
Blue Line IP Camera Troubleshooting v2
Upgrading Your Firmware
Please identify the correct model from the list of firmware provided below.
Please select the appropriate link and download the .bin file. Once the download is completed copy the .bin file to a USB Flash/Thumb Drive. We suggest formatting your USB drive to FAT32 before attempting the update.
**Note : Units with Build Dates of 2013 or earlier may require you to rename the file to “update.bin” before launching the upgrade.
Once the .bin file has been transferred onto your drive you can insert the USB Drive into either of the two USB ports found on your unit. One can be found on the front panel and one can be found on the rear of the unit.
Once the drive is inserted into the unit go to the following menu:
Main Menu –> Setting –> System –> Upgrade. Click Start. Find and select the .bin file you transferred to the USB Drive and Click Start.
*NOTE – On select models you will need to go to:
Main Menu–> Info –> Version –> Upgrade
The unit will now begin upgrading to the latest Firmware Revision that is available for your device. Once completed the system will reboot. After the reboot we recommend doing the following:
1) Remove the USB Drive from your system.
2) Change your passwords on your “admin” account. For assistance in altering your password please follow this link: https://www.cctvsecuritypros.com/content/pdfs/password-account-settings.pdf
.
| SureVision 2019 + Purchase Dates | |
| NVR | |
| SV-NVR2P8 | https://drive.google.com/open?id=1IXTMXDH6Ts25SmYsCsJ5oRTH8fn5_4ka |
| SV-NVR4P16 | https://drive.google.com/open?id=1c_y7YGxE_DY2kq8GEdkaoFE4kR-jwOfR |
| SV-NVR832 | https://drive.google.com/open?id=1c_y7YGxE_DY2kq8GEdkaoFE4kR-jwOfR |
| SV-NVR864 | https://drive.google.com/file/d/1t-OALXUz5uMujSi9iNUiWPDNBF__eXgF/view?usp=sharing |
IMPORTANT: If you are having difficulty identifying the correct firmware please email us at support@cctvsecuritypros.com with your order number and unit model number.
User Account Locked
Your system will lock itself out when you or someone else has attempted to log into your DVR
with an incorrect user/password combination more than three times within 30 minutes
When this happens you have two options.
1. Wait 30 minutes after the last failed login attempt and try again.
2. Reboot the DVR by using the rear toggle switch or by unplugging.
When the unit powers back on try and login with the default username and passwords.
Username: admin
Password: admin
or
Username: 888888
Password: 888888
If neither of these passwords get you into your system you will need to email us at
Support@CCTVSecurityPros.com
and request a Master Password. Once we can confirm your
account we will happily be able to provide you with the correct login credentials.
Please have your Order Number or DVR/NVR Model Number when requesting a Master
Password.
*Note: The DVR/NVR Model Number can be found on the Bottom or Side of your system.
.
IP Camera Harness Repair
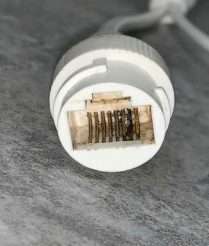
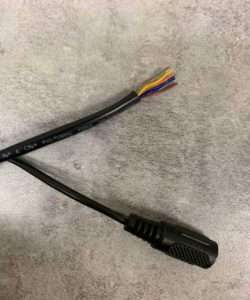
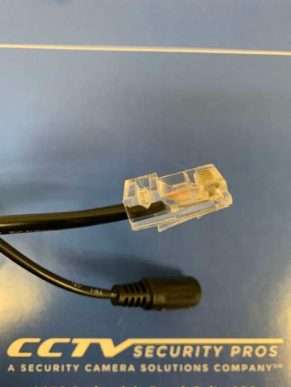
If your connector looks like the ones below, moisture has gotten into your RJ45 connector. The number one cause of premature IP camera failure has to do with improper weatherproofing techniques. If caught early enough a simple cotton swab and rubbing alcohol will clean that connector right up! You may need to resort to some heavier duty electrical contact cleaner if the cotton swab method does not work.
If all else fails and the connector is too far gone and cleaning it will not work, you will need to perform a harness repair.
.
In order to perform the repair you will need:
.
.
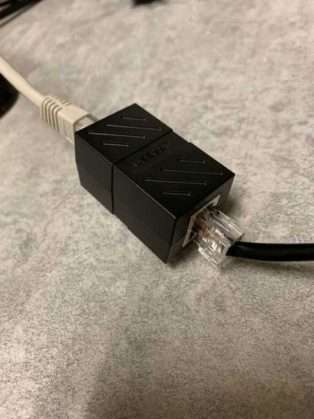
 1 x RJ45 Crimp Tool1 x Male RJ45 1 x Female to Female RJ45
.
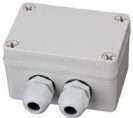
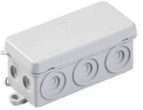
1 x Your choice of weatherproofing ( Weatherproof junction box or weatherproof Female to Female connection)
.
.
Start by removing the RJ45 end off of your IP cameras harness. Be sure
.
Strip back the outside insulation to expose the internal cables.
.
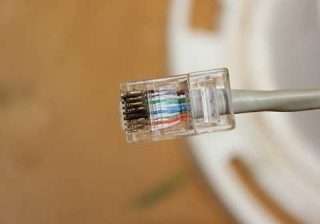
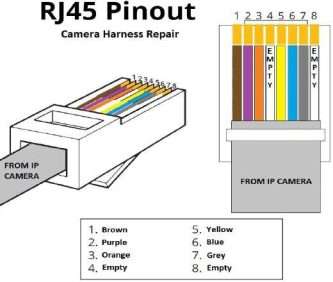
Organize the cables to match the pinout of the IP camera. Slide the organized cables into the connector and crimp. All CCTV Security Pros IP cameras will use this pinout.
Connect your Female to Female RJ45 connector to check your work, you should have a functioning IP camera now that its void of all corrision.
Now that the IP camera has been repaired we still need to weatherproof this connection. It is now more vulnerable than ever!
Consider using a weatherproof junction box to make your connections in, or perhaps a weatherproof Female to Female connector.
Remember that different coupling styles exist so make sure that you are informed about how to use the coupler before you start crimping wires.
Troubleshooting Steps 4/8/16 Channel
(Cannot Find the Network Host)
To solve the error, please verify that the camera is properly plugged into the back of the system. If you unplug and re-plug it back in this should verify it is connected physically.
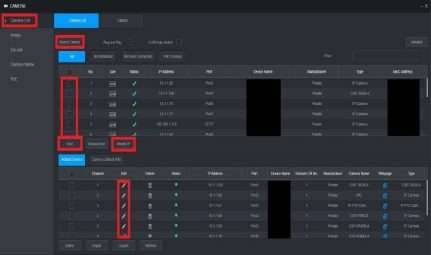
If the issue continues go to Main Menu > Camera > Camera List and delete the camera with the red status from the bottom list and do a Device Search to verify the camera is showing up on the top list.
If the camera does not show up this means the cable is not connecting properly, which could either mean the camera is not getting power or isn’t transmitting data. The best way to determine whether it is an issue with the Camera or Cable is to bench test the camera on a known working cable.
If it does show up but it has a different IP Address, please confirm the IP Address is in the 10.1.1.1-255 range (This is the default range of the internal Switch).
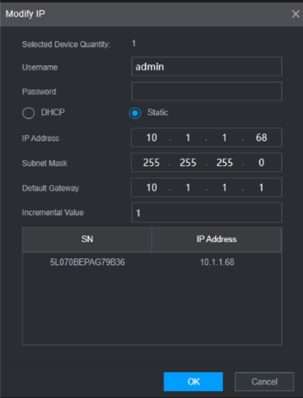
If the camera is not within the correct IP range, then the camera could need to be modified on the top list to properly connect in which you would select the camera, hit modify, type in the camera’s username and password and set the IP address to DHCP to automatically obtain an IP or statically assign the camera an IP address to match your switch range and gateway.
If the camera is on the correct range, you should be able to add it to the bottom list and it will come up with Green or Red, If Red double check the error message on the live view on the system.
If the Error says Invalid Username or Password, go back to Settings > Camera > Camera List and modify the camera at the bottom of the list and type in the correct login information.
If the error says Cannot Find the Network Host, check the IP Address is in the correct range, if it is you need to verify your cable is good by testing the camera with another known good cable or testing on a short patch cable as the cable could be experiencing packet loss.
Make sure the cable is T568B Standard and is within 100 meters (328 feet.)
Night Vision Issues
When a camera goes into night vision mode, the infrared LEDs around the lens turn on. If the video signal at nighttime or in dark locations is washed out, foggy or you see “halos” on the screen it is because the infrared LEDs are reflecting back into the camera lens.
the LEDs to reflect off of it at night.
cameras LEDs to focalize on the mounting surface and greatly reduce the Infrared distance.
get the most infrared range and clarity.
Adding 3rd Party Cameras to Blue Line NVR
We always recommend using Blue Line IP cameras with our Blue Line NVRs for the easiest and most complete experience possible. However, we understand that using 3rd Party Cameras can be beneficial in some applications. This guide will explain the basics of adding a 3rd Party IP camera into your Blue Line NVR.
Information you will need to add 3rd Party Cameras.
With your camera attached to one of the PoE ports on your NVR, you’ll navigate to the camera settings from the main menu.
A 3rd Party Camera normally will not add itself, so you will need to go into the Camera List and click on Search Device. If the camera is detected, you will be able to select it and click on the Modify IP button toward the middle of the screen.
When modifying the IP address of the camera the default IP range for the PoE ports on the NVR is
10.1.1.xxx so you’ll want to make sure the camera is on the same range.
You will need to know the camera’s password to change the IP Address. Once the IP is successfully changed it should update after clicking Search Device again
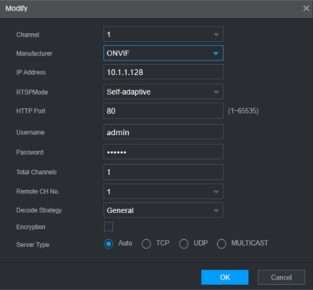
Check the box to the left of the camera and click Add. Most cameras will show up with the Manufacturer as ONVIF. If they do not and show up as red, you will need to click on the edit button on the camera and change the Manufacturer to match the camera’s manufacturer, or to ONVIF if the manufacturer of the camera is not listed.
While in the modify window you can also enter the password for the camera in the password field. Once that is completed you can click OK. After a few seconds the status should change to a green icon and then you should be able to see the camera’s live view. Please keep in mind that if the Error Message says Invalid Username or Password you may need to login to the camera from the Web and setup an Onvif User for the system to login with.
If the camera is still showing offline, setting the manufacturer to PELCO can sometimes resolve the issue.
Additional 3rd Party Camera Information
DVR/NVR Rebooting
If your DVR or NVR is rebooting by itself please read the guide below.
If your DVR or NVR is rebooting once a week this is completely normal. Our DVR and NVR systems are designed to reboot once a week (Tuesday at 2AM by default).
If your DVR or NVR is rebooting more frequently you first want to check the power source of the DVR or NVR.
Be sure you are using the correct Power Source that was included with the DVR or NVR. Below are the correct power adapter specs so you can identify the correct one.
NVRCUBE = 12V, 2.0Amp NVRWIFI = 12V, 2.0Amp
LITE Series DVR = 12V, 2.0Amp
Pro Series DVR = 12V, 5.0Amp
Pro Series NVR = 3 Prong Power Cord to Power Outlet Extreme Series DVR/NVR = 3 Prong Power Cord to Power Outlet
If you can confirm you are using the correct Power Adapter you may need to double check the outlet you are plugged into. Try an alternate outlet and eliminate any Battery Backup Power Supplies for test purposes.
If the power source is not causing the reboot cycle it could be related to the internal hard drive. To check this out please continue reading.
First you will need to Power Off the DVR. We suggest powering the system down from the Power Switch on the rear of the system or by simply unplugging the Power Cable.
Once the system has been powered down you will need to open up the system. Please see below to locate the screws that need to be removed.
NVRCUBE or NVRWIFI
There will be 4 Phillips head screws located on the bottom of the system. Once the screws are removed the top cover will lift off.
Lite Series DVR
There are 2 Phillips head screws located in the rear and 2 on the side of the DVR, 1 on each side. Once the screws are removed the top cover will lift off.
Pro Series DVR/NVR
There will be 4 Phillips head screws located on the rear of the system. Once the screws are removed the top cover will slide towards the rear and lift off.
Extreme Series DVR/NVR
There will be 2 Phillips head screws located on the rear of the system. Once the screws are removed the top cover will slide towards the rear and lift off.
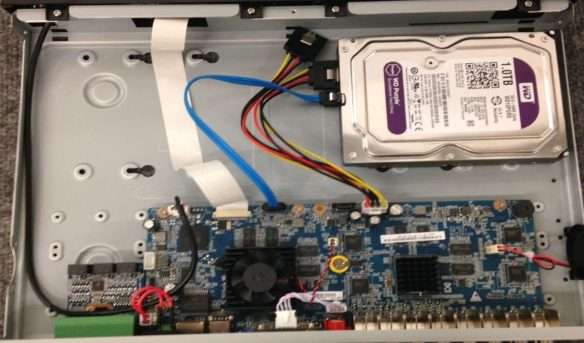
Once the top cover has been removed it will expose the Hard Drive and its connections.
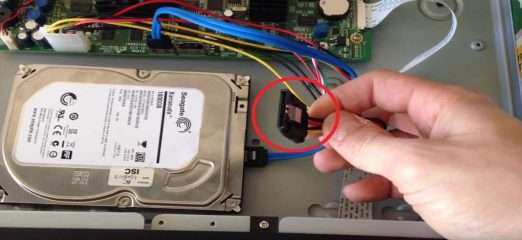
First we want to Unplug the Large Black Connector. Press down on the metal tab and pull the connector out of the Hard Drive.
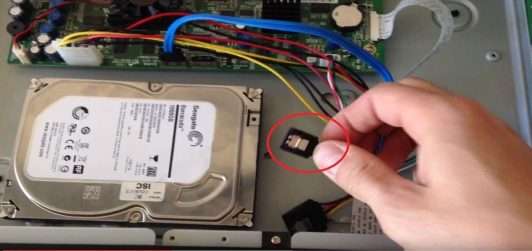
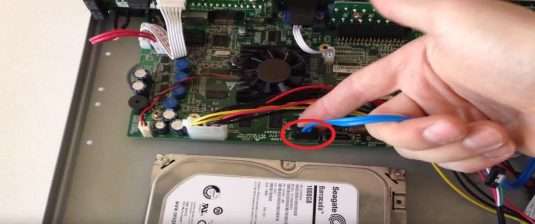
Now we want to unplug the second smaller connector (Blue Cable) from both ends. Press down on the tab and remove from the Hard Drive as well as the System Board.
Once the connections have been disconnected. Plug them back in securely and listen for the metal tab to click. This will ensure a good connection in between the System Board and Hard Drive.
Note*
While you still have the system open, it might be a good idea to check the cooling fans for any dust or debris that could be stopping the fan from moving. This could cause the DVR or NVR to overheat.
Once the connections are tight, lets put the top cover back on. When the cover is back on you can proceed to power on the system. Once the system is powered on you will need to monitor the system and check if it is still rebooting.
Disconnecting The Internet
If the system is still rebooting you may want to disconnect it from your Router or Modem by unplugging the Ethernet cable in the rear. You will loose your remote viewing capabilities temporarily while unplugged but can help us diagnose the issue.
With the cable unplugged you may want to monitor the system closely to see if this has made any changes to the rebooting issue.
Disconnecting Cameras and Other Sources
Disconnecting cameras, alarms, extra monitors and microphones is the last thing we can try to solve your rebooting issues.
Cameras, monitors, and microphones mounted near high voltage could be causing your system to reboot by itself. If your system detects any incoming voltage or amperage coming into the rear inputs the system will shut down to protect itself from damage.
Leave your main Display Monitor and Power Source connected. Disconnect one input at a time to see if it makes a change in your reboot cycle. If you notice a change in the rebooting you can single it out by using this method of elimination.
