ClareVision Camera and NVR Setup Documentation
Users now have the ability to add NVRs to their account, as well as adding cameras to the NVR.
IMPORTANT NOTE: We recommend that the cameras are first configured individually and then added to the ClareVision app before adding them through FusionPro. This ensures that the password is reset on the camera. If attempting to add the camera in FusionPro with a 6-character password or less (which is the default) it will fail.
To add a new NVR:
- Access the desired FusionPro account and click to add a new device.
Desired Account > Devices tab > Add Devices > Cameras > (Select an NVR type)
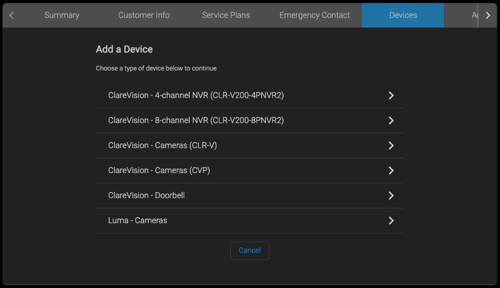
- Enter all the required info (IP address, username, password) and select the desired channels.
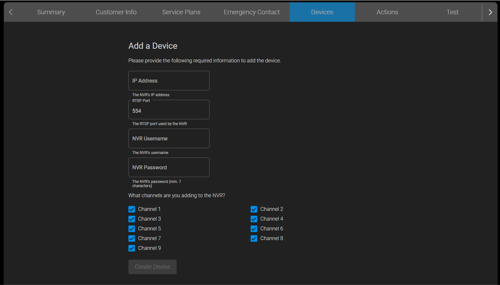
- Click Create Device.
Devices are created until an error occurs. If an error occurs, device creation will stop and it notes which channels were successfully added. If the user accidentally checked a channel that is not in use, simply uncheck the problematic channel and click Create Device.
If the user returns to the add device screen and enters the IP of an existing NVR, the existing channels are displayed.
To add a camera to an existing NVR:
- Follow the steps above for adding a camera.
– or –
Edit an existing camera on the NVR. - Scroll down to the NVR Cameras table.
- Click on an unconfigured row.
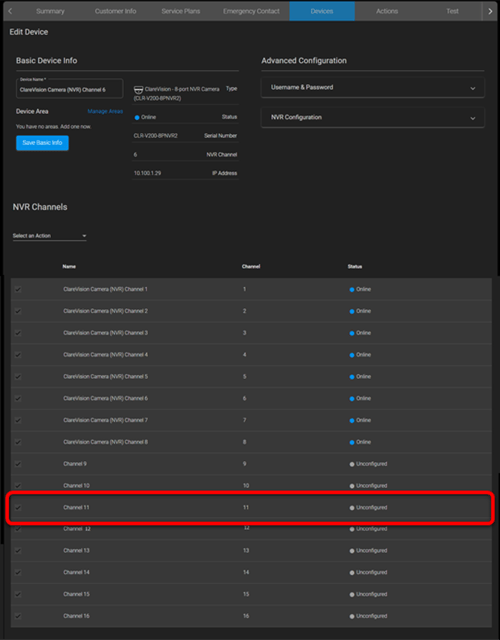
- Re-enter the username and password and click Save.
You can also navigate to any NVR channel device from another NVR channel device by clicking Edit in the NVR Cameras table of a configured channel.
To delete an NVR camera:
- Go to the Devices tab.
- Select the checkbox for the desired camera, and then select Delete in the Select an Action drop-down.
Read Next : ClareVision Camera and NVR Firmware
Cameras, NVRs, and ClareVision App Frequently Asked Questions
CAMERAS
Does Clare plan to release any WiFi cameras?
Yes, they are available as of Q1 2022. Check them out in the SnapOne store.
Are your cameras NDAA compliant?
Yes, the ClareVision product line is compliant with NDAA regulations.
Are your cameras ETL listed?
Yes, our cameras are ETL/ETL-C listed.
Are your cameras ONVIF Compliant?
Yes, ClareVision cameras are compliant with Profile S and T.
What is the difference between the Value Series, Performance series, and Color at Night?
The Value Series is intended to service accounts with basic surveillance requirements without sacrificing video quality and reliability. You will find the value series in the same high quality IP67 housings as the performance series and the video performance to be outstanding. The Performance Series adds:
- True Wide Dynamic Range (120db)
- Smart Events (Intrusion, line crossing, loitering, people gathering)
- Sony® Starvis™ image sensors for improved low light performance
- Higher power on-board processor which will allow new smart event processing features in the future
Color at Night cameras feature everything included in Performance Series cameras with the added benefit of a warm white LED light that can illuminate the scene and produce vivid color in night time settings. This allows for important details to be captured that are normally lost with IR night vision cameras such as vehicle colors, facial features, licence plates, etc.
Do all cameras come with SD Cards?
No. The 2MP and 4MP Value Series and 4MP Performance series come with pre-installed SD cards. The 8MP and varifocal Performance Series cameras do not come with SD cards. SD Cards are available for purchase should you need to add or upgrade capacity.
What can I store on the SD Card?
The SD card is intended for event storage, but you can configure normal (full time) record as well. You can only record ONE event type to record on the SD card: basic motion, smart events, OR normal record. NVR’s do not have this restriction.
What is the lapse time for the SD Card, and will it loop back?
The SD card in the 2MP is 16GB and 32GB in the 4MP cameras (both Performance and Value). For the 4MP cameras, if the defaults in the camera are left unchanged, you will be able to record approximately 18 hours of fulltime video or just over 1,000 on minute events. If the compression is changed to H.265, you will be able to store about 36 hours of fulltime video or 2,000 one-minute events. The 2mp will last slightly longer. The default setting for the cameras is loop-back enabled, meaning the camera will overwrite the oldest stored video once it runs out of storage space (FIFO).
Can I use the SD card as a ‘backup’ to the NVR by storing events locally and fulltime record and events on the NVR?
Yes. Camera recording can be set up independent from NVR recording.
What wall brackets and junction boxes are compatible with ClareVision cameras?
You can see a complete list of all ClareVision wall brackets and junction boxes, as well as cameras they are compatible with HERE.
Why is my camera recording full time when it’s configured for motion only?
All 4M V100 cameras (part number CLR-V100-4X36X) record full time and tag the motion events in the time line when motion occurs.
What are some of the important default settings I should know?
ClareVision have been configured for best out-of-box settings and experience. The default settings should be ‘ready to go’ for 90% of applications reducing training and field installation errors. The important settings are as follows:
- FPS: 15
- Compression: H.264
- IR: automatic
- WDR (when available): off
- Time: NTP time server on, refresh every 10 min, Eastern Time Zone, DST on
- Motion Record: enabled, 7 days, 24 hours a day
- Motion Events: enabled, 7 days, 24 hours a day
- Smart Events: disabled
Do any of the ClareVision cameras include built in microphones or I/O connections?
Yes, please refer to the following article for a complete list. CLICK HERE.
What is the password process and what if I lose it?
The default password is the first six characters of the UUID. The first time you log into the camera from the web console you will be prompted to change the password. You will be prompted with setting up security questions and offered to download an encryption key for password recovery. Either those questions or the encryption key can be used to reset the password. If you do not take these steps and store this information, the only way to recover the camera is a physical factory restore. (See manual). When that is done, the camera will restore to factory default settings allowing you to enter the first fix digits of the UUID as the password.
I use Hikvision, is there an ‘activation key’?
There is no ‘activation key’ for the ClareVision cameras.
What is the difference between the calendar in the storage settings menu and the calendar in the events menu?
The events menu is essentially an ‘arming’ feature. In order to propagate events to the mobile app, linked services (e.g., relays, FTP, email), or to record you need to arm an event type. The configuration of the event along with the event calendar control the CONFIGURATION of the event (e.g., H/M/L sensitivity, motion area) and the time of day / day of week the camera will trigger on an event. The event ‘arming’ controls when and how an event happens, and no other system or service will receive those events without this feature set up. The record calendar simply controls when events (or normal video) will be recorded provided they are armed at that time.
What do you recommend I do for setup with the two calendars?
The flexibility of these calendars is virtually endless, but in a majority of use cases we recommend the following:
- Set the record calendar to 7×24 record for the event type you wish to record.
- Use the event calendar to control when an event will be triggered which will in turn control when it is recorded.
How does all this relate to the mobile app and the user experience?
The event ‘arming’ controls the propagation of the event to the mobile app via push notifications. This is INDEPENDENT from whether the event is recorded. The recording under storage management controls what ends up on the SD Card which is where the mobile app goes for the event history. We cannot stress this enough: keep the storage settings calendar set to 7×24 and use the event calendar to control when a motion event (example) is triggered (push notification) and stored to the SD card (event lookup in the mobile app). If you do not do that you risk having a push notification sent to the user with no recording to view when they go to the event log.
Why then are the event arming schedules and record schedules separate?
There are plenty of use cases where you may want to record on a different schedule than the arming schedule. This can be common in more complex installs where the linkage feature for event arming is used. (see manual for more information).
What are Smart Events and how do they work?
Smart Events are events that require the presence of a human to trigger. They are also specific in nature: intrusion zone, line crossing, loiter, people gather.
What is the difference between a Motion Event and a Smart Intrusion Event?
You can essentially use the Smart Intrusion event to reduce false triggers if the primary interest is detecting the presence of a person. Motion events use a typical grid pattern and sensitivity settings to control which areas of the field of view are analyzed for motion and at what sensitivity. A car, dog, or any real motion in the included field of view will trigger an event. A smart intrusion event is set up by drawing a box around the area of interest, setting the sensitivity and detection type. Once configured, a human will have to enter the intrusion zone for the event to trigger.
How do I power the cameras?
Nearly all ClareVision cameras (excluding CLR-V100-4B36WF-W and CLR-V100-4T36WF-W) are PoE AF and do not require PoE+ (PoE AT). You can also power the cameras with a 12V DC 1amp power supply (not included).
Do the cameras support remote access?
The cameras support remote access via the mobile app via Clare’s free P2P service. Additionally, you may use Dynamic DNS or configure the local router to enable remote web access.
How do I predict the storage and bandwidth required for an installation?
You may use the Clare bandwidth and storage calculator located HERE to calculate your bandwidth and storage requirements for a project.
How do the cameras receive firmware updates?
All Clare cameras can be updated via the ClareVision OTA server using the mobile app. This is the easiest way to update the cameras. Update notices happen two different ways:
- Upon adding the camera to the app, the app will check the OTA server for a firmware update and, if available, require the user to download the update.
- Once added, if the camera is eligible for an update an icon will appear in the live view indicating there is an available update. Updates are in the device configuration dropdown under “Device Information”.
Which browsers does Clare support?
Currently, ClareVision cameras and NVRs support Google Chrome and Edge browsers.
Is there a Control4 driver for ClareVision cameras?
Yes. The Control4 driver supports live view and events including motion events and smart events. SDDP is not currently supported but will be released along with OVRC support before the end of 2021.
Is there a ClareOne driver for ClareVision cameras?
Yes. The ClareVision driver supports live view on the mobile app and ClareOne panel as well as motion and smart event propagation for automation rules and notifications.
Are the ClareVision cameras/NVRs OVRC enabled?
Currently, only ClareVision NVRs support OvrC. OvrC Support for cameras will be coming at a later date.
Do I need to do port forwarding?
No. ClareVision cameras and NVRs do not require any port forwarding.
NETWORK VIDEO RECORDERS (NVRS)
Are your NVR’s NDAA compliant?
Yes, ClareVision products are in full compliance with the NDAA regulations.
Which browsers does Clare support?
ClareVision NVR’s currently support Google Chrome and Edge browsers.
Can I record normal video (full time), smart events and motion events on independent schedules?
Yes. Recording schedules are controlled under storage management.
How much storage is on an NVR?
The 4-Channel has 1TB, the 8-Channel has 2TB and the 16-channel (upcoming) has 4TB of HDD storage on-board. The 4-channel and 8-channel support one HDD up to 8TB’s. The 16-channel supports up to 2 HDD or 16TB’s of total capacity
Do your NVR’s support outboard storage?
Yes. They support USB drives and NAS drives.
I see you list your NVR’s as 4, 8 and 16 channel but the camera support figures are higher, please explain?
The model ID for the NVR (e.g., 4-channel) is the number of PoE ports on-board. The channel support listed in the data sheet is the actual number of cameras the NVR will support. The four channel will support 9 cameras, the 8 channel will support 16 cameras and the 16 channel will support 25 cameras.
Keep in mind the cameras supported number is a license number and is not an absolute support figure. The incoming and outgoing bandwidth of the NVR will dictate the number of cameras the NVR can support in a real application. The bandwidth calculations are impacted by VBR settings, compression settings, framerate settings, motion in the field of view among other factors.
Does your NVR support 4K?
Yes. The NVR output is 4K. If the camera is not a 4K camera, the NVR will up-sample the video to 4K as it passes video to the HDMI port. The NVR will record up to 4k (8MP) camera streams.
Do your NVR’s have sensor inputs and relay outputs?
Yes. There are 16 sensor inputs and 4 relay outputs on the 16 channel NVR.
Does the NVR expose the camera settings for easy setup?
Yes, the NVR provides access to nearly all camera settings via the NVR web UI.
Is there a Control4 driver for the NVR?
Yes, the Control4 driver supports live view. If you would like events from a camera on the NVR, connect the camera to the NVR on the general LAN and not the PoE ports. When that is done, the camera driver can be used to directly access the cameras.
Is there a ClareOne Driver for the NVR?
Yes, the ClareOne driver supports live view. If you would like events from a camera on the NVR, connect the camera to the NVR on the general LAN and not the PoE ports. When that is done, the camera driver can be used to directly access the cameras.
Are the ClareVision NVR’s OVRC enabled?
Yes. ClareVision NVRs feature native OvrC Support.
Do the ClareVision NVR’s work with legacy ClareVision Plus cameras?
Yes. We have tested all ClareVision Plus cameras on the ClareVision NVR’s. They will add as ‘ONFIV’ cameras.
Do the ClareVision NVR’s work with Luma cameras?
Yes. We have tested products from each Luma category on the ClareVision NVR’s. They will add as ‘ONVIF’ cameras.
When a ClareVision Plus camera or Luma camera are connected to a ClareVision NVR, which app do I use?
Connecting a ClareVision Plus camera, Luma camera (or ONVIF camera) to a ClareVision NVR enables the ClareVision app to gain access to the cameras for purposes of live view and event playback. The live view NVR integration to ClareOne and Control4 will also function. In effect, the ClareVision NVR ‘adapts’ a ClareVision Plus or third party ONVIF camera to the ClareVision cloud. You can use this technique to take over camera systems that are ONVIF compliant and bring them to the Clare Cloud!
Can I add or change a ClareVision NVR hard disk drive?
Yes, the four, eight and sixteen channel NVR’s have 1TB, 2TB and 4TB hard disk drives pre-installed. The four and eight channel NVR’s can support one hard disk drive up to 8TB. The sixteen channel NVR has four drive bays total and ships with 1 4TB HDD pre-installed. The sixteen channel NVR can be equipped with up to four 8TB internal hard disk drives, or 32TB’s total storage. Additionally, the sixteen channel NVR has an external SATA port for connection to external hard disk arrays. The warranty is not voided when you change or upgrade hard disk drives.
What manufacturer and model hard drives are recommended?
Clare installs and recommends Toshiba DT series hard disk drives designed for surveillance applications.
CLAREVISION APP
Which operating systems is the app available on?
The ClareVision App is available on the Google Play store for Android and Apple App store for iOS.
Does the mobile app support NVR’s and cameras?
Yes. There is a different view for NVR’s (grid view) than cameras. The features and actions are nearly identical other than the device presentation.
How do I add cameras to the mobile app?
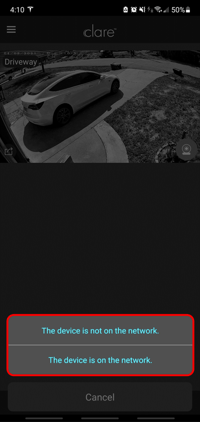
Adding cameras is extremely simple in ClareVision. Tap the “+” sign on the home page, tap ‘device is on the network’ if you are on the same network as the camera (e.g., home LAN), the app will scan the local network for all unattached cameras and NVR’s and produce a list of cameras for inclusion. Select the camera you would like to add and enter the password. You can now access the camera for live view and view all stored events on the camera or NVR.
How do I configure the mobile app or cameras for remote viewing?
No configuration required. Once you add the device to the mobile app, the Camera is enabled in the ClareVision cloud automatically.
Can I add a camera remotely?
Yes. Tap the “+” button on the home screen and either scan the UUID or enter it by hand, enter the password and done.
I have noticed there are very few configuration options for camera events in the mobile app. Why is that?
That was intentional. Most pro-style apps do not provide configuration features in the end user mobile app. We did not want the user to inadvertently alter the configuration you enabled thereby causing a service visit. We will gradually enable end user configuration when that feature (e.g., motion) can be completely displayed to the end user and you can remotely view the changes and correct them in the event a user configured something incorrectly.
Which events are supported by the mobile app at launch?
Motion events are supported at launch. Smart events are not. We expect to release smart events support before the end of Q2 2021.
Can I search for a recording or event by date/time?
Yes, tap ‘Filter’ in the event log to filter by event type and/or date/time.
I see you still have ClareHome/ClareOne and now ClareVision. What do I need to do to enable the best consumer experience?
While there are several ways to configure a ClareOne/ClareVision system, we recommend the following sequence as a guide to best practices:
During the setup of the ClareOne panel via FusionPro, go to the “Add Devices” tab and select Cameras. When in that screen FusionPro/ClareOne will scan the local network for ClareVision Cameras and produce a list of devices you may add. In that screen, each camera discovered on the network includes a configuration web console link. Use that link to connect to the ClareVision Camera(s) or NVR web interface.
Use the web console for the cameras or NVR to set the password and configure the camera/NVR including event arming and recording schedules
Once complete, enter the new device username (default admin) and the new;y changed password in FusionPro to enable the camera(s) and NVR in ClareOne.
Once the cameras are installed, have the user download the ClarOne/ClareHome app and the ClareVision app. Once the user has signed into the ClarHome app and added the desired cameras to the ClareVision app the two apps will deep link.
A deep link action happens when a user taps the ClareHome camera icon on the favorites page. Doing so will automatically take the user to the ClareVision app to that camera’s live feed. Tapping the back arrow in Android or the app name in the upper left corner of an iOS device will return the user to ClareHome/ClareOne.
Why did you release ClareVision on a second app?
After a great deal of deliberation, we determined that the stand-alone use cases for the camera line did not need the burden of the entire ClareHome application, and that through deep linking we could create a near ‘single app’ experience for the user when both systems are present.
Where else is deep linking used?
Everywhere. Any app you use where you touch an icon or hyperlink uses deep linking to take you to the destination app/web site. The most well-known example of deep linking is Facebook and Facebook Messenger. The messaging app is an independent app from the base Facebook app and uses deep linking to provide a seamless user experience.
Will there be a single account in the future for users with ClareOne and ClareVision?
Yes. We are working hard to provide a single-sign-on experience for the Clare Ecosystem.
Is there a monthly fee for ClareVision services?
No. The P2P service and all cloud services are free of charge. We encourage dealers to charge for this service as part of your recurring monthly fee however making 100% of your service fee drop to your bottom line!
Introduction
The ClareVision camera line includes Value, Performance, and Varifocal series cameras which are available in bullet, dome, and turret forms. This guide covers the setup process for using these cameras standalone with only the ClareVision App and how to add them to work with the ClareOne Panel and ClareHome App.
FAQ’s, Best Practices, and How-To’s:
How do I configure ClareVision WiFi Cameras?
How can I fix streaming issues when viewing a camera feed in the ClareVision App?
What video encoding does the ClareOne Panel or Control4 system support?
How do I configure Smart Events like humanoid detection?
How do I set up Cloud Storage for ClareVision cameras?
Understanding Recording Schedules vs. Arming Schedules on ClareVision Cameras
Part 1 of 3: ClareVision Camera Setup:
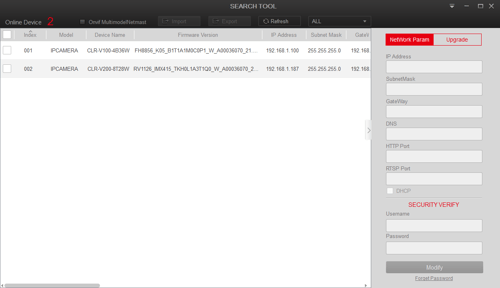
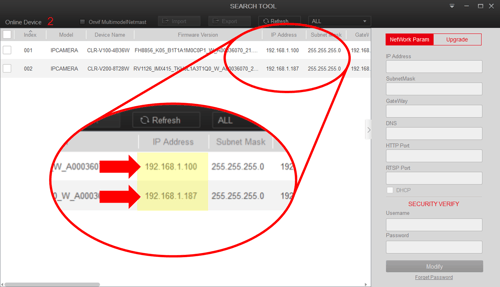
4. Enter default camera username and password.
The password is case sensitive:
Default Username: admin
Default Password: First SIX characters of the UUID/SN
Note: The UUID/SN can be found on the rear of the camera and installation manual.
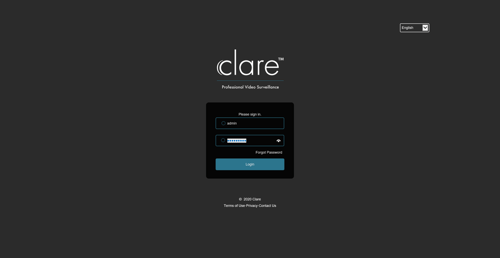
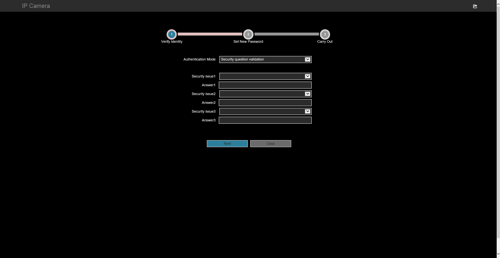
NOTE: You should now be able to log into the camera web console which gives you access to all advanced camera configuration settings. Here you can adjust motion detection settings, storage, smart events (Performance Series cameras), and more. For a complete breakdown of these settings and to view the in-depth camera setup guide, please click HERE.
Part 2 of 3: ClareVision Account Creation and Camera Inclusion:
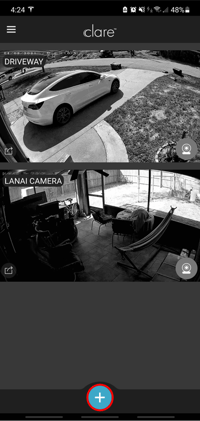
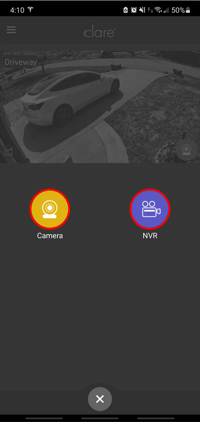
“The device is on the network”
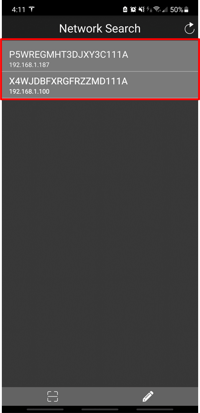
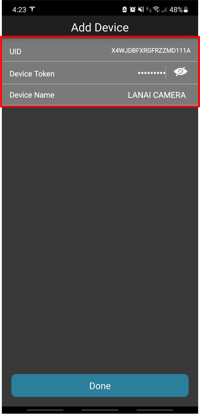
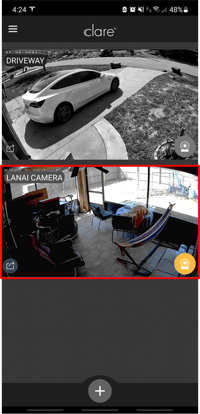
Cameras can now be accessed using the ClareVision App and will work Standalone. Camera setup for standalone use is now complete. Please follow the next step if you would like to integrate the cameras to work with the ClareOne Panel and ClareHome App.
Part 3 of 3: (Optional) Setting up ClareVision for use with ClareOne Panel and ClareHome App
1. Navigate to FusionPro and access the customers account.
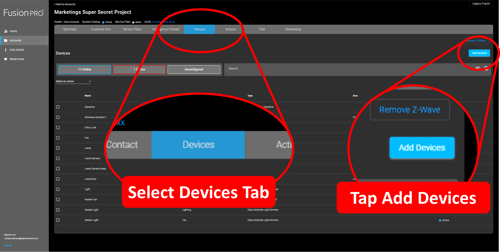
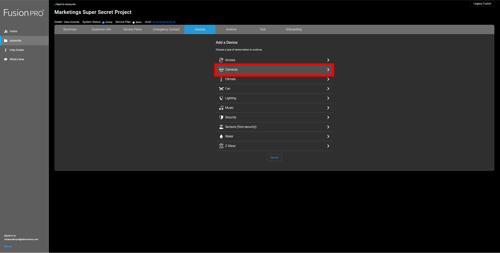
5. FusionPro will search the network for compatible cameras and display a list of all available cameras found.
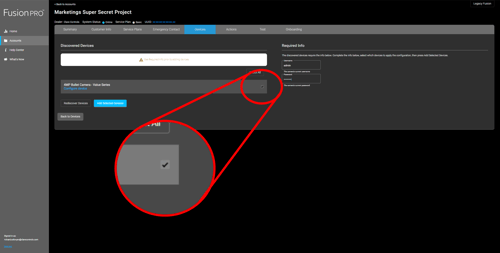
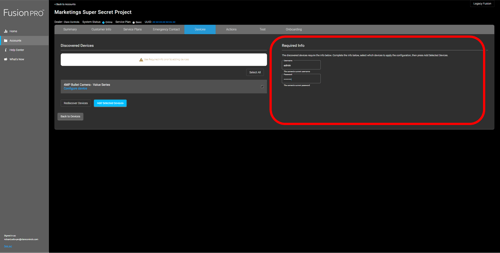
Adding camera tiles to ClareOne Panel and ClareHome App:
1. Tap on any free tile on the ClareOne or ClareHome Favorites screen to bring up the device list.
2. Select “CCTV” from the list.
3. Tap “+ add” next to the desired camera.
Devices Covered
The list of cameras covered by this Quick Start Guide are as follows:
| Model Number | Camera Name |
| CLR-V100-2T36(B/W) | ClareVision 2MP IP Turret Camera, 3.6MM lens, 16GB SD Card, (Black/White) |
| CLR-V100-2B36(B/W) | ClareVision 2MP IP Bullet Camera, 3.6MM lens, 16GB SD Card, (Black/White) |
| CLR-V100-4B36(B/W) | ClareVision 4MP IP Bullet Camera, 3.6MM lens, 32GB SD Card, (Black/White) |
| CLR-V100-4T36(B/W) | ClareVision 4MP IP Turret Camera, 3.6MM lens, 32GB SD Card, (Black/White) |
| CLR-V200-4T28(B/W) | ClareVision 4MP IP Turret Camera, 2.8MM lens, 32GB SD Card, Starlight, WDR, (Black/White) |
| CLR-V200-4B28(B/W) | ClareVision 4MP IP Bullet Camera, 2.8MM lens, 32GB SD Card, Starlight, WDR, (Black/White) |
| CLR-V200-4D28(B/W) | ClareVision 4MP IP Dome Camera, 2.8MM lens, 32GB SD Card, Starlight, WDR, (Black/White) |
| CLR-V200-8D28(B/W) | ClareVision 8MP IP Dome Camera, 2.8MM lens, Starlight, WDR, (Black/White) |
| CLR-V200-8B28(B/W) | ClareVision 8MP IP Bullet Camera, 2.8MM lens, Starlight, WDR, (Black/White) |
| CLR-V200-8T28(B/W) | ClareVision 8MP IP Turret Camera, 2.8MM lens, Starlight, WDR, (Black/White) |
| CLR-V200-4DVF(B/W) | ClareVision 4MP Motorized Varifocal IP Dome Camera, 2.7-13.5mm, Starlight, WDR, (Black/White) |
| CLR-V200-4TVF(B/W) | ClareVision 4MP Motorized Varifocal IP Turret Camera, 2.7-13.5mm, Starlight, WDR, (Black/White) |
| CLR-V200-4BVF(B/W) | ClareVision 4MP Motorized Varifocal IP Bullet Camera, 2.7-13.5mm, Starlight, WDR, 60M IR, (Black/White) |
In this article, we will cover the basics on setting up 2-way audio on ClareVision cameras and provide you with best practices when setting up audio input and output.
Index:
Audio Setup using External Microphone and Speaker
Testing Audio
Audio Setup using Built-in Microphone
IMPORTANT NOTES:
- Not every ClareVision camera supports 2 way audio. Cameras must have an Audio IN and Audio OUT connector. Note that most have RCA type connectors while a couple have 3.5mm connectors. Refer to the ClareVision Camera Cables and Connectors Guide for a list of which cameras include external Audio In/Out.
- The ClareVision cameras do not provide power for any externally connect speaker or microphone, power must be provided to each according the manufacturers’ specifications.
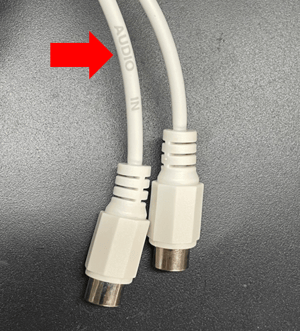
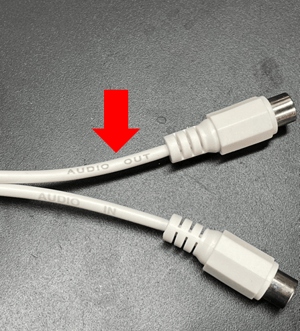
- The Audio IN and Audio OUT cables are clearly marked on the cables.
- It is acceptable to use a RCA to 3.5mm converter for speaker and microphone connections.
Audio Setup using External Microphone and Speaker
You will need to connect your external speaker and microphone to the camera using an RCA adaptor or 3.5mm jack with Wi-Fi cameras. ClareVision cameras do not provide power to the external speakers and microphone, you will need to make sure they are powered separately.
For a list of cameras that have built-in microphones or support external speakers and microphones, please refer to our ClareVision Camera Cable Guide.
- Connect the microphone to the cable labeled Audio In.
- Connect the speaker to the cable labeled Audio Out.
- Connect power to the external speaker and microphone according to their specifications.
- Using Chrome or Edge, browse and log in to the camera’s user interface using the camera’s IP address and navigate to the Audio Configuration settings.
Configuration > Video > Audio.
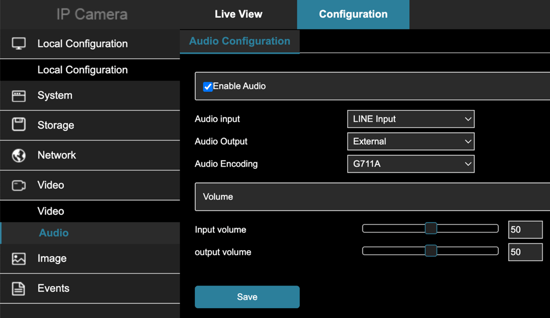
- Enable Audio settings and select:
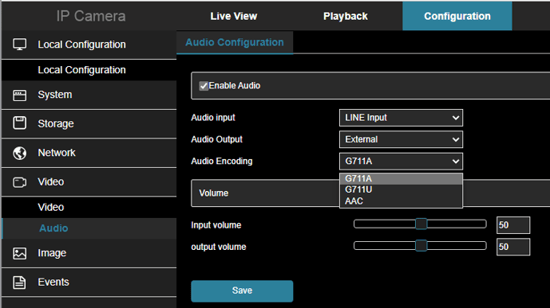
- Audio Input: LINE Input
- Audio Output: External
- Audio Encoding: G711A.
- You may need to adjust the Audio Input and Output volumes depending on your audio hardware.
- Tap Save to save your configuration settings.
TIP:
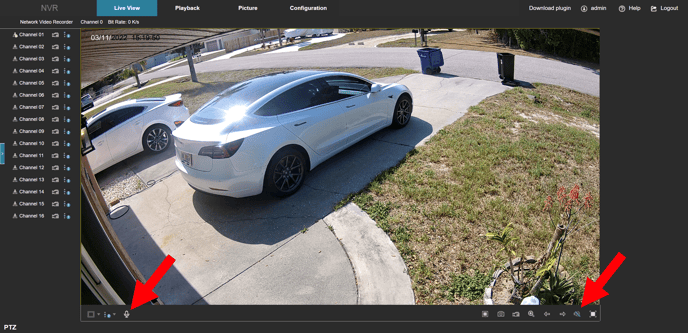
You can access camera audio from the web console by tapping on the Speaker Icon to hear sounds, and Microphone Icon to speak through the camera. Note: you will need to enable the Audio settings for Line In and Line Out, as well as allow the web browser to access your computer’s microphone. You will not be able to play sounds out of a camera that does not support a Line Out external speaker.
Testing Audio
-
- Test the speaker and microphone by opening the ClareVision App.
- Select the camera you would like to test and enter the Live Feed.
- Tap on the Speaker button in the app to hear audio coming from the camera’s connected microphone. You can tap on or speak into the external microphone while someone is listening on the app.
Note: Having the app too close to the external speaker and microphone may result in feedback.
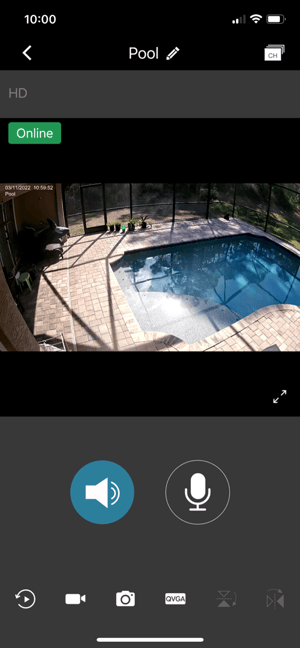
- Tap the Microphone button in the app and speak into your mobile device. You should be able to hear your voice through the connected speaker.
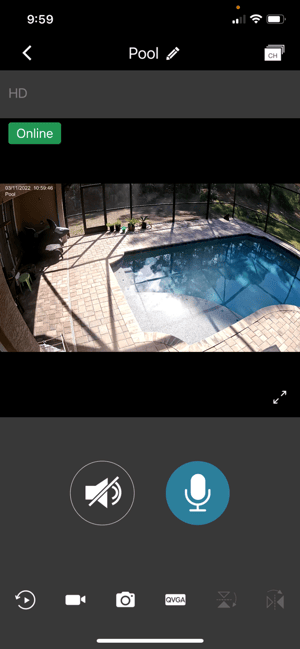
- Adjust the audio output and input from the camera Web Console in the Audio Configuration settings as needed.
- That’s it, you are all set!
Audio Setup using Built-in Microphone
Some ClareVision cameras include a built-in microphone. You can access the microphone from your live video feed in the ClareVision App.
- Open the ClareVision App
- Select on your camera that supports a built-in microphone.
- Tap the speaker icon to start hearing audio.

How to Access the Reset Button on a Fixed Lens Turret
- The Reset Button is located on the side of the camera sphere. Rotate the sphere until the weather resistant cover is revealed.
- Using a Philips head screwdriver, unscrew the protective cap to reveal the reset button.
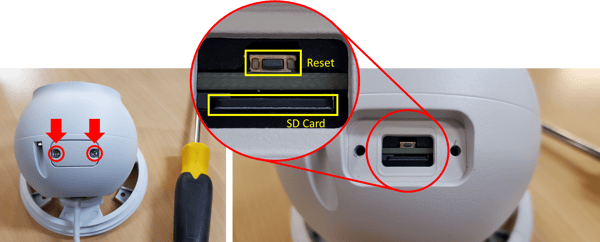
- Reset the camera by holding down the Reset Button for 10-15 seconds. Camera must be powered on.
- Secure the cover in place using the original screws.
- Done!
How to Access the Micro SD Card Slot on a Fixed Lens Turret:
- The Micro SD Card slot is located on the side of the camera sphere below the Reset Button. Rotate the sphere until the weather resistant cover is revealed.
- Using a Philips head screwdriver, unscrew the protective cap to reveal the reset button.

- Press on the Micro SD Card to eject it.
- Press a replacement Micro SD Card into the slot until you hear a click to firmly lock it in place.
- Secure the cover back in place using the original screws.
- Done!
IMPORTANT: We recommend only ClareVision Micro SD Cards be used with ClareVision cameras. Non-Clare branded Micro SD cards may not meet the performance requirements for optimal operation.
How to Access the Reset Button on a Fixed Lens Dome
- The Reset Button is located under the protective dome of the camera. Unscrew the three security set screws using the included alan key and carefully remove the dome cover.
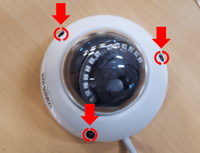
- The Reset Button is located on the main PCB board below the camera mounting structure.
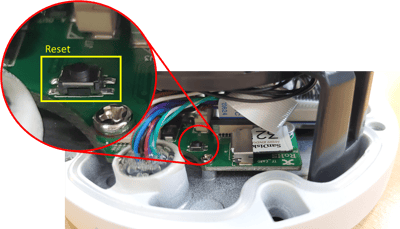
- Reset the camera by holding down the Reset Button for 10-15 seconds. Camera must be powered on.
- Replace the protective dome and screw in the original screws.
- Done!
How to Access the Micro SD Card Slot on a Fixed Lens Dome:
- The Reset Button is located under the protective dome of the camera. Unscrew the three security set screws using the included alan key and carefully remove the dome cover.

- The Micro SD Card slot is located on the main PCB board below the camera mounting structure.
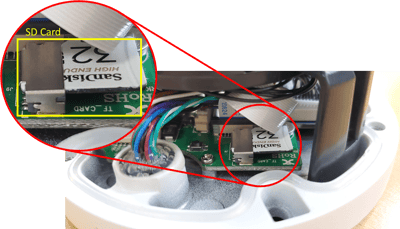
- Press on the Micro SD Card to eject it.
- Press a replacement Micro SD Card into the slot until it firmly locks in place.
- Replace the protective dome and screw in the original screws.
- Done!
IMPORTANT: We recommend only ClareVision Micro SD Cards be used with ClareVision cameras. Non-Clare branded Micro SD cards may not meet the performance requirements for optimal operation.
The amount of bandwidth you’ll need depends on your encoding bitrate. For example, if you are encoding at 3,000 Kbps, you will need at least 3 Mbps of upload bandwidth. If your stream’s bitrate is too high relative to your upload bandwidth, your live stream will be unreliable for viewers. For example, a stream with a 6,000 Kbps bitrate doesn’t work on a network with a 5 Mbps upload bandwidth limit.
Above are the general required bandwidth for streaming guidelines. For example, the minimum bandwidth required for 1080p (HD) streaming is 5 Mbps, while the minimum 4K (UHD) streaming bandwidth is around 25 Mbps.
Use the following table as a reference for pulling RTSP streams from the ClareVision (CLR-VXX) cameras and NVR.
NOTES:
- The V100 series cameras support only two streams.
- Channels on the NVR and Camera are numbered in a zero-based format. Ch 1 = 0 in the URL, and stream 1 = 0 in the camera.
- The listed URLs for NVRs work only if the NVR is on current firmware. As of this posting that is 22.1.30.4.
| Device Type | Channel/ Stream |
Stream URL | Notes |
| V300 Camera | Main Stream | rtsp://[username]:[password]@[IP]:554/0 | |
| V300 Camera | 2nd Stream | rtsp://[username]:[password]@[IP]:554/1 | |
| V300 Camera | 3rd Stream | rtsp://[username]:[password]@[IP]:554/2 | |
| V200 Camera | Main Stream | rtsp://[username]:[password]@[IP]:554/0 | |
| V200 Camera | 2nd Stream | rtsp://[username]:[password]@[IP]:554/1 | |
| V200 Camera | 3rd Stream | rtsp://[username]:[password]@[IP]:554/2 | |
| V100 Camera | Main Stream | rtsp://[username]:[password]@[IP]:554/0 | |
| V100 Camera | 2nd Stream | rtsp://[username]:[password]@[IP]:554/1 | |
| V100 Camera | 3rd Stream | Not supported | |
| NVR | Ch 1/Stream 1 | rtsp://[username]:[password]@[IP]:10201/00 | |
| NVR | Ch 1/Stream 2 | rtsp://[username]:[password]@[IP]:10201/01 | |
| NVR | Ch 1/Stream 3 | rtsp://[username]:[password]@[IP]:10201/02 | If supported |
| NVR | Ch 2/Stream 1 | rtsp://[username]:[password]@[IP]:10202/00 | |
| NVR | Ch 2/Stream 2 | rtsp://[username]:[password]@[IP]:10202/01 | |
| NVR | Ch 2/Stream 3 | rtsp://[username]:[password]@[IP]:10202/02 | If supported |
| NVR | Ch 3/Stream 1 | rtsp://[username]:[password]@[IP]:10203/00 | |
| NVR | Ch 3/Stream 2 | rtsp://[username]:[password]@[IP]:10203/01 | |
| NVR | Ch 3/Stream 3 | rtsp://[username]:[password]@[IP]:10203.02 | If supported |
| NVR | Ch 4/Stream 1 | rtsp://[username]:[password]@[IP]:10204/00 | |
| NVR | Ch 4/Stream 2 | rtsp://[username]:[password]@[IP]:10204/01 | |
| NVR | Ch 4/Stream 3 | rtsp://[username]:[password]@[IP]:10204/02 | If supported |
| NVR | Ch 5/Stream 1 | rtsp://[username]:[password]@[IP]:10205/00 | |
| NVR | Ch 5/Stream 2 | rtsp://[username]:[password]@[IP]:10205/01 | |
| NVR | Ch 5/Stream 3 | rtsp://[username]:[password]@[IP]:10205/02 | If supported |
| NVR | Ch 6/Stream 1 | rtsp://[username]:[password]@[IP]:10206/00 | |
| NVR | Ch 6/Stream 2 | rtsp://[username]:[password]@[IP]:10206/01 | |
| NVR | Ch 6/Stream 3 | rtsp://[username]:[password]@[IP]:10206/02 | If supported |
| NVR | Ch 7/Stream 1 | rtsp://[username]:[password]@[IP]:10207/00 | |
| NVR | Ch 7/Stream 2 | rtsp://[username]:[password]@[IP]:10207/01 | |
| NVR | Ch 7/Stream 3 | rtsp://[username]:[password]@[IP]:10207/02 | If supported |
| NVR | Ch 8/Stream 1 | rtsp://[username]:[password]@[IP]:10208/00 | |
| NVR | Ch 8/Stream 2 | rtsp://[username]:[password]@[IP]:10208/01 | |
| NVR | Ch 8/Stream 3 | rtsp://[username]:[password]@[IP]:10208/02 | If supported |
| NVR | Ch 9/Stream 1 | rtsp://[username]:[password]@[IP]:10209/00 | |
| NVR | Ch 9/Stream 2 | rtsp://[username]:[password]@[IP]:10209/01 | |
| NVR | Ch 9/Stream 3 | rtsp://[username]:[password]@[IP]:10209/02 | If supported |
| NVR | Ch 10/Stream 1 | rtsp://[username]:[password]@[IP]:10210/00 | |
| NVR | Ch 10/Stream 2 | rtsp://[username]:[password]@[IP]:10210/01 | |
| NVR | Ch 10/Stream 3 | rtsp://[username]:[password]@[IP]:10210/02 | If supported |
| NVR | Ch 11/Stream 1 | rtsp://[username]:[password]@[IP]:10211/00 | |
| NVR | Ch 11/Stream 2 | rtsp://[username]:[password]@[IP]:10211/01 | |
| NVR | Ch 11/Stream 3 | rtsp://[username]:[password]@[IP]:10211/02 | If supported |
| NVR | Ch 12/Stream 1 | rtsp://[username]:[password]@[IP]:10212/00 | |
| NVR | Ch 12/Stream 2 | rtsp://[username]:[password]@[IP]:10212/01 | |
| NVR | Ch 12/Stream 3 | rtsp://[username]:[password]@[IP]:10212/02 | If supported |
| NVR | Ch 13/Stream 1 | rtsp://[username]:[password]@[IP]:10213/00 | |
| NVR | Ch 13/Stream 2 | rtsp://[username]:[password]@[IP]:10213/01 | |
| NVR | Ch 13/Stream 3 | rtsp://[username]:[password]@[IP]:10213/02 | If supported |
| NVR | Ch 14/Stream 1 | rtsp://[username]:[password]@[IP]:10214/00 | |
| NVR | Ch 14/Stream 2 | rtsp://[username]:[password]@[IP]:10214/01 | |
| NVR | Ch 14/Stream 3 | rtsp://[username]:[password]@[IP]:10214/02 | If supported |
| NVR | Ch 15/Stream 1 | rtsp://[username]:[password]@[IP]:10215/00 | |
| NVR | Ch 15/Stream 2 | rtsp://[username]:[password]@[IP]:10215/01 | |
| NVR | Ch 15/Stream 3 | rtsp://[username]:[password]@[IP]:10215/02 | If supported |
| NVR | Ch 16/Stream 1 | rtsp://[username]:[password]@[IP]:10216/00 | |
| NVR | Ch 16/Stream 2 | rtsp://[username]:[password]@[IP]:10216/01 | |
| NVR | Ch 16/Stream 3 | rtsp://[username]:[password]@[IP]:10216/02 | If supported |

This text is priceless. When can I find out more?