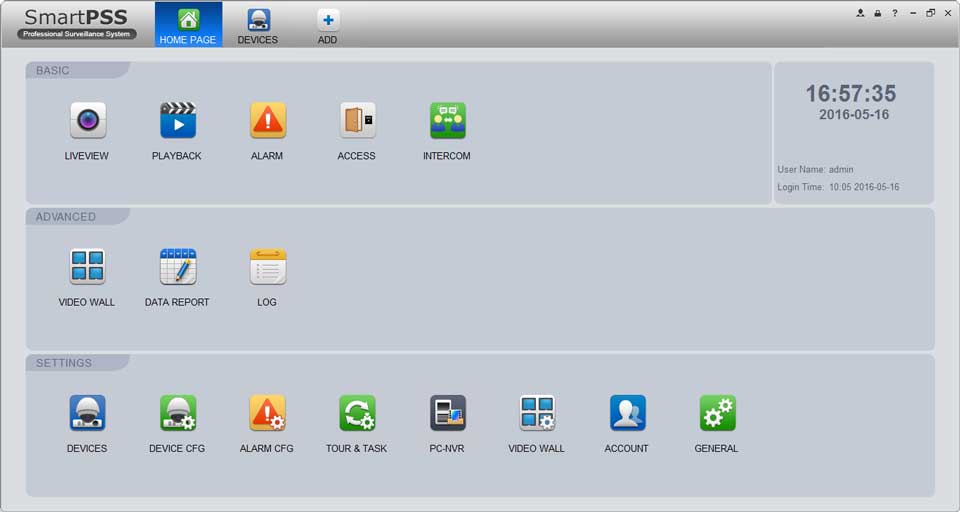
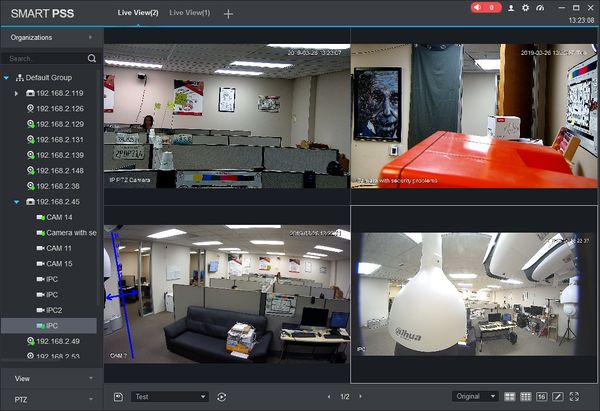
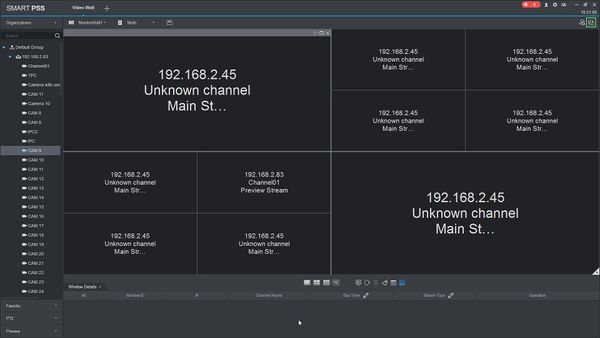
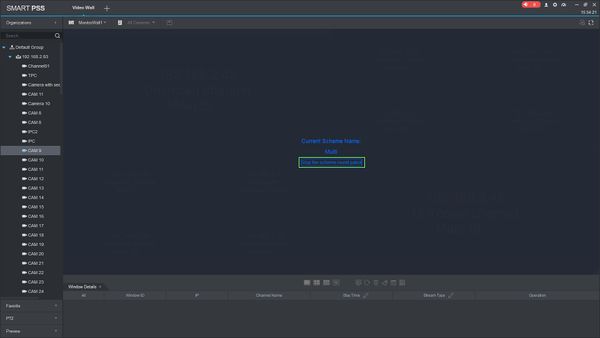
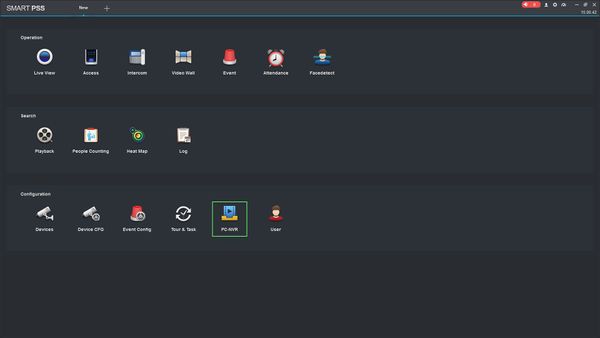
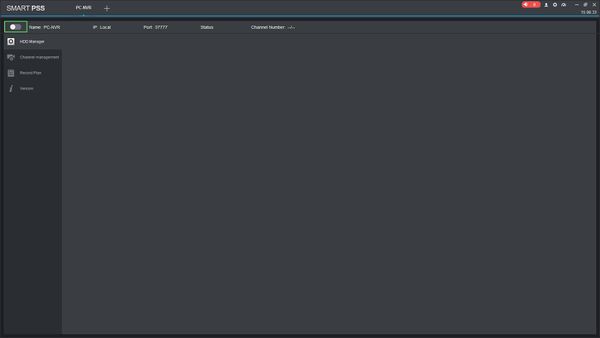
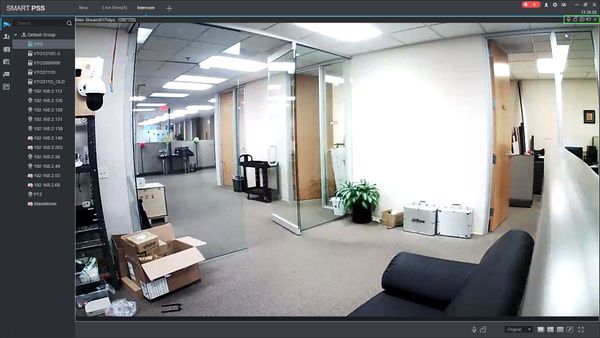
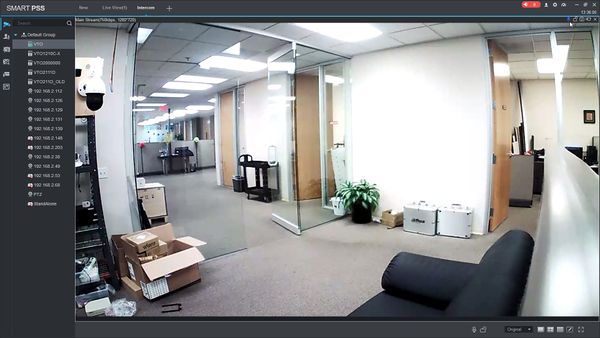
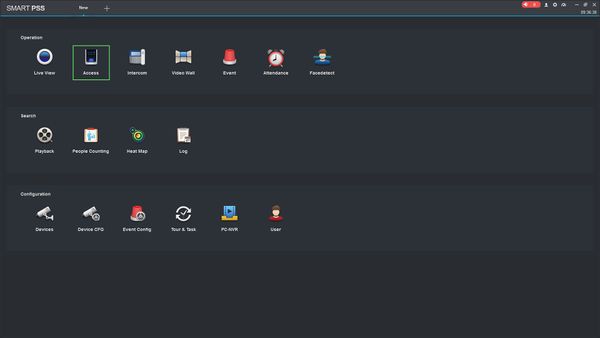
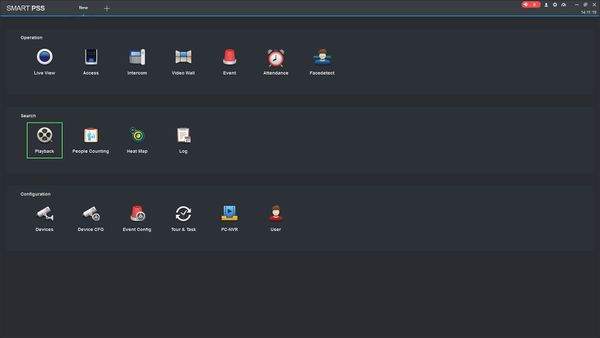
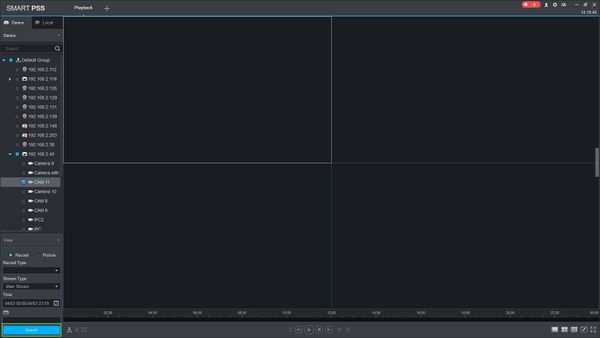
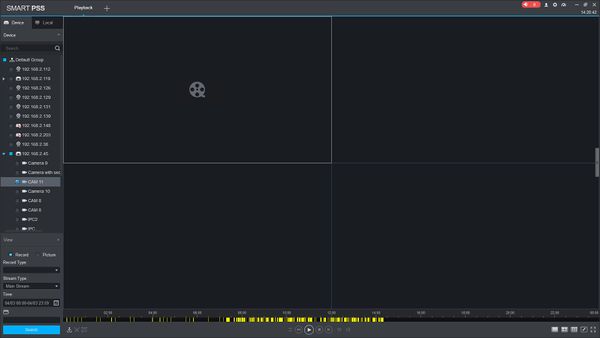
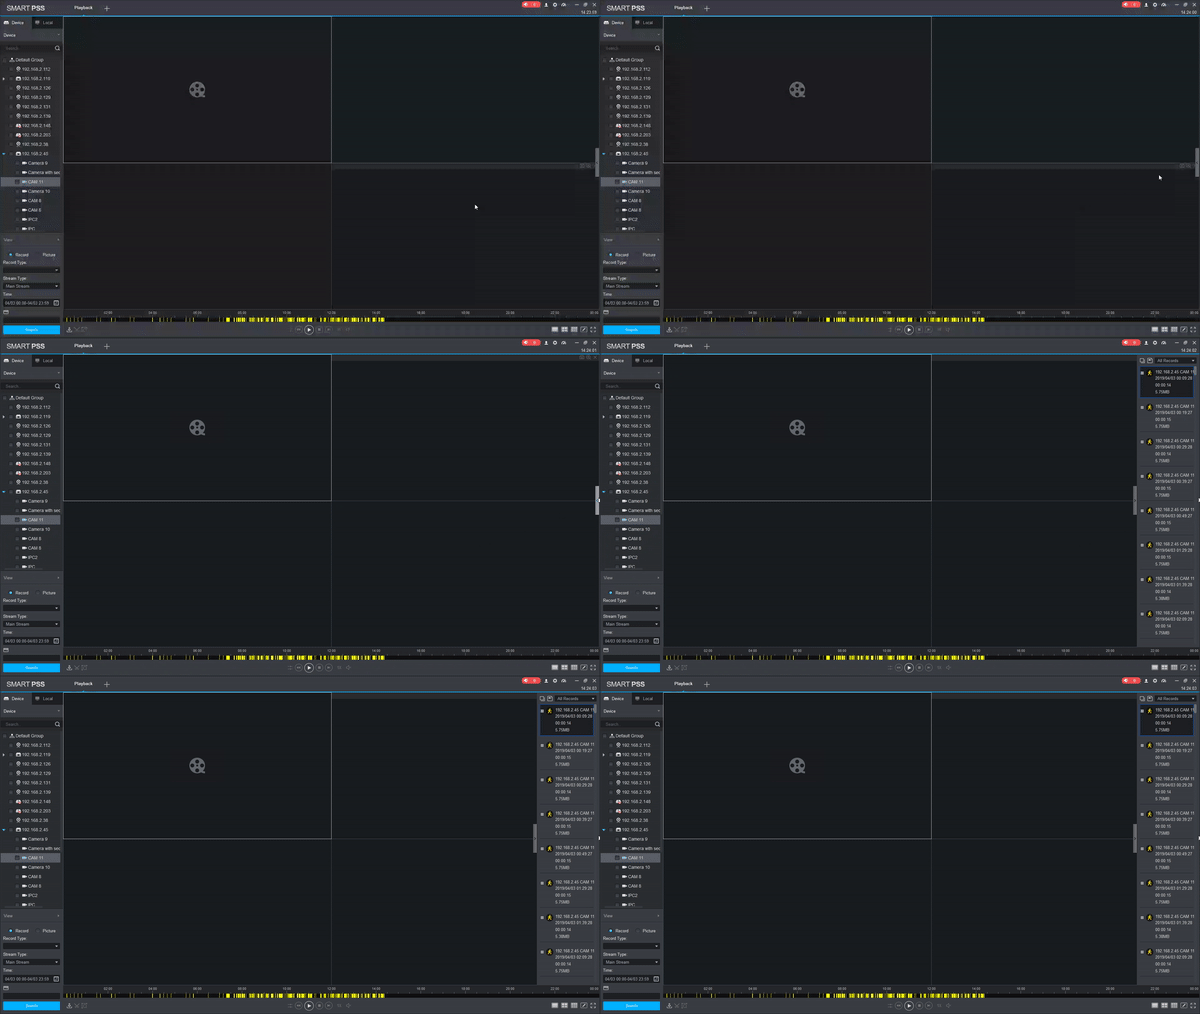
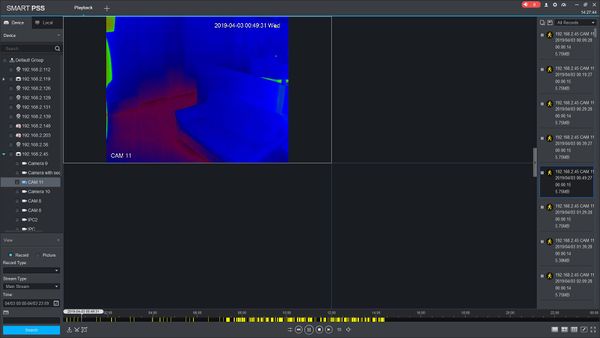
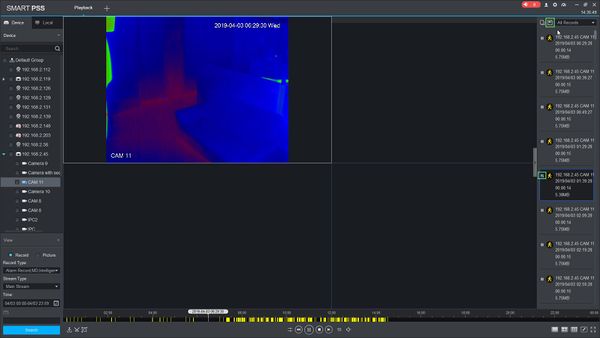
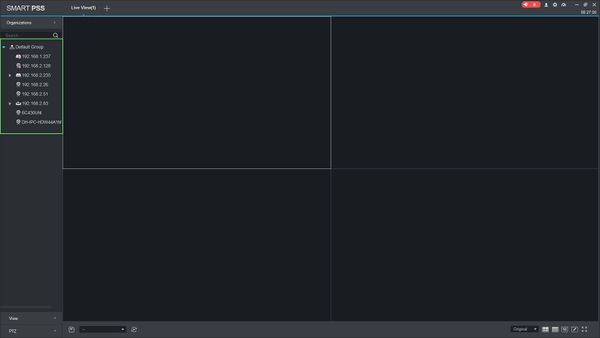
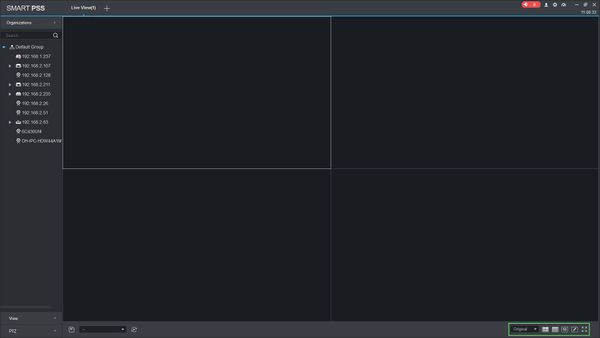
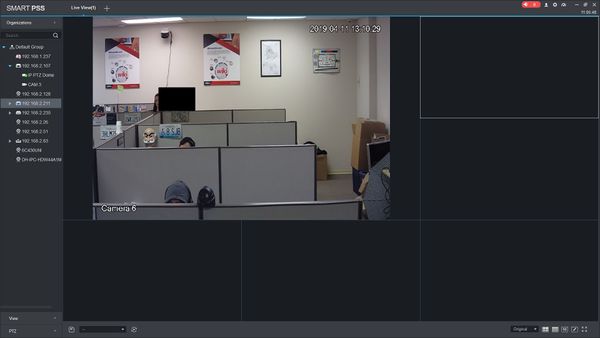
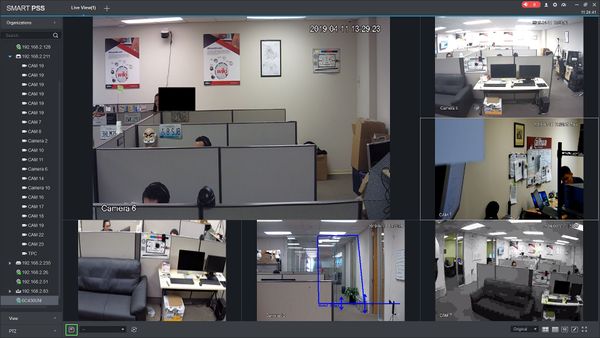
How to Smartpss Configuration SmartPSS is an all-in-one, full-featured video surveillance application that is ideal for the small to mid-size business that needs to monitor people, premises, and assets.
SmartPSS integrates all Dahua network cameras and storage devices into one intuitive, easy to use interface. The software provides efficient device management, video monitoring and playback, alarm and analytic configuration, as well as video wall setup and preview.
Content ;
- How to Use SmartPSS with Two Monitors
- How to Use Task Plan in SmartPSS
- How to Enable Task in SmartPSS
- How to Export Device Record in SmartPSS
- How to Export Device Picture in SmartPSS
- How to Playback Local Record in SmartPSS
- How to Search Client Log
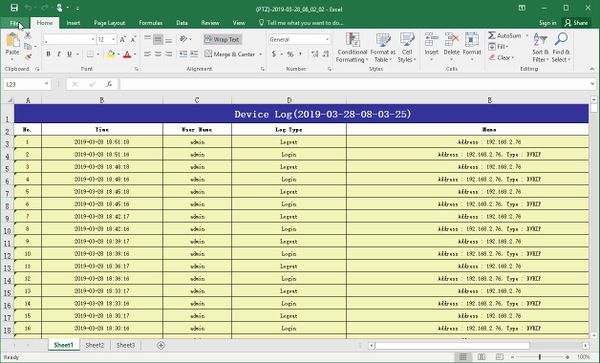
- How to Search Device Log in SmartPSS
- How to Create a User in SmartPSS
- How to Setup Event Alarm Link
- How to Setup Video Wall
- How to Setup PC NVR
- How to Setup Video Talk
- How to Setup Video Wall
- How to Setup Attendance
- How to Setup Access
- How to Import & Export Access User List
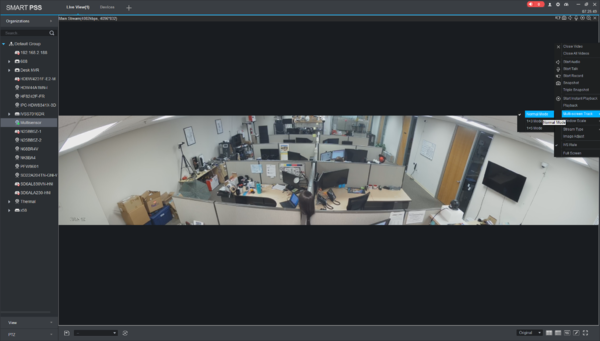
- How to Use Different Multisensor Camera Modes
- How to Playback Events
- How to Setup Customer Screen View
- EMap Setup
- SmartPSS 2.09 – Event Config Setup For MD Window Pop-up
How To Use SmartPSS With Two Monitors
Description
This article will show you how to open SmartPSS on multiple monitors
Prerequisites
- SmartPSS
- More than 1 Monitor Connected to the computer running SmartPSS
Read Next : Dahua NVR XVR Basic Setup Initial Setup
Video Instructions
Step by Step Instructions
1. Launch SmartPSS.
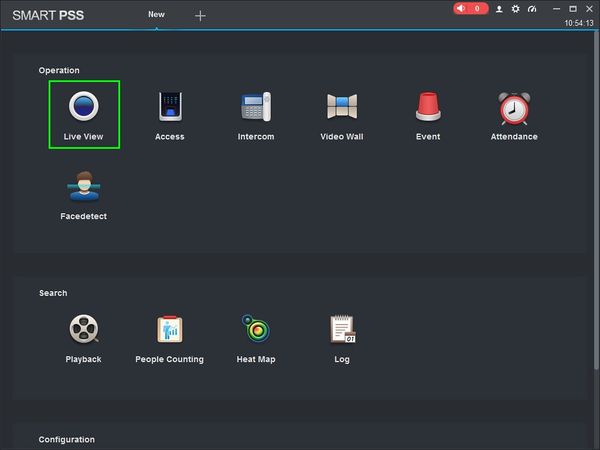
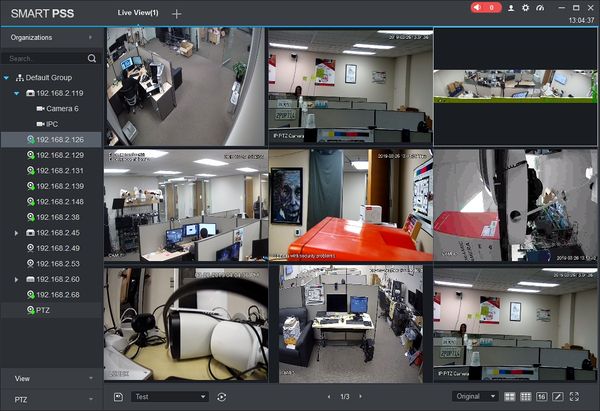
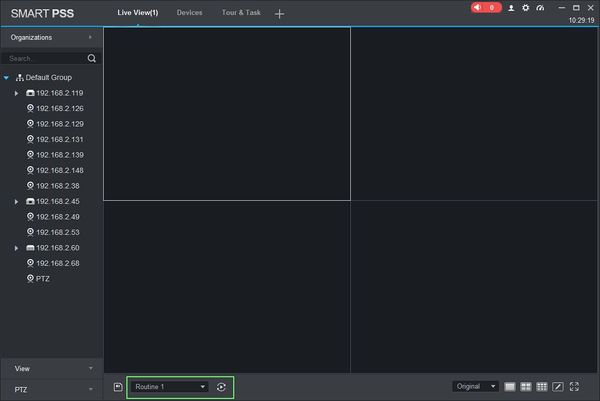
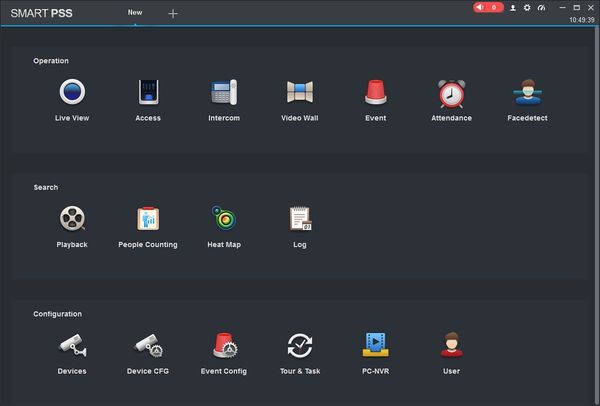
2. Click a menu option, such as ‘Live View’, to open this menu in a new tab
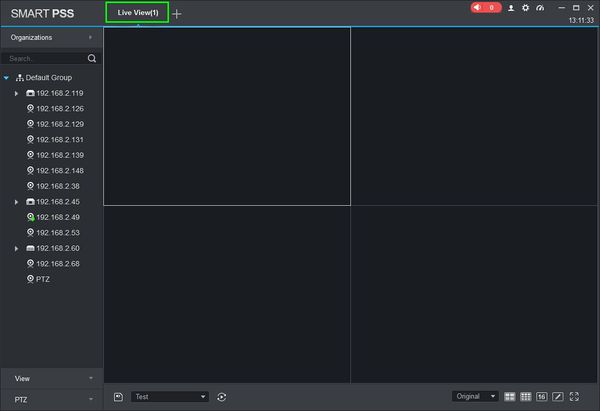
3. A new tab will be opened for Live View.
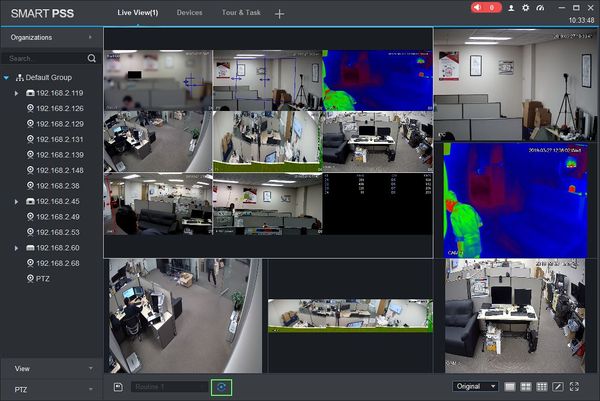
4. Add devices to the grid layout as desired to set up the primary monitor by dragging and dropping.
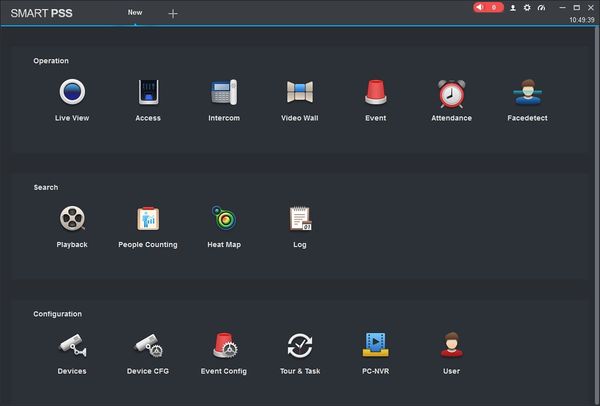
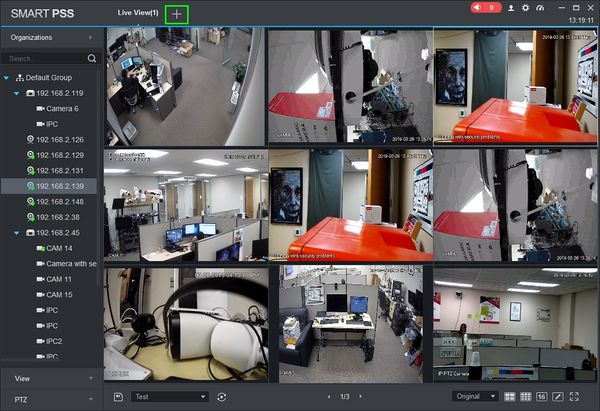
5. Click the + / Plus icon to open a new tab
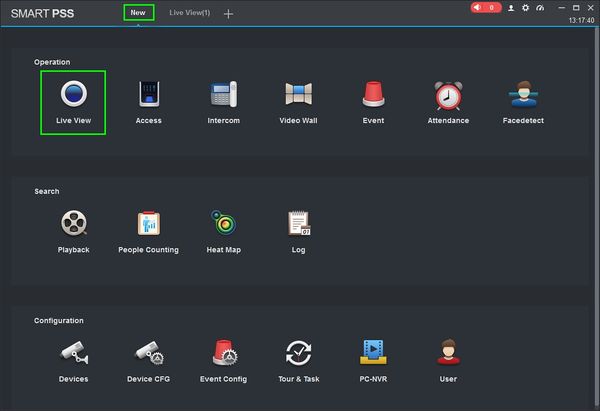
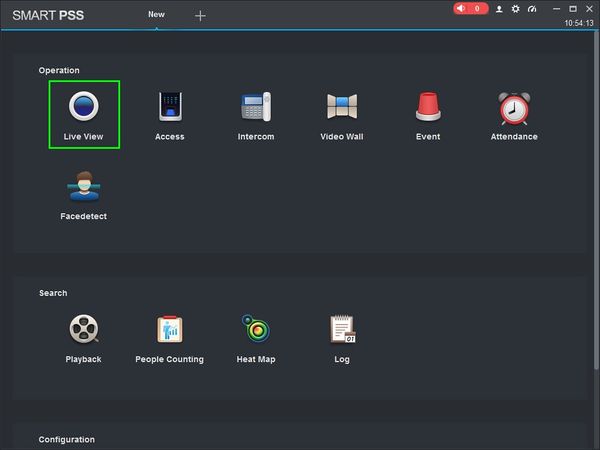
6. Once on the New Tab Menu, Click ‘Live View’
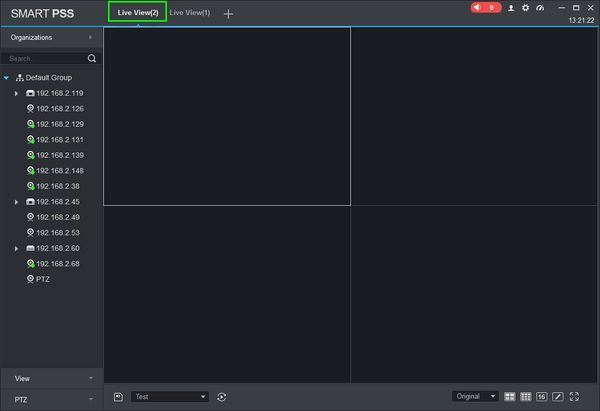
7. A new Live View tab will appear. Add devices to the grid layout as desired to set up the secondary monitor by dragging and dropping.
8. Click the tab header then drag and drop it to the secondary monitor. A new independent window of SmartPSS will load.
How To Use Task Plan In SmartPSS
Description
This article will show you how to setup and use Task Plan in SmartPSS 2.0. Task Plan allows you to configure an automated sequence of video from multiple video devices added to SmartPSS using a wide array of customization options.
Prerequisites
- SmartPSS
- Devices added to SmartPSS
Video Instructions
Coming Soon
Step by Step Instructions
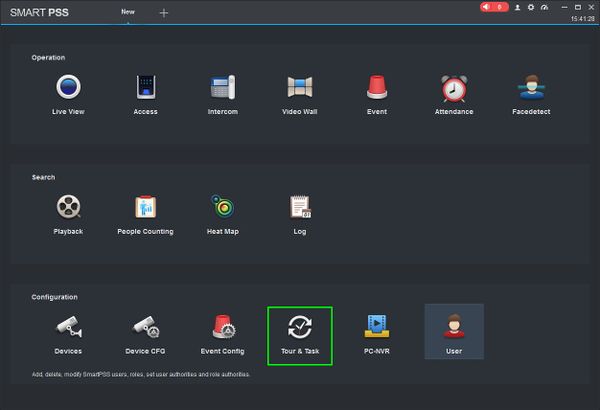
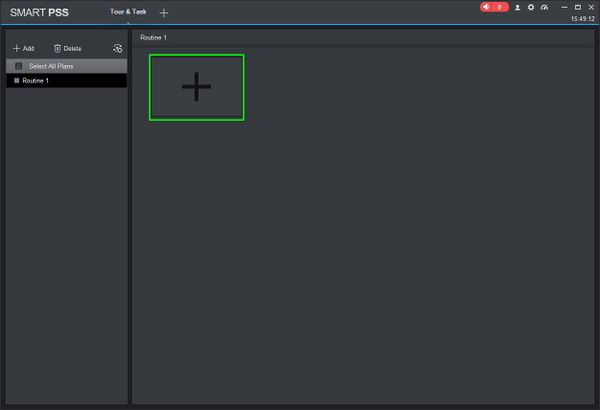
1. Launch SmartPSS and select ‘Tour & Task’.
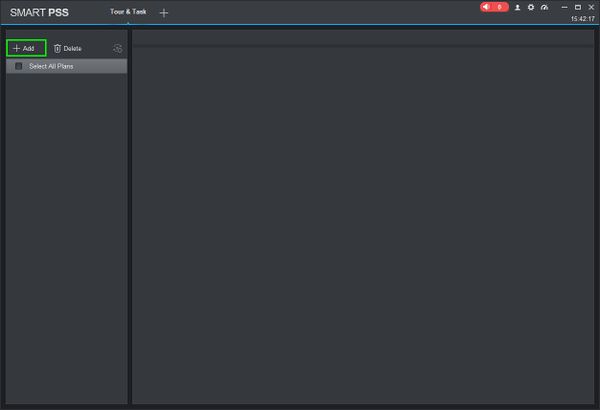
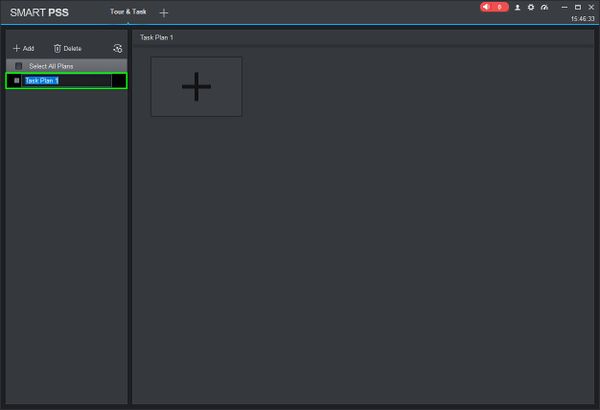
2. On the Tour & Task window click ‘+ Add’. Enter a name for the plan then press Enter.
3. Click the + to create a new Task Plan.
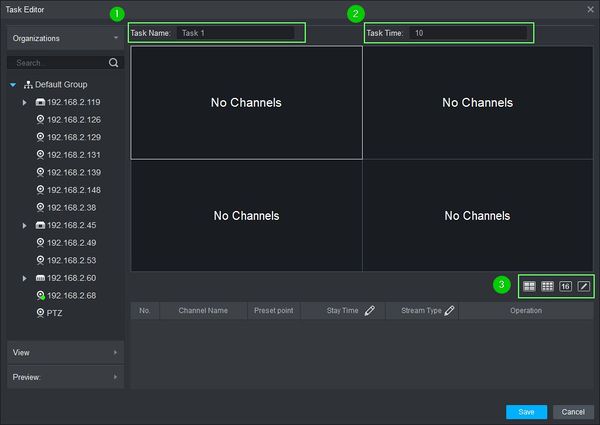
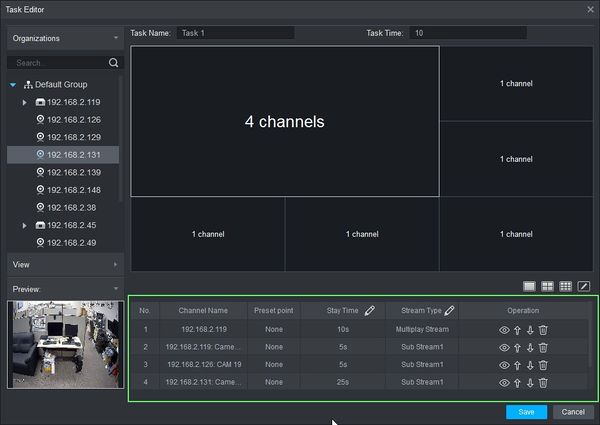
4. The Task Editor window will open.
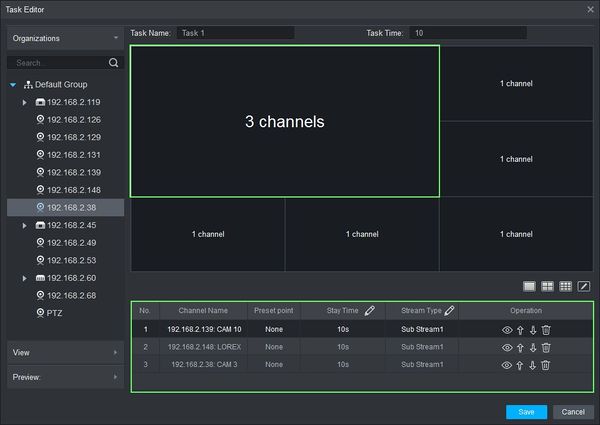
- Enter a Task Name¹ and Task Time² (in seconds).
- Select from the pre-configured layouts or create your own³
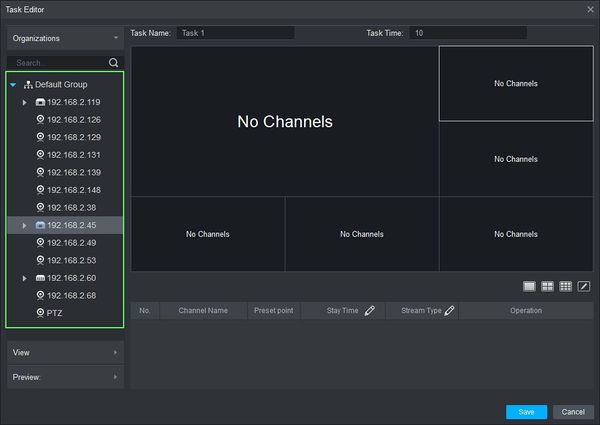
5. To add video to the layout there are several options:
Drag & Drop
- Use the Device tree on the left to click on a device then drag and drop it onto the layout. If the device has multiple streams (ex: DVR or NVR) all streams from the device will auto populate the grid layout.
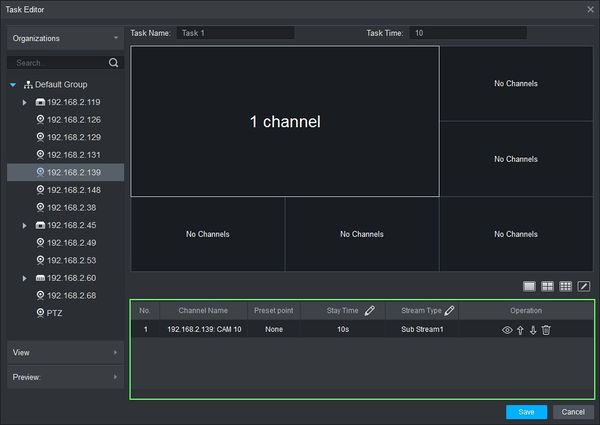
- Once a device is added it will appear in the Task List
- You can also drag and drop additional video sources into a window to create a sequence within the selected pane. The grid will update with the number of video sources that are added to the selected pane.
Bind
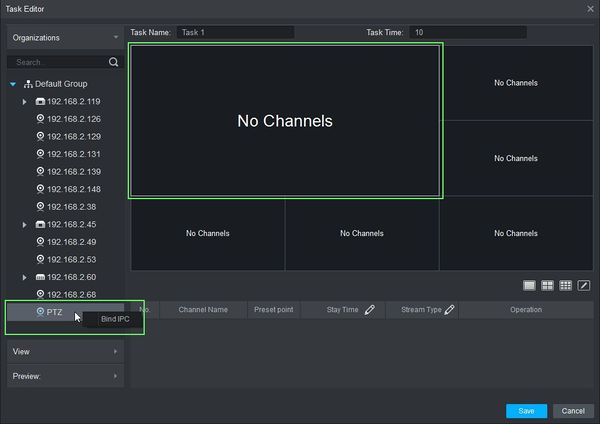
- Select the video pane in the grid (outlined in white) then right click the device you wish to add from the Device Tree on the left hand side of the screen. Click ‘Bind IPC’ to add the video to the selected window.
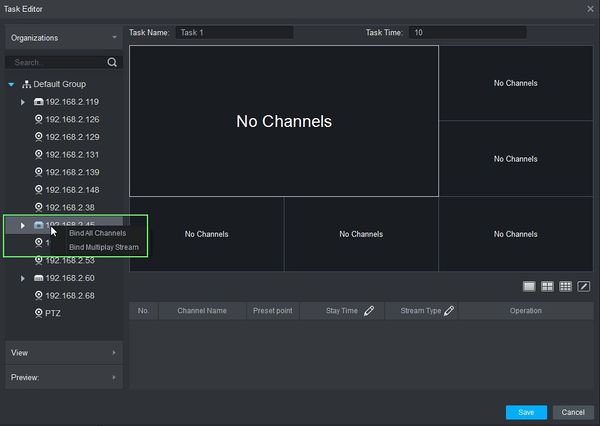
- For supported devices with multiple video streams (ex: DVR, NVR) you have additional options when right clicking the device:
Bind All Cameras – Auto populates the grid layout from the selected device
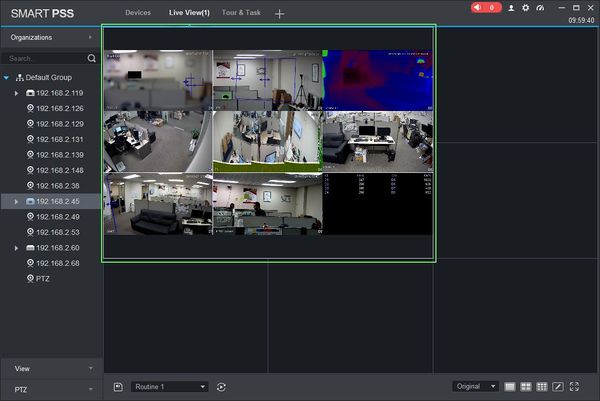
Bind Multiplay Stream – Creates a video layout within the selected pane of all connected cameras from the device
Example:
6. After adding the desired video sources to the task you can use the Task List window to edit each individual window’s settings.
Select the video pane in the grid (outlined in white) and the programmed objects and events for this window will appear in the Task List. Each field can be edited by double clicking in the menu
- Preset point: Allows the user to select a preset point for supported cameras such as PTZ – SmartPSS/How To Use PTZ Preset in SmartPSS
- Stay Time: Time (in seconds) for video . Click the ‘Pencil’ icon at the top of the list to change the value for the entire list.
- Stream Type: Select which video stream: Main Stream, Sub Stream1, etc. Click the ‘Pencil’ icon at the top of the list to change the value for the entire list.
- Operation: Use the icons to Preview the stream, move the event up or down in the list order, or delete the event.
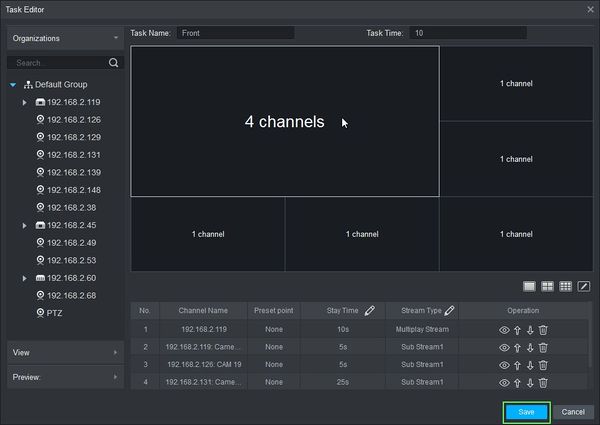
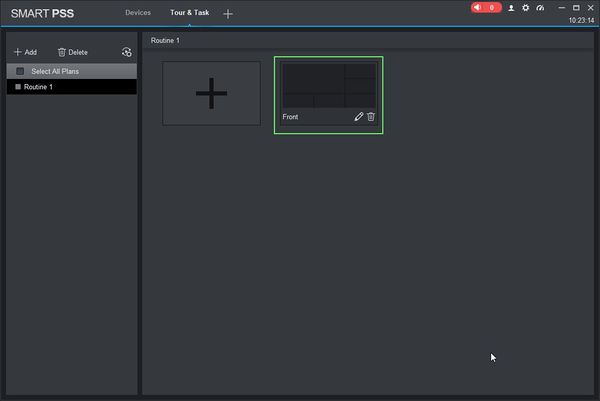
7. Once the Task has been programmed click Save to save your work and return to the Tour Window and the new Task should appear in the window.
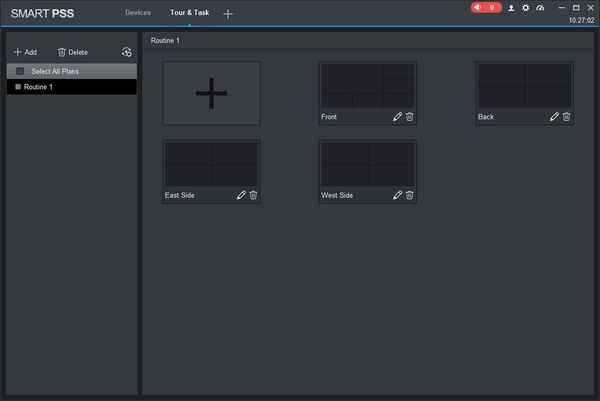
8. Continue creating tasks using the Task Editor to build a series of tasks for this tour to run. Drag and drop the tasks to change the order. Click the ‘Pencil’ icon to edit the Task or the ‘Trash’ icon to delete the Task.
9. Once the Tour has been programmed you can now enable/begin your created tours: SmartPSS/How To Enable Task
10. The tour will continue to run until ‘Stop Tour’ is clicked.
How To Enable Task In SmartPSS
Description
This article will show you how enable configured tours manually or by schedule using SmartPSS
Prerequisites
- SmartPSS
- Devices added to SmartPSS
- Tours configured in SmartPSS – SmartPSS/How To Use Task Plan
Video Instructions
Coming Soon
Step by Step Instructions
Manual Tour
1. Launch SmartPSS.
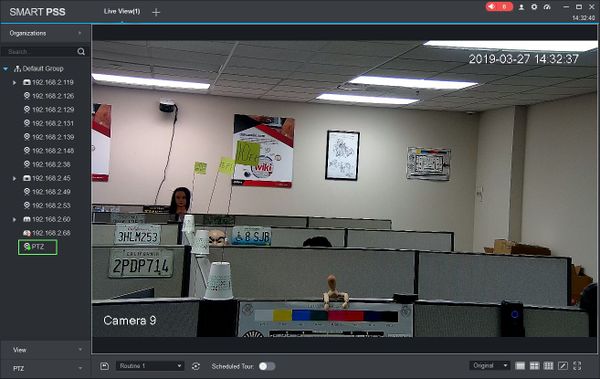
2. Click ‘Live View’
3. Use the drop down box to select the Tour, then click ‘Start Tour’
4. The tour will continue to run until ‘Stop Tour’ is clicked.
Schedule Tour
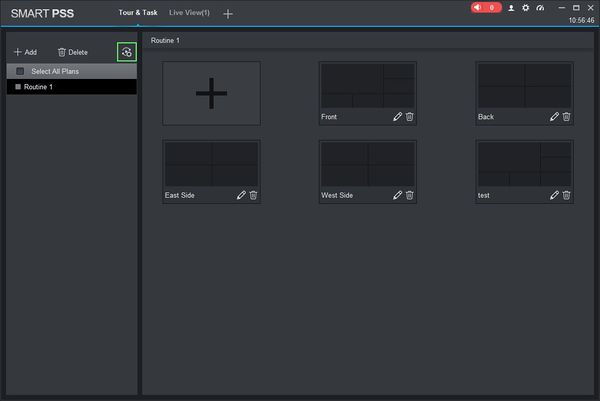
1. Launch SmartPSS and select ‘Tour & Task’.
2. Click ‘Scheduled Tour Setting’ to open the menu
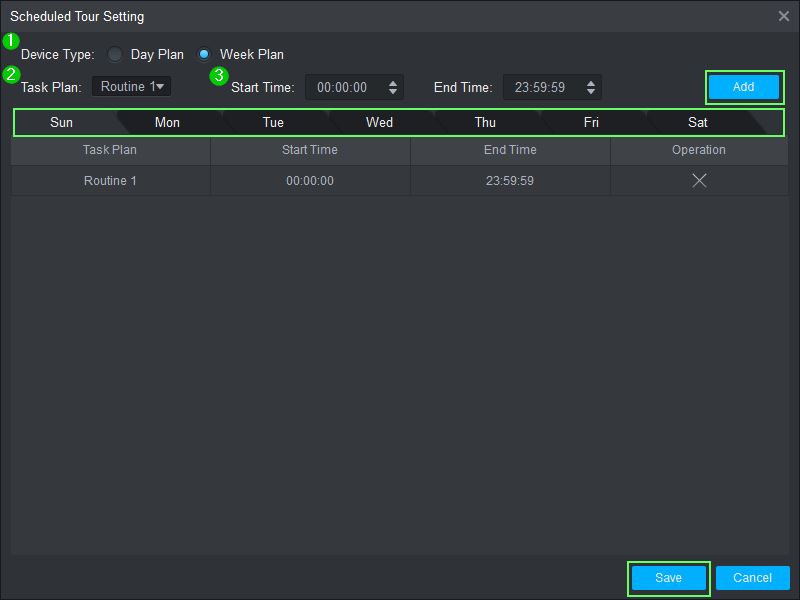
3. Use the menu to configure the schedule.
- Device Type¹ – Select from a single day or a week schedule option
- Task Plan² – Task the schedule is being created for
- Start/End Time³ – Enter a Start Time and End Time for the schedule.
For Week Plan options, Use the tabs above the table to select which day to add the schedule to.
Click ‘Add’ to add the time to the schedule.
Click ‘Save’ once you have completed the schedule.
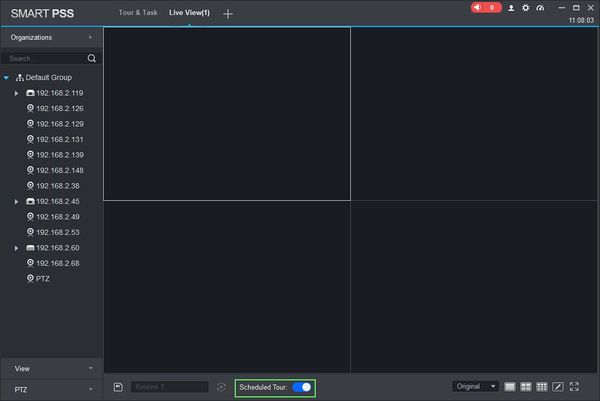
4. Return to Live View, then click to toggle ‘Scheduled Tour’ in the lower portion of the screen to enable the Scheduled Tour Setting. The Scheduled Tour will continue to operate according to the programmed scheduled until it is disabled or the software is closed.
How To Export Device Record In SmartPSS
Description
This article will show you how to export recordings from a device in SmartPSS 2.0
Prerequisites
- SmartPSS
- Supported device with recorded footage
- Device with recorded footage added to SmartPSS Device List – How To Add Device to SmartPSS
Video Instructions
Step by Step Instructions
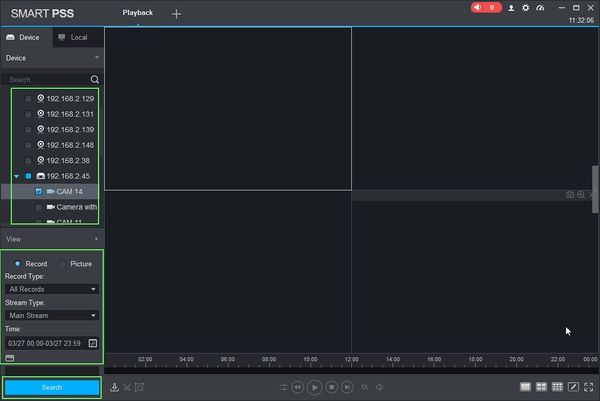
1. Launch SmartPSS.
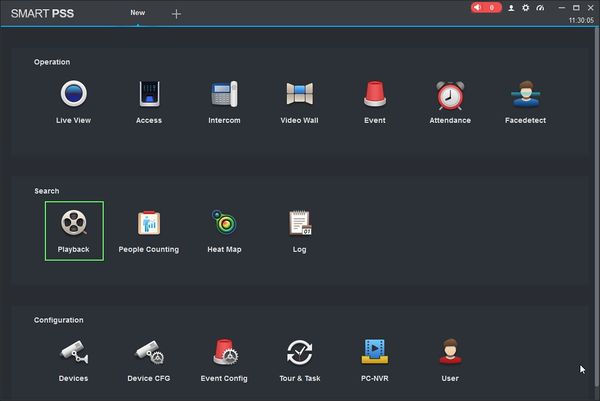
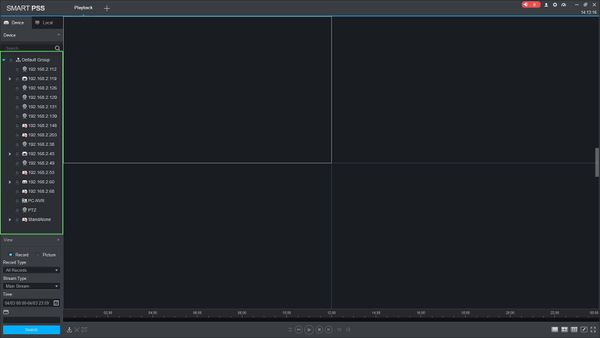
2. Click ‘Playback’
3. The Playback window will open
Use the Device Tree on the left to select the device you wish to export from.
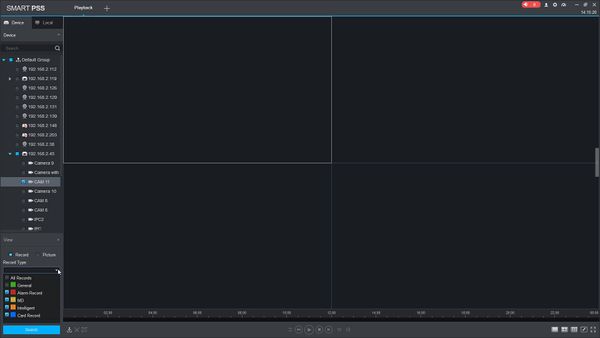
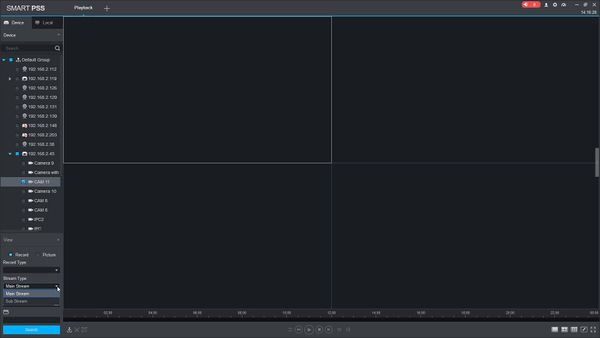
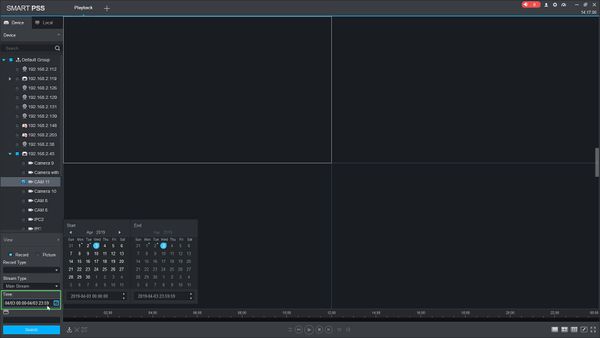
You can configure the parameters of the search using the drop down box:
- Record Type
- Stream Type – Main Stream, Sub Stream
- Time
Click ‘Search’ to begin a search based on the parameters.
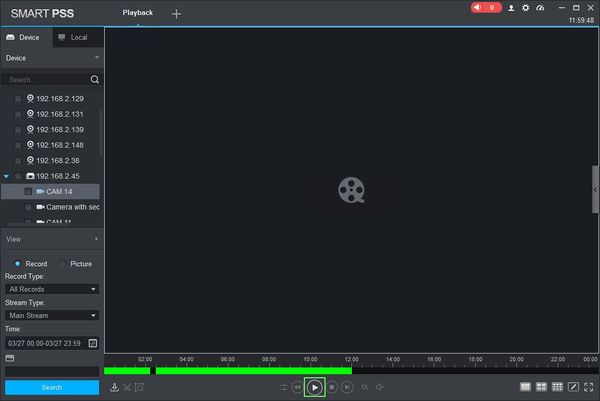
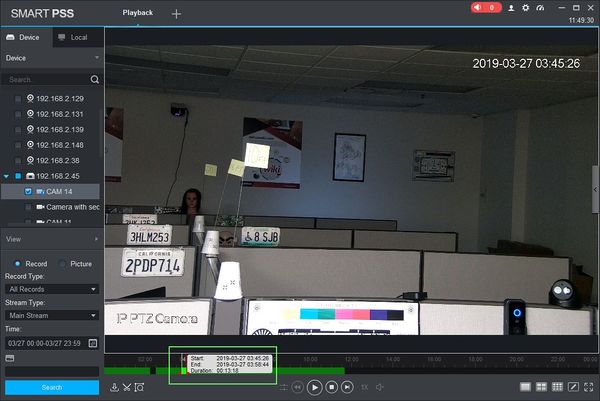
4. Once the Search is complete recorded footage will appear in the timeline. Press the ‘Play’ icon to begin playback.
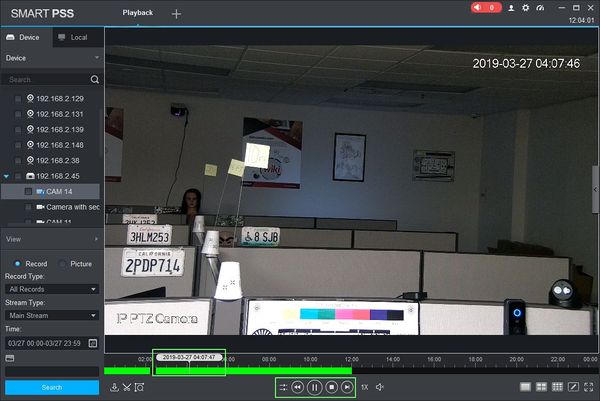
5. Use the Playback tools to navigate to a starting point for the clip. You can use the playback buttons below the timeline or drag the timeline scrubber
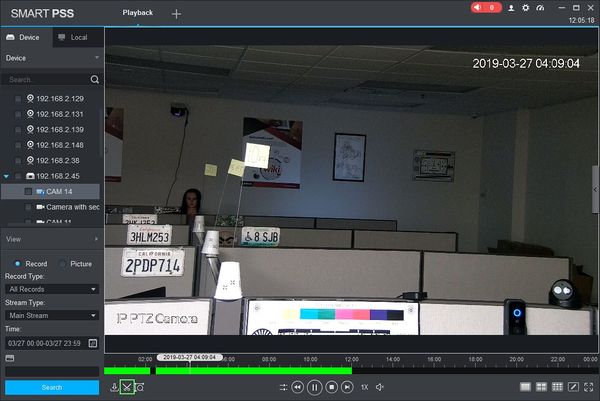
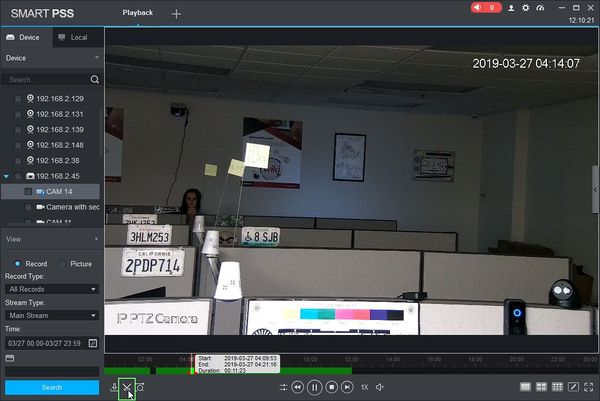
6. Click the Time Clip icon to select a start point.
7. Once clicked, a draggable window will appear in the timeline. Use this tool to select the length of the clip to export. The window will show you the Start and Time time of the clip as well as the Duration.
8. Click the Time Clip icon again to select an end point
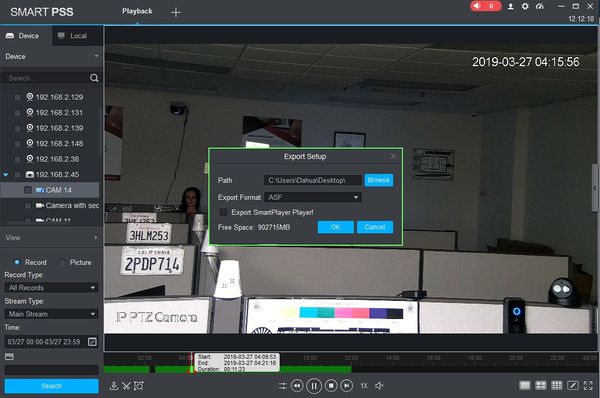
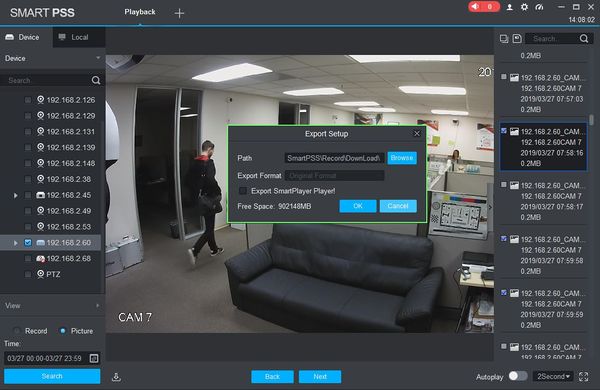
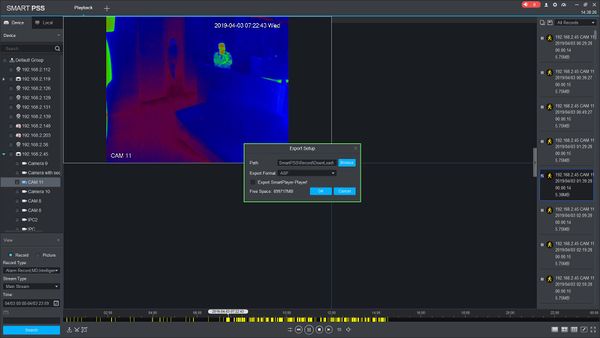
9. The Export Setup menu will appear.
The menu gives several options for export:
- Path: Click browse to select a file location to save the exported footage
- Export Format: Select which video format for the clip (ASF, AVI, MP4, or Original Format)
- Export SmartPlayer Player: Check the box to include the playback software with the export
Once the export settings have been configured, click Ok to begin Export.
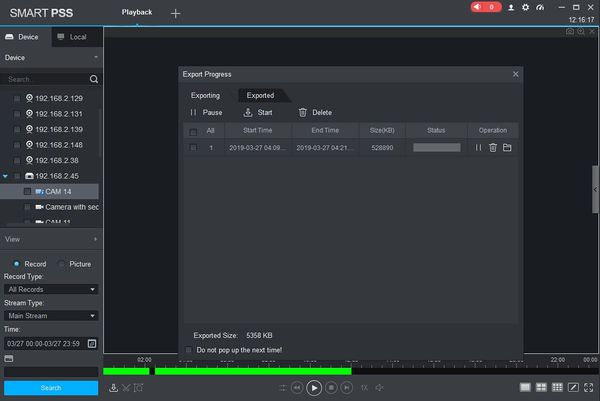
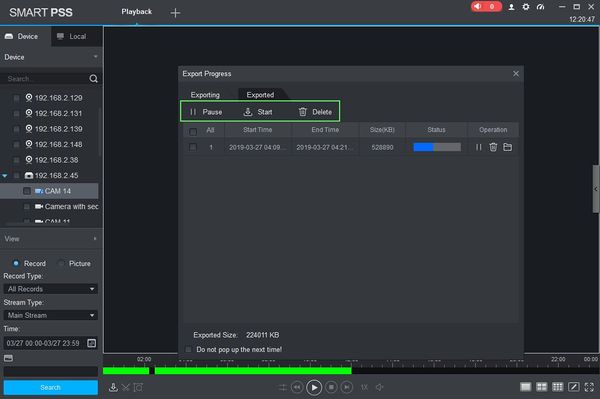
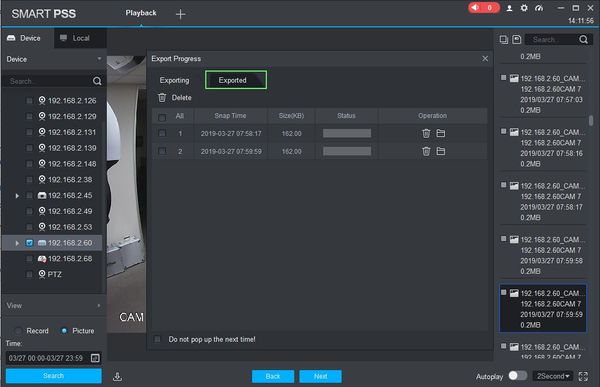
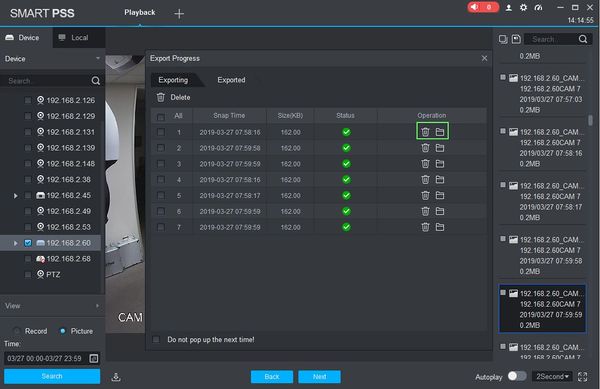
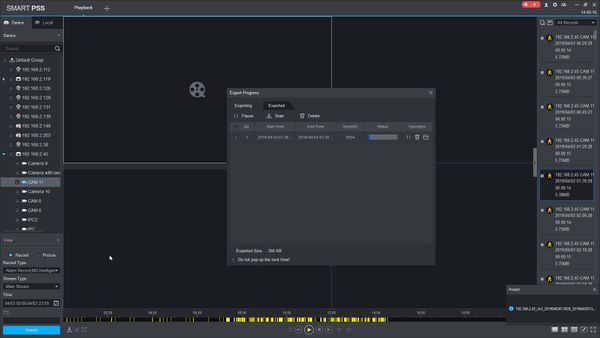
10. The Export Progress window will appear.
This window will give you a live update of the export process.
You can Pause, Start, or Delete exports in progress by using the icons at the top of the screen
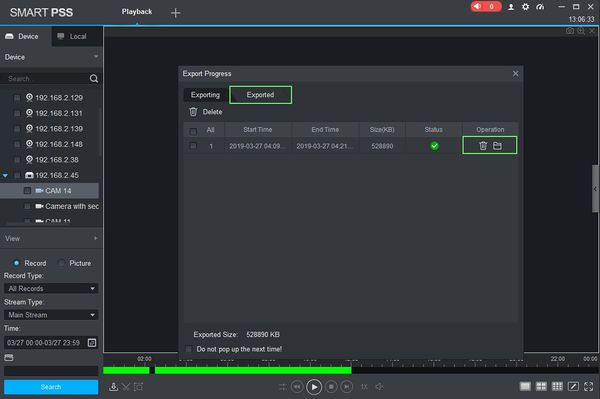
11. Once the Export is complete, it will appear in the ‘Exported’ tab
Click the Trash icon to delete
Click the Folder icon to open the directory the file was exported to
How To Export Device Picture In SmartPSS
Description
This article will show you how to export recorded pictures from a device in SmartPSS 2.0
Prerequisites
- SmartPSS
- Supported device with recorded pictures
- Device with recorded pictures added to SmartPSS Device List – How To Add Device to SmartPSS
Video Instructions
Step by Step Instructions
1. Launch SmartPSS.
2. Click ‘Playback’
3. The Playback window will open
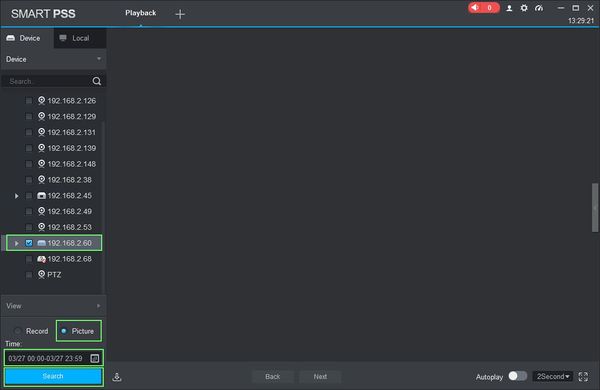
Use the Device Tree on the left to select the device you wish to export from.
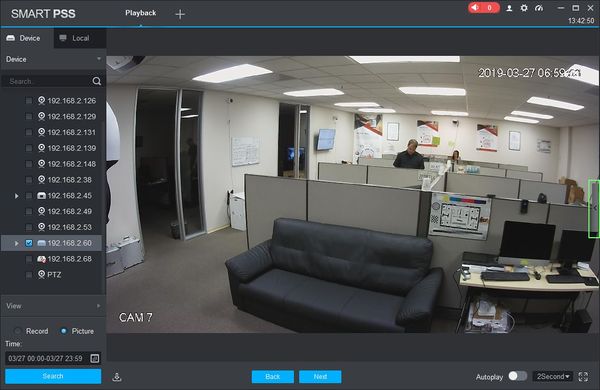
Select ‘Picture’ to search Picture records
Click in the Time field to select a date range to search. Please note the maximum is 24 hour range.
Click ‘Search’ to begin a search based on the parameters.
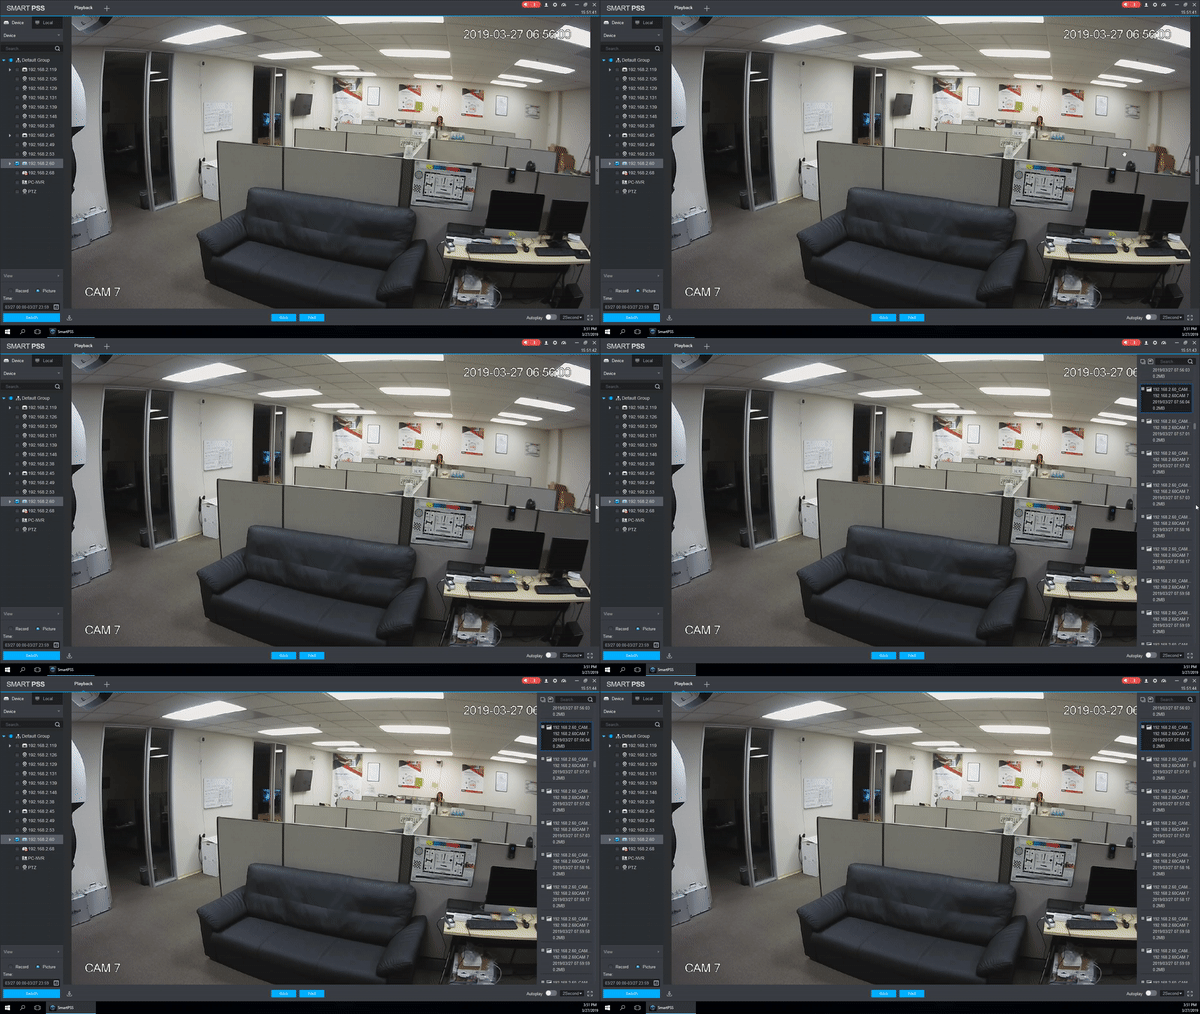
4. Once the search is complete the first image will be loaded in the center screen.
- Use the buttons labeled “Back” and “Next” to navigate through the recorded images.
- Autoplay – Toggle Autoplay to begin an automatic slideshow of all images. You can adjust the sequence delay using the drop down box (1-3 seconds).
- Click the Full Screen icon to make SmartPSS full screen
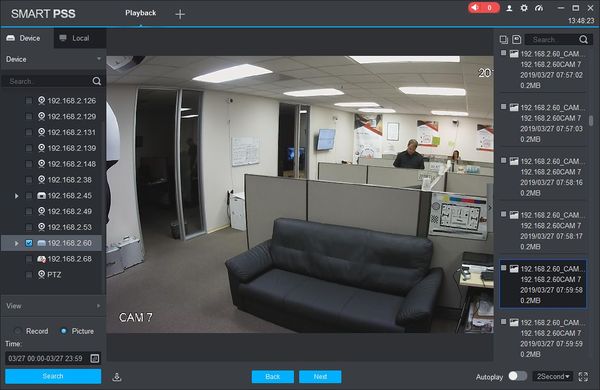
5. Click the Floating Bar on the right hand side of the screen to open the Picture Export menu
This menu shows all recorded images from the requested time period/device in a list.
Click an entry in the list to load the image in the center window.
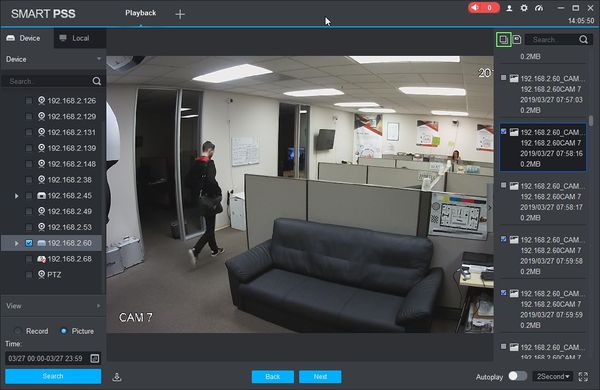
6. Use the checkbox next to the picture to select it for export. You can also click the Checkbox icon above the list to select all pictures in the list at once.
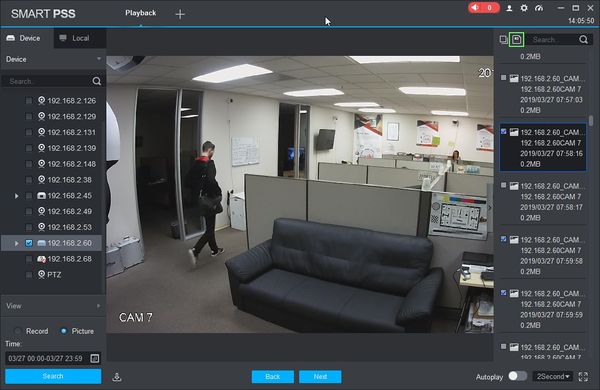
7. Once the pictures for export have been selected, click the Export icon to open the Export Menu
8. Use the Export Menu to define the parameters of the picture export
- Path: Directory to save exported picture
- Export Format: –
- Export SmartPlayer Player: –
Click OK to begin Export
9. The Export Progress menu will appear. This menu will give you live progress for the export process.
Completed exports will appear under the ‘Exported’ tab
Click the Trash icon to delete the picture
Click the Folder icon to open the directory the picture was exported to
How To Playback Local Record In SmartPSS
Description
This article will show you how to use the local record feature in SmartPSS 2.0, which allows the user to directly record and playback live video from an added device
Prerequisites
- SmartPSS
- Video Device added to SmartPSS Device List – How To Add Device to SmartPSS
Video Instructions
Step by Step Instructions
Local Recording
1. Launch SmartPSS.
2. Click ‘Live View’
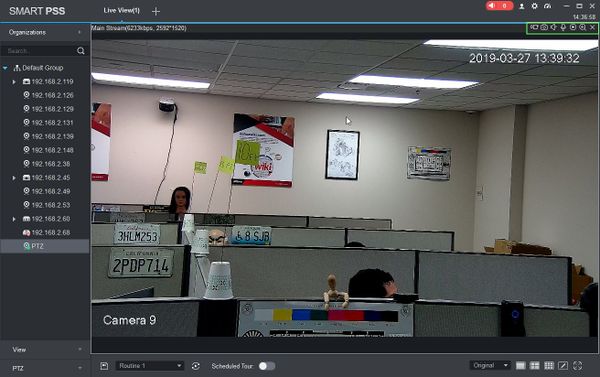
3. Double click a camera in the list or drag and drop it to a position in the window to load.
4. Hover the mouse over the window to show the menu
To begin recording, click the Local Record icon ![]()
To end recording, click the icon again.
Local Record Playback
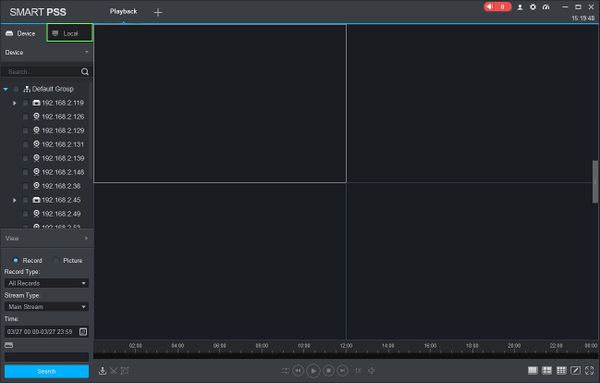
1. Click ‘Playback’
2. The Playback window will open
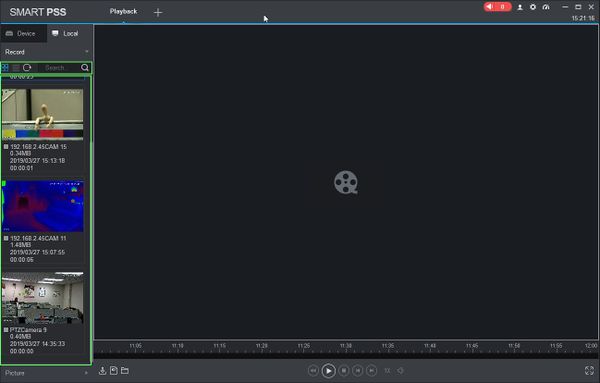
Click the ‘Local’ tab to view recordings that have been made on the local computer.
3. Click the icons above the list to choose from a Thumbnail or List View, Refresh the list, or use the Search field to Search by camera name
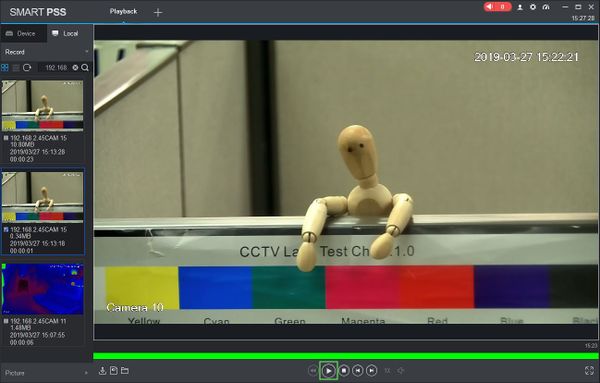
4. Double click a clip in the list to begin playback, or alternatively you can check the box next to the camera then click the ‘Play’ button
How To Search Client Log In SmartPSS
Description
This article will show you how to search and review the local log in SmartPSS 2.0
Prerequisites
Video Instructions
Coming Soon
Step by Step Instructions
Local Recording
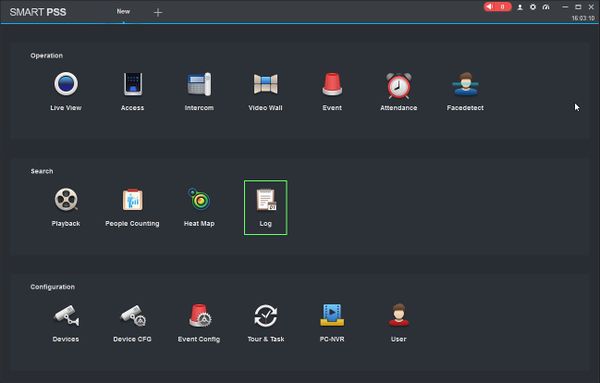
1. Launch SmartPSS.
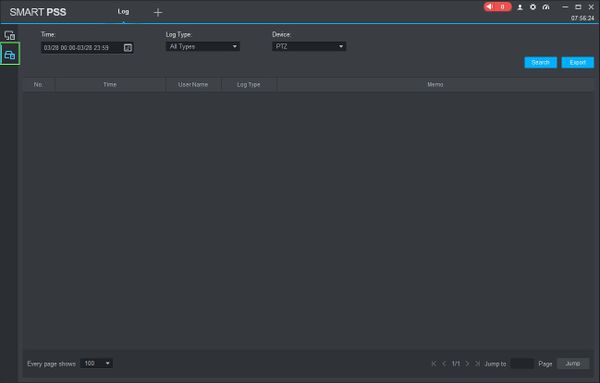
2. Click Log
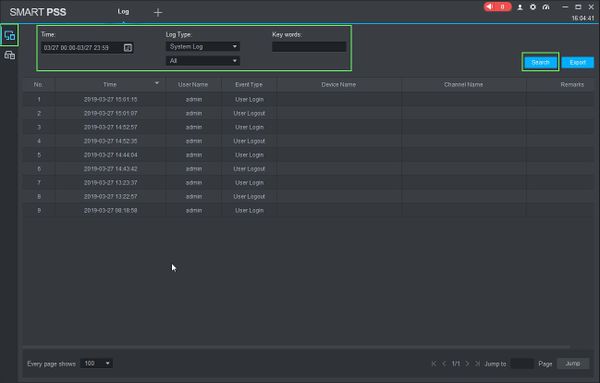
3. This will open the Log menu
Make sure the ‘Client’ icon on the left side of the screen is selected, then enter the parameters of the search:
- Time Range: Click in the Time field to select a date range to search. Please note the maximum is 24 hour range.
- Log Type: Select the alarm type(System, Operation, Alarm)
Click ‘Search’ to begin the search.
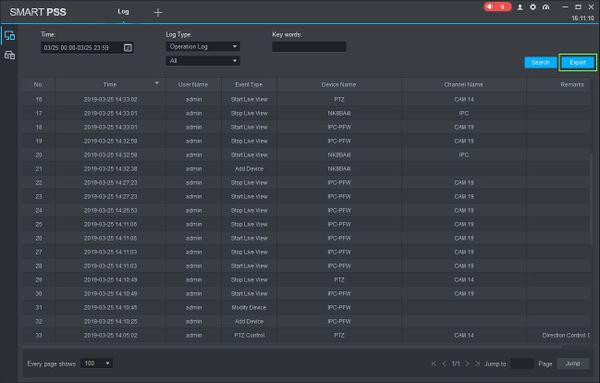
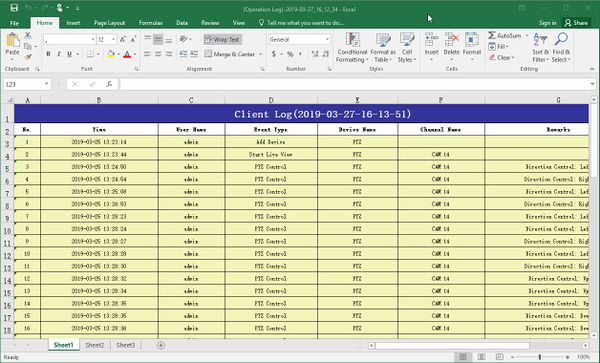
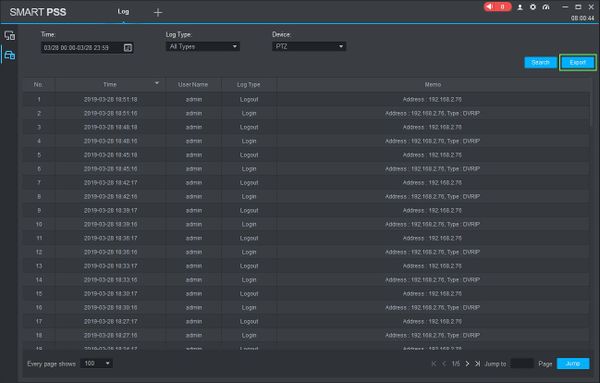
4. The log information will load in the center of the screen for review. To export this list, click the ‘Export’ button
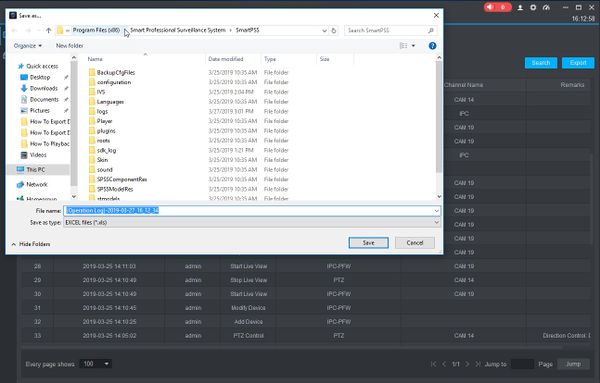
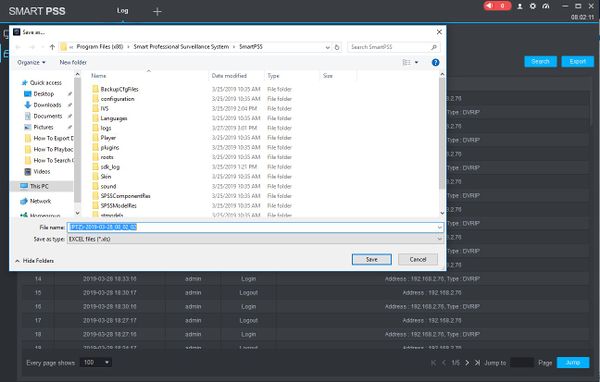
5. A file dialogue window will open, prompting the user where to save the log (.xls format)
6. Once exported the log can be opened using a program that can read the ‘.xls’ file format
How To Search Device Log In SmartPSS
Description
This article will show you how to search and review the device log in SmartPSS 2.0
Prerequisites
Video Instructions
Coming Soon
Step by Step Instructions
1. Launch SmartPSS.
2. Click Log
3. This will open the Log menu. Click the ‘Device’ icon on the left side of the screen, then enter the parameters of the search:
Make sure the ‘Device’ icon on the left side of the screen is selected, then enter the parameters of the search:
- Time Range: Click in the Time field to select a date range to search. Please note the maximum is 24 hour range.
- Log Type: Select the type of log you wish to search for
- Device: Select from the drop-down list that shows all devices added to SmartPSS
Click ‘Search’ to begin the search.
4. The log information will load in the center of the screen for review. To export this list, click the ‘Export’ button
5. A file dialogue window will open, prompting the user where to save the log (.xls format)
6. Once exported the log can be opened using a program that can read the ‘.xls’ file format
How To Create Users In SmartPSS
Description
This article will show you how to create users and roles in SmartPSS 2.0
Prerequisites
Video Instructions
Step by Step Instructions
Creating a Role
1. Launch SmartPSS.
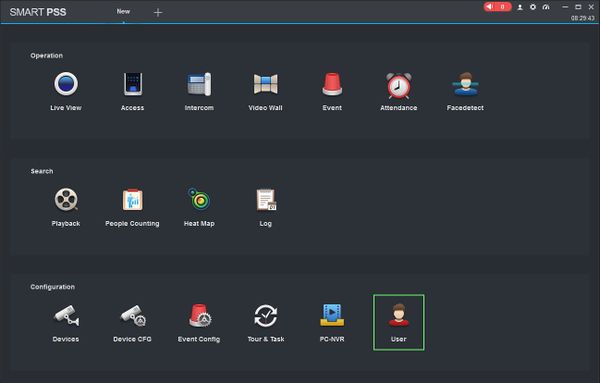
2. Click User
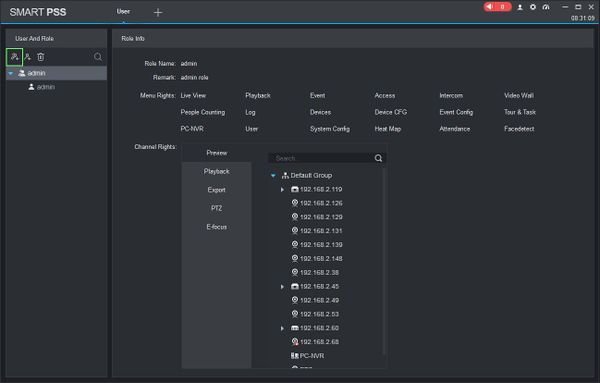
3. Click ‘Add Role’
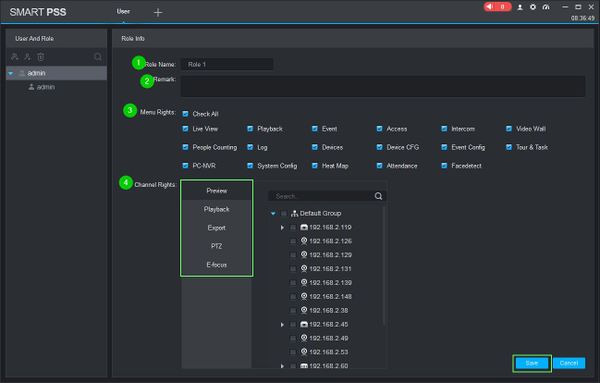
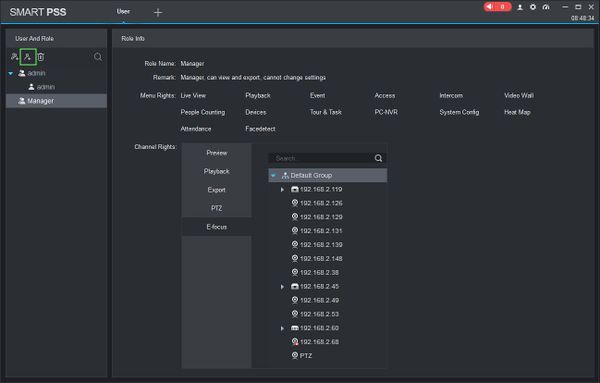
4. The Role Info menu will appear. Use the fields to enter the parameters of the role:
- Role Name: Name for the role
- Remark: Description of role for reference
- Menu Rights: Use the checkbox to select which menu rights you wish to allow for this role
- Channel Rights: Specific per device user rights can be set to the role for already added devices
After filling out the parameters for the role, click Save
The Role will be created
Creating a User
1. Click User
2. Click ‘Add User’
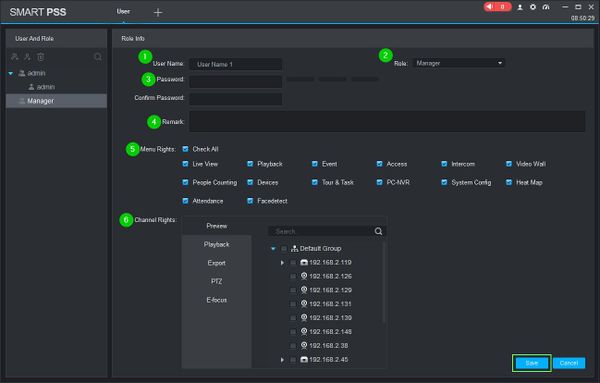
3. The User Info menu will appear. Use the fields to enter the parameters of the role:
- User Name: Name for the role. This name must be unique
- Role: Use the drop-down box to select the Role for this user
- Password: Enter a password for the user and confirm. The 3 bar meter next to the field will denote the password complexity
- Remark: Description of user for reference
- Menu Rights: Use the checkbox to select which menu rights you wish to allow for this user
- Channel Rights: Specific per device rights can be set to the user for already added devices
After filling out the parameters for the role, click Save
The User will be created
How To Setup Event Alarm Link In SmartPSS
Description
This article will show you how to setup the Event Alarm Link feature in SmartPSS 2.0
Prerequisites
- SmartPSS
- Devices added to SmartPSS Device List – How To Add Device to SmartPSS
Video Instructions
Coming Soon
Step by Step Instructions
1. Launch SmartPSS.
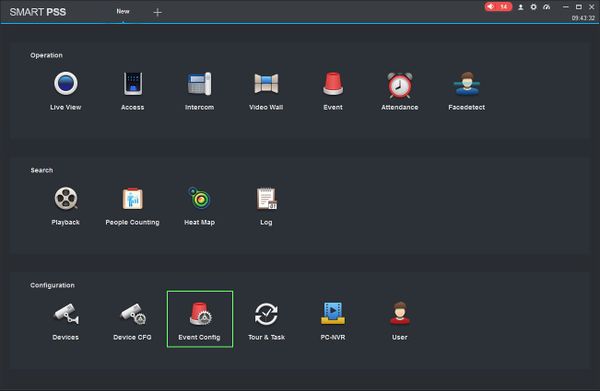
2. Click ‘Event Config’
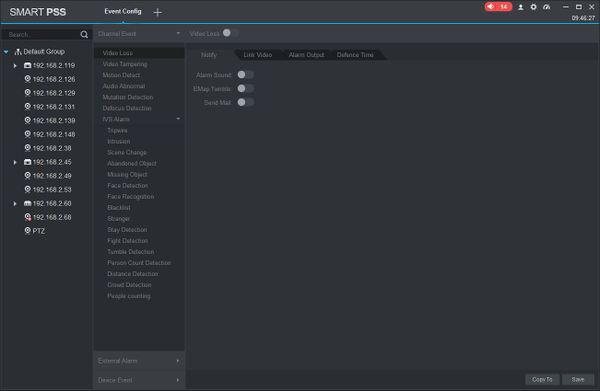
3. The Event Config menu will appear.
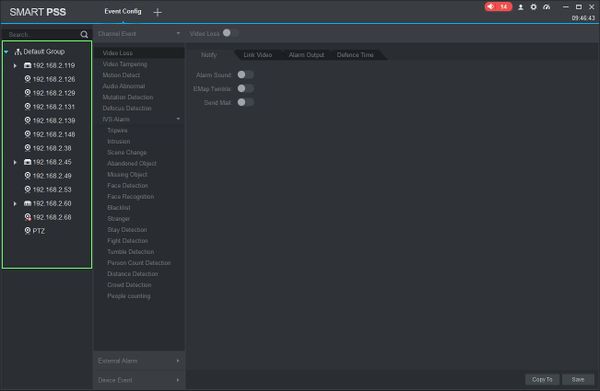
4. Click to select the device you wish to configure from the Device Tree on the left
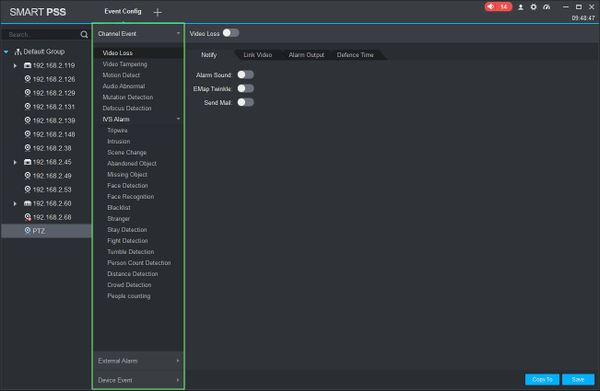
5. Select the Event Type for this camera
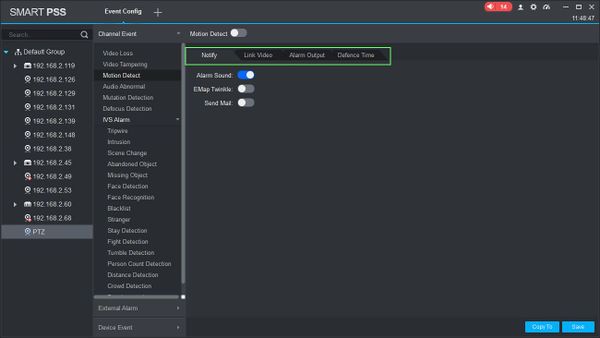
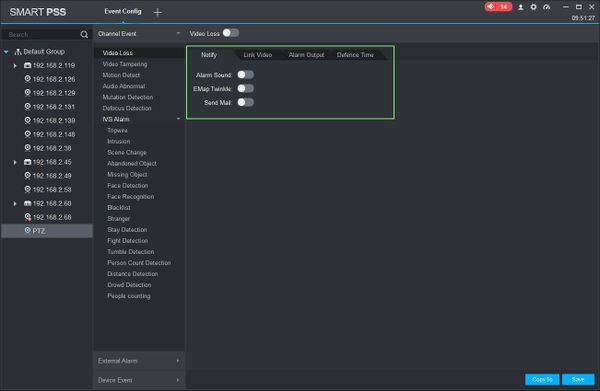
6. Use the tabs on the right to set up the parameters for when the Event is triggered.
The different options will be explained below:
Notify
When the event occurs it can give a notification.
Notification types
Alarm Sound: Play sound at local computer
EMap Twinkle: Twinkle notification on EMap
Send Mail: Send an email
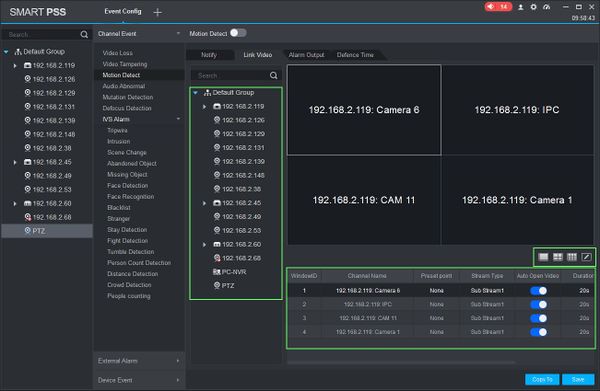
Link Video
When event occurs it can link to a live camera preview or record.
Drag and drop a device from device tree into the grid layout in the center of the screen
Select from the pre-configured layouts or create your own
- Preset point: Allows the user to select a preset point for supported cameras such as PTZ – SmartPSS/How To Use PTZ Preset in SmartPSS
- Stream Type: Select which video stream: Main Stream, Sub Stream1, etc.
- Duration: Time (in seconds) for video .
- Operation: Use the X icon to delete
Alarm Output
When event occurs it can output a signal to trigger an alarm directly on the camera.
Select the device from the device tree
Set Auto Open
Duration: Enter a time for the alarm output (in seconds)
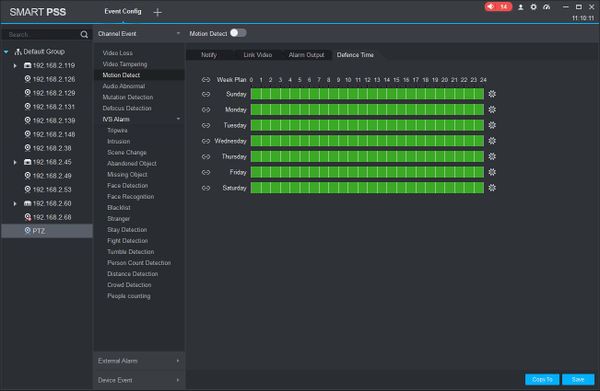
Defence Time
Set a schedule for the Alarm.
The event will be automatically programmed to run at all times, represented by the Green color
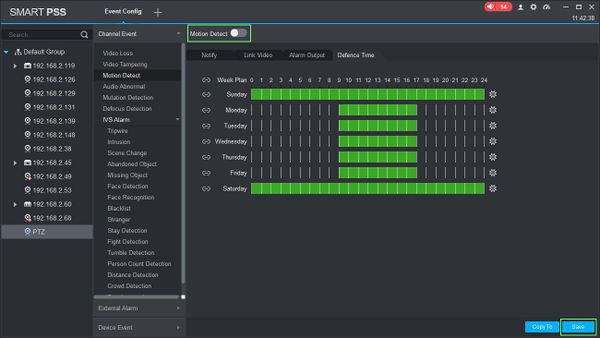
In the center of the screen click and drag the mouse to delete or add time
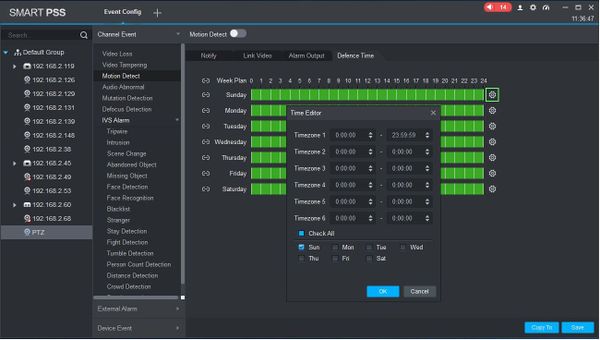
OR you can click the Gear to open a pop up menu to define the parameters of the schedule
Enter a time range for the schedule
Use the checkbox at the bottom to select which day(s) to set the schedule to. You can use ‘Check All’ to set the current schedule to all days
Click OK to set the schedule
7. Once the Event parameters have been configured click ‘Save’ to save the settings, then click the toggle at the top of the page to enable the event.
Once this event is enabled it will begin actively working according to the set parameters.
How To Setup Video Wall In SmartPSS
Description
This article will show you how to setup a video wall in SmartPSS 2.0
Prerequisites
- SmartPSS
- Supported device with video wall feature, such as Decoder
- Device added to SmartPSS Device List – How To Add Device to SmartPSS
Video Instructions
Step by Step Instructions
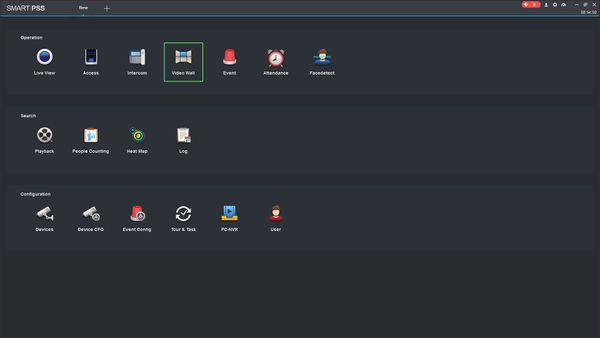
1. Launch SmartPSS.
2. Click Video Wall
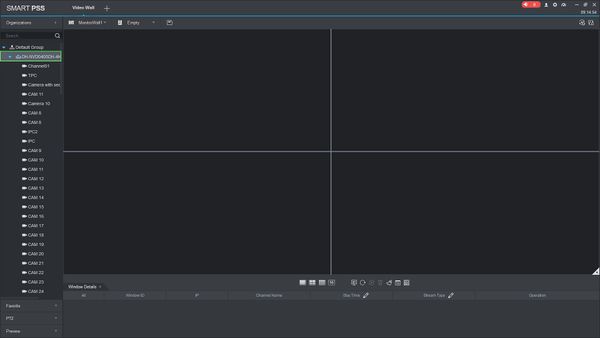
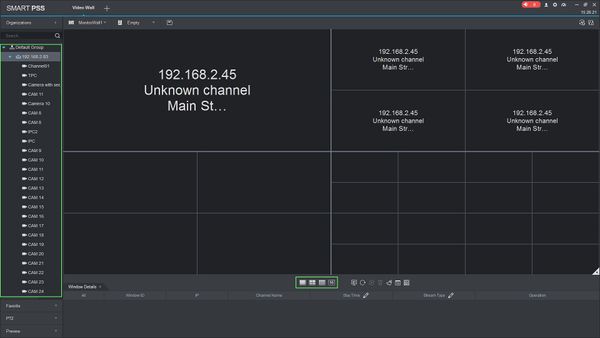
3. The device tree on the left will show all devices added to SmartPSS that are compatible with the Video Wall feature.
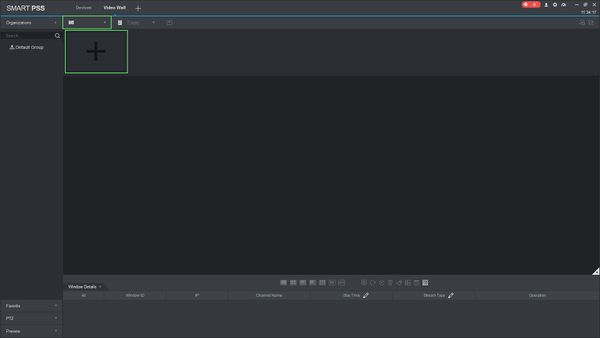
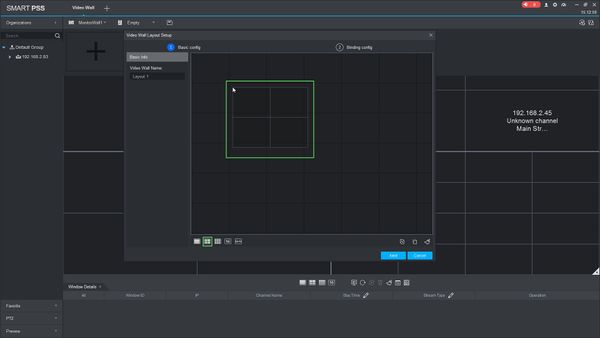
4. Click the ![]() icon to open the Video Wall Layout Setup menu.
icon to open the Video Wall Layout Setup menu.
Click the + to create a new layout
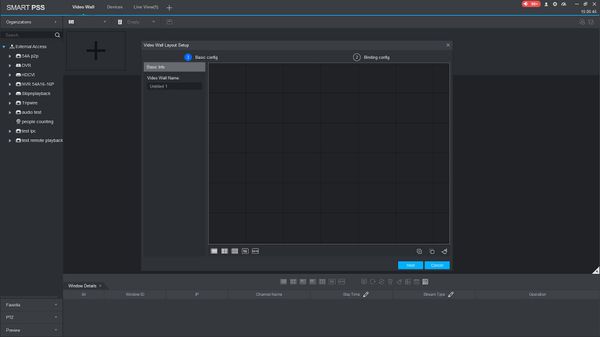
The Video Wall Layout Setup menu is where you can define the physical layout of the monitor outputs per device
5. Use the menu buttons below the grid to create the Video Wall Layout.
Start by clicking one of the layout options in the bottom left of the screen (1, 2×2, 3×3, etc.).
Click again in the grid to place the grid.
You can also use the menu on the right to combine or splice screens.
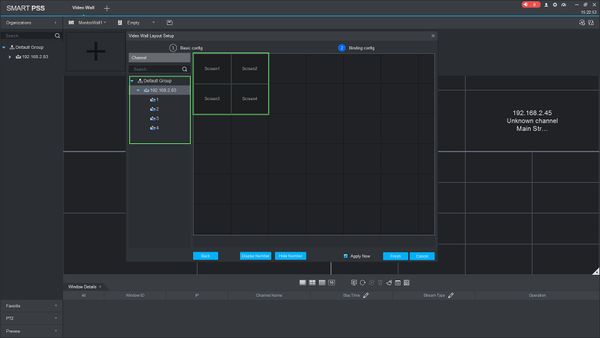
Click Next
7. A device tree will appear on the left.
Drag and drop from the device tree to the grid layout to configure the arrangement for the corresponding monitor outputs for the device
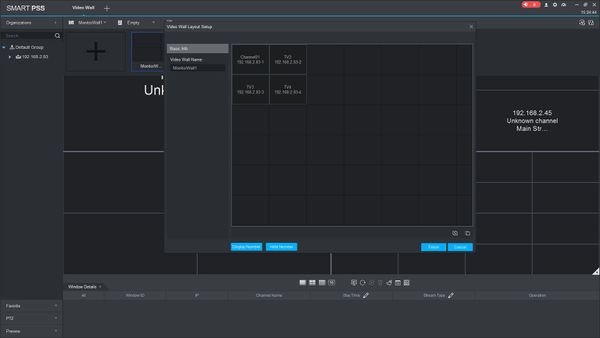
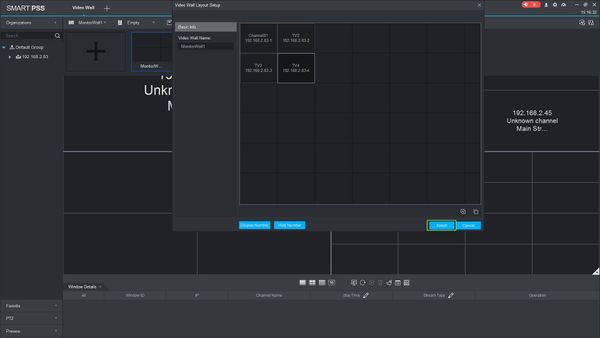
6. Click Finish once the Video Layout has been created
In this example, a decoder with 4 Monitor Outputs has been arranged in a 2X2 Layout
7. Use the device tree on the left to drag and drop streams into the Video Wall Layout
Click inside a quadrant and click from one of the layout options to change to one of the available options – 1 , 2X2, 3X3, 4X4
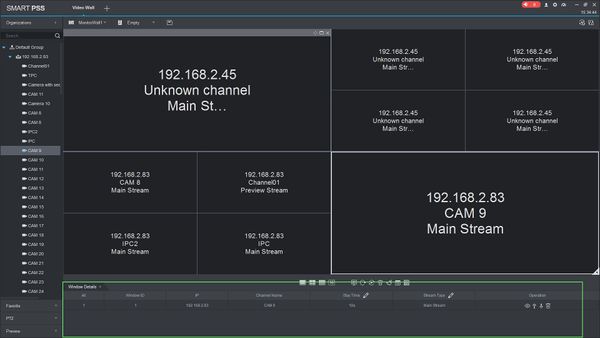
8. The Windows Detail window allows you to change settings for each of the windows – such as Stream Type and Stay Time
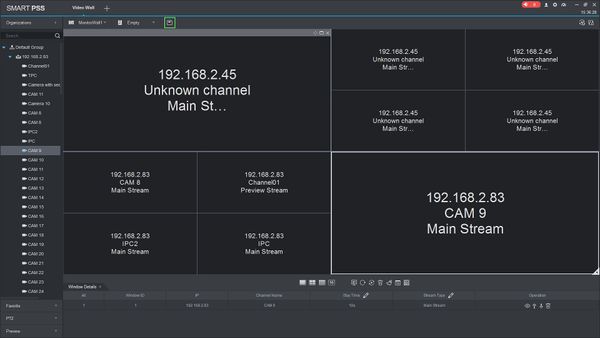
9. Once the layout has been configured Click the Save icon ![]()
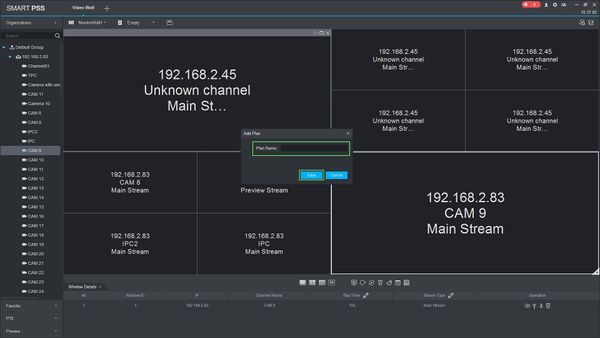
10. Enter a name for the Plan then Click Save
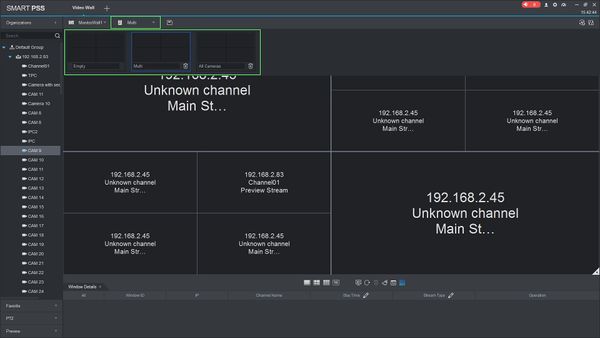
11. All created Plans will appear in the Plan submenu, click the ![]() icon to view and switch between created Layout Plans.
icon to view and switch between created Layout Plans.
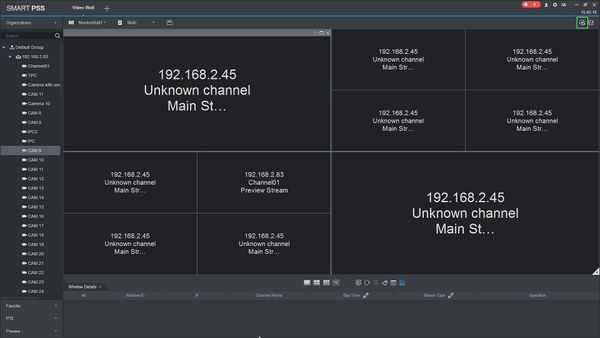
12. Click Schedule Control Config on the right side of the screen to configure a Scheduled Tour of created Video Wall Layouts
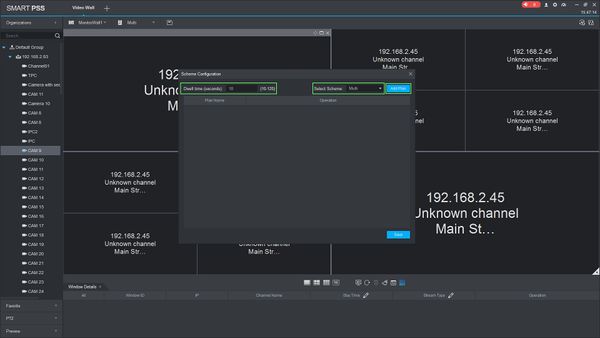
13. Use the Scheme Configuration menu to program the tour
Enter a dwell time (in seconds) Select the created Layout Scheme Then Click Add Plan
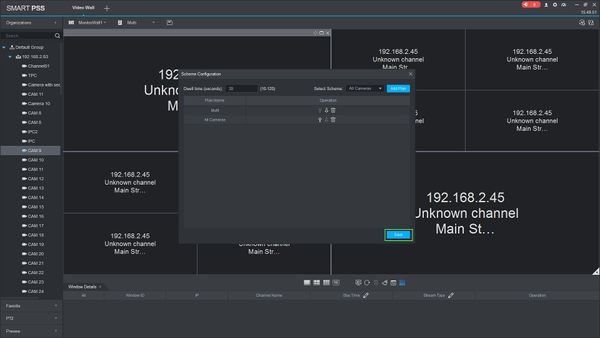
14. Click Save once the Scheme has been configured
15. To begin a created scheme click the ![]() icon on the right side of the screen
icon on the right side of the screen
16. The scheme patrol will begin. To stop click the button in the center of the screen
How To Setup PC-NVR In SmartPSS
Description
This article will show you how to setup PC-NVR in SmartPSS 2.0
Prerequisites
- SmartPSS
- Device added to SmartPSS Device List – How To Add Device to SmartPSS
Video Instructions
Step by Step Instructions
1. Launch SmartPSS.
2. Click PC-NVR
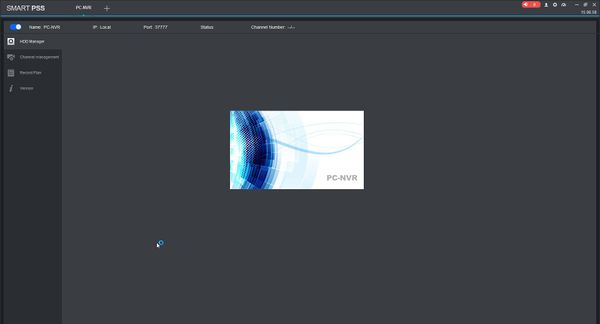
3. Click the toggle switch at the top left of the screen to enable PC-NVR
A splash screen for PC-NVR will appear.
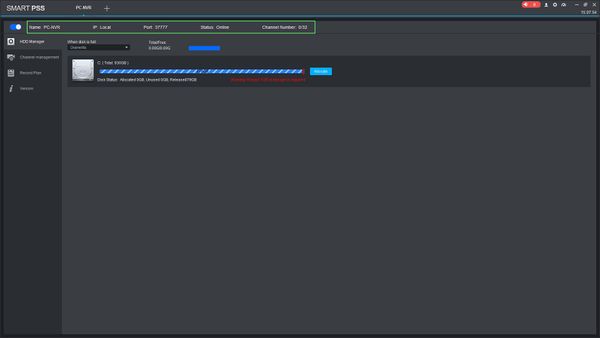
After a few moments PC-NVR will be enabled. You can confirm this by checking the server information at the top and making sure Status is “Online”
Once PC-NVR is enabled you can begin initial configuration.
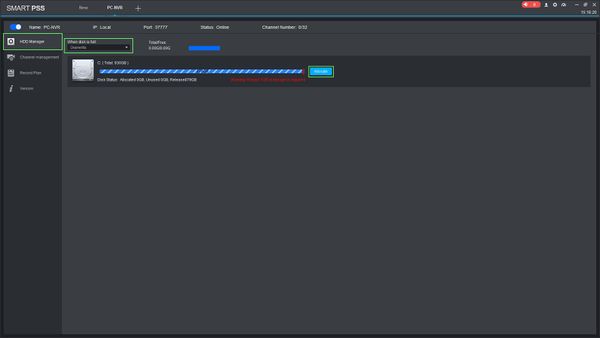
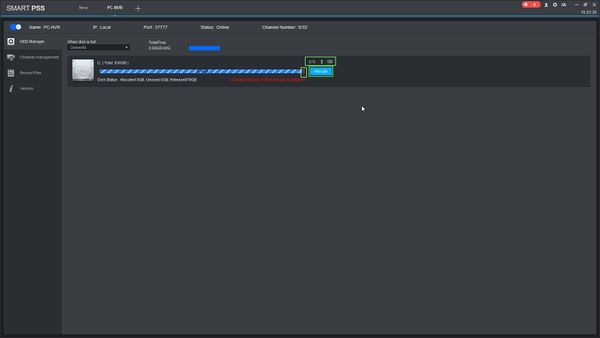
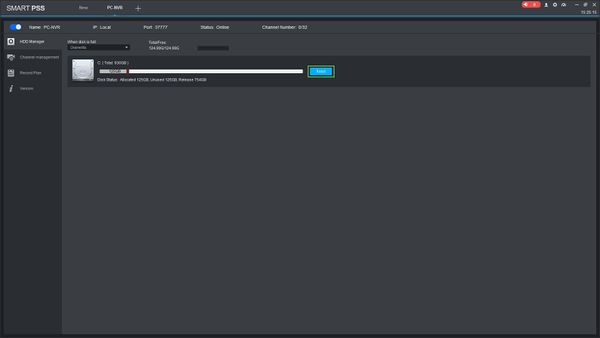
4. Click HDD Manager to setup the local hard drive to be used for recording.
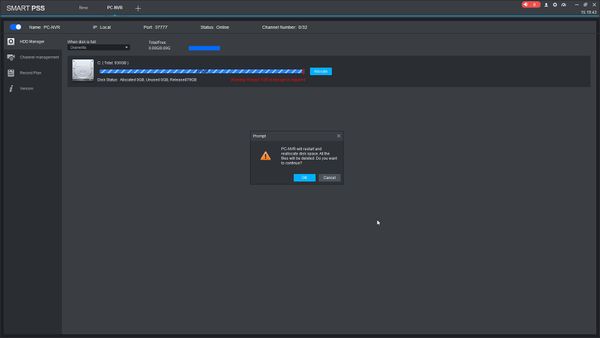
Click Allocate to begin disk setup.
You will receive a prompt, click OK
5. Use the slider to allocate disk space for recordings or you can manually enter the value. Click ‘Allocate’ once you have entered the disk size
To delete the disk allocation, click the button next to the Hard Drive. Note: Deleting a drive allocation will delete all recording files.
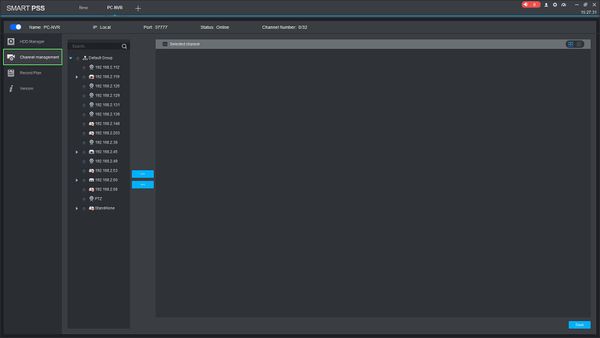
6. Click Channel Management
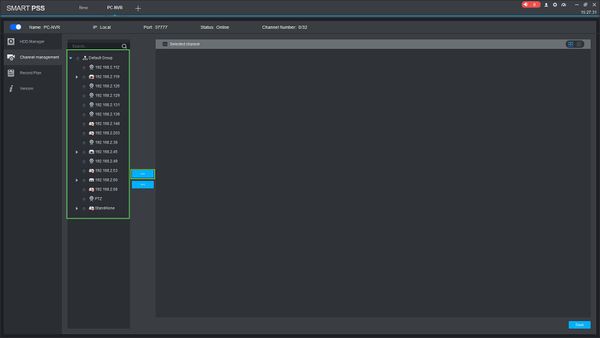
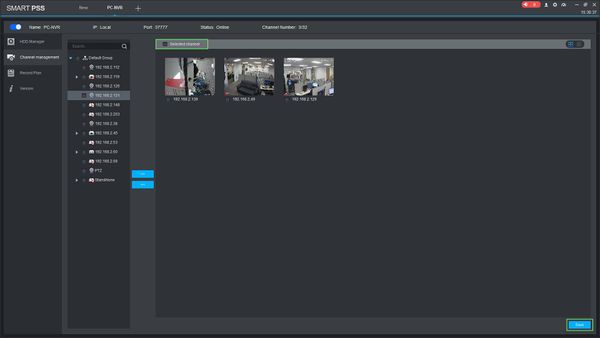
7. Select the devices you want to add to PC-NVR from the device list then click the >> button. To delete any devices click the << button.
8. Once the device is added a preview will load from each device. Use the checkbox next to each to device to select it, or use the Checkbox at the top to Select All devices. Once the devices have been checked click Save
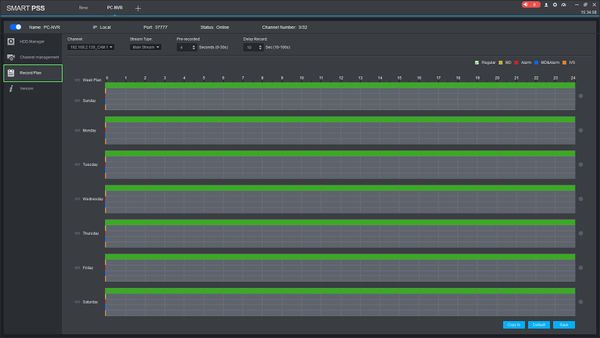
9. Click Record Plan
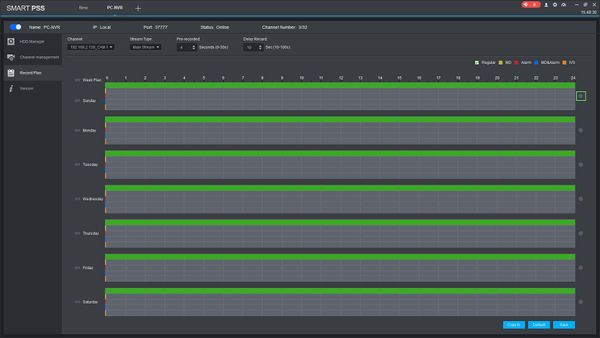
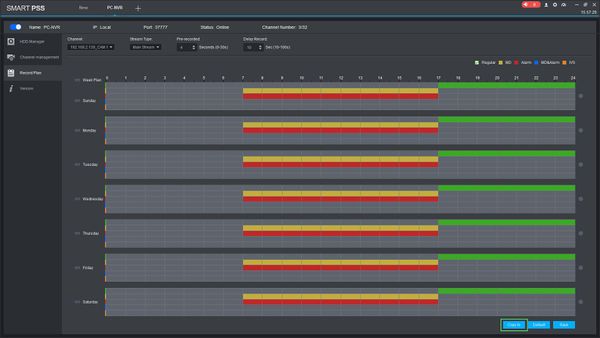
10. Use the Record Plan menu to set up a schedule for the device to record. By default the schedule will be set to Regular (Continuous) recording 24/7.
Click the Gear icon to enter the Schedule Menu
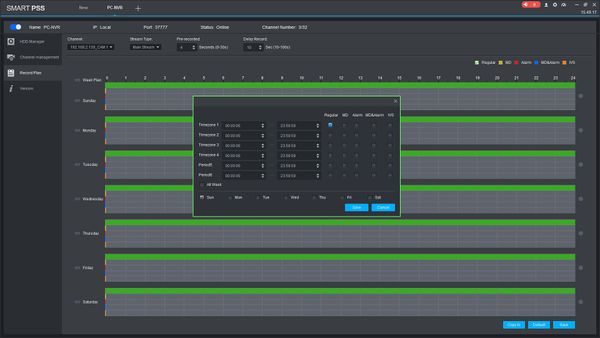
11. Enter the parameters of the Schedule, including time range and Recording Type (Regular, Event)
Once finished click Save
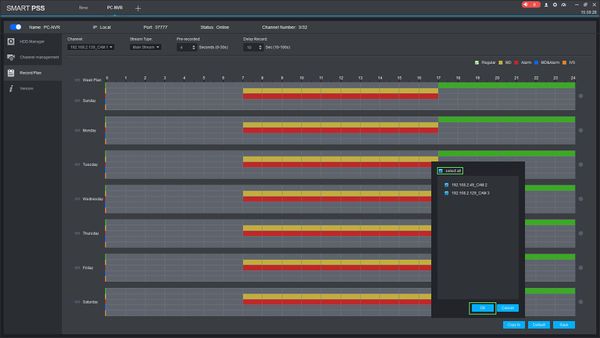
12. Once the schedule has been created it can be copied to another device. Click ‘Copy to’ to copy the current schedule to other added devices
13. Select which devices to add the current schedule to then click OK
How To Setup Video Talk In SmartPSS
Description
This article will show you how to setup and use Video Talk in SmartPSS 2.0
Prerequisites
- SmartPSS
- Device with video talk capabilities
- Device with video talk capabilities added to SmartPSS Device List – How To Add Device to SmartPSS
- Device with video talk capabilities configured with local computer:
Video Instructions
Step by Step Instructions
1. Launch SmartPSS.
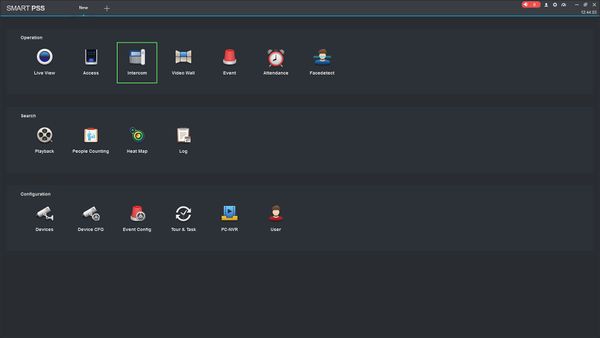
2. Click Intercom
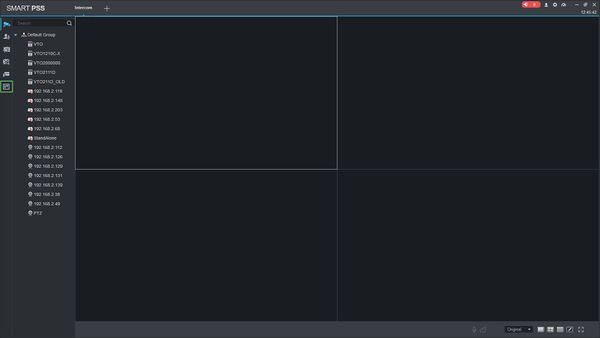
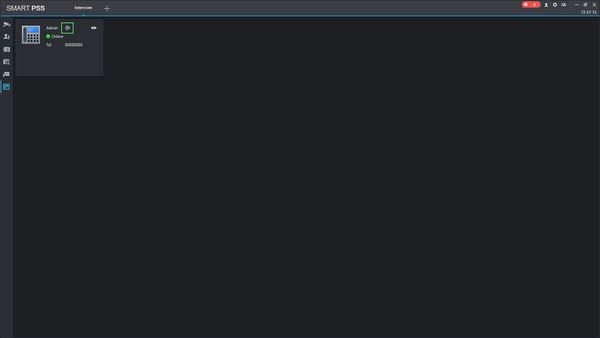
3. Click the VTS icon on the left to enter the VTS Settings menu
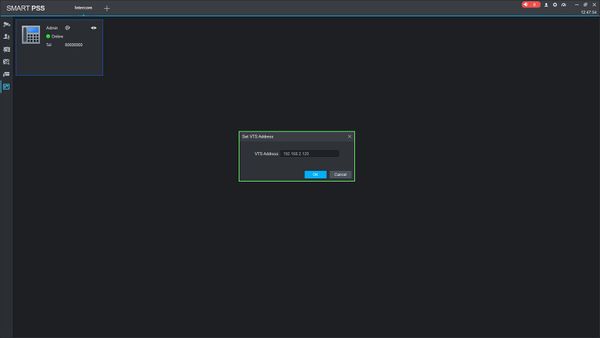
4. Click the IP icon to edit the setting
5.Enter the local IP of the computer running SmartPSS
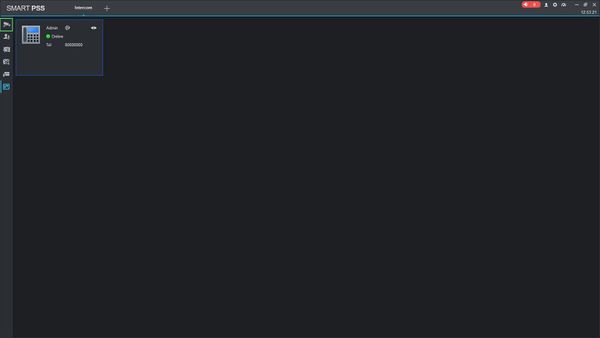
Setup is complete
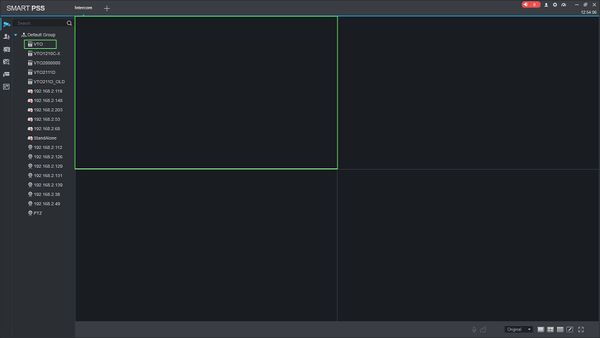
6. Click on Monitor
8. Double Click the device the device list on the left side of the screen, then double click the video pane to bring the feed up in full screen
9. Hover the mouse over the window to show the menu
10. Click the Shout icon ![]() to begin a Video Talk
to begin a Video Talk
The icon will change to ![]() when active.
when active.
Click the icon again to end.
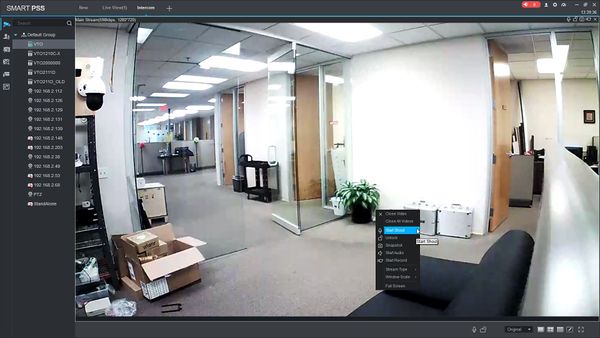
Alternatively, you can Right Click the video feed and select Start/End Shout from menu
How To Setup Video Wall In SmartPSS
Description
This article will show you how to setup a video wall in SmartPSS 2.0
Prerequisites
- SmartPSS
- Supported device with video wall feature, such as Decoder
- Device added to SmartPSS Device List – How To Add Device to SmartPSS
Video Instructions
Step by Step Instructions
1. Launch SmartPSS.
2. Click Video Wall
3. The device tree on the left will show all devices added to SmartPSS that are compatible with the Video Wall feature.
4. Click the ![]() icon to open the Video Wall Layout Setup menu.
icon to open the Video Wall Layout Setup menu.
Click the + to create a new layout
The Video Wall Layout Setup menu is where you can define the physical layout of the monitor outputs per device
5. Use the menu buttons below the grid to create the Video Wall Layout.
Start by clicking one of the layout options in the bottom left of the screen (1, 2×2, 3×3, etc.).
Click again in the grid to place the grid.
You can also use the menu on the right to combine or splice screens.
Click Next
7. A device tree will appear on the left.
Drag and drop from the device tree to the grid layout to configure the arrangement for the corresponding monitor outputs for the device
6. Click Finish once the Video Layout has been created
In this example, a decoder with 4 Monitor Outputs has been arranged in a 2X2 Layout
7. Use the device tree on the left to drag and drop streams into the Video Wall Layout
Click inside a quadrant and click from one of the layout options to change to one of the available options – 1 , 2X2, 3X3, 4X4
8. The Windows Detail window allows you to change settings for each of the windows – such as Stream Type and Stay Time
9. Once the layout has been configured Click the Save icon ![]()
10. Enter a name for the Plan then Click Save
11. All created Plans will appear in the Plan submenu, click the ![]() icon to view and switch between created Layout Plans.
icon to view and switch between created Layout Plans.
12. Click Schedule Control Config on the right side of the screen to configure a Scheduled Tour of created Video Wall Layouts
13. Use the Scheme Configuration menu to program the tour
Enter a dwell time (in seconds) Select the created Layout Scheme Then Click Add Plan
14. Click Save once the Scheme has been configured
15. To begin a created scheme click the ![]() icon on the right side of the screen
icon on the right side of the screen
16. The scheme patrol will begin. To stop click the button in the center of the screen
How To Setup Access In SmartPSS
Description
This article will show you how to setup access control in SmartPSS 2.0
Prerequisites
- SmartPSS
- Supported access control device (for ex: DHI-ASC1204C 4 Door Controller Access Control/Products/ASC1204C)
- Device added to SmartPSS Device List – How To Add Device to SmartPSS
Video Instructions
Step by Step Instructions
1. Launch SmartPSS.
2. Click Access
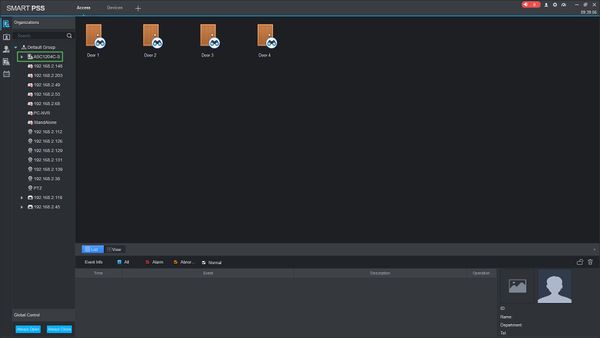
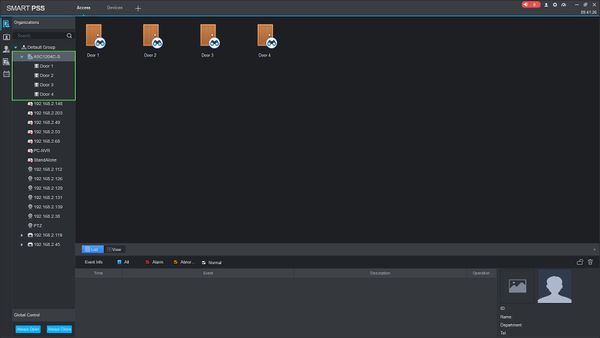
3. Access Control Devices will appear in the Device Tree on the left.
You can click to expand the tree to see all Doors added to the controller
Adding A User
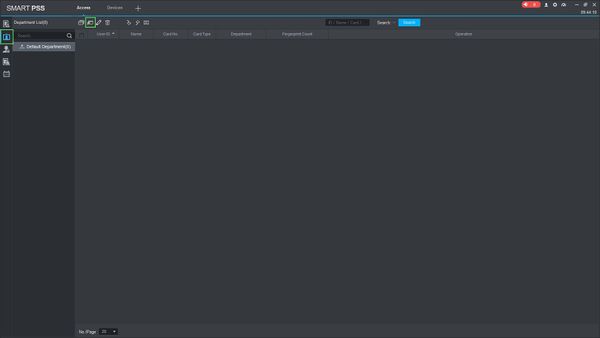
1. Click the User tab, then click Manual Add
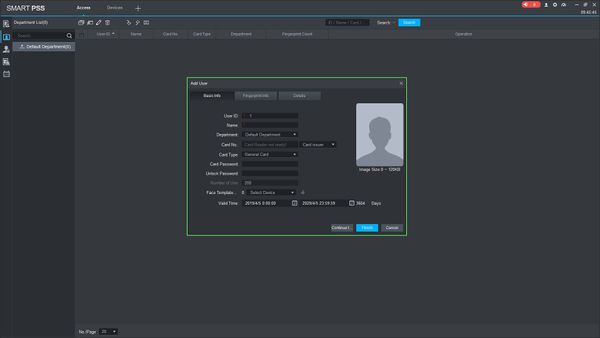
2. The Add User menu will appear
Enter the information for the user
How To Import & Export Access User List In SmartPSS
Description
This guide will show how to Export and Import a User List for an Access Controller in SmartPSS
Prerequisites
- SmartPSS
- Supported access control device (for ex: DHI-ASC1204C 4 Door Controller Access Control/Products/ASC1204C)
- Device added to SmartPSS Device List – How To Add Device to SmartPSS
- User(s) added to Access Control device
Video Instructions
Step by Step Instructions
Import Access User List
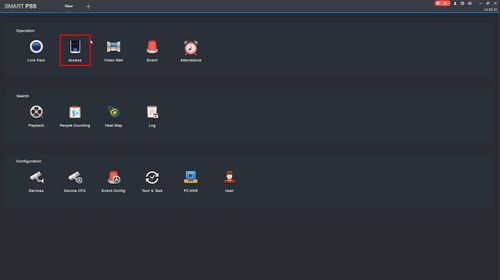
1. Launch SmartPSS.
From the Main Menu click Access
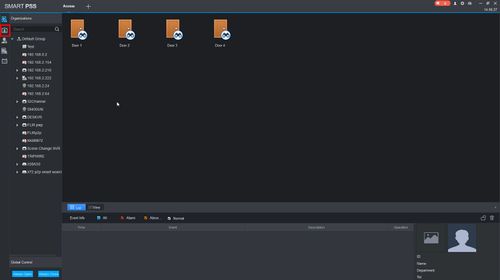
2. Click User
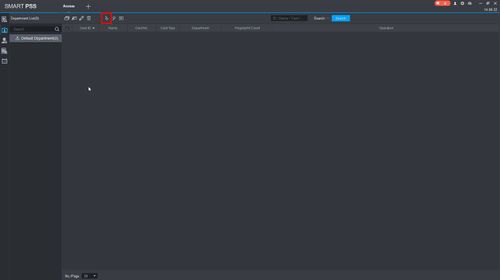
3. Click Import
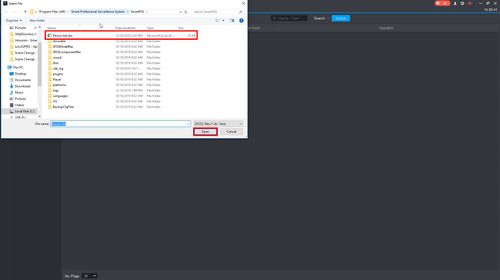
4. Use the window that appears to select the user list to Import
Click Open
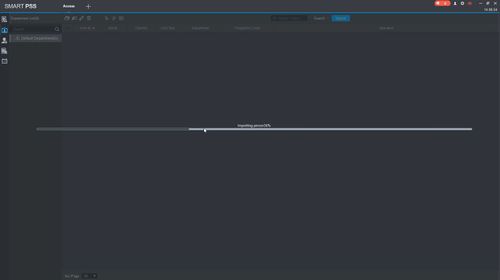
5. The user list will begin importing
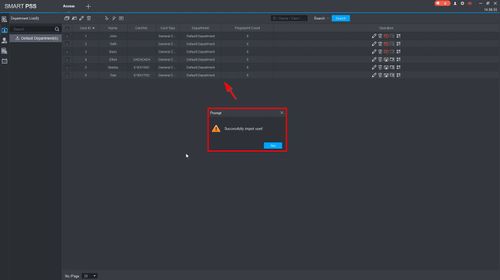
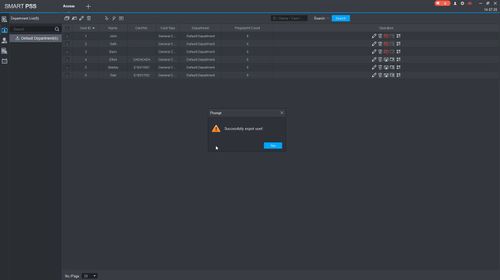
A prompt will confirm a successful import
The information from the selected user list will be updated to the current user list
Export Access User List
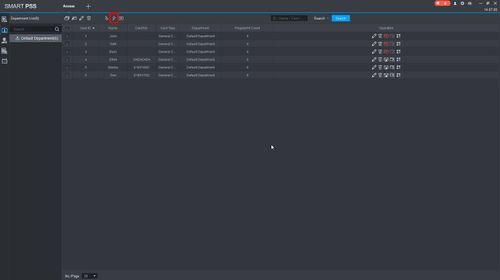
1. From User section of Access
Click Export
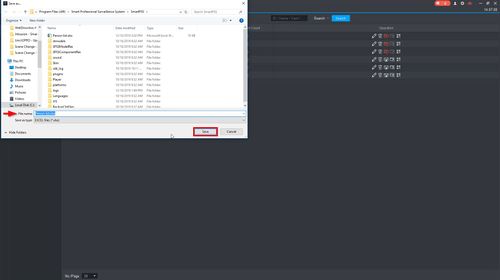
2. Use the window that appears to confirm the name of the backup and where to save the file
3. A prompt will confirm a successful export
How to Use Different Multisensor Camera Modes
Description
This article will show you how to suse different multisensor camera modes in SmartPSS 2.0
Prerequisites
- SmartPSS
- Multisensor camera
- Multisensor camera added to SmartPSS Device List – How To Add Device to SmartPSS
Video Instructions
Step by Step Instructions
1. Launch SmartPSS.
2. Click ‘Live View’
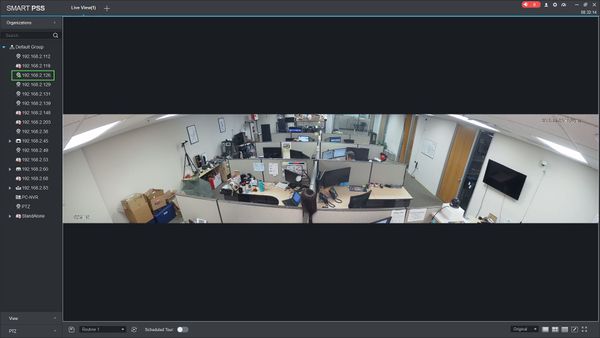
3. Double Click the Multisensor on the device list on the left side of the screen, then double click the video pane to bring the feed up in full screen
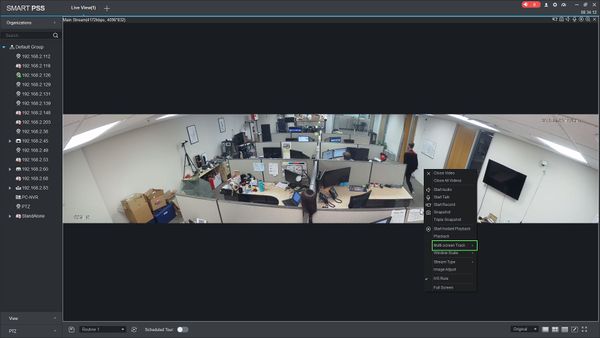
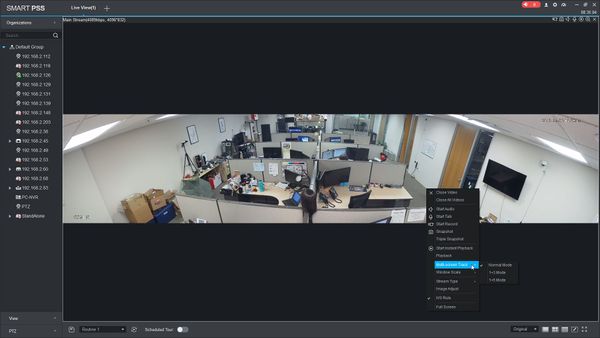
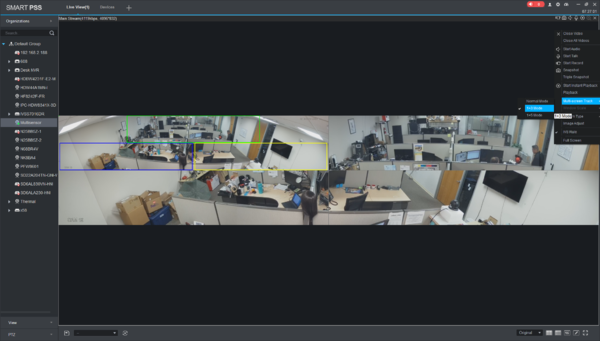
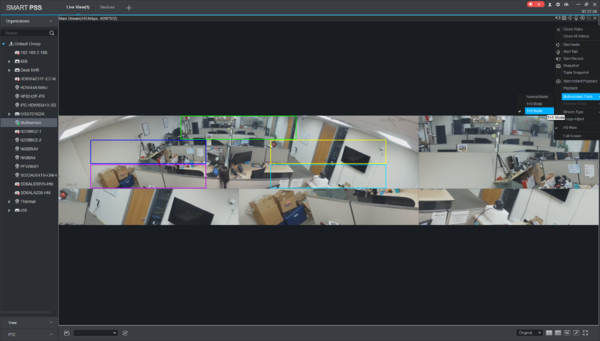
4. Right click the video stream window, then select ‘Multi-screen Track’
There are 3 layout options under this menu:
- Normal
- 1+3 Mode
- 1+5 Mode
How To Playback Events In SmartPSS
Description
This article will show you how to playback events in SmartPSS 2.0
Prerequisites
- SmartPSS
- Video Device added to SmartPSS Device List – How To Add Device to SmartPSS
- Events for the selected device configured in SmartPSS or at the device
Video Instructions
Step by Step Instructions
Local Recording
1. Launch SmartPSS.
2. Click Playback
3. Select the device from the device tree on the left side of the page
4. Use the dropdown box under Record Type to select the type of Event to search for
5. Use the dropdown box under Stream Type to select the type of stream to search for
6. Click in the Time field to select a date range to search
7. Once the parameters of the search have been entered, Click Search
8. The search results will populate in the timeline
9. Click the Floating Bar on the right hand side of the screen to open the Event menu
10. Double click any Event in the list to begin playback
11. To quickly Export any event, Check the checkbox next to the event then Click the Export button
The Export Setup menu will appear.
Enter the parameters of the export, then click OK to begin the export.
12. The Export Progress menu will appear showing the progress of the export
How To Setup A Custom Screen View In SmartPSS
Description
This article will show you how to setup a custom screen view in SmartPSS 2.0
Prerequisites
- SmartPSS
- Devices added to SmartPSS Device List – How To Add Device to SmartPSS
Video Instructions
Step by Step Instructions
1. Launch SmartPSS.
2. Click ‘Live View’
3. The device tree on the left will show all devices added to SmartPSS.
4. Use the Layout Options in the bottom right of the screen to adjust the Live View to 2X2, 3×3, 4×4, or create your own custom layout
5. Click on a device then drag and drop to a tile in the center of the screen to load the stream in a window.
Continue to arrange the layout as desired by dragging and dropping other devices from the device tree.
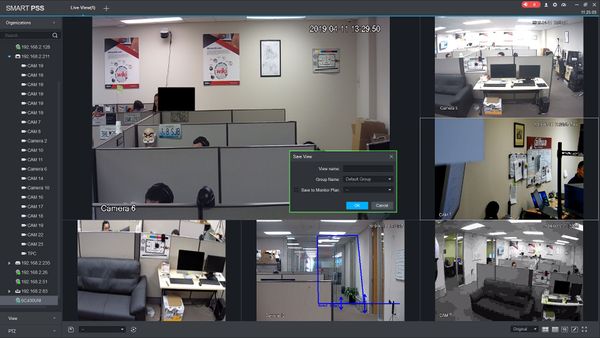
6. Click the Save icon ![]() to save the current layout
to save the current layout
7. The Save View window will appear
Click OK to save the view
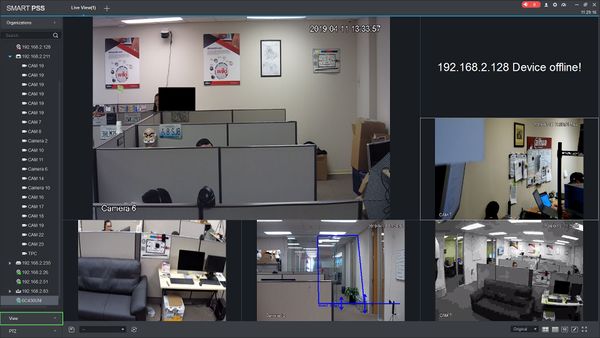
8. To select from created Custom View Screens click View on the left side of the screen
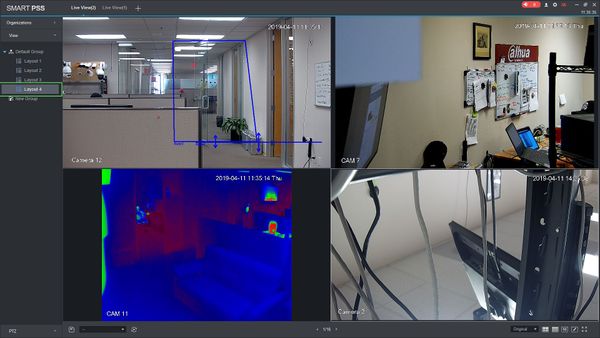
9. Custom screen views that have been created will appear on the left side of the screen
Double Click the View Name and the custom view will display
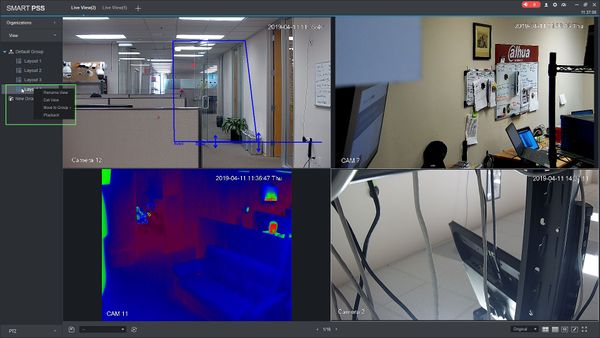
10. To edit any created custom screen views, right click the view in the list
You can rename, delete, move between groups, or begin playback using this submenu
SmartPSS EMap Setup
Description
This guide will show how to create an EMap using SmartPSS
Prerequisites
- Floor Plan image in JPG format
- SmartPSS Version 2.002.0000009
- Several Devices Added to SmartPSS
Video Instructions
Step by Step Instructions
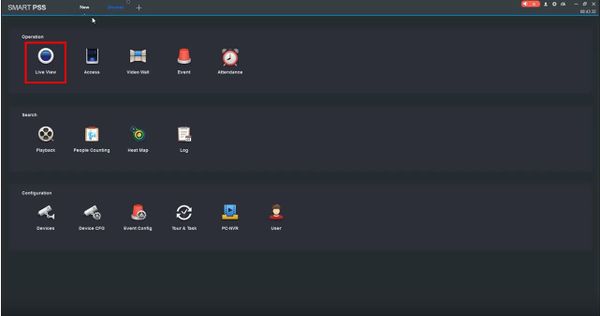
1. From the Main Page of SmartPSS click Live View
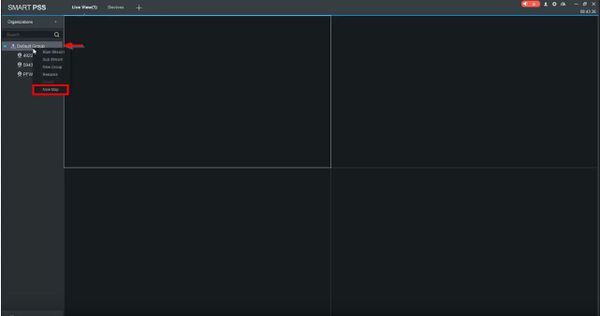
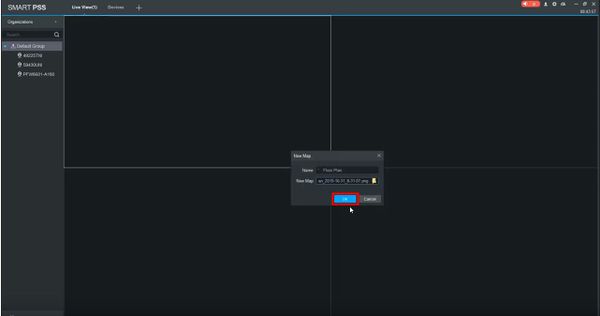
2. In the Device Tree on the left side of the screen, Right Click the Group (by default Default Group)
Select ‘New Map”
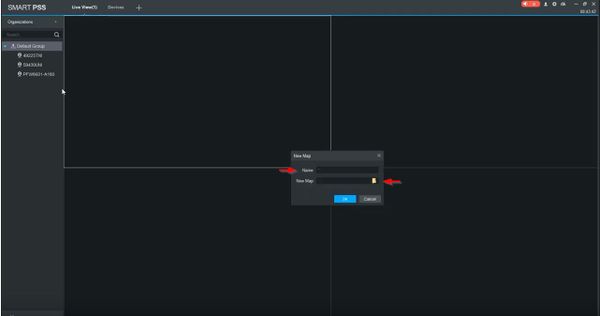
3. The New Map window will appear
Enter a name for the Map.
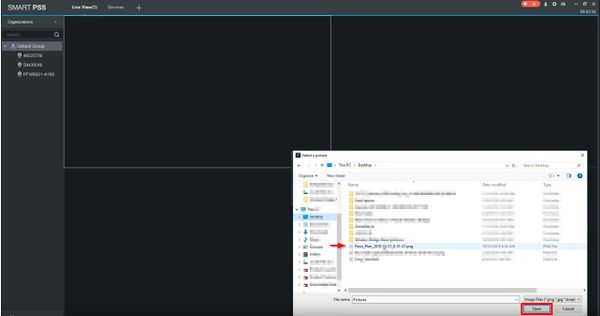
Click the folder icon to locate the floor plan image on the computer
Click Open once the floor plan image has been selected
4. Click OK
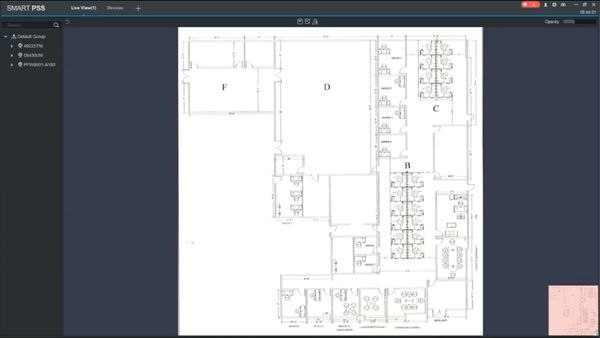
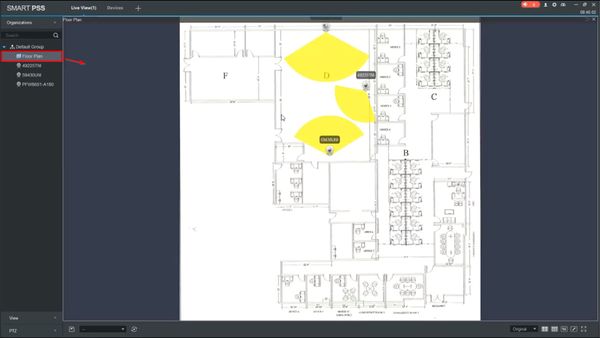
5. The floor plan image will appear once added
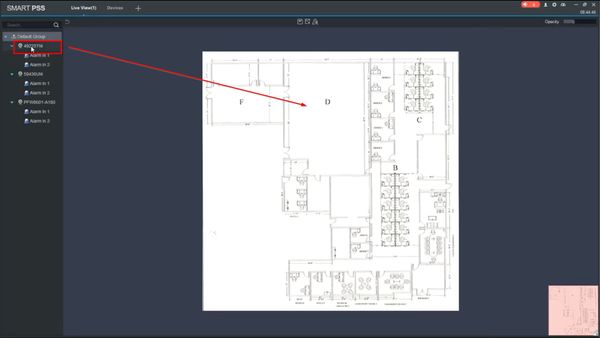
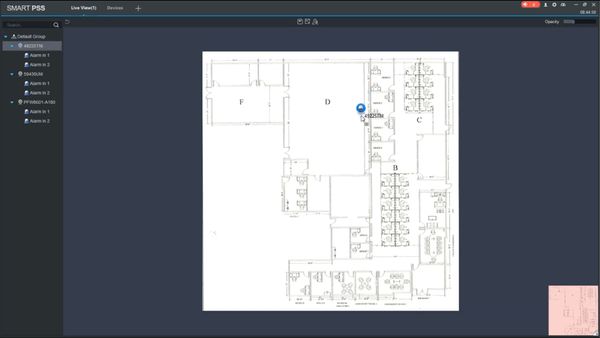
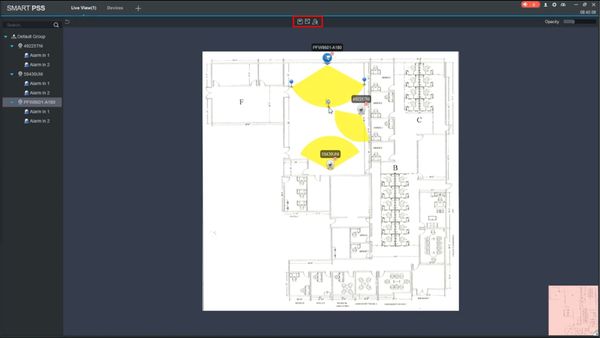
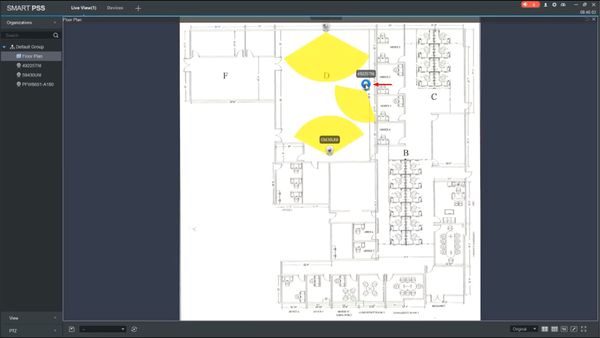
6. Use the Device Tree on the left side of the screen to drag and drop devices on top of the EMap
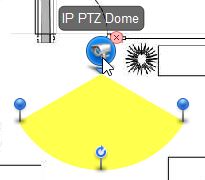
7. Once a camera has been added you can adjust the viewing angle and direction of the camera
8. Continue to add devices as desired
Click the Save icon ![]() at the top of the screen to Save the EMap
at the top of the screen to Save the EMap
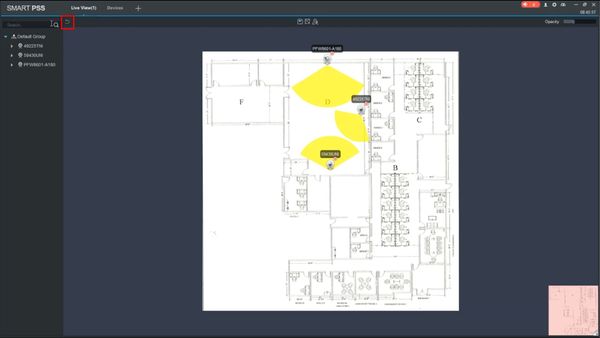
9. Click the Return arrow ![]() in the top left of the screen to return to Live View
in the top left of the screen to return to Live View
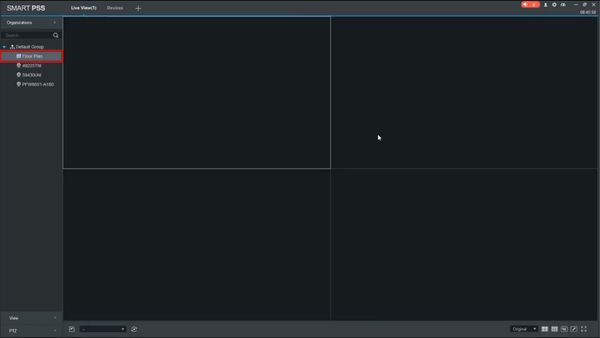
10. The EMap will now appear in the Device List
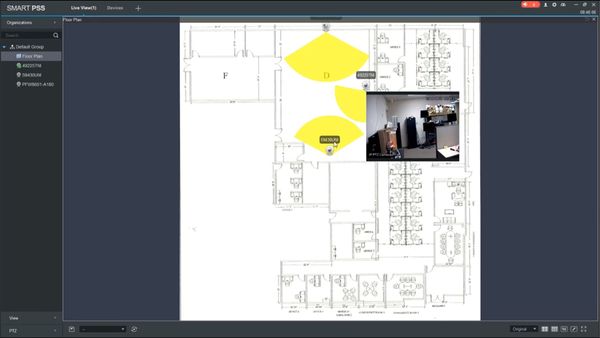
11. Double click or drag and drop the EMap to an open window to display
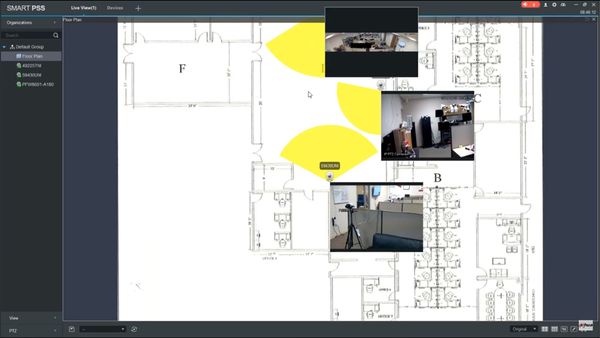
12. Click a Camera’s icon to open the Video Stream for this device
SmartPSS 2.09 – Event Config Setup For MD Window Pop-up
Description
How to enable motion detection via SmartPSS 2.09 for window pop-up
Prerequisites
- SmartPSS installed
- Recorders or cameras added in SmartPSS
Step by Step Instructions
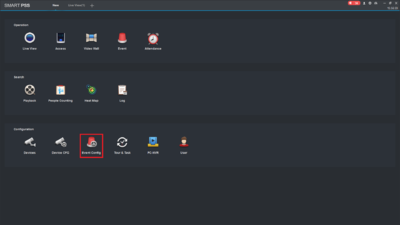
1. Click “Event Config” on the main menu.
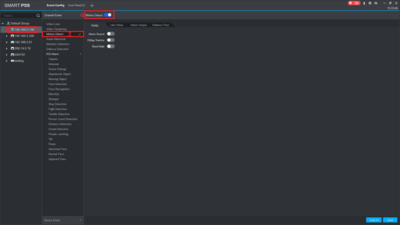
2a. Select the camera by left clicking it once.
2b. Select “Motion Detection” under Channel Event.
2c. Enabled “Motion Detect” once Motion Detect has been selected on the earlier step.
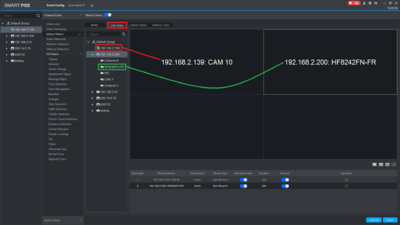
3. Click “Link Video” and select the cameras to be added onto the grid boxes.
Tip: If only one camera needs to be added then select one grid box only. Multiple grid boxes can be selected for more cameras.
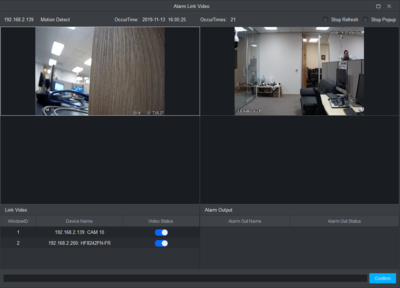
4. Once motion is detected, another pop-up windows will appear and show the camera(s)’ live views. Please note that if there are more than one camera are selected previously, both cameras will show up regardless of motion on the second camera.
For example, the below image shows both cameras being up but there isn’t any motion on the first camera, however, it still shows up due to both cameras are added to the same grid box.
Important notice: If two cameras are setup separately (not on the same grid box), the pop-up windows still shares between them but only one camera can be seen at a time.
