InVidTech Vision Series Setup Guide v1, InVid Tech offers a wealth of knowledge and experience in the security industry, providing the latest technology to help our clients stand out from the competition.
InVid Tech is here to help you succeed, and as a company, we pride ourselves on the level of personal service we offer. We have an experienced team based in the United States, including Sales, Customers Service, Marketing & Tech Support. Additionally, there is support for Latin American Countries.
How do I access the cameras on my computer?
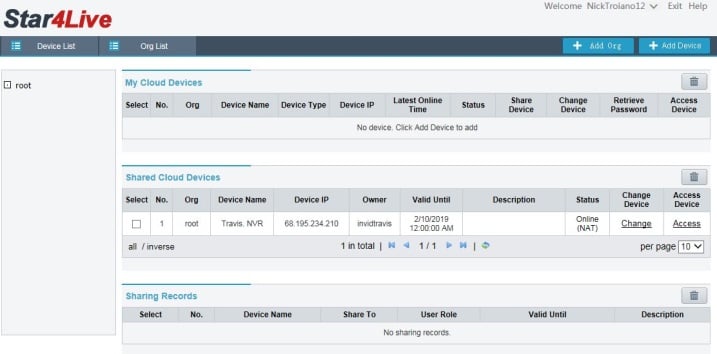
Go Here, login using with the credentials you used to sign up with. You will see your devices at the top, click ACCESS and it will launch a new tab for that device. This info can also be found by going to our website and downloading it Here
How do I network the unit so it can be viewed remotely?
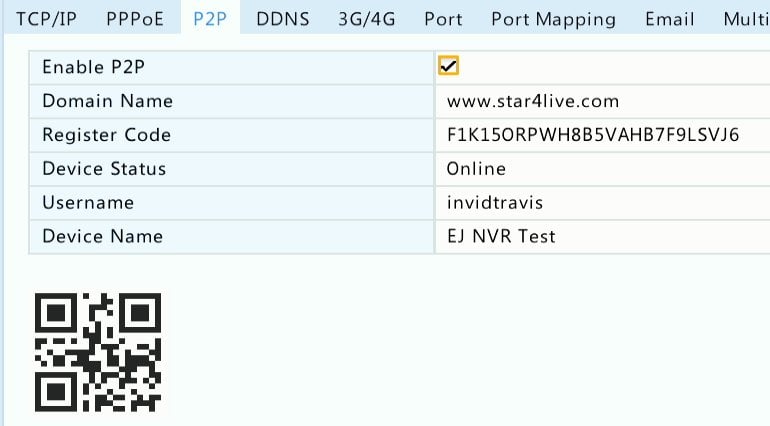
First you want to make sure you plug the unit into your router. Now on the unit login, then right click on the mouse and go to Menu> System> Network. You can set the IP Address under “TCP/IP”. Once you’ve entered your IT information go to “P2P” across the top. Make sure it is enabled. Below you will see the server address Here. You will go there and create an account then link the unit with your account. See Link below for more detailed instructions. Here
How do I connect a third party camera?
You will need a PC and the manufacturers IP tool to address the camera(s) IP address within the same scheme as the internal NIC of the NVR (172.16.0.x). Now go to the camera management within the NVR, switch the port that the camera(s) are plugged into from PNP to IP address, protocol will be ONVIF, port will be 80 (HTTP port of the camera) and type in the username and password of the camera and it should connect. Some manufacturers require ONVIF to be enabled within the camera before adding to different unit. Please check their website for information on how to enable ONVIF.
Why can’t I use Chrome, Firefox, Edge or Safari to view my device(s)?
Chrome, Firefox, Edge and Safari took away a plugin that was used for ActiveX plugins. This has effected anyone that uses an ActiveX plugin for their devices not just InVid.
Why is my Vision camera not connecting to the NVR?
That may be due to the NVR having the old default password of 123456. Leave the camera plugged into the unit and go to Menu>Camera then click on the “cog” (gear looking icon) next to the port of the camera you are trying to connect. Type in the password “1234567u” for the camera and the camera should then connect.
Why did my device suddenly go offline?
If you are connected to your ISP’s router (Internet Service Provider) occasionally it is possible your ISP is doing a update which can occasionally change your network environment and require a reboot of your router/recorder (Router first then recorder). It is highly recommended that with this device to install your own router to run the recorder to avoid this from happening, however if using your ISP’s router the above stated solution is the fix for it.
How do I Share a device added to my star4live account?
Have the new user create an account Here. Log into the account with your device, click on SHARE, enter in the customers user name or email, choose a “valid to date”, when this date hits the device will no longer be shared, and hit ok. The device will now be found under the Shared Record. This info can also be found by going to our website and downloading it Here
Trying to view devices on IE but can’t download the plugins?
Please ensure you are in fact using Internet Explorer and not Edge. The two have similar icons, Edge is a darker blue lower case “e” whereas Internet Explorer is a lighter blue lower case “e” with a yellow ring going over the top left of the “e”. Also note that on Windows 10 Edge is the default browser, Internet Explorer isn’t on the task bar or the desktop, you can use Cortana and search “Internet Explorer” to launch.
How do I turn On/Off motion function?
Right click on the mouse, go to the menu>alarm>motion. By default motion detection should be enabled. You want to draw the area of where you want motion to be detected and then hit apply down at the bottom.
How can I see video from last week?
To playback video you want to right click on the mouse and the second to last option on the bottom is “Playback”. On your right you will select which cameras you will like to playback, below the camera list select the date in which the video was recorded. Hit the play button down at the bottom and the playback should start.
How do I add a User?
Right click on mouse go to Menu>System>User. Click Add at the bottom. Create the username and password then select permissions you want to grant that user and hit OK.
How do I format my hard drive? Vision Series
Go to Menu, click on Storage, click on Hard Disk, select your disk(s) and click Format (remember, this erases all data on that drive(s)).
Do I need to port forward this device? Vision
If you’re using the P2P which is explained above no port forwarding is required, if you are networking this device to be seen remotely via a WAN IP or DDNS, yes port forwarding is required.
Is there a manual for this device?
Yes, you can find it on our website Here
Where can I check to see if my unit is recording?
The best way is by doing a playback (refer to question above). You can also go into the Menu, select Maintain on your left and Recording across the top.
InVidTech Vision Series Setup Guide v1
How to Setup Vision Email Notification
Learn how to setup email notification on your Vision machine
Step 1: Setting up a GMAIL account.
1. Go to My Account setting page, click on the square and click my account.
2. Click Signing in to Google.
3. Click Allow all less secure apps on
Step 2 – Setting DVR/NVR Configurations
Enabling Motion Detection
Hit Apply to save then OK
What is the default password of the Vision devices?
We provide a sticker on the inside of the boxes, whether it’s a DVR Encoder, NVR or IP Camera. The default user name and password could be either “admin/123456” or “admin/1234567u”. Once the change-over is fully complete they will all be “admin/1234567u”
How to Setup Vision P2P Using the QR Code
With P2P QR connection there is no need to set any ports, worry whether or not your uPnP is enabled within your router, do any port forwarding within your router or setup a DDNS name.
Not connected? Here are some things to check
Viewing your Vision Device Online or from Mobile App
Viewing from your Web Browser (Internet Explorer):
Viewing from your InVid Vision mobile app:
 Is my unit up to date with its firmware?
To find out if the unit is up to date Locally, you want to go to the Menu, select Maintain on your left then Upgrade. Now select “Upgrade by Cloud” (across the top) then hit “Check” in bottom right had corner. To find out if the unit is up to date Remotely, you want to go to Setup, then Maintenance then Maintenance again and hit “Check New Version”. If it is the latest firmware it will say “The current version is already the latest.” If it is not up to date then you will be prompted to upgrade, which will download the file from the cloud, upgrade and restart your NVR.
How do you check to see if an upgrade is available for the Vision NVR?
Is it possible to reset a password for a device?
Yes please contact our Tech Support, 631-388-5700.We will need the devices FULL serial number, you can do this at the main monitor or from the web interface.
How do I access the cameras on my phone?
Once you have downloaded the VISION app from the App Store or Google Play store, sign in with your login credentials used when creating your star4live account.Hit the camera icon in the top right hand corner and you will see a list of all devices added to your account.Choose the device youd like to access and hit “Start Live View” at the bottom of the screen. This info can also be found by going to our website and downloading it Here
Where do I download the APP?
-The app can be found at either the app store for an Apple device, or the Google Play store for an Android Device, you want to search “Paramont CMS”. This info can also be found by going to our website and downloading it Here
What App do I use for my phone?
InVid Vision
How do I view my device(s) on my Mac?
The current work-around is to install the appropriate CMS software which will allow you to watch live and playback your device(s). You can download the CMS software(s) off our website Here.


