Uniview IP Security Camera Guides This guide will explain the few steps needed to create a group of devices in EZstation for easy management. This can be beneficial if you want to group different cameras in different folders.
How to group Uniview Devices in EZStation
This guide will explain the few steps needed to create a group of devices in EZstation for easy management. This can be beneficial if you want to group different cameras in different folders.
Note: EZStation should already be installed and and running.
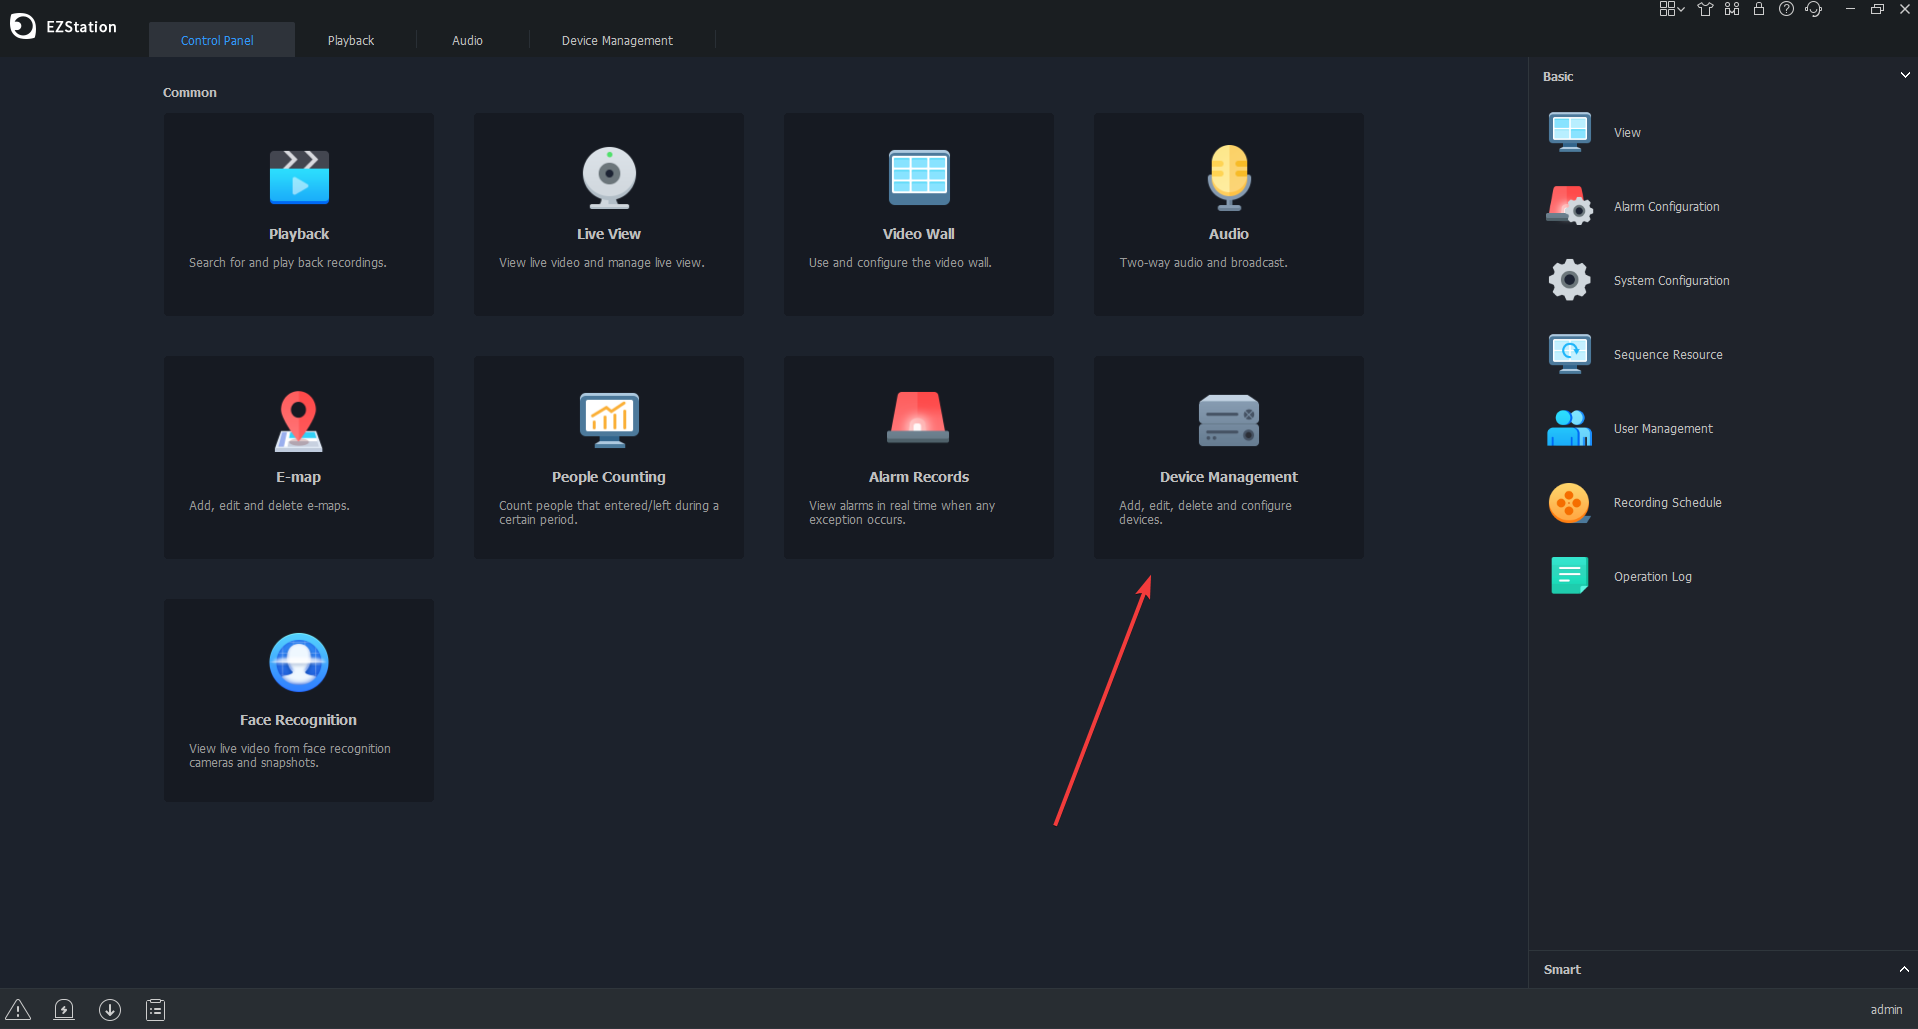
1. Click Device Management
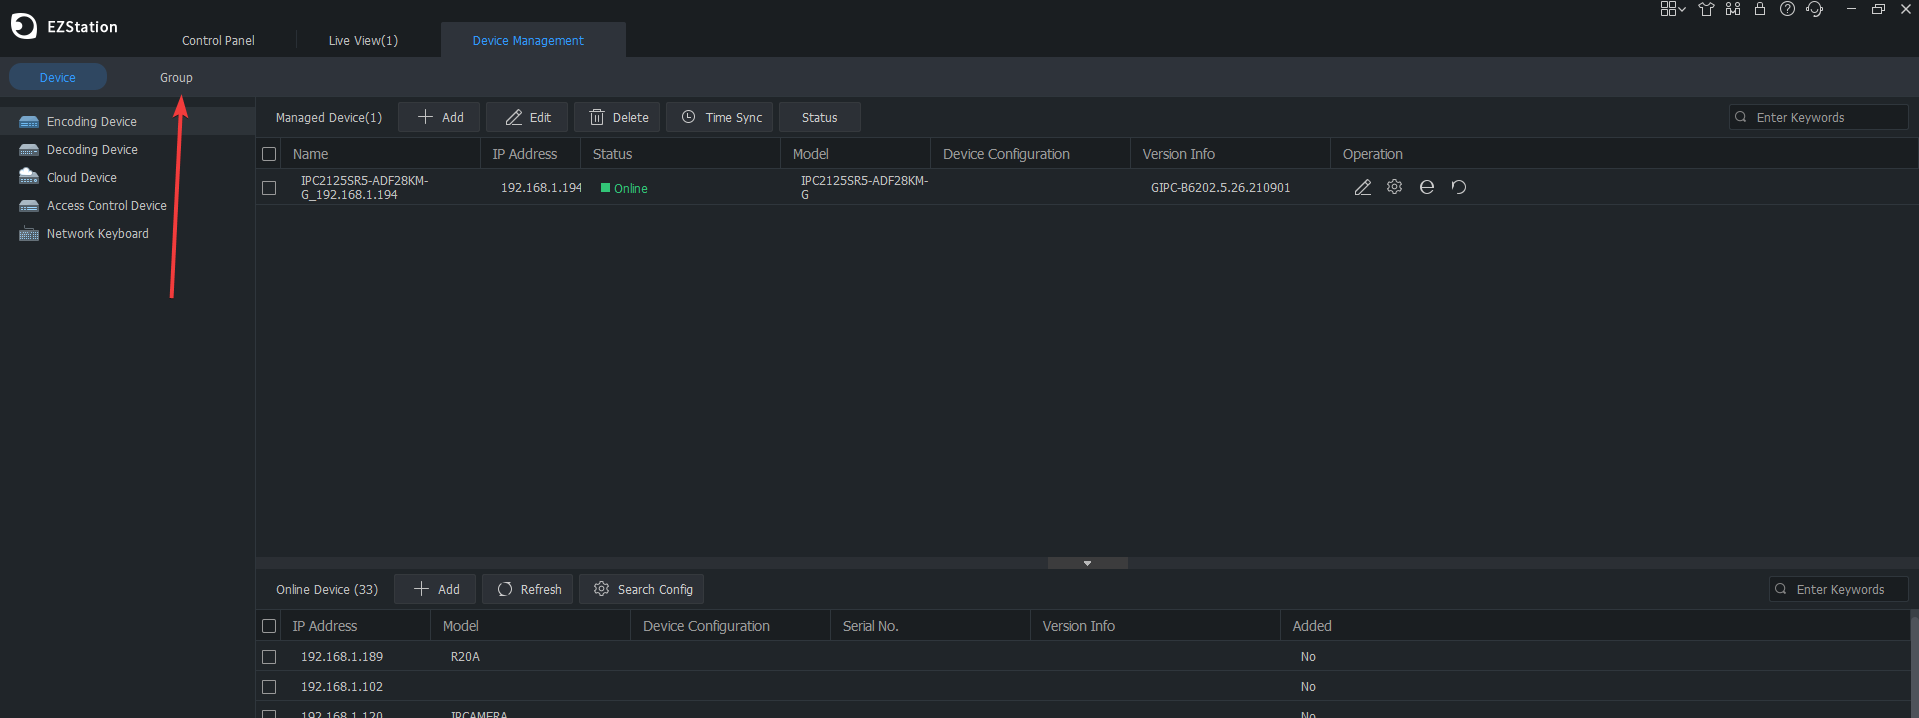
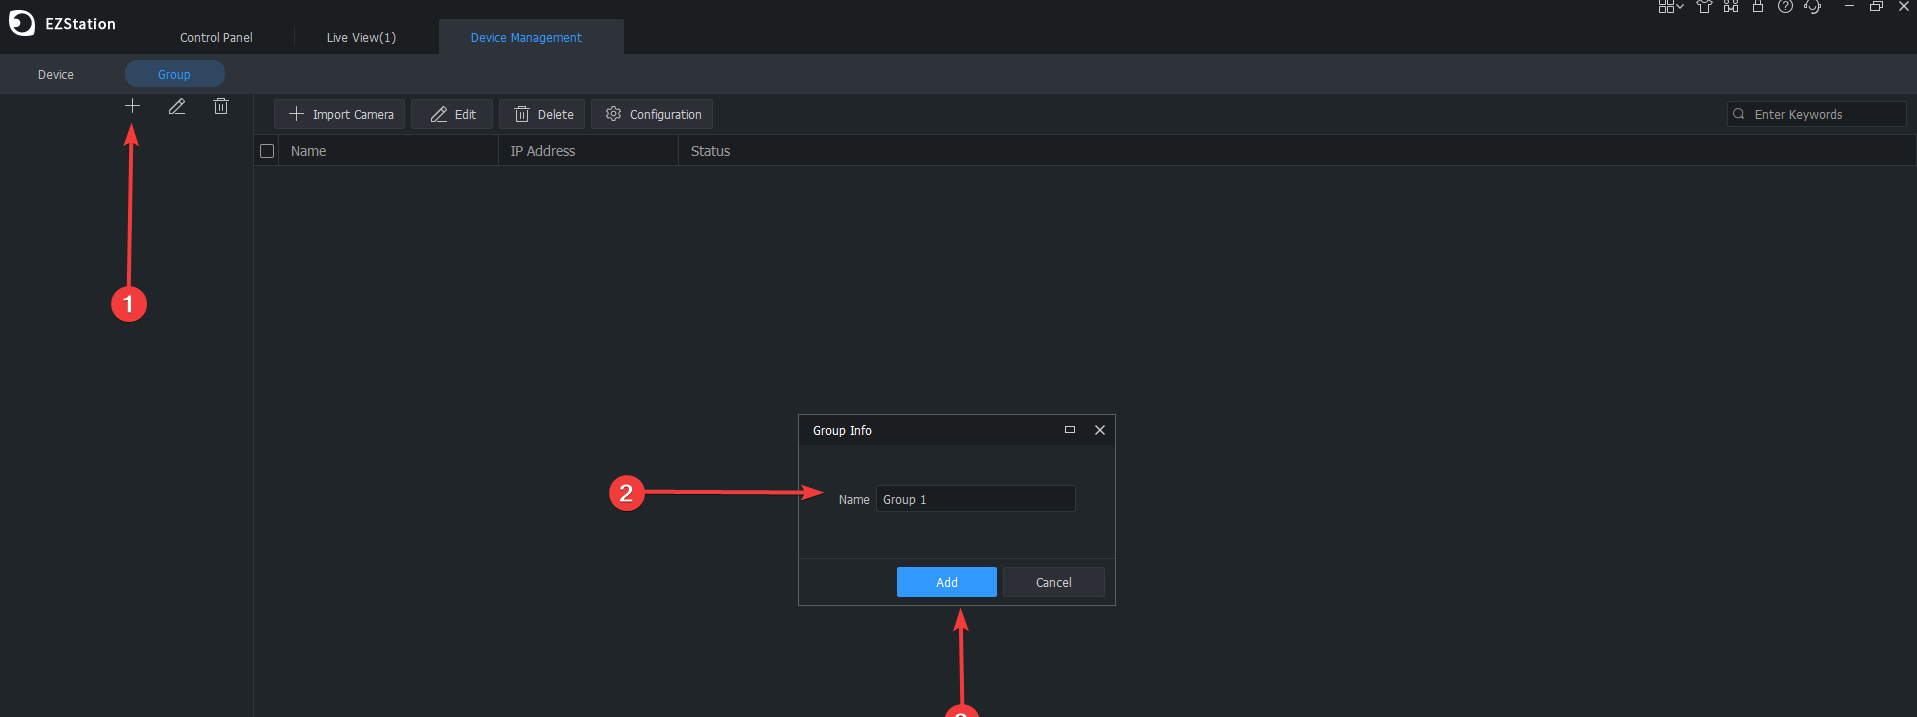
3. Click the plus button, type in a name in the Group info window, then click Add.
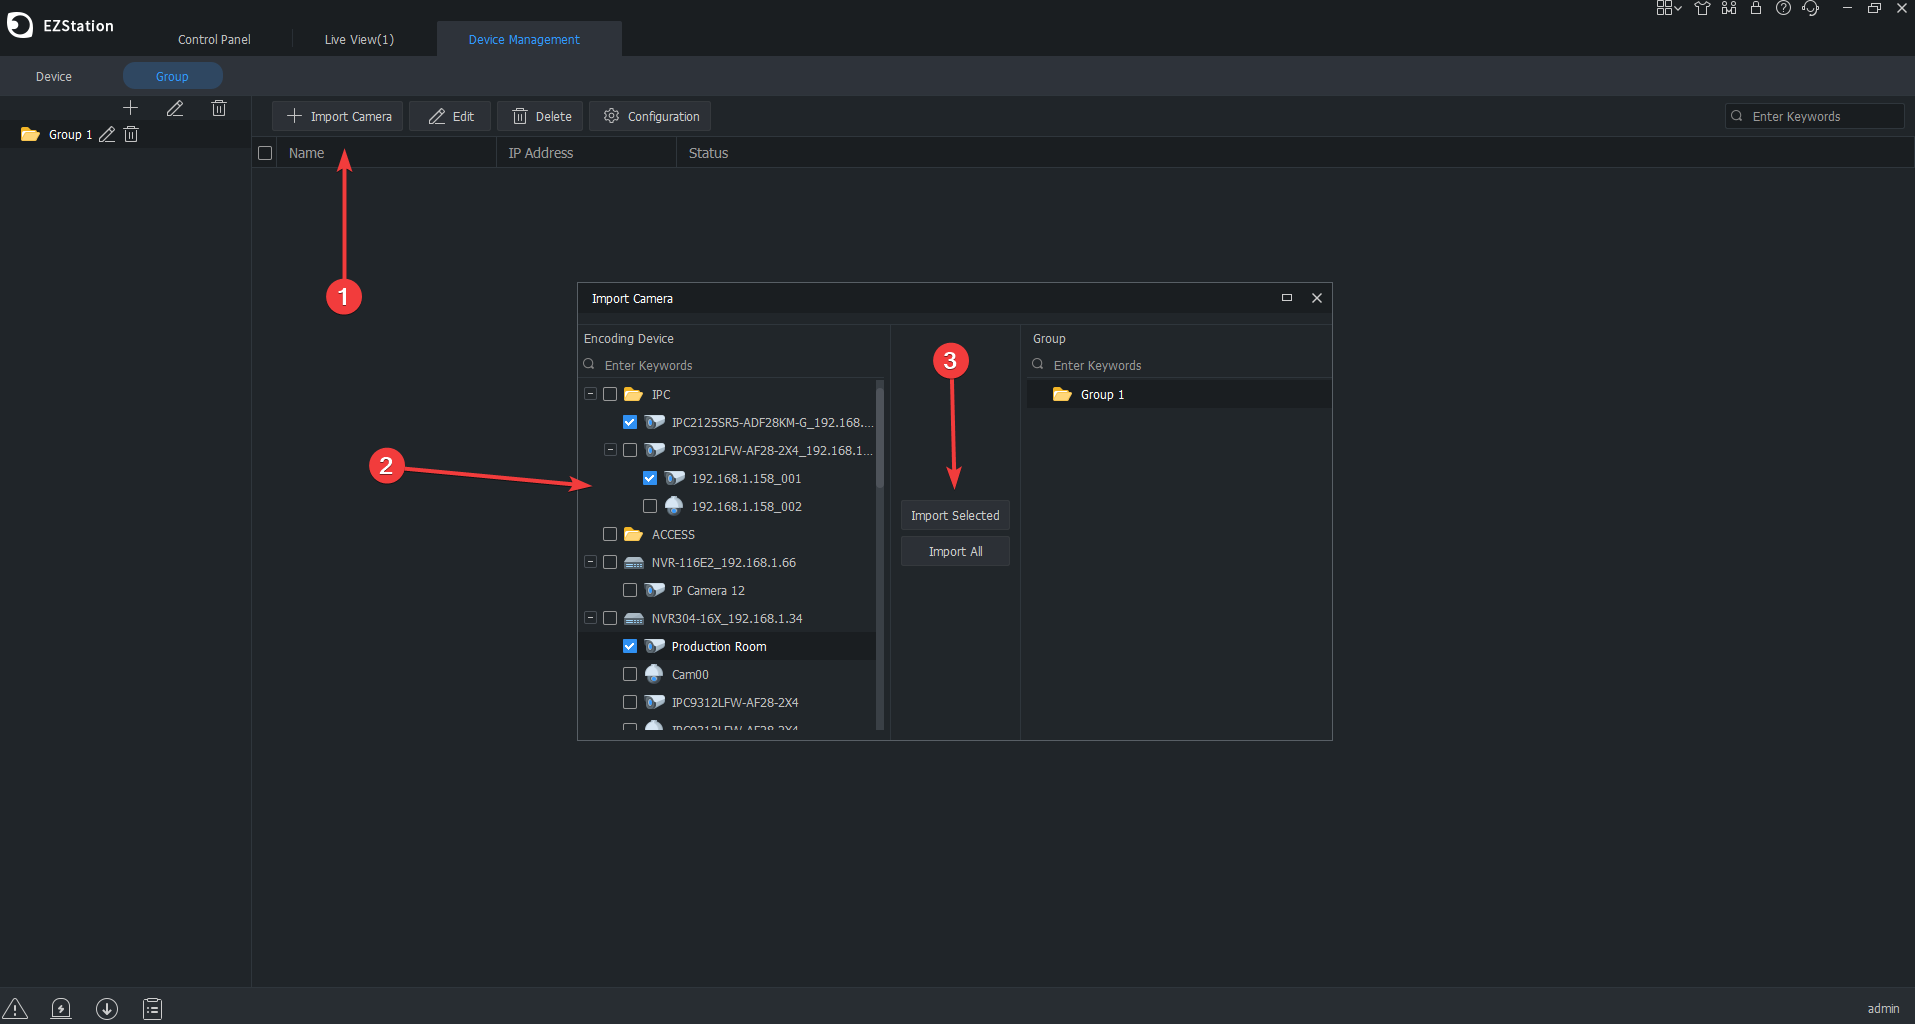
4. Click Import Camera, select the cameras you want to add to the group by checking the box next to the model number. Lastly, click the Import Selected button to add them to the Group folder on the right.
5. Repeat the steps again for any additional groups that need to be created.
Uniview IP Security Camera Guides
Read Next :
Adding a Uniview Dual Lens PTZ to a Uniview NVR
This guide will take you through each step required to add the dual lens PTZ (IPC9312LFW-AF28-2X4) to a Uniview NVR.
It has been written in the context that the dual lens PTZ is connected to a separate POE switch and there’s already an IP address, subnet mask, and gateway assigned to the camera within the local network subnet range.
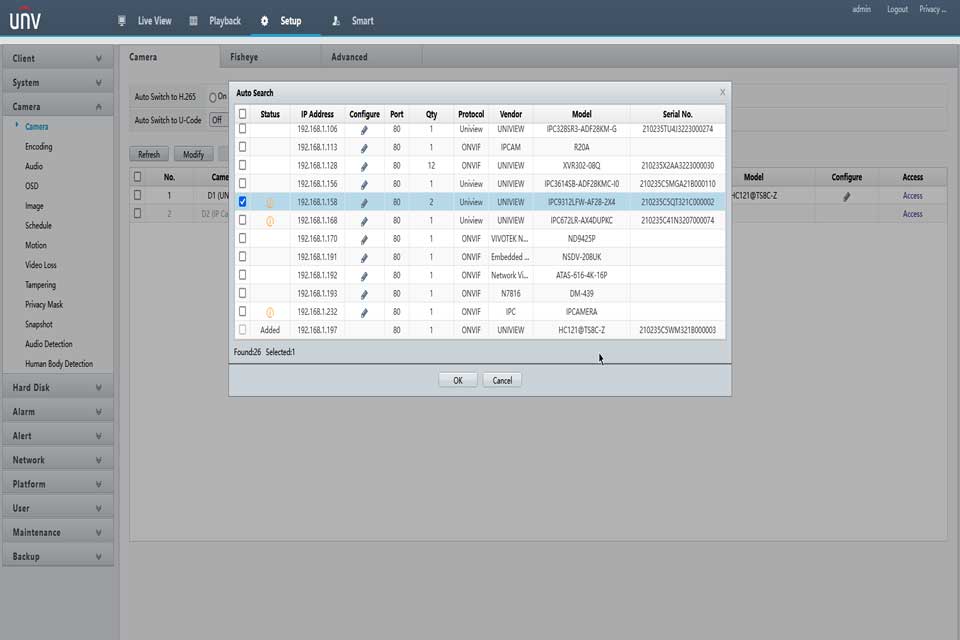
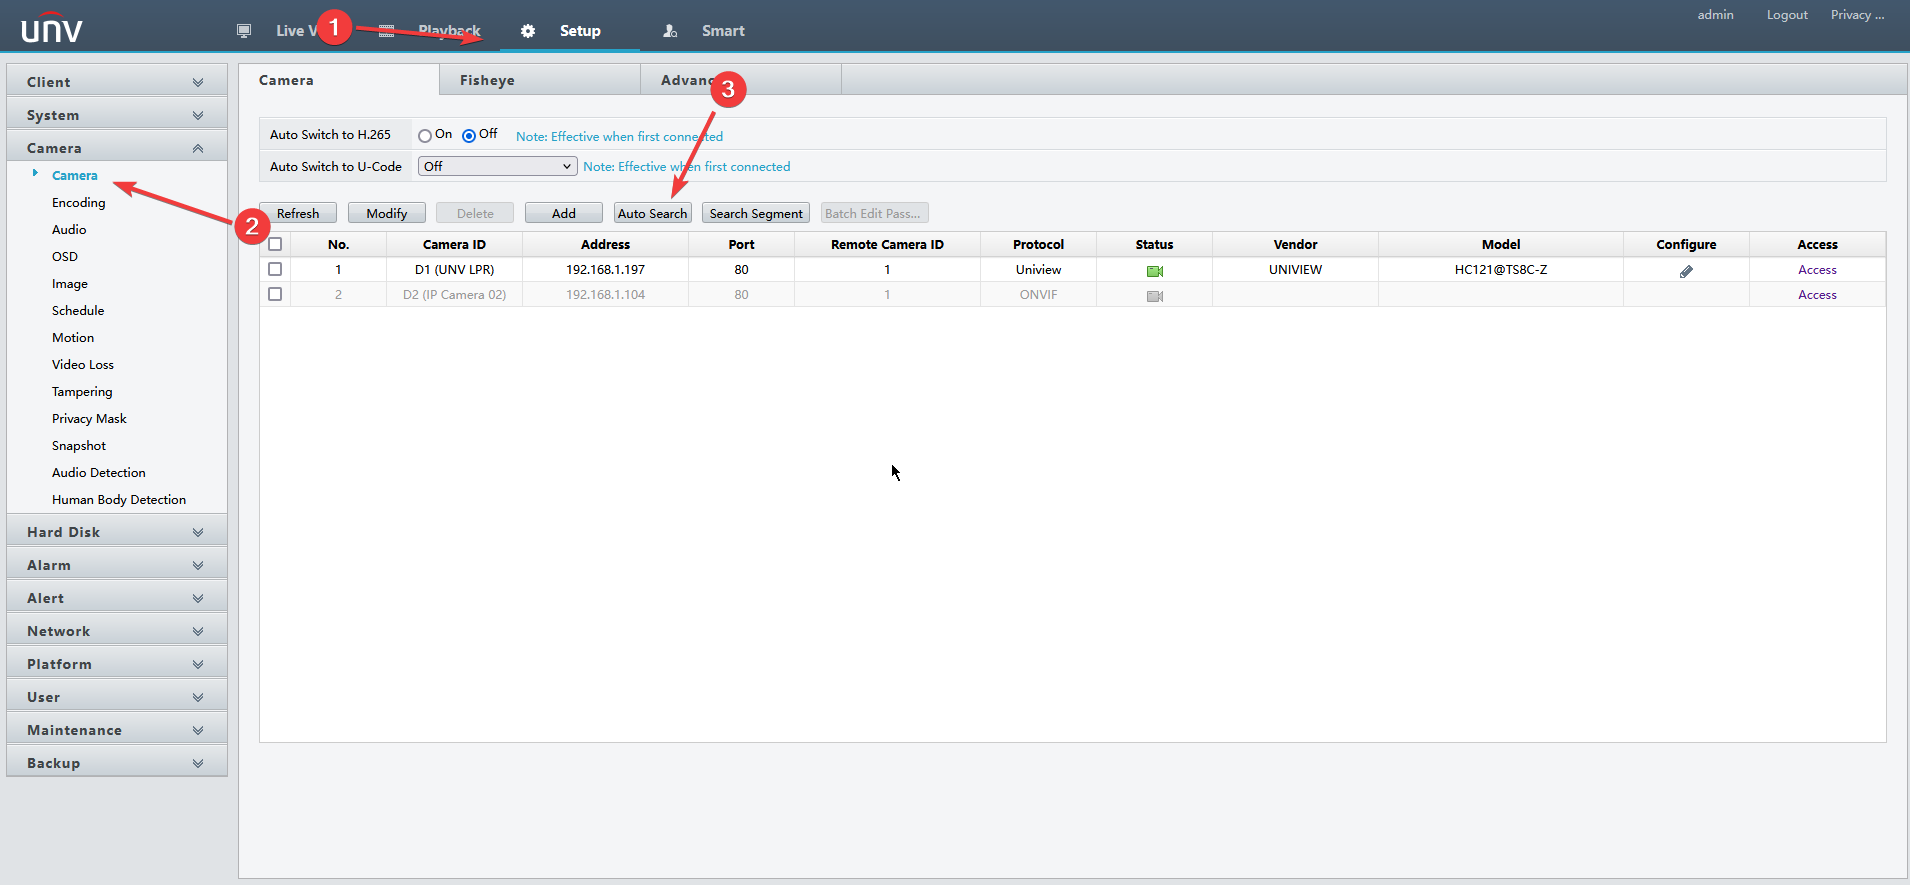
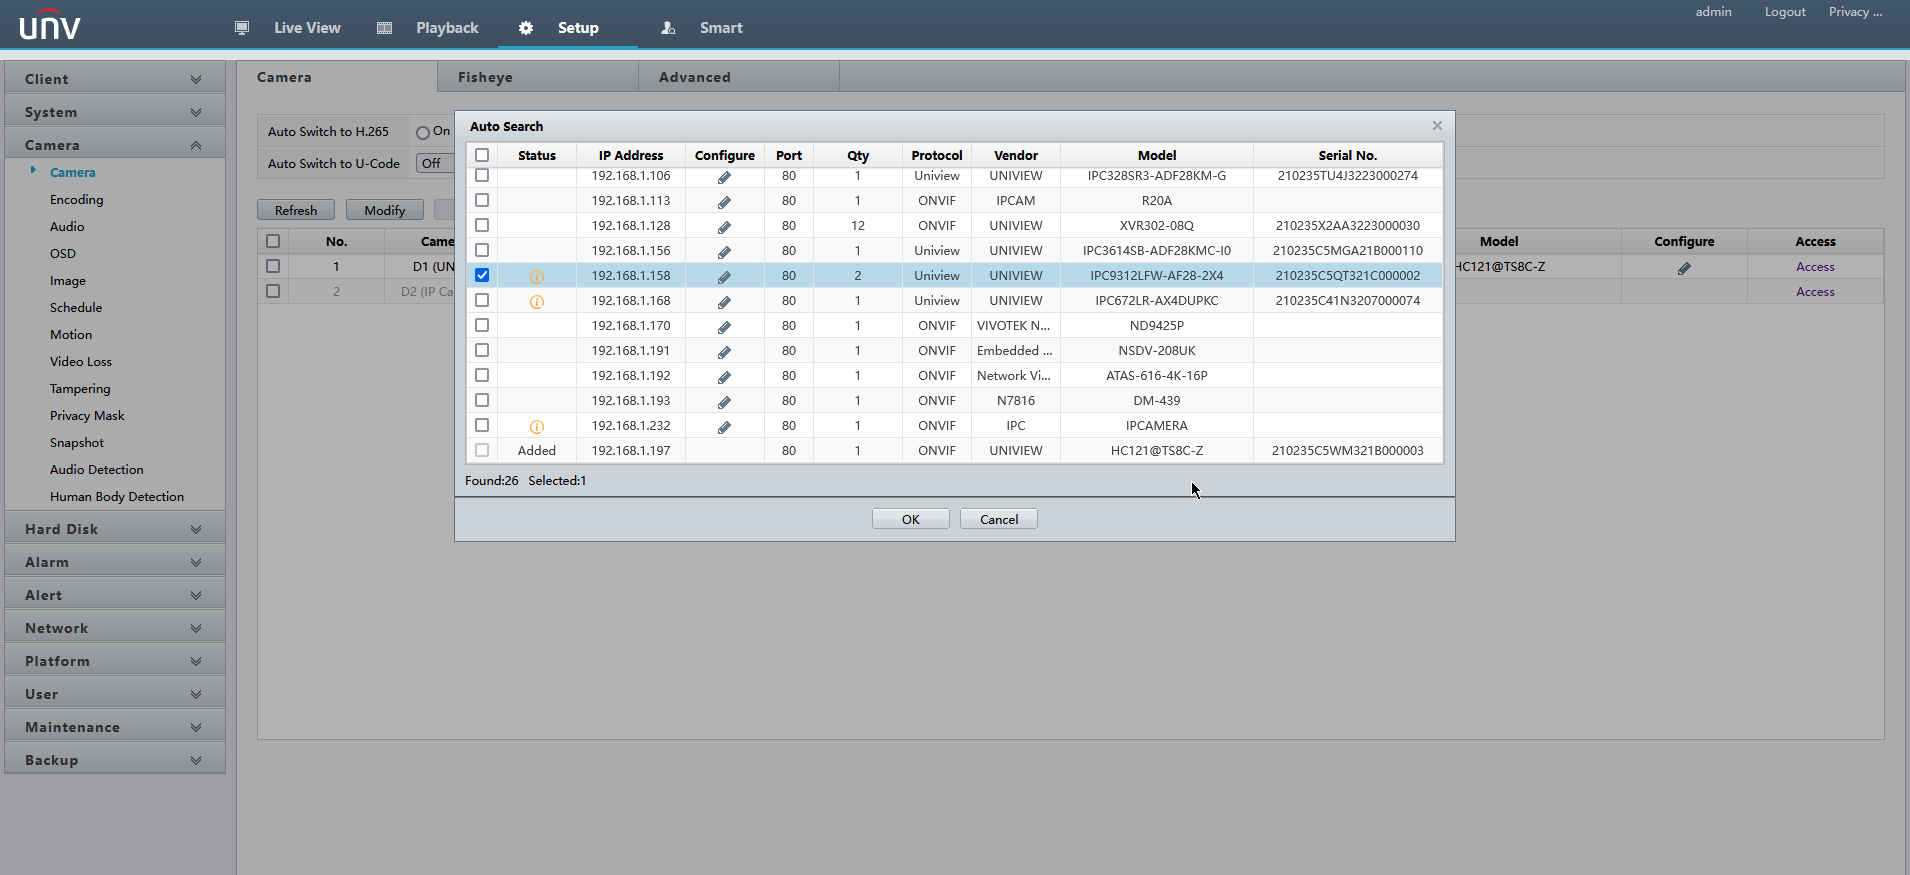
Step 1: Open the web interface for the NVR and go to Setup->Camera->Camera. Next click the button labeled “Auto Search” and wait a few seconds for it to populate with a list of cameras.
Step 2: Select the PTZ from the list by checking the box to the left of the IP address. Click the OK button to add the PTZ to the NVR. (Notice on the Qty column the dual lenz PTZ has a “2” where the other IP cameras have a 1. This essentially means we can add it to the NVR twice, once for each lens on the PTZ.)
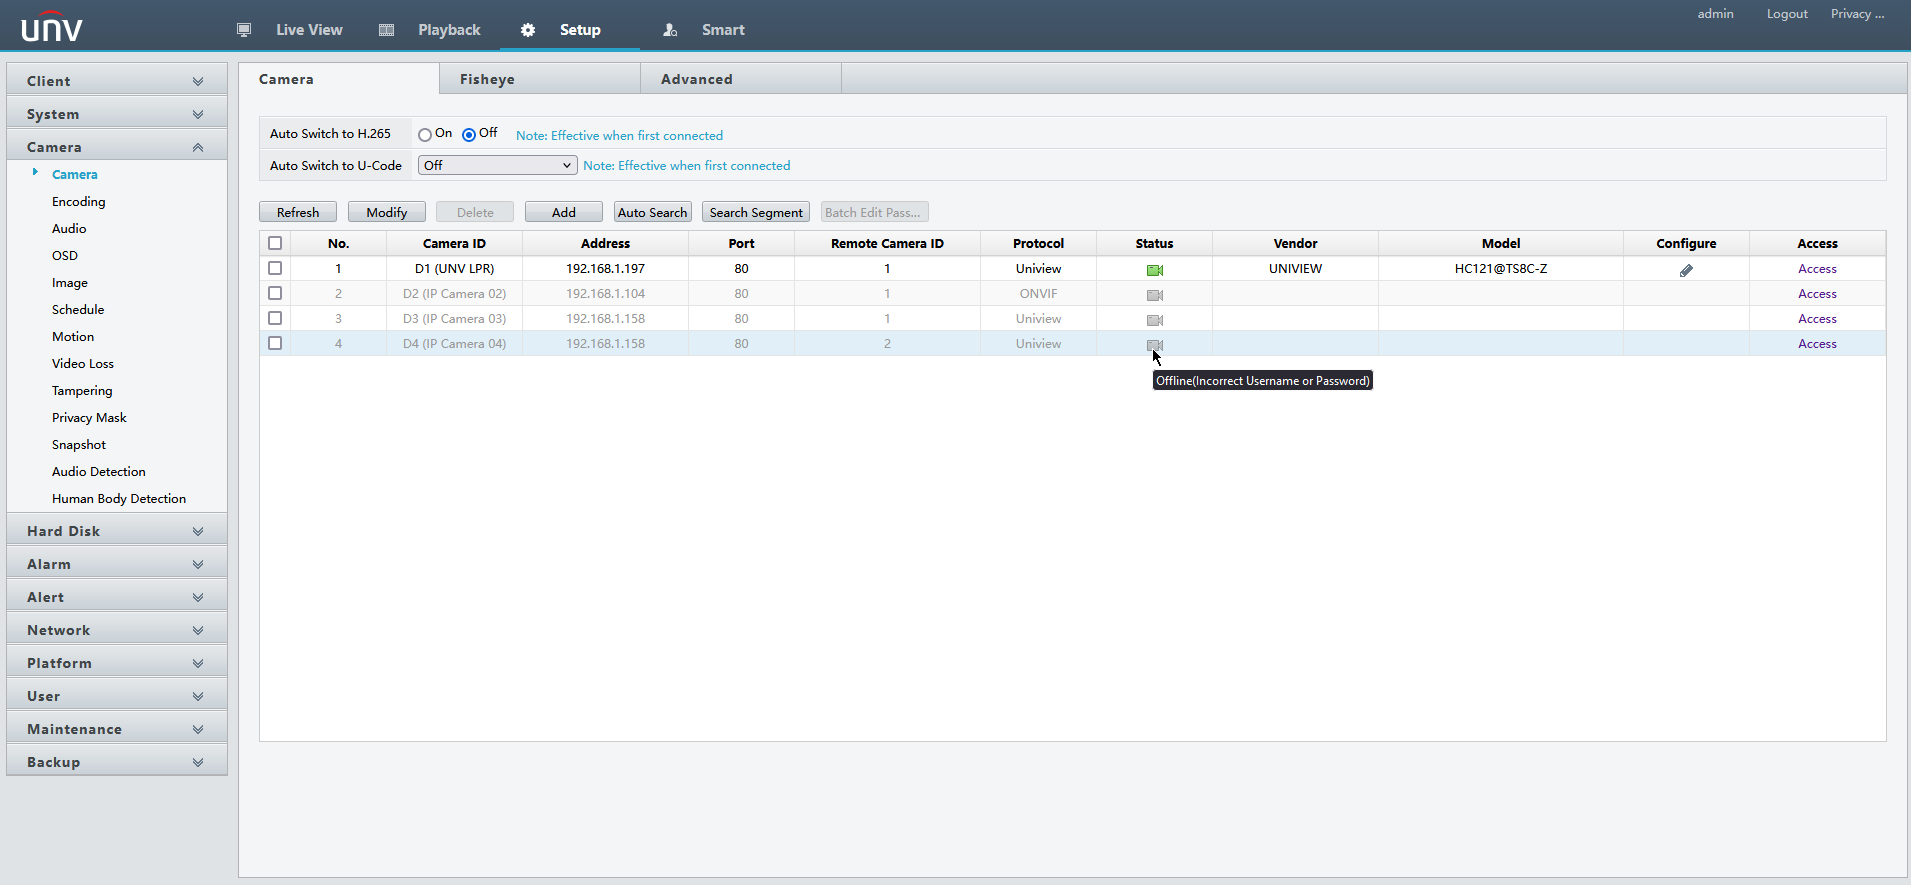
Step 3: On the camera page you should now have two new devices added with the same IP address, one for each lens on the PTZ.
-The Status column will show blue camera icons when connecting the camera, if successful the camera icons will turn green.
-If unsuccessful the icons will turn grey, if so hover your mouse over one of them and it will give you a short message on why it did not connect.
Note:
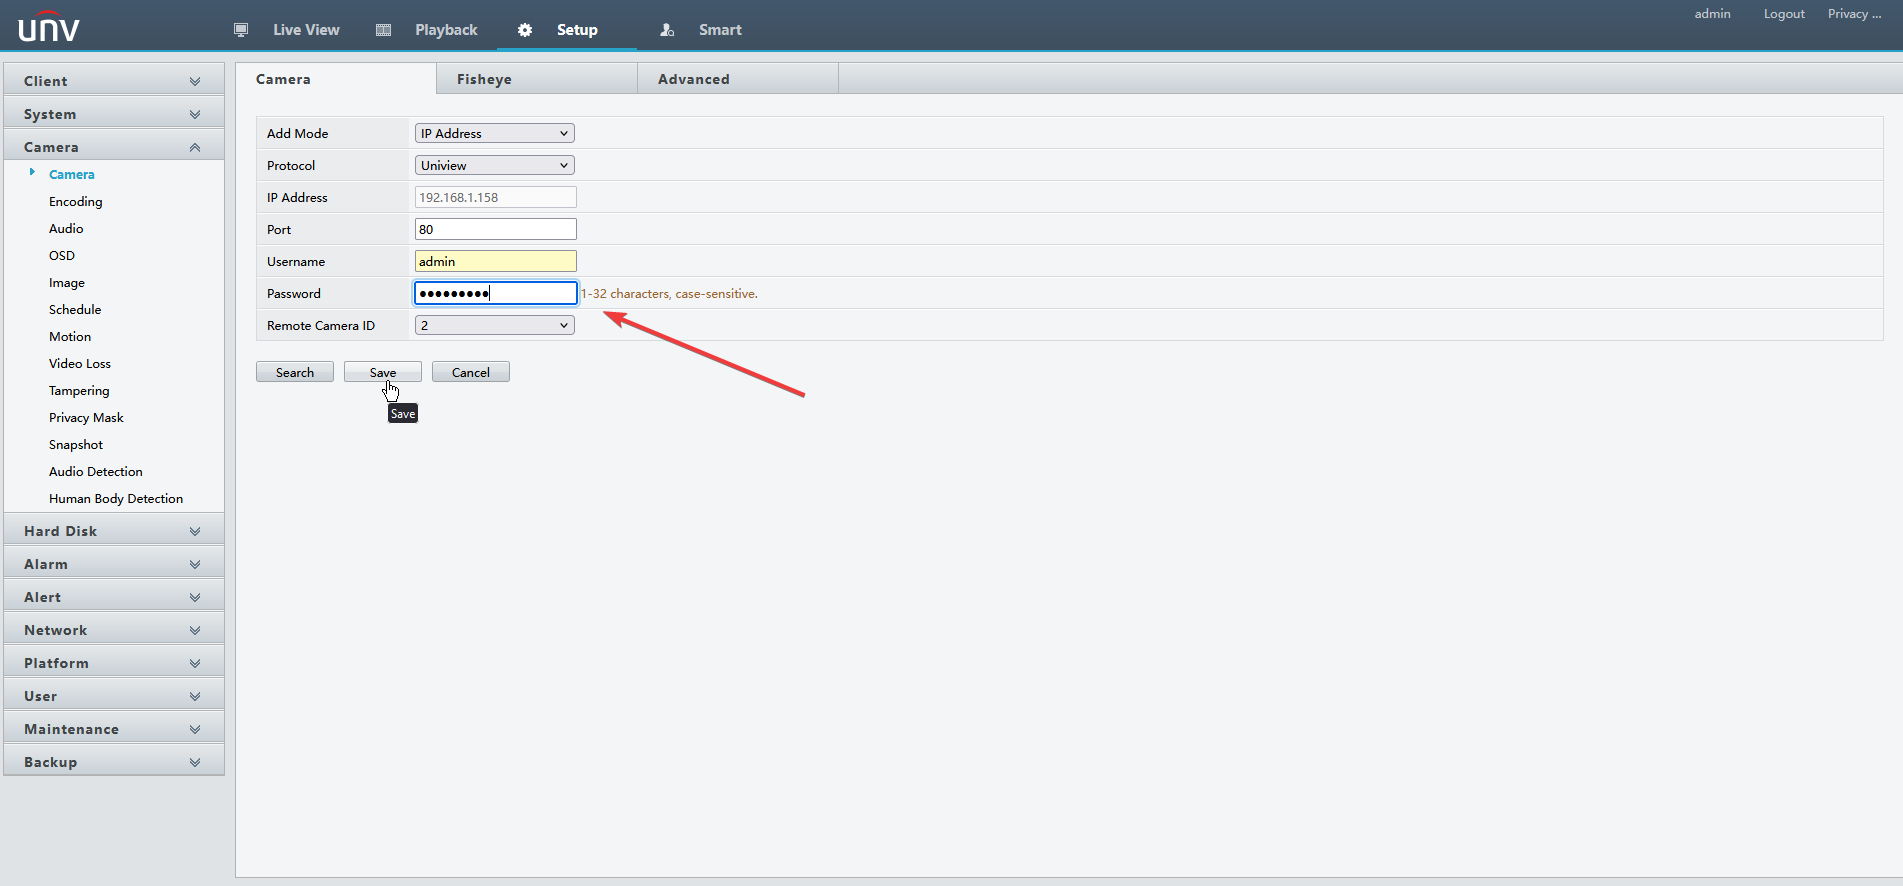
As you can see in the screenshot above the PTZ streams didn’t connect because the default password (123456) was changed on the PTZ.
Step 4 (Optional): If you didn’t change the default password on the PTZ it will be connected to the NVR without any additional actions needed. You’re all set, click the Live View tab to view the PTZ streams.
If the password on the PTZ was changed prior to adding it to the NVR and you are getting the “wrong username or password” message select one of the channels that were added and click the Modify button. Type in the password that you created for the PTZ in the password field then click the Save button. Lastly, do the same thing for the second channel stream.
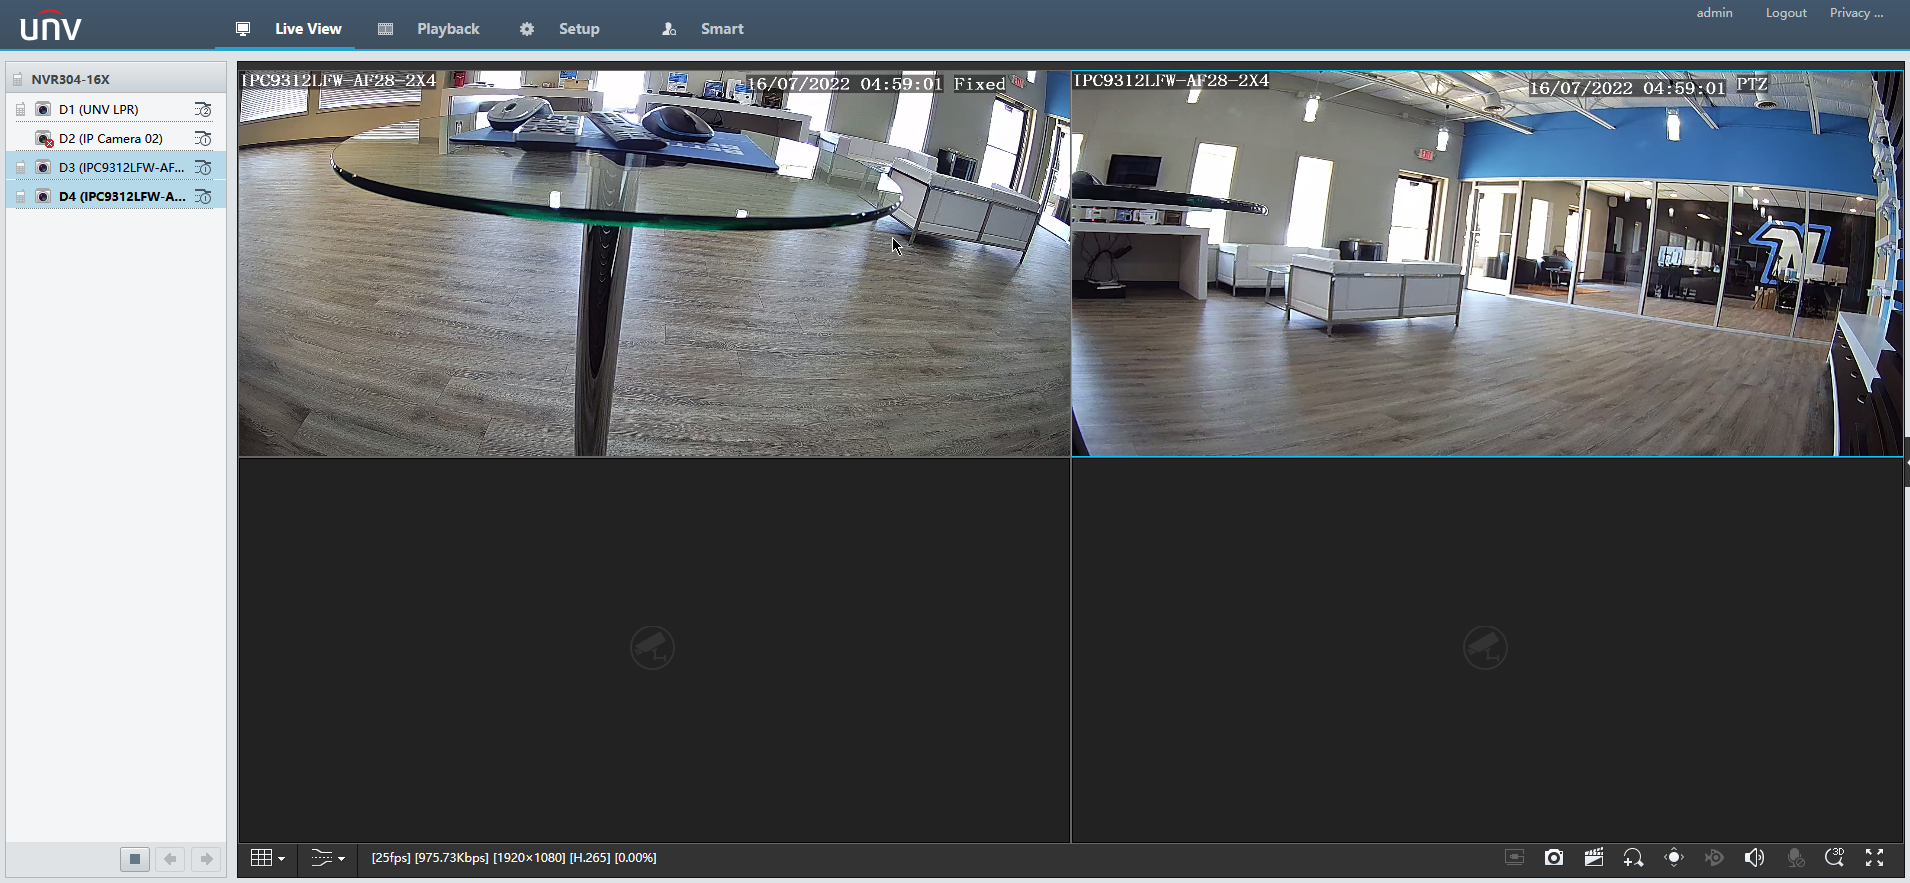
Once you have the password set for both channels the Status icons should turn green (you may need to click the Refresh button a few times). Now go to the Live View tab to view both PTZ streams.
Live View:
How to Setup Audio
Audio can be very helpful in CCTV when installing cameras around POS systems, medical buildings, and conference rooms.
The convenience of IP cameras with Audio is that no cables have to be run back to the recorder. All audio will be encoded in the camera and sent through the network to be recorded.
Please Note
Be aware of your state audio recording laws before proceeding.
Connecting Microphone to Camera
Each Audio enabled camera has a two wire lead coming out of the pigtail. One is positive and the other is ground, they should be labelled. The best way to connect a MIC to these cables and get the best audio quality is to have a MIC with a RCA connection. Follow the steps below to connect the RCA MIC to the two audio wires.
- Connect a Video balun to the two audio wires coming from the camera. Positive wire into the positive side of the balun and gray ground into the negative side of the balun.
- Next connect a BNC to RCA Male connector to the BNC side of the video balun
- Next plug the RCA Male connector into the MIC’s RCA Female port.
At this point the MIC will need to be powered. If the camera model number is IPC3234SR3-DVZ28 the camera’s 12 volt input can be changed in the camera maintain settings to be a 12 volt output. This output can then power the MIC using the power the camera is getting from PoE. All other camera models will need a 12 volt power ran to the MIC.
- After the MIC is powered log into the camera on the web browser.
- Once logged into the camera navigate to Setup > Video & Audio > Audio and change the Audio enable to On for both the Main and Substreams.
Listening To Audio On The NVR
On a Uniview recorder, to listen to the Audio from the camera the first thing is to set the video stream to have the audio enabled. To enable the audio stream open the main menu of the recorder and navigate to Camera > Video > and then select the camera channel number under Camera ID. Once the camera is selected and its encode settings are being displayed change the Audio Stream to On.
After the audio is turned on for the camera exit the main menu and bring the live view images up.
Next select the camera that audio is on so that its channel box is highlighted in yellow. After the camera is selected a small drop down menu will display under or above the camera. In this small menu there is an Audio enable button that looks like a speaker, click this button to enable the camera’s audio. Remember that to hear audio the monitor will need speakers and the video will need to be over HDMI not VGA.
How to setup PTZ control & Basic Functions
PTZs are a great solution to supplement with a CCTV system as it gives the user the ability to Pan and Tilt the camera around as well as optically zooming in on areas of importance.
In this guide, we will be showing how to control the PTZ and its basic functions. This guide will be from the PTZs web interface from a windows-based PC.
Note
– These functions are available only for the PTZ cameras or a camera installed on a Pan/Tilt motor. Please see the actual model for details.
– Some of the lens control functions are applicable to cameras equipped with motorized lens.
– The PTZ control buttons may vary with camera model. For the PTZ control buttons that your camera supports, see the Web interface.
Live View Controls

Basic Settings

- Preset Image Freeze
- When enabled, this function captures a still image and holds it until the camera has moved to the next selected preset, eliminating jarring transitions.
- Stop PTZ Control After Timeout
- PTZ Manual Control will stop after timeout time.
- Timeout(s)
- Alloted amount of seconds before the PTZ timeouts
- PTZ Rectification
- PTZ will reinitialize its preset configuration. Only use this if you notice the PTZ drifting.
Home Position
PTZ camera will return to home position if no operation is made within a specified period.
Note: You need to add presets or a patrol route first. See Add a preset and Add a patrol route for
details

- Mode
- Preset or Patrol
- ID
- Choose which preset or patrol for the Home Position
- Idle State(s)
- PTZ will resume Home Position Mode after allotted number of seconds.
Limit
Set rotation limits to prevent the PTZ camera from hitting obstacles such as a wall.

Remote Control
When the third-party platform is used and the PTZ protocol does not match that, you can set the
remote control function to control the PTZ.

- Listener Port
- Camera’s local port, which cannot be a port that is already in use. Change the
default setting only when necessary.
- Camera’s local port, which cannot be a port that is already in use. Change the
- Address Code
- The camera can read the address code contained in instructions. The camera
interprets the instruction only when the address code in the instruction is the
address code configured here.
- The camera can read the address code contained in instructions. The camera
Patrol

- Resume Patrol
- Set the time when patrol resumes.
Configuring WDR
WDR Stands for Wide Dynamic Range. WDR is used when a camera is installed inside a building facing
towards and window or door and allows the camera to see inside and outside with no over exposure or
dark spots.
The WDR on Uniview’s IPC354SR3-ADNPF28-F is 120DB allowing for sight in even the most dramatic of light differences.
Setting up a camera for WDR can be done from the recorder or from being logged directly into the
camera. On the camera the settings are located under “Setup > Image > Exposure”, then turn the
“WDR” setting to “On”

WDR Level/Sensitivity setting will be adjusted based on where the camera is installed and how much of
a light difference there is. This setting will have to be changed after the camera is installed to the customer’s image quality satisfaction. The higher the more range in light difference.
WDR Mode can also be set to “Automatic” this option can be used for when the cameras image has a
lot more of the image outdoor then indoors. This will be the best way for the camera to automatically
adjust for the sun or cloudy weather each day.

WDR Off

WDR On
Updating Firmware Via Cloud
Uniview offers firmware updating via the cloud server. Cloud updating can provide the newest features and better functionality to on site devices, without ever having to worry about getting the correct firmware file or having to call technical support.
In this guide, we will be going over the multiple different ways of upgrading the firmware for your device.
Method 1. Updating From The NVR
- Log into the Main Menu of the recorder.
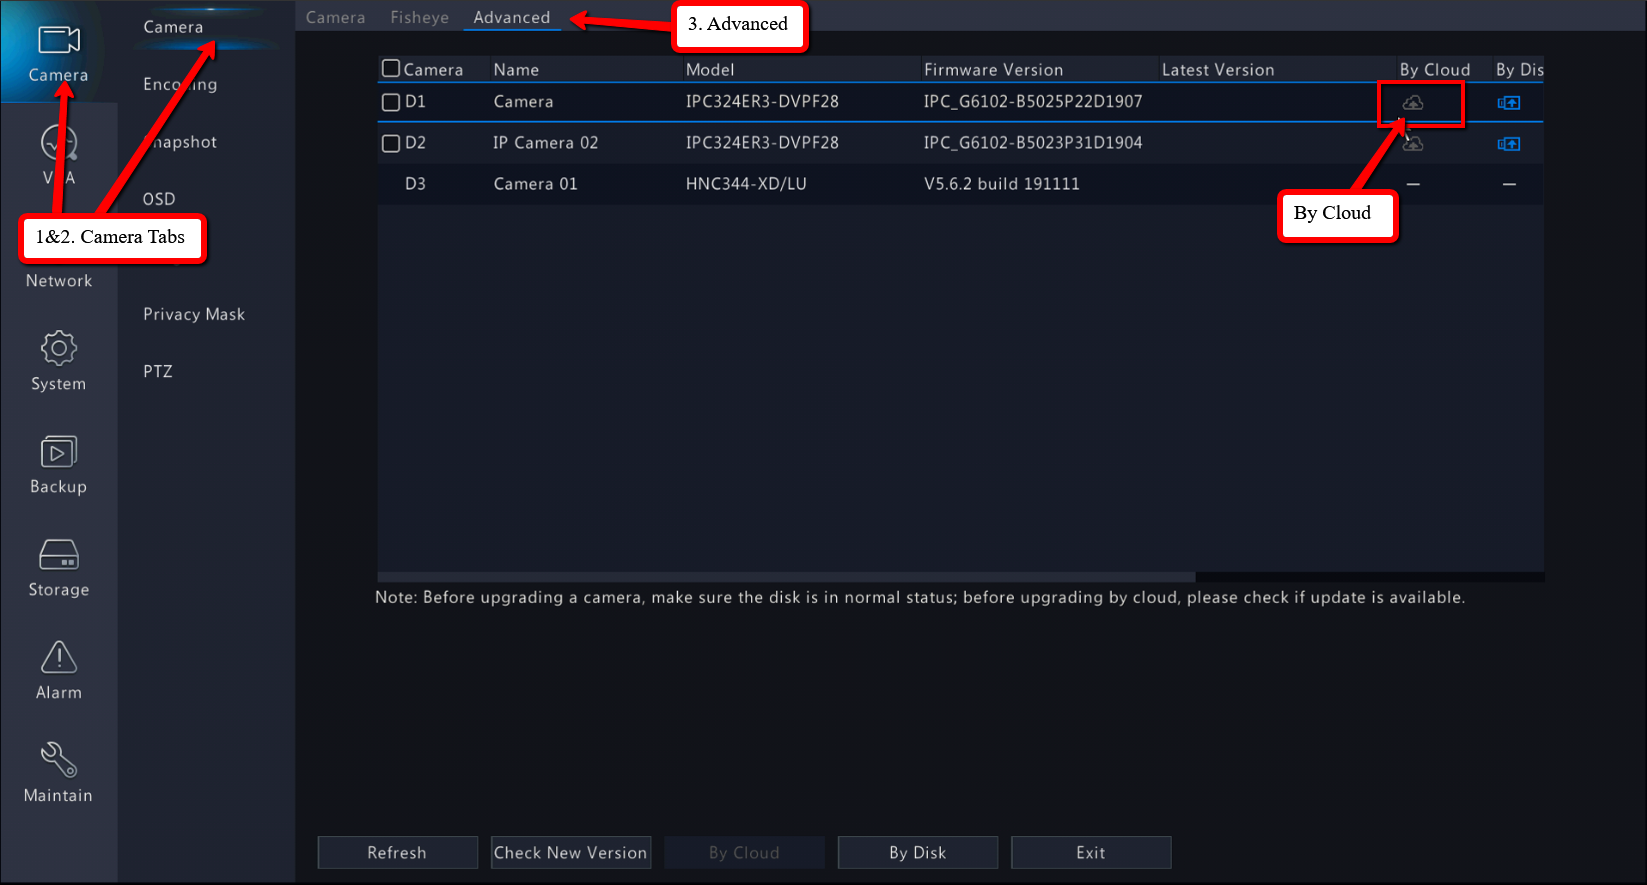
- Navigate to Camera > Camera > Advanced
- Click on the By Cloud button for each camera that needs to be upgraded. Each camera can also be selected by clicking on its check box and then clicking the By Cloud icon to the right.
Method 2. Updating From The NVR Web Interface
- Load the recorders IP address in Internet Explorer. Login to the recorder once the login page is
loaded. - Navigate to the Settings menu and then to Camera in the left hand menu and then to IP Camera in the sub menu.
- Navigate to the Advanced settings tab
- In the list of cameras find the cameras that need to be upgraded and click the Upgrade By Cloud Button
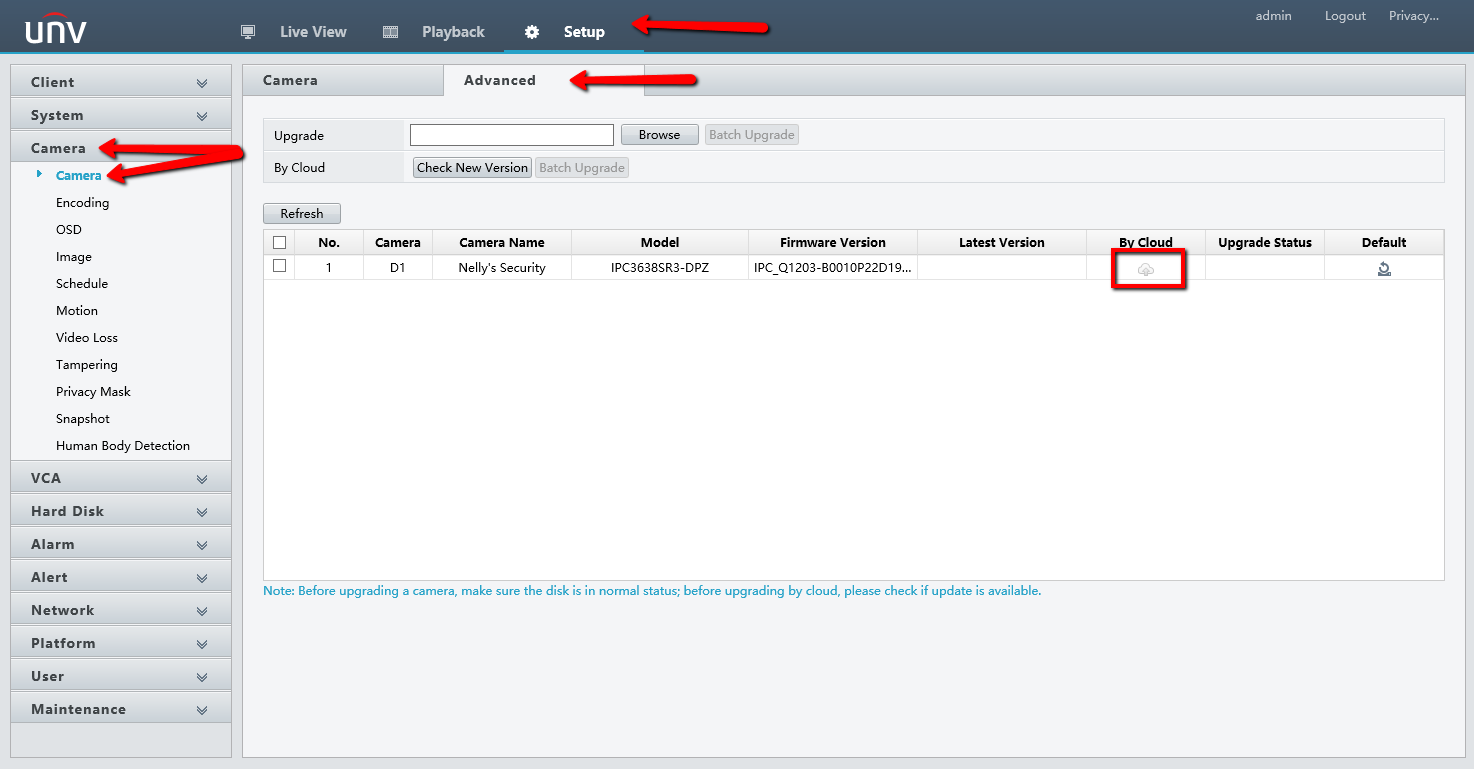
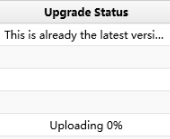
- The cameras status list will then display downloading followed by uploading % and then finished off with upgrading. After it is done upgrading the camera will reboot.
Method 3. Upgrading From Camera Web Interface
- Find the local IP address of the camera and navigate to the IP address in Internet Explorer
- Login to the camera and navigate to Setup > Maintenance > Maintenance
- Locate the Cloud Upgrade Detect button and click it
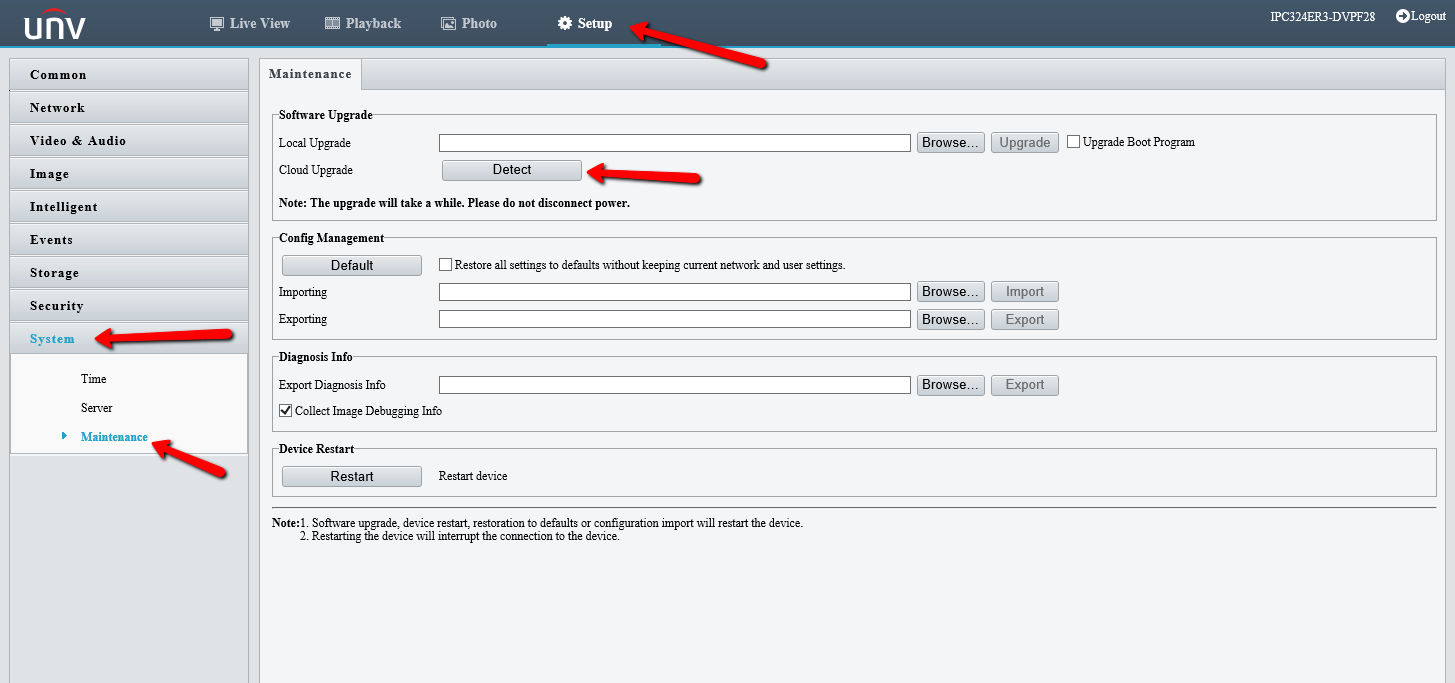
- The camera will feed back A New Version Detected for Upgrade
- Then click the Cloud Upgrade button again

- The camera web interface will then show a camera is updating overlay.

Method 4. Updating From EZTools
- Open the EZTools Program
- You can Download That here
- Select the Upgrade Tab on the Left side
- Click on the Online Upgrade Tab
- Checkmark the Device you would like to upgrade
- Click on the Upgrade button on the bottom right corner
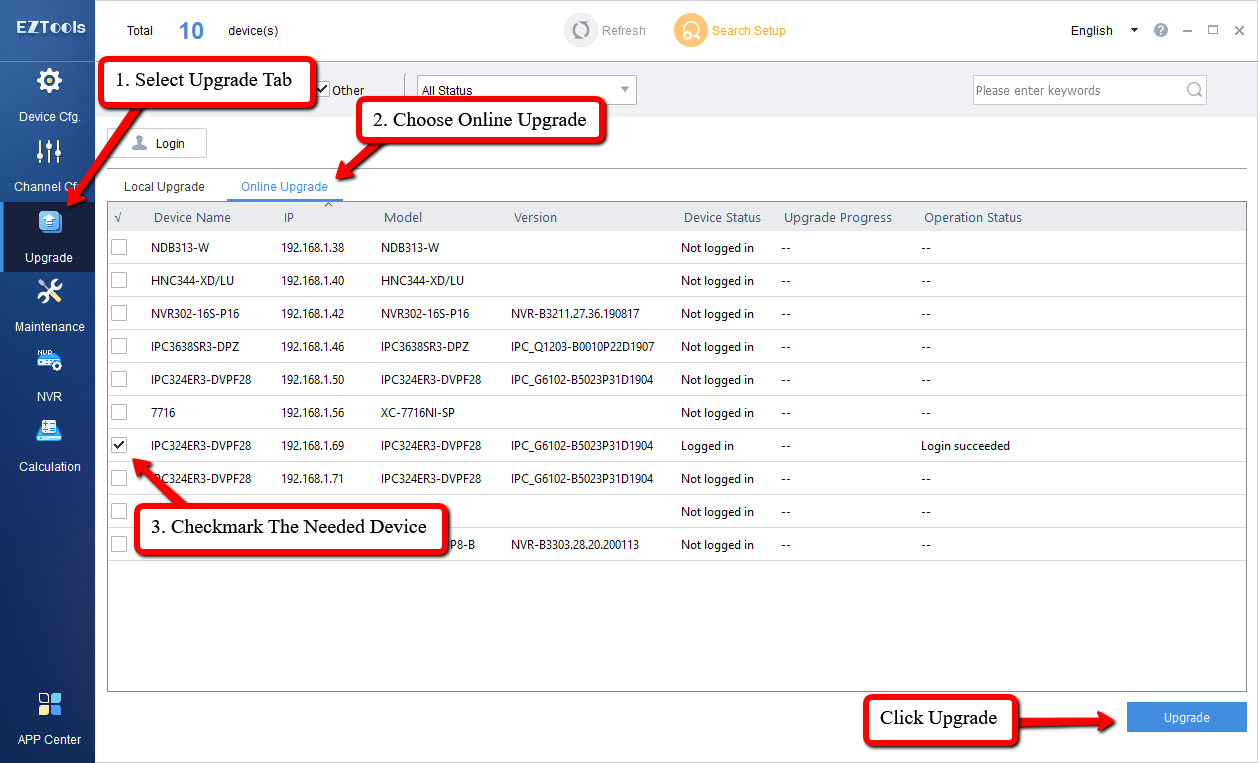
- Once online upgrade is clicked the EZTools will search automatically for newer firmware for the
selected devices. The EZTools will then give you a popup showing the current device firmware
and the newest available device firmware. Check off each device that you want to upgrade on
the left hand side and click the OK button at the bottom.
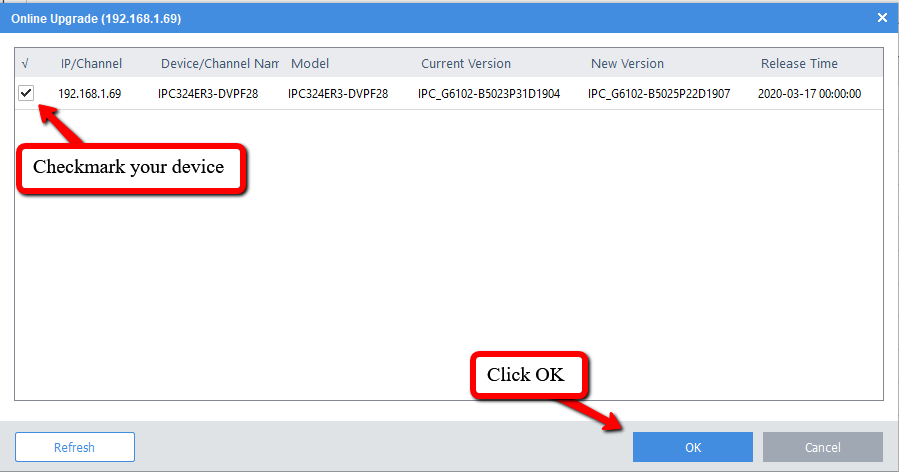
- The status of the device in the main list of devices will then read updating

- After the update is done the device status will say Upgrade Succeeded, the device will then
restart and be up to date

Method 5. Updating From EZView App
- Open the EZView app and navigate to the main menu in the upper left hand corner of the app.
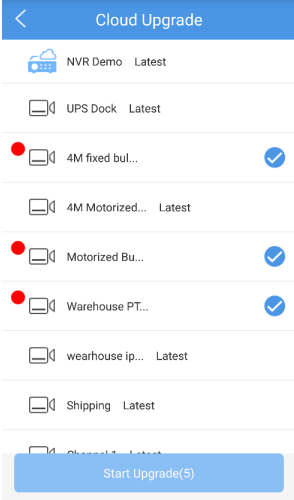
- Select the Devices tab. The device that has a red circle next to it shows that an update is available for the recorder or the cameras.
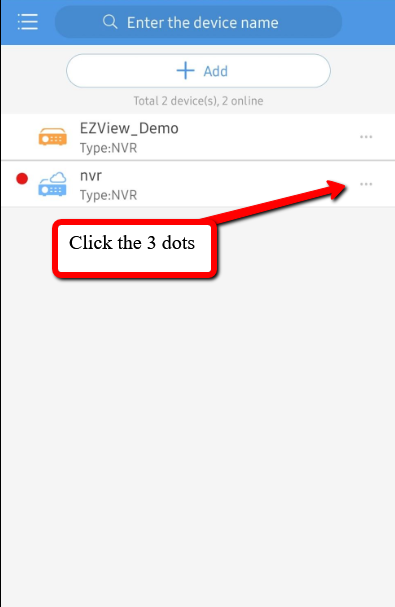
- Assuming that the device has already been added to the app (if not add the device) click on the
device and select the P2P Upgrade button.
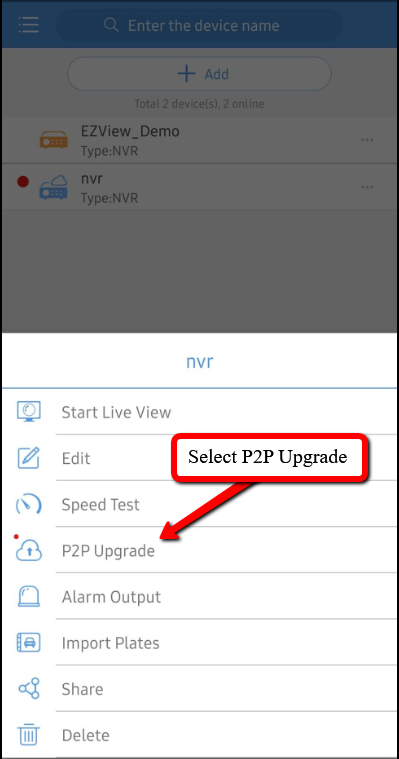
- In the next menu select all of the devices that have the red circles next to them indicating that
they need to be firmware updated - Click on the Start Upgrade button at the bottom of the screen. The update will take about 5-10 min depending on how many devices and internet speed.
- After giving the recorder enough time check back to the app to see if all of the red circles are gone. If they are this will let you know that all selected devices upgraded correctly.
