Uniview NVR Quick Start Guides, This guide will show you the few simple steps to add a Uniview product (NVR/IP Camera) to the EZStation software for Local Viewing only. This can prove beneficial in cases where
How to Add a Uniview NVR Device to EZstation for Viewing on the Local Network (LAN) Only
This guide will show you the few simple steps to add a Uniview product (NVR/IP Camera) to the EZStation software for Local Viewing only. This can prove beneficial in cases where:
1. There is no internet access.
2. Viewing the device remotely isn’t needed.
3. Signing into a cloud account on EZStation on the same network as the device is slow to load the video.
Note:
-EZStation should already be installed and running.
-Click on any of the images below to enlarge them in a new tab.
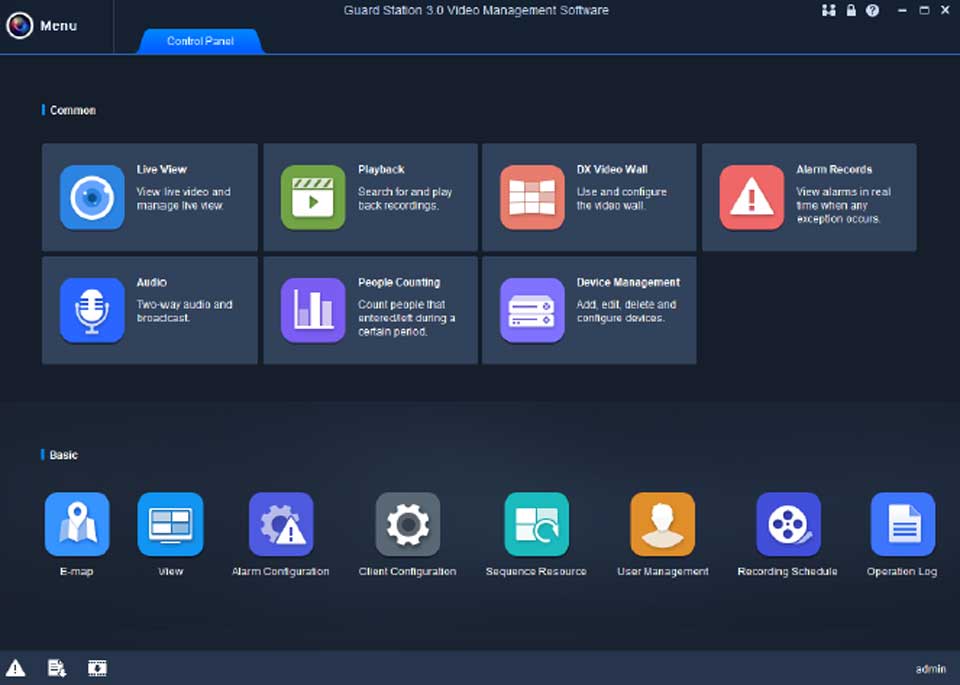
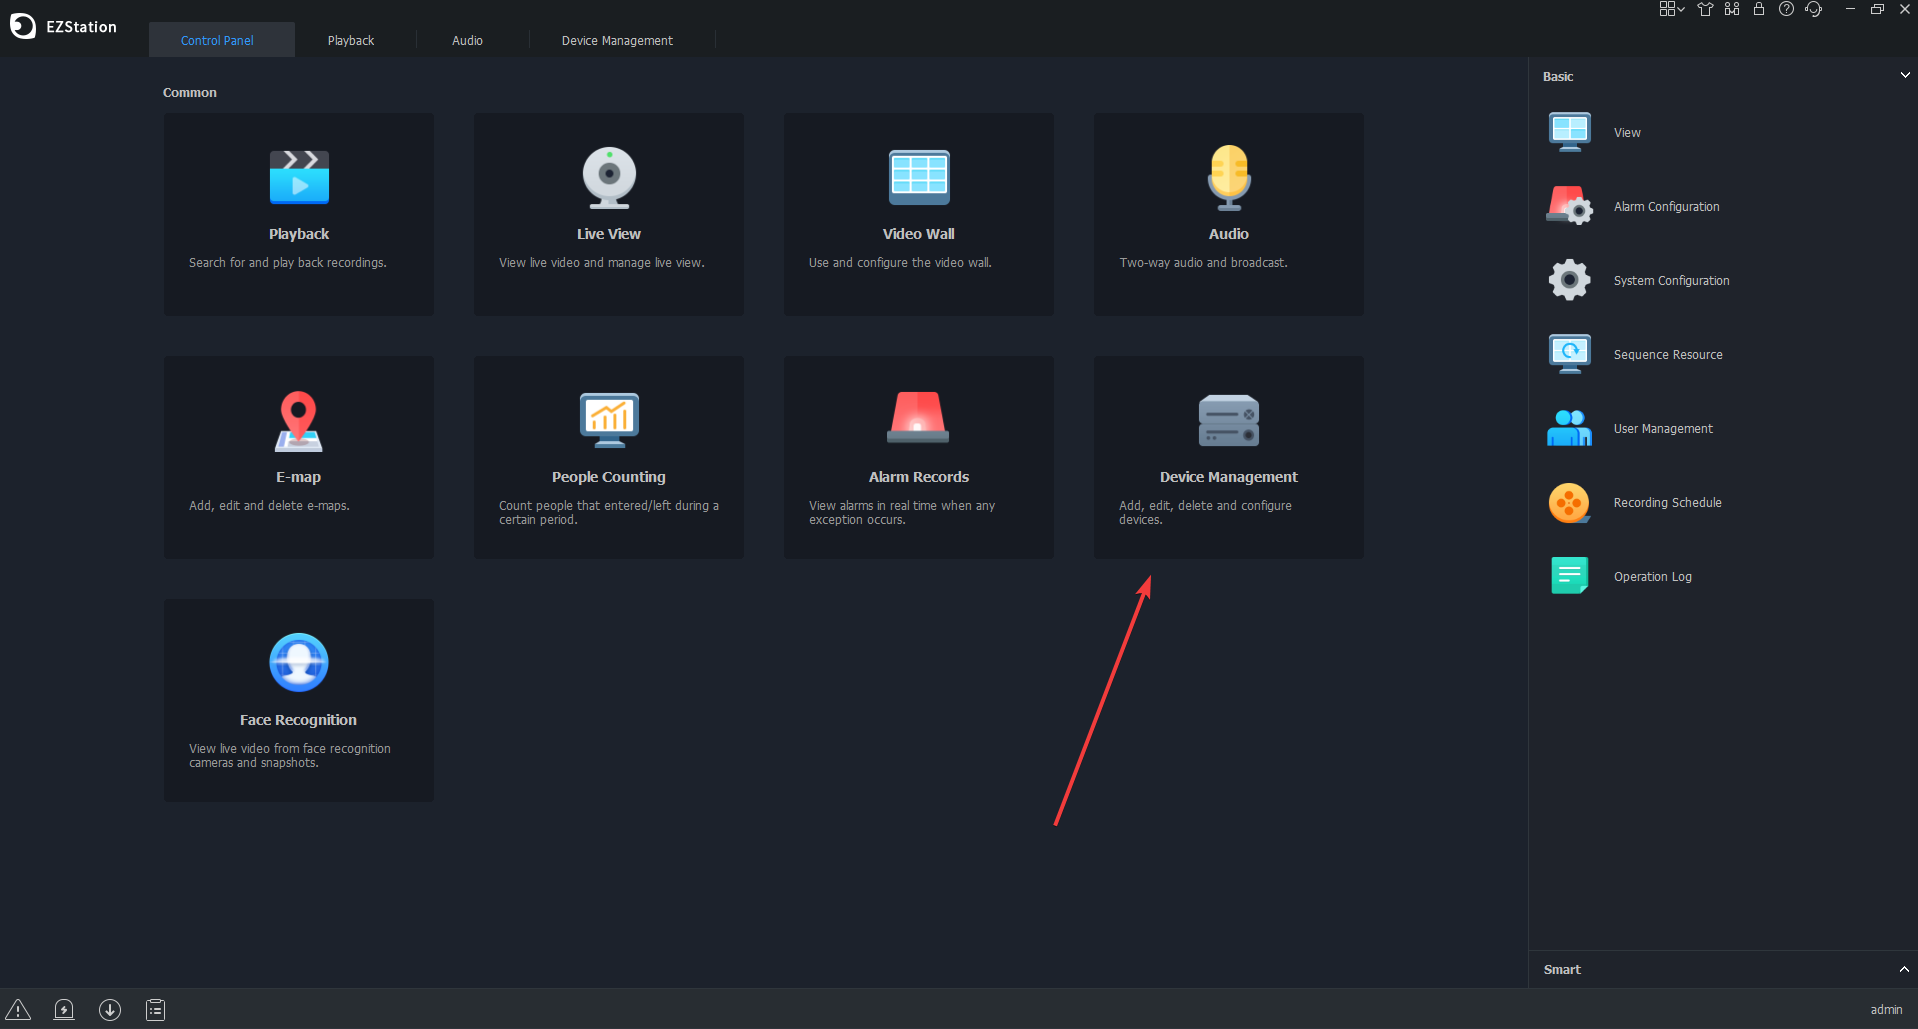
1. Click Device Management
Read Next :
- Uniview IP Security Camera Guides
- Uniview NVR Remote Access
- Uniview Setup Guide: Video Content Analysis
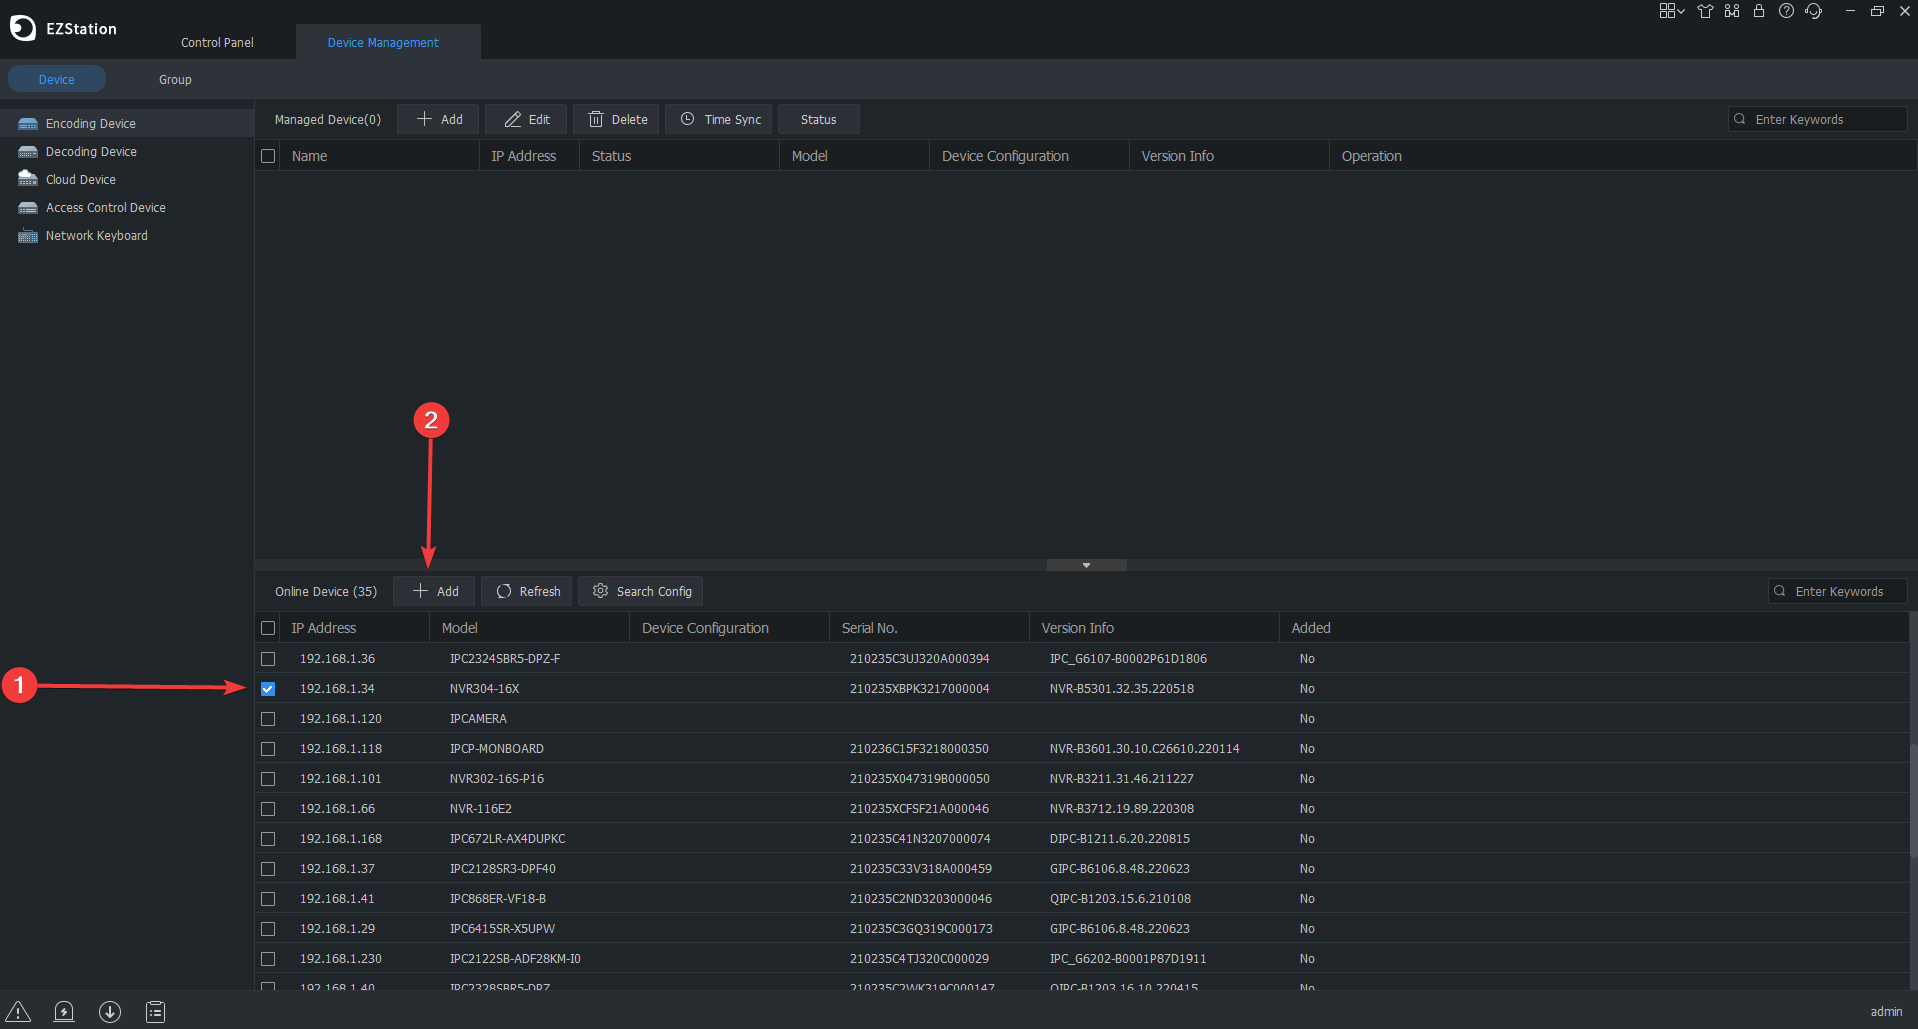
2. On the Device Management page the top section on the right labeled “Managed Device” will show devices that have been added to EZstation. The bottom section on the right labeled “Online Device” will show all devices that are detected on your local network.
1. Select the device from the list on the bottom.
2. Click the Add button.
3. The device will now be added to the top Managed Device section. If the default password to the device was changed previously it’s important to click the Edit button and input the password on the window that comes up, then click Okay.
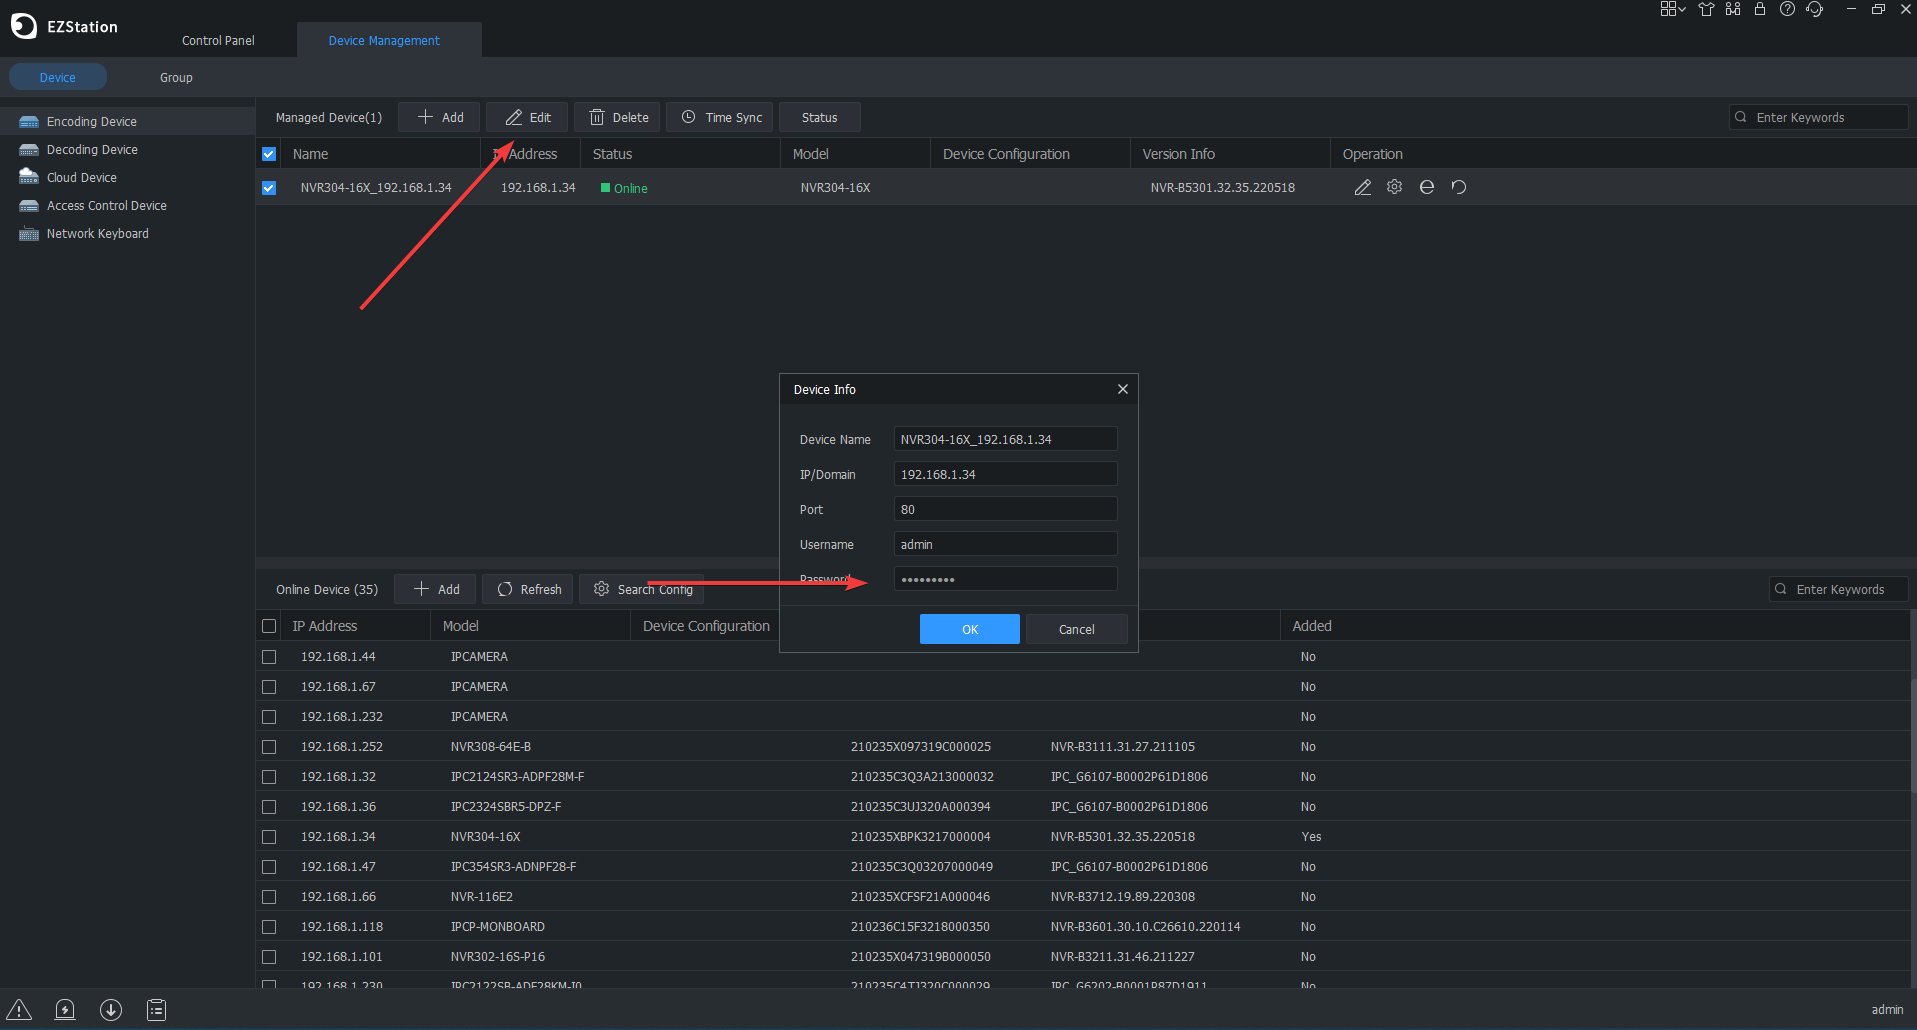
4. If everything went well the Status should now say Online.

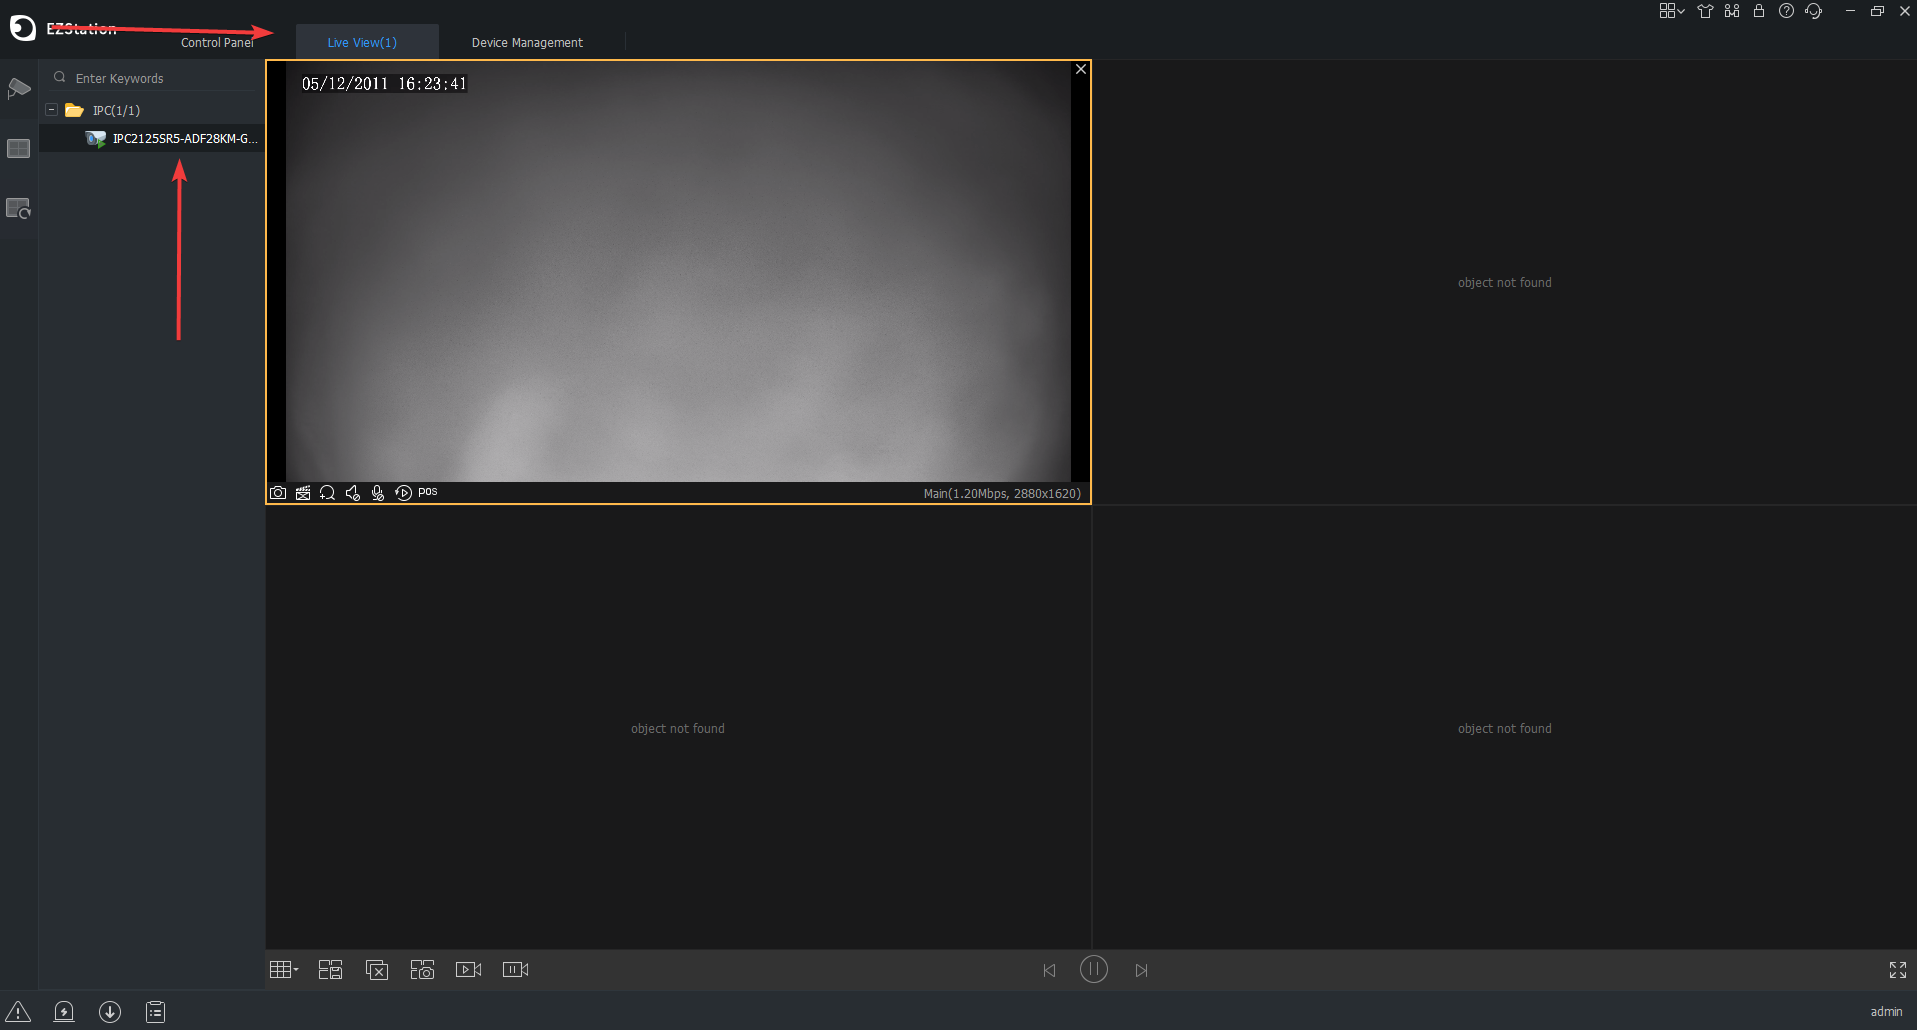
5. Click the Live View tab at the top of EZstation. Lastly, double click on the device on the left column to start the live view.
How to record audio on a Uniview NVR
Record audio on a Uniview NVR by following each step below
NOTE
-This audio setting has only been added on select models with newer (2022+) firmware installed. -This guide assumes you have already enabled audio on the IP cameras with a microphone.
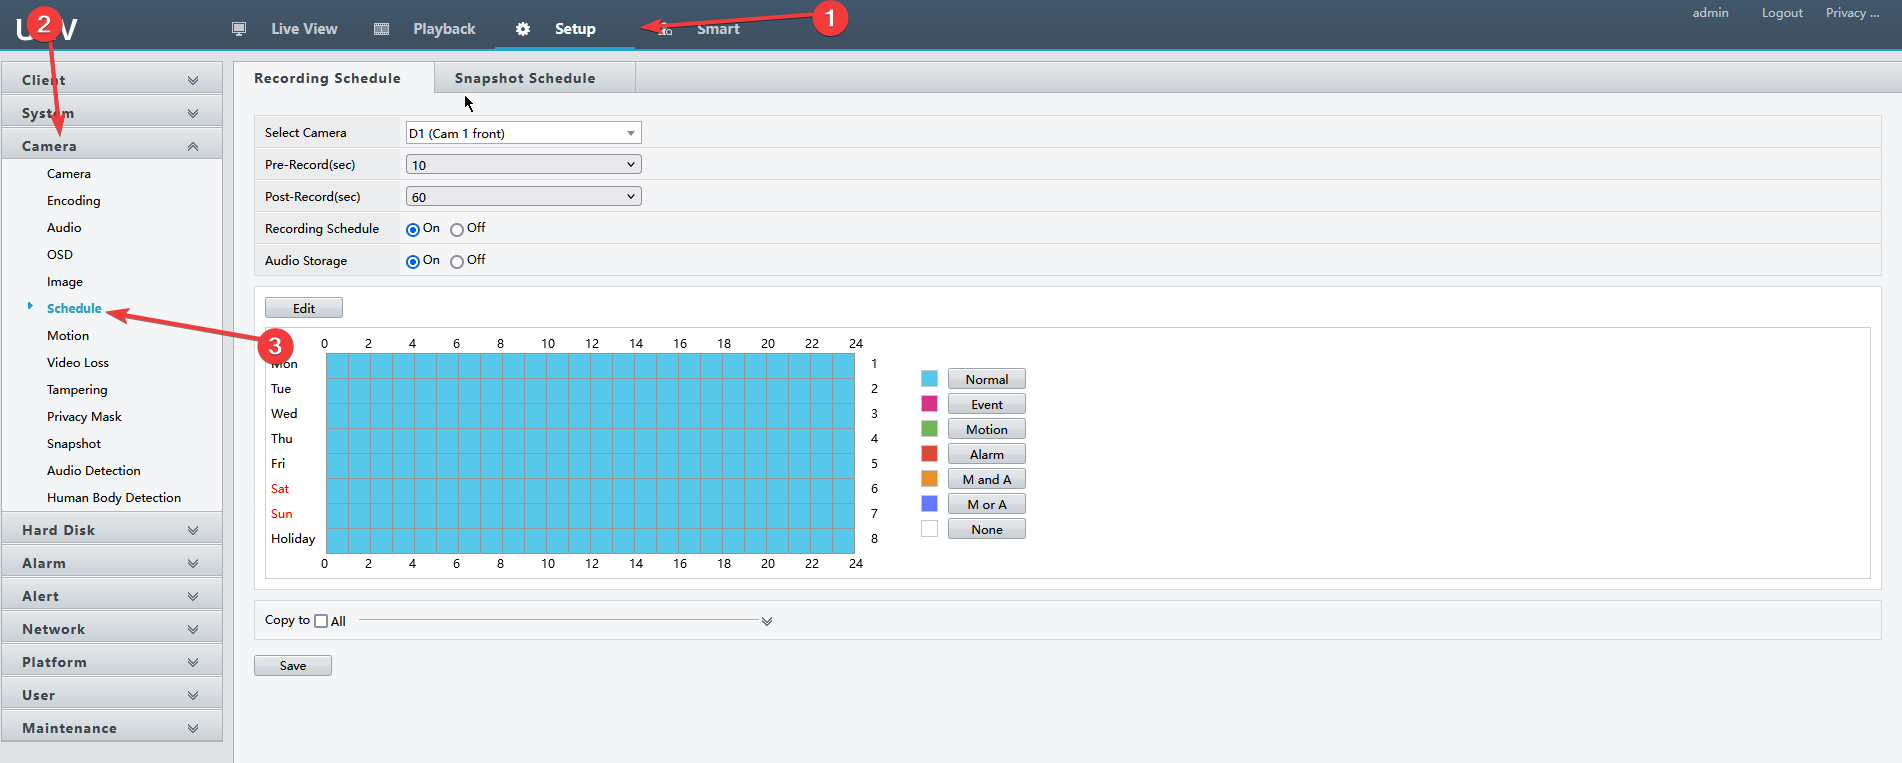
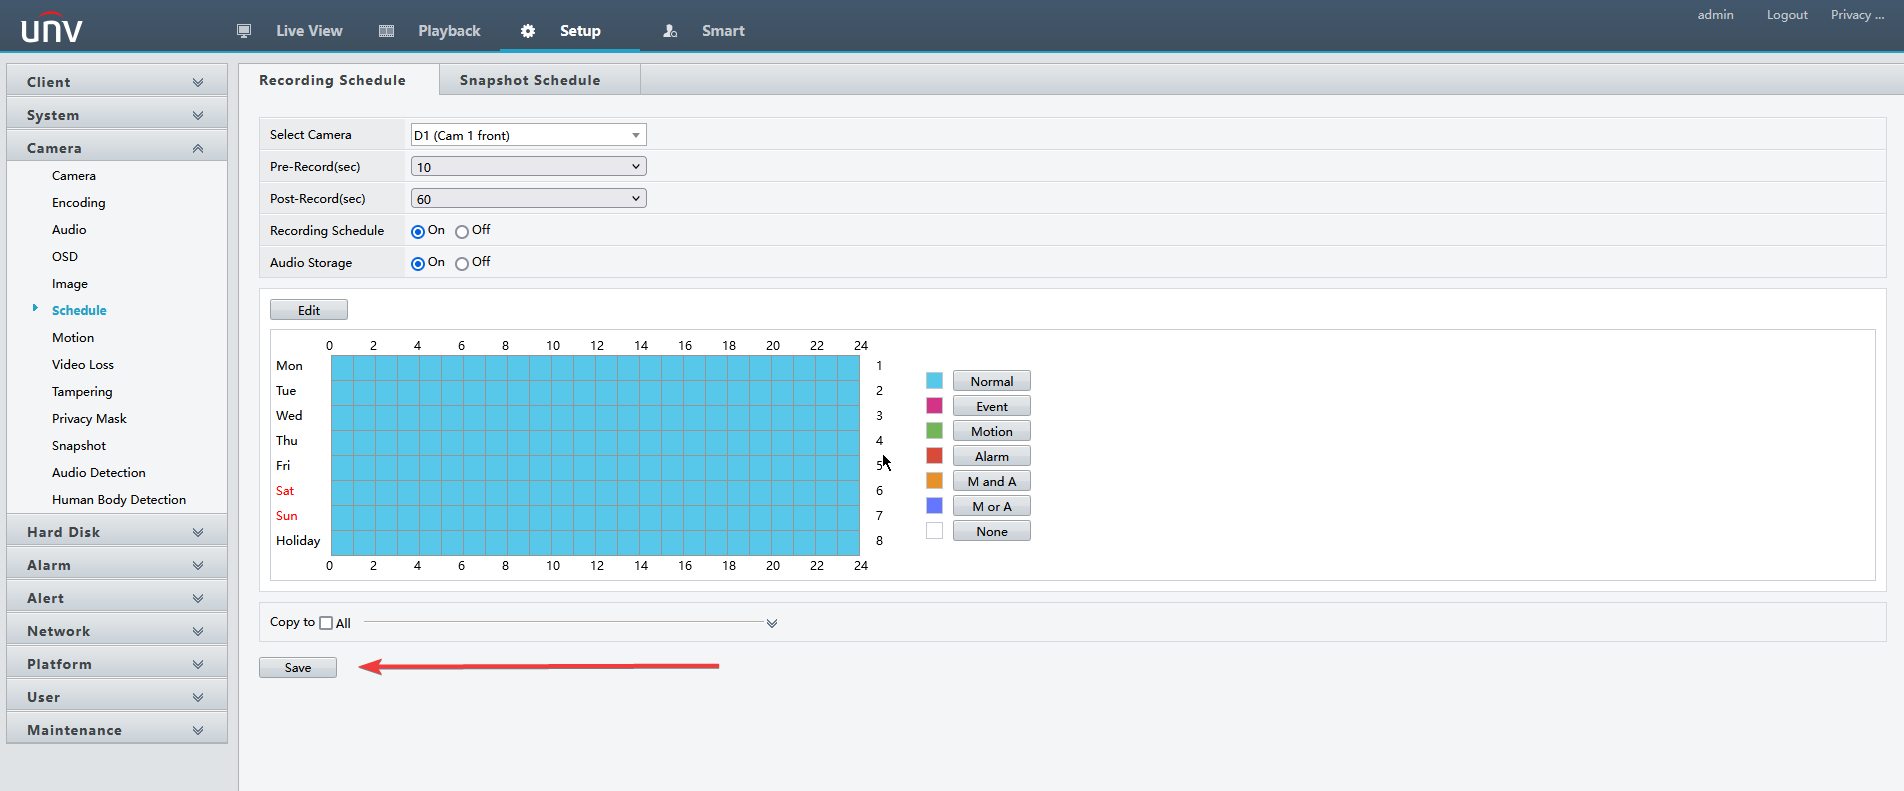
1. After logging into the web interface of the NVR go to Setup->Camera->Schedule.
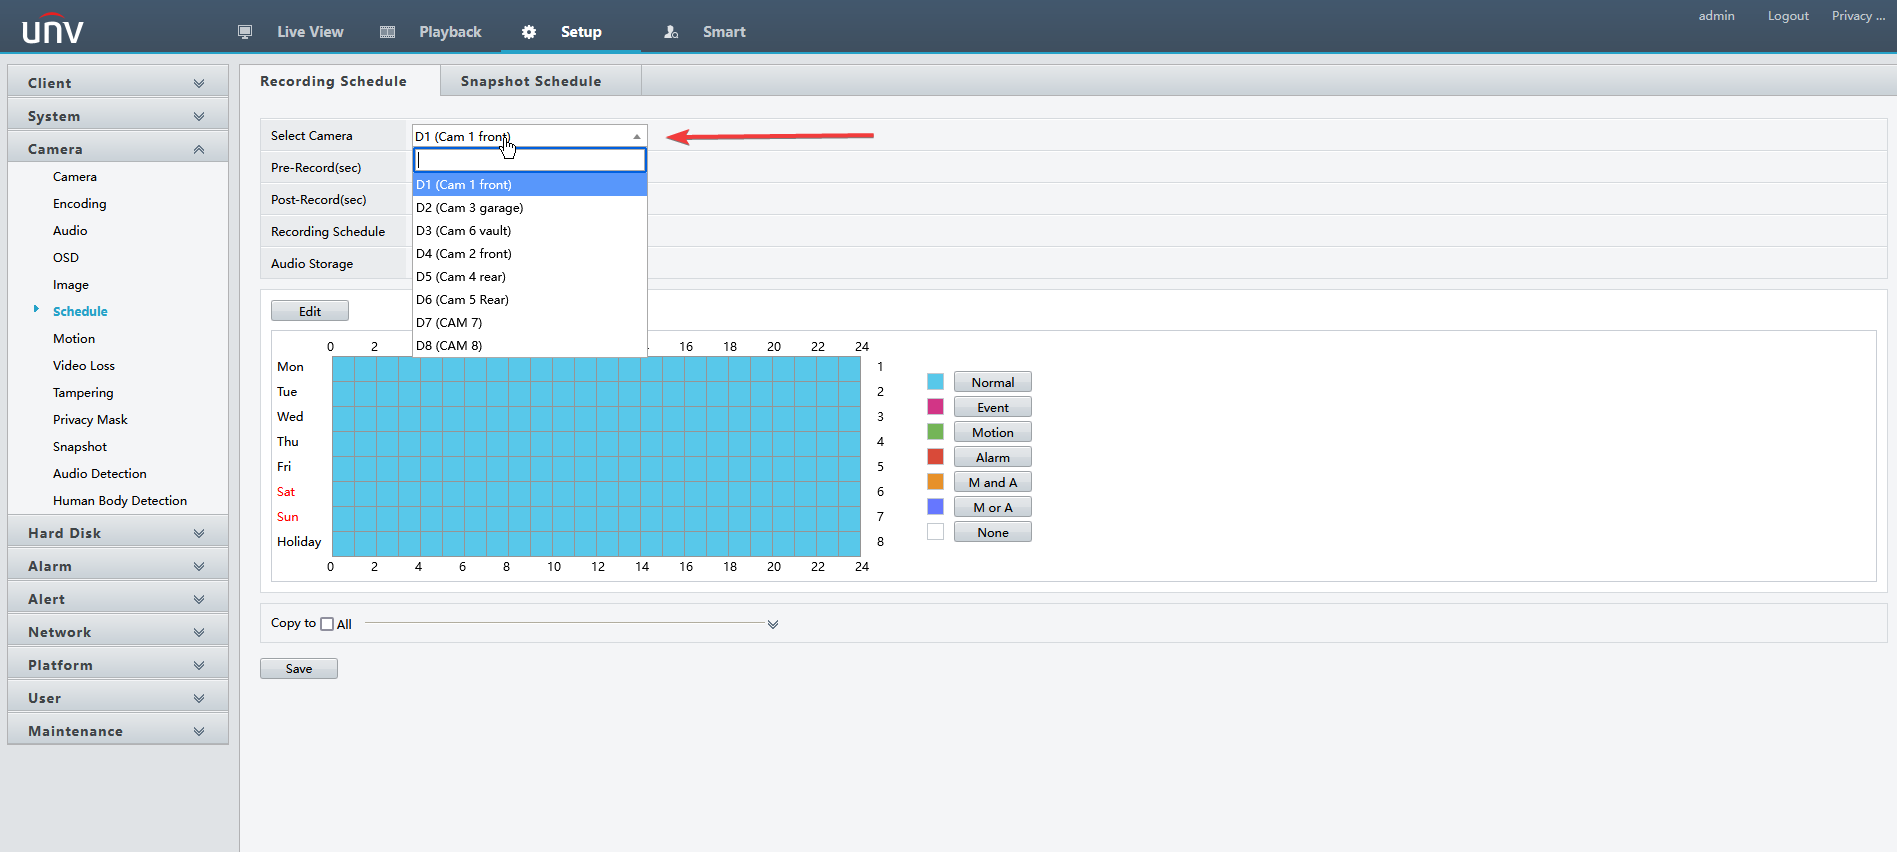
2. Select the camera you want to enable audio recording on by clicking the drop down.
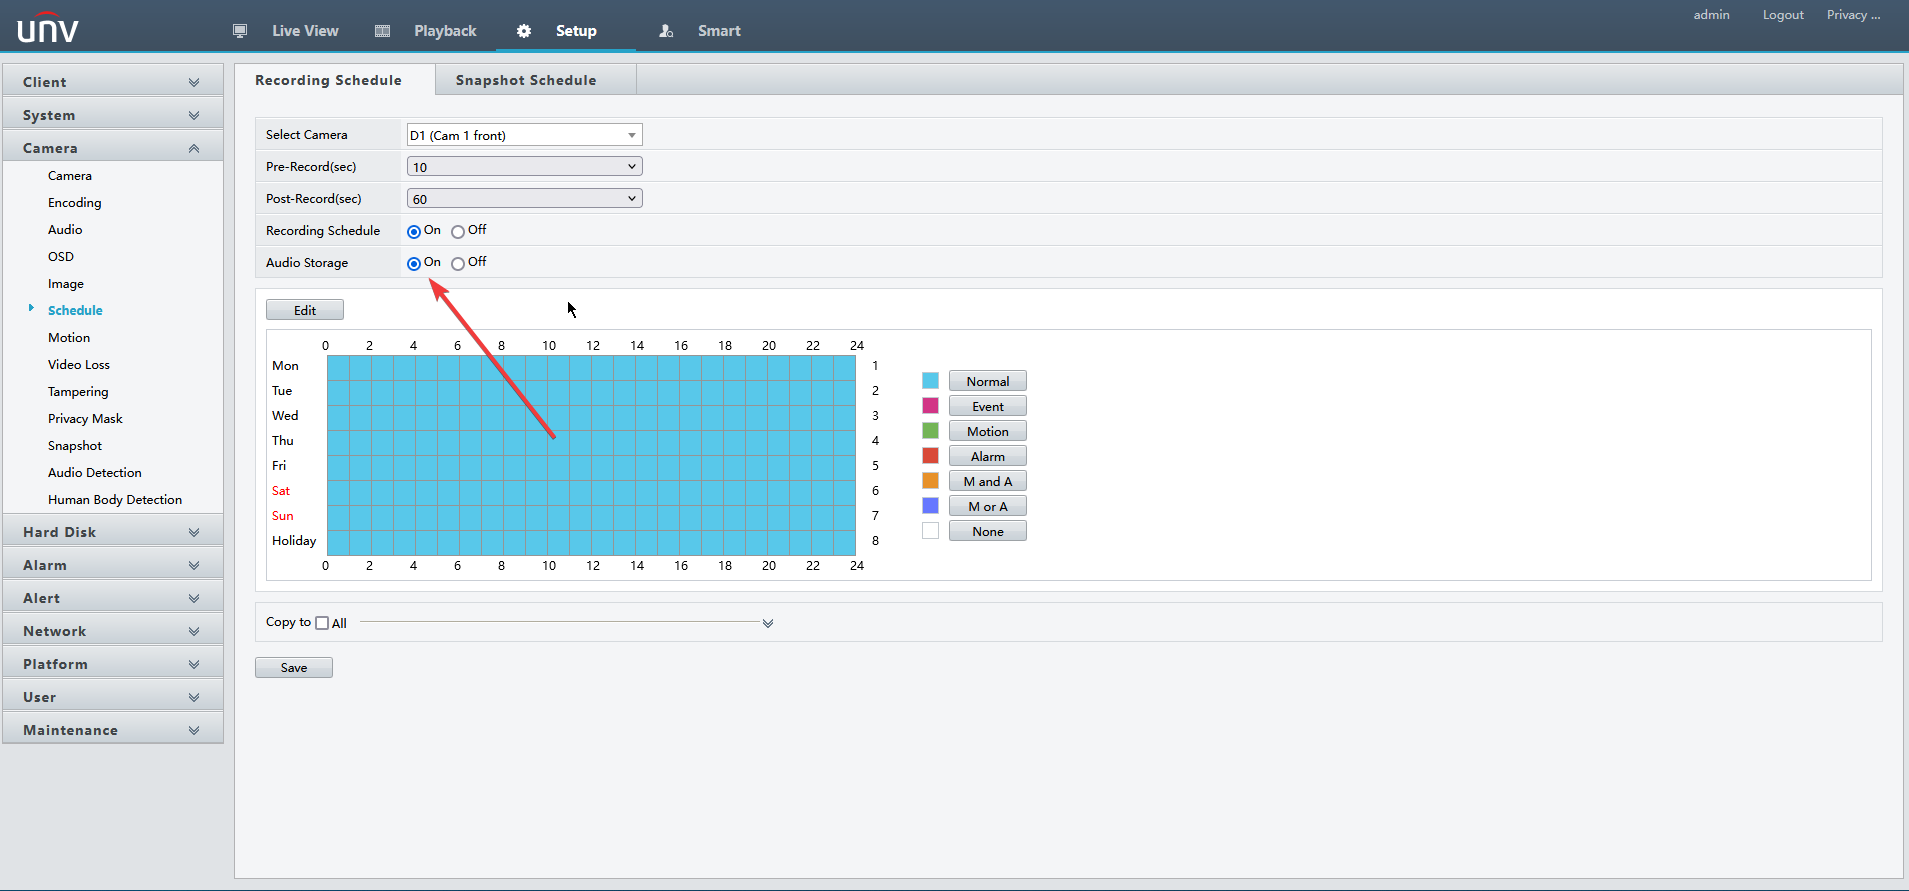
4. Change the Audio Storage option to On.
3. Click Save.
Creating New Users
Adding users to your UNV NVR allows you to customize exactly what people are able to see when operating your device, which can help protect your settings and the security of your device.
This tutorial assumes you have already completed the basic set up for your UNV NVR
Accessing and Configuring a New User
- Sign into your UNV NVR. To do this, start at the Live View screen of your NVR.
- Right Click Anywhere on Live View > Main Menu > Draw Pattern or Enter Password
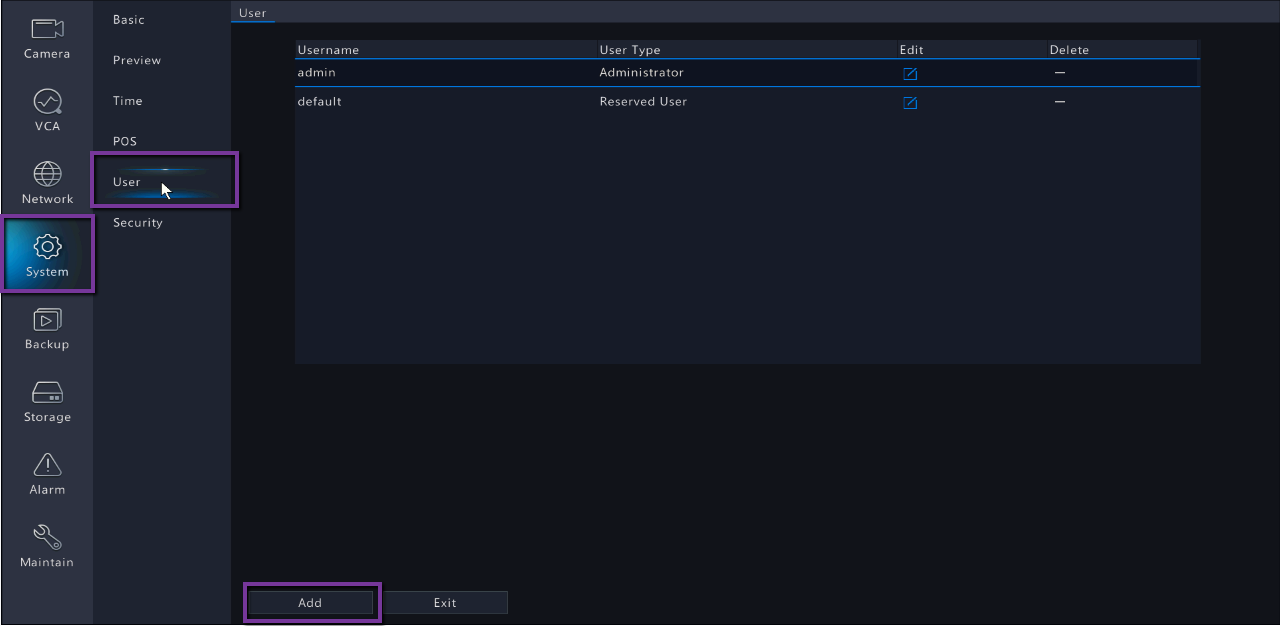
- You will be taken to the main menu. Click on “System” and then navigate to the “User” menu. At the bottom of the screen, you will see a button labeled “Add”. Click there.
You will see a pop up menu with everything you need to configure your new user. From top to bottom:
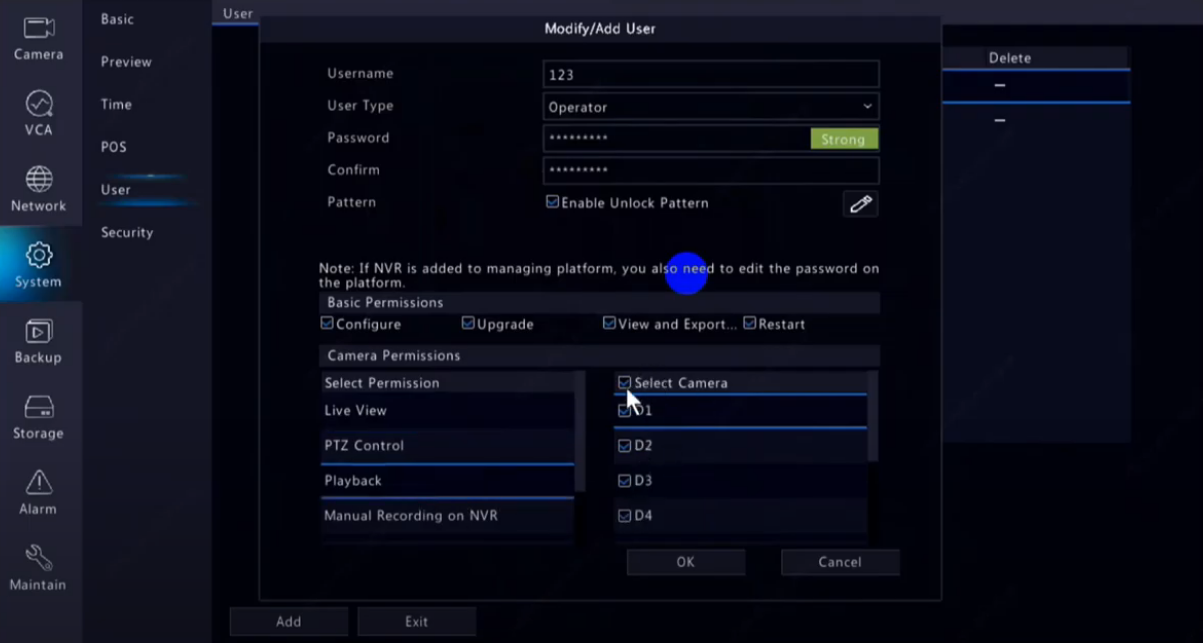
- Username: This is the username for the user you are creating. It can be whatever you’d like.
- User Type: This controls the general configuration for the user you are creating. You will notice that you cannot have more than one admin account.
- Operator: This is a user type that has permission to use the NVR configuration menu. Use this account type if you want your user to be able to change and configure your NVR through it’s main menu. Please Note: You can customize exactly what permissions this user gets, but by default, the Operator type is used for tech support and configuration.
- Guest: This is a user type that has permission to ONLY view Live View and Playback on your NVR. You can customize exactly what cameras they can view. This is the recommended user for anyone that is only allowed to Live View and Playback your cameras.
- Password: This is the password that the new user will use to sign into the NVR. It must be considered a “STRONG” password. Once you have decided upon a strong password, you must retype it in the Confirm Password section.
- Pattern: As with the admin account, your user account can have it’s own distinct lock pattern. This is where you can draw that pattern. Please note that the pattern MUST be distinct from other users, or there will be a conflict.
- Permissions: This menu allows you to configure permissions for your new user account.
-
- Basic Permissions:
- Configure: This allows the use of the main menu to configure the settings of the NVR. Only give this option to trusted users.
- Upgrade: This allows the user to update the firmware on the cameras and recorder. Only give this option to trusted users.
- View and Export…: This allows the user to view and export logs and configuration files. Only give this option to trusted users.
- Restart: This allows the user to restart the NVR. Only give this option to trusted users.
- Camera Permissions:
- Live View: This allows the user to view the Live View on certain cameras. You can choose either all cameras or specific cameras by selection the camera numbers on the right-hand side. Unselecting a camera will turn that camera into a blank square when this user is logged in.
- PTZ Control: This allows the user to move and zoom cameras that have the ability to do so. Only give this option to trusted users, as they will be able to adjust the position on motorized cameras.
- Playback: This allows the user to view Playback on certain cameras. ou can choose either all cameras or specific cameras by selection the camera numbers on the right-hand side. Unselecting a camera will force the error “You Do Not Have Permission” if the user tries to view playback.
- Manual Recording on from the NVR: This allows the user to override the recording schedule for your cameras and manually decide when a camera should record. Only give this option to trusted users.
- Basic Permissions:
-
Once you have completed the permissions for your new user, click the “OK” button on the bottom right-hand side. This will take you back to the User screen.
Setting Up Motion Recording Via Web Interface
Motion detection recording allows you to only record footage when there is activity in any of the areas that you are monitoring, making it easier to search for events recorded and also allowing your system to conserve disk space on your NVR’s hard drive.
Step 1. Navigating To The Motion Settings
- Open the recorder web login by typing the recorders local IP address / external IP / DDNS into the Internet Explorer web browser.
- Click “Download” at the top of the page to install the web plugin. Make sure you close your browser during the installation.
- Reopen the recorders login page and login using your user name and password (Default is Username: admin Password: 123456)
- Once you are logged in navigate to the “Settings” button at the top of the screen
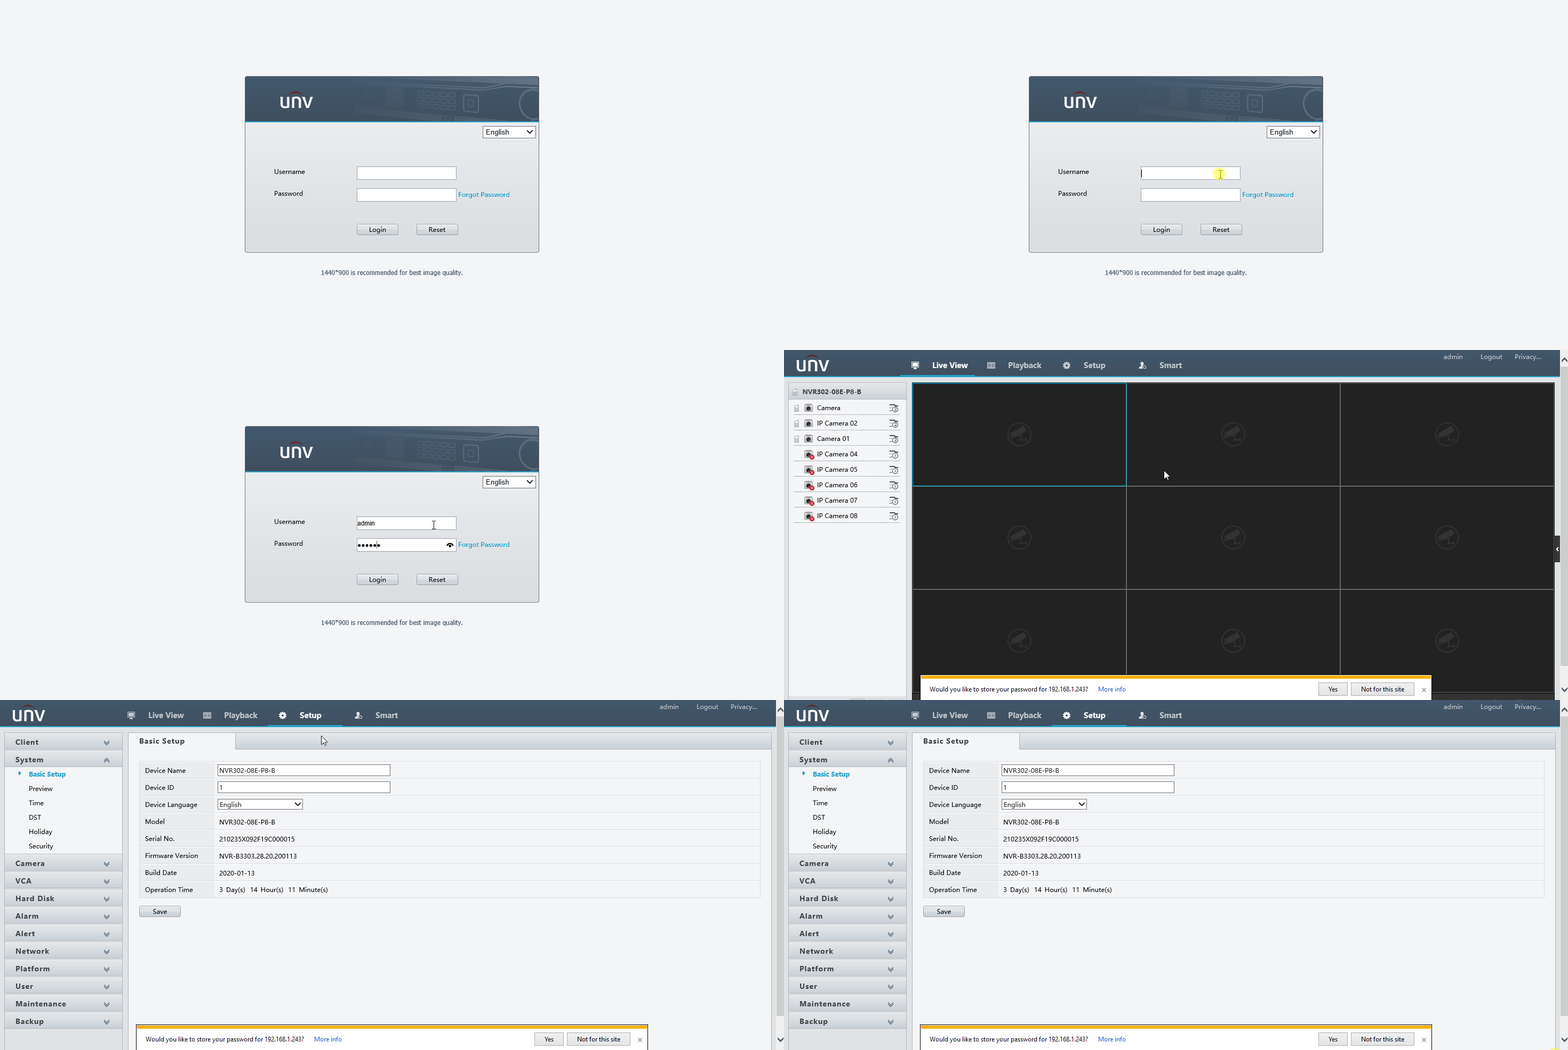
- . Once in the “Settings” menu on the left hand side navigate to “Camera > Motion”
- All of your motions settings will be found in this menu. The first setting that will need to be configured is the “Area”. To set up the area for detection first click on “Start Drawing”, next on the image provided to the left start in the corner and drag and drop a red grid over the whole image.
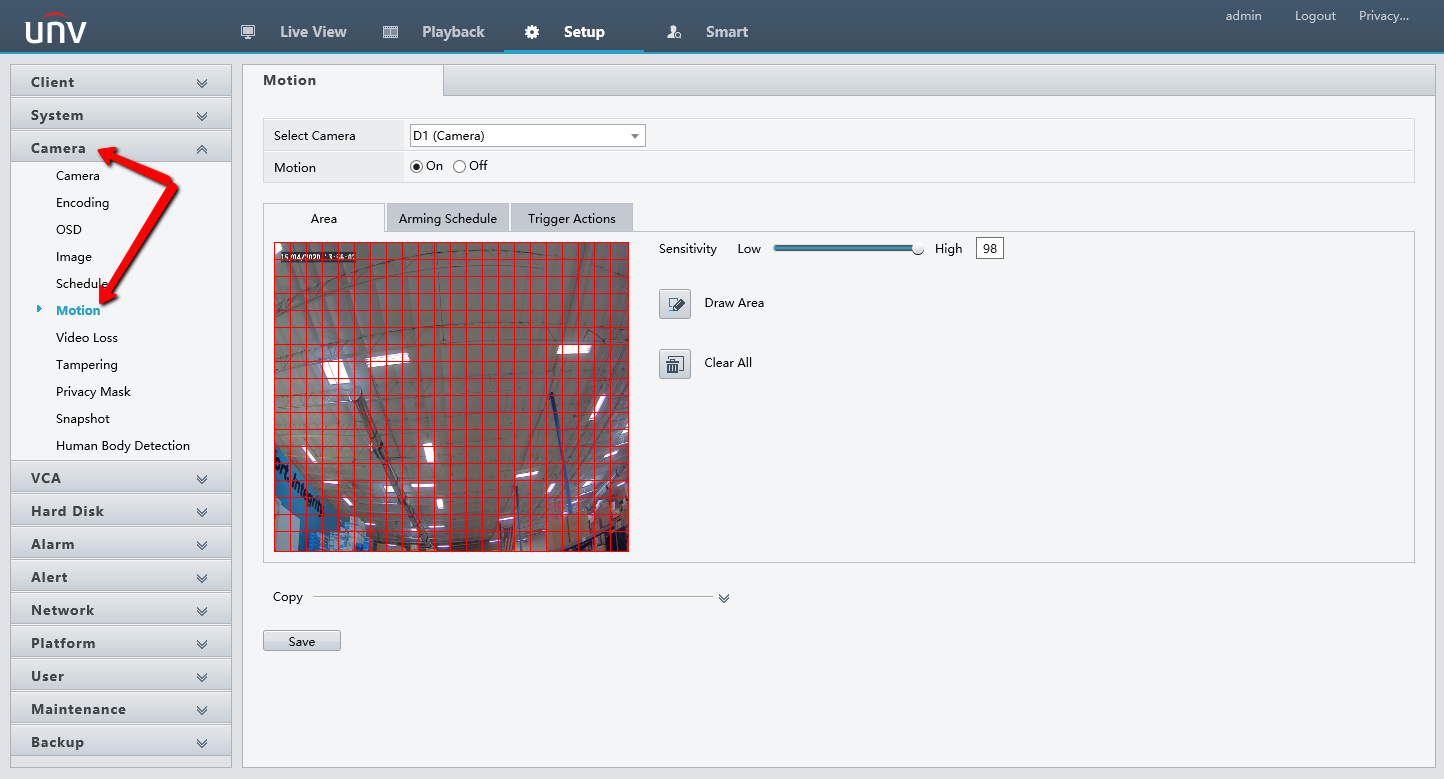
- Next make sure that the “Motion” setting is check to the “On” Position.
- Every situation is different where the camera will be installed. Typically setting the sensitivity to 50 is recommended, then adjusting from there if needed. Either lowering if too many false triggers occur, or raising it if little to no triggers occur
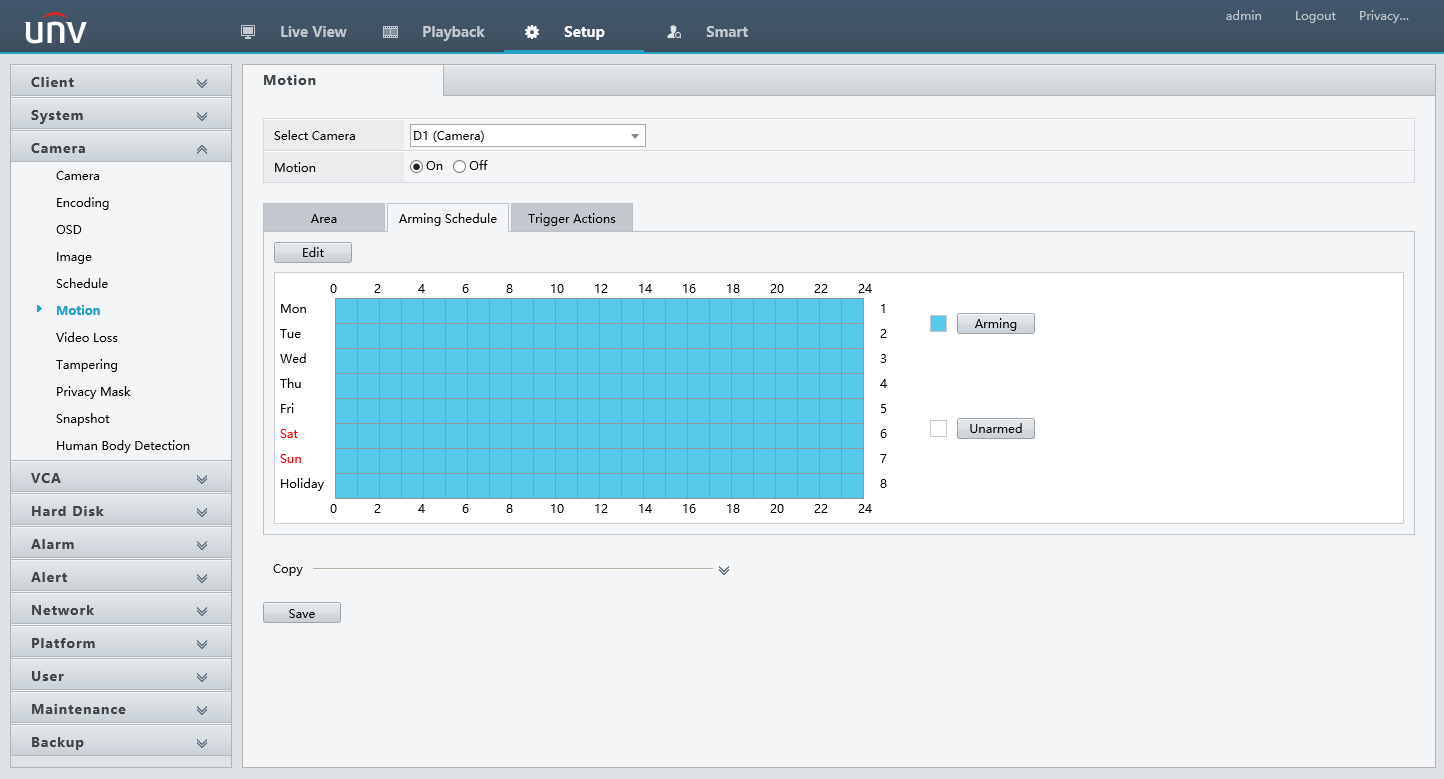
- Setting the Arming Schedule will be the next tab over.(time when actions will be
triggered). We usually recommend keeping this at 24/7, but every situation is different!
- Next setting to set up is going to be the “Trigger Actions”. The trigger actions are set up to the camera what to do when motion is detected. The main setting that you want to make sure you have set is the “Trigger Recording”. When setting the trigger reordering setting you want to check on the channel that you are currently configuring, for example if you are configuring motion for camera one in the trigger recorder menu “D1” would be checked on while all the other are unchecked and if you were configuring channel 5 under trigger recorder “D5” would be checked on while all the other were unchecked.
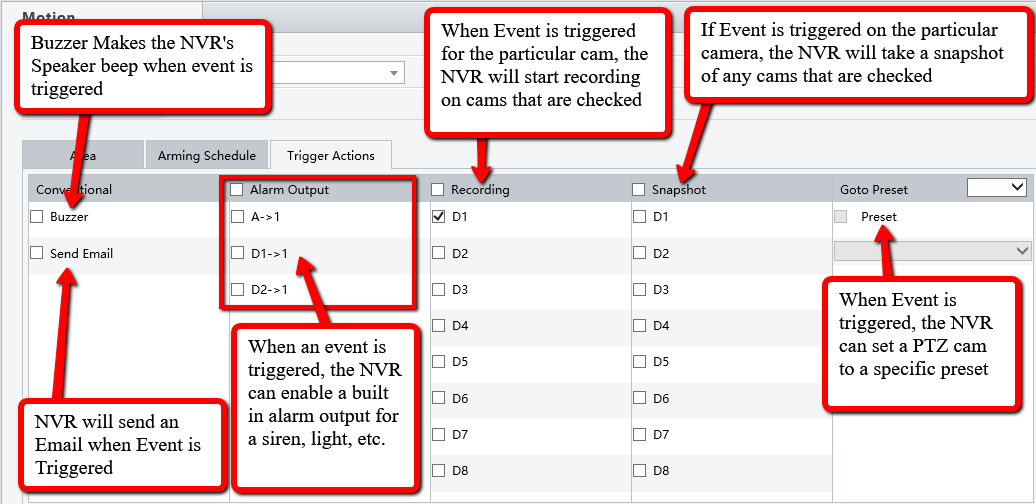
Key
- Conventional
- Buzzer – The NVR’s Speaker will beep when event is triggered.
- Send Email – NVR will send an Email when Event is Triggered
- Alarm Output – When an event is triggered, the NVR can enable a built in alarm output for a siren, light, etc.
- Recording – When Event is triggered for the particular cam, the NVR will start recording on cams that are checked
- Snapshot – When Event is triggered on the particular camera, the NVR will take a snapshot of any cams that are checked
- Goto Preset – When Event is triggered, the NVR can set a PTZ cam to a specific preset
Step 2. Setting Up The Schedule
- Next thing to set up will be the Schedule on the recorder. To access these setting navigate to “Settings > Camera > Schedule”
- Pre-Record is for how much data will be saved from before the motion started. Post-Recorder is how long the camera will keep recording even after it has stopped detecting motion.
- Make sure that “Recording Schedule” is check to the “On” position.
- First thing you want to think about is if you want the cameras to record all of the time or on motion in this tutorial we are setting up all camera on motion. If you want the camera to record all of the time by default you can leave the schedule at the all blue color.
- To change the Schedule to motion you can click the “Motion” button on the right and then drag and drop the green color over each day and hour starting in the corner.
- Other option for setting up the Schedule is you can click on the “Edit” button just above the upper left corner. This will allow you to manual type in each periods start and end times how you want the recorder to record during that time.
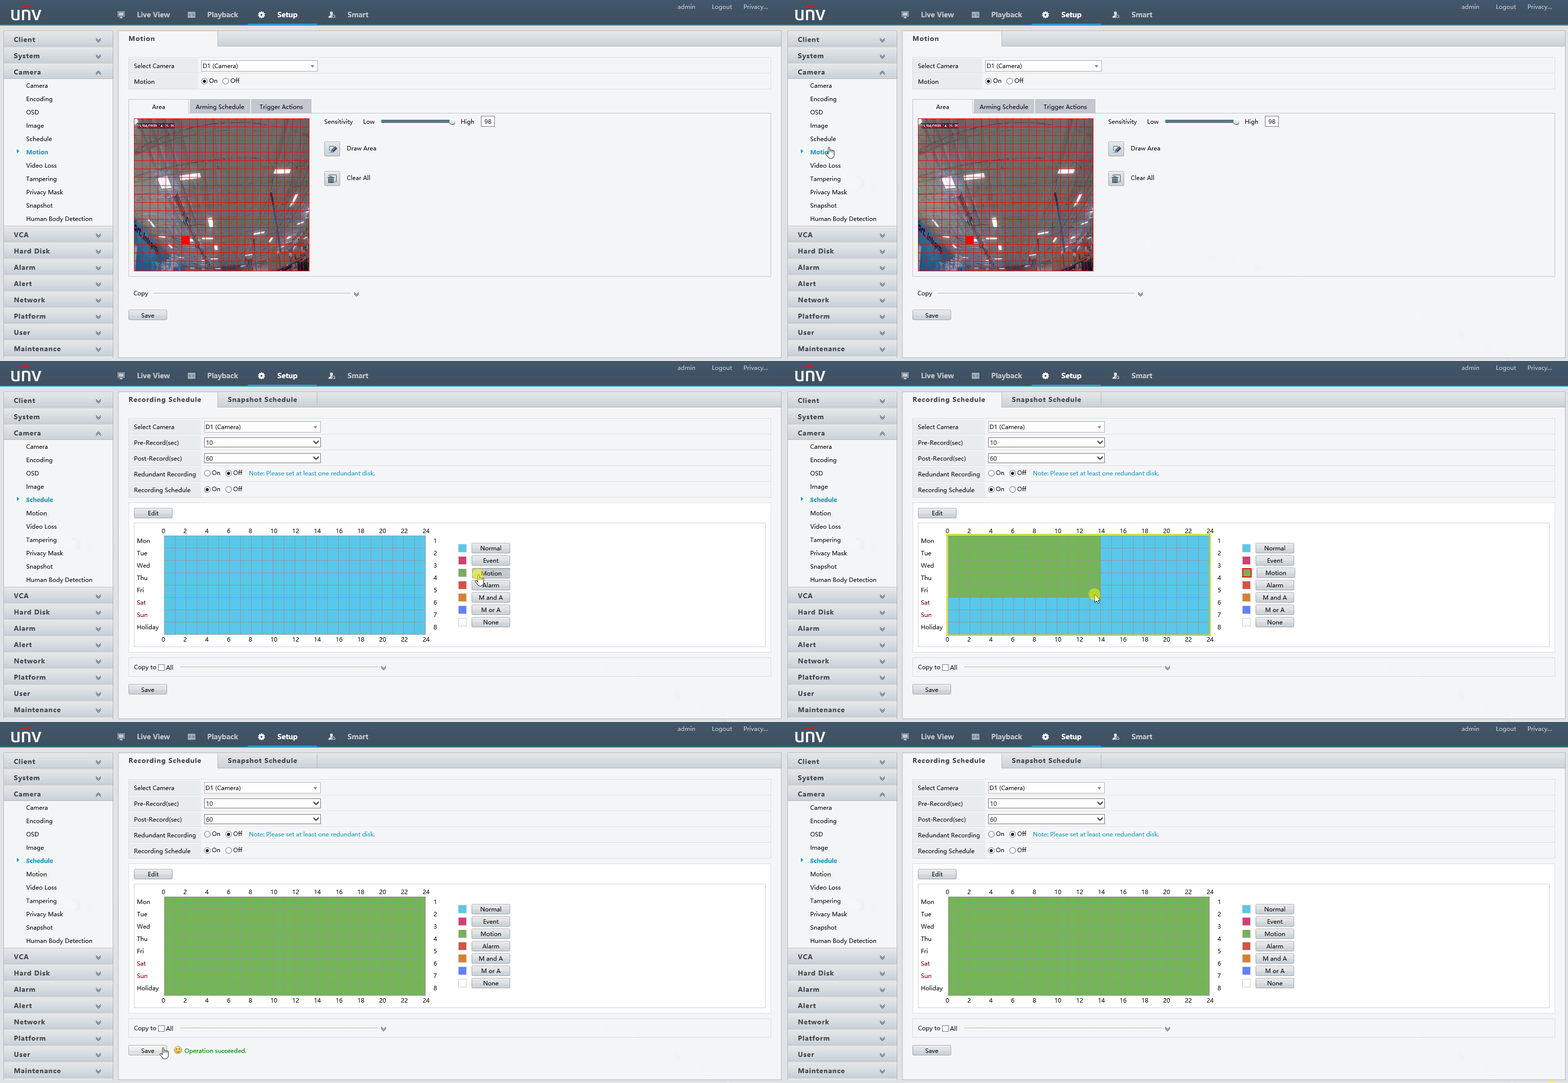
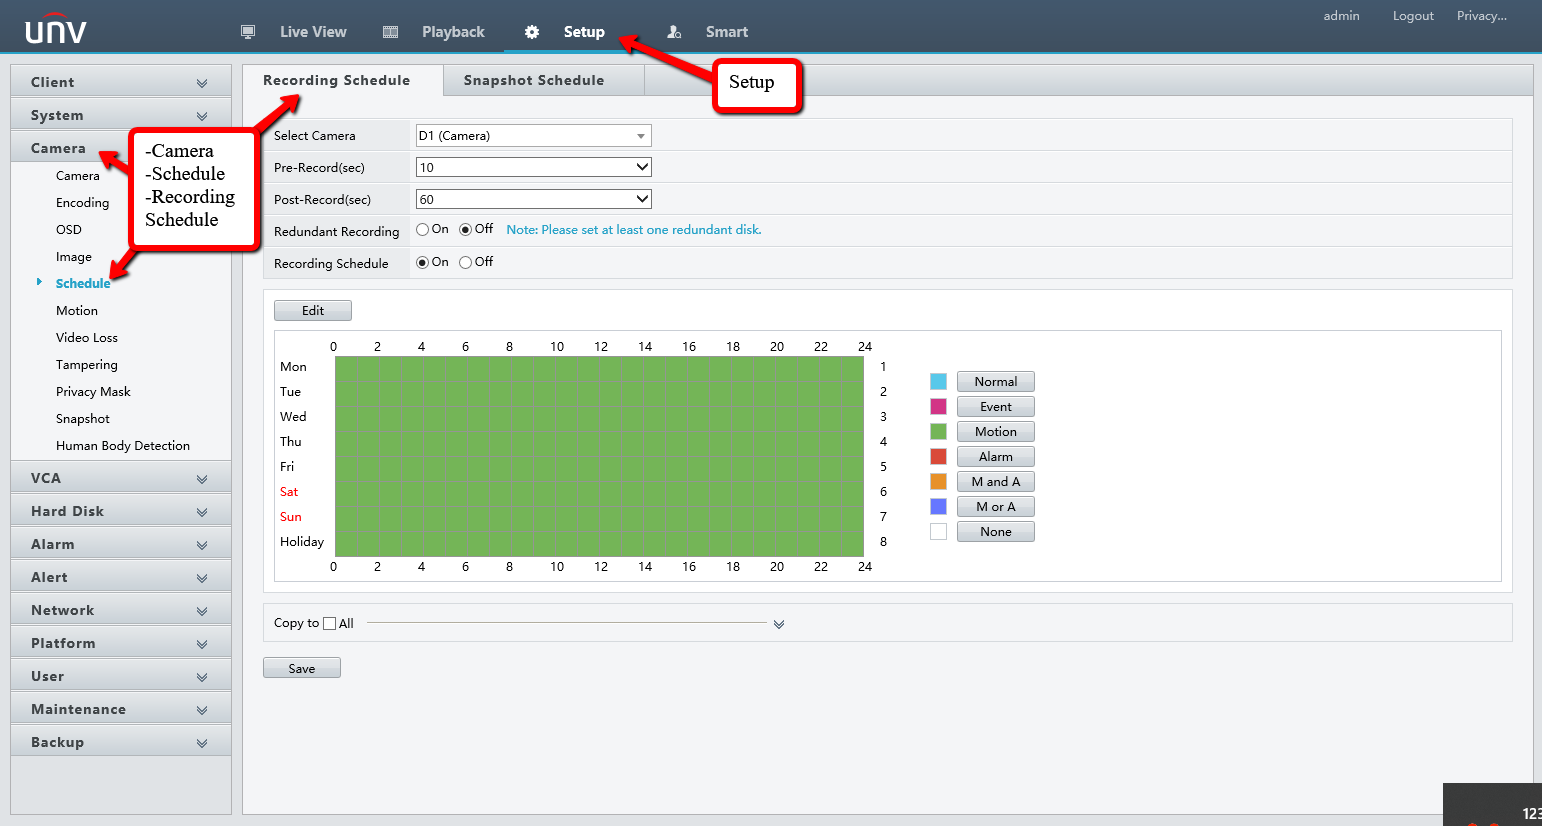
- You can then use the “Copy to” drop down to copy the schedule to all cameras or you can manual set up each camera by changing the Camera ID at the top.
How to set up Gmail email alerts on a Uniview NVR
This guide will explain each step to set up email alerts on a Uniview NVR using a Gmail account
Note
If you would like to receive E-mail alerts whenever an event has occurred, we recommend using a Gmail account. It’s free, secure, and easy to configure. If you don’t already have a Gmail account you can create one here.
First, you’ll need to make sure that your Gmail account is configured to allow “less secure apps” to send E-mail to your account from the NVR.
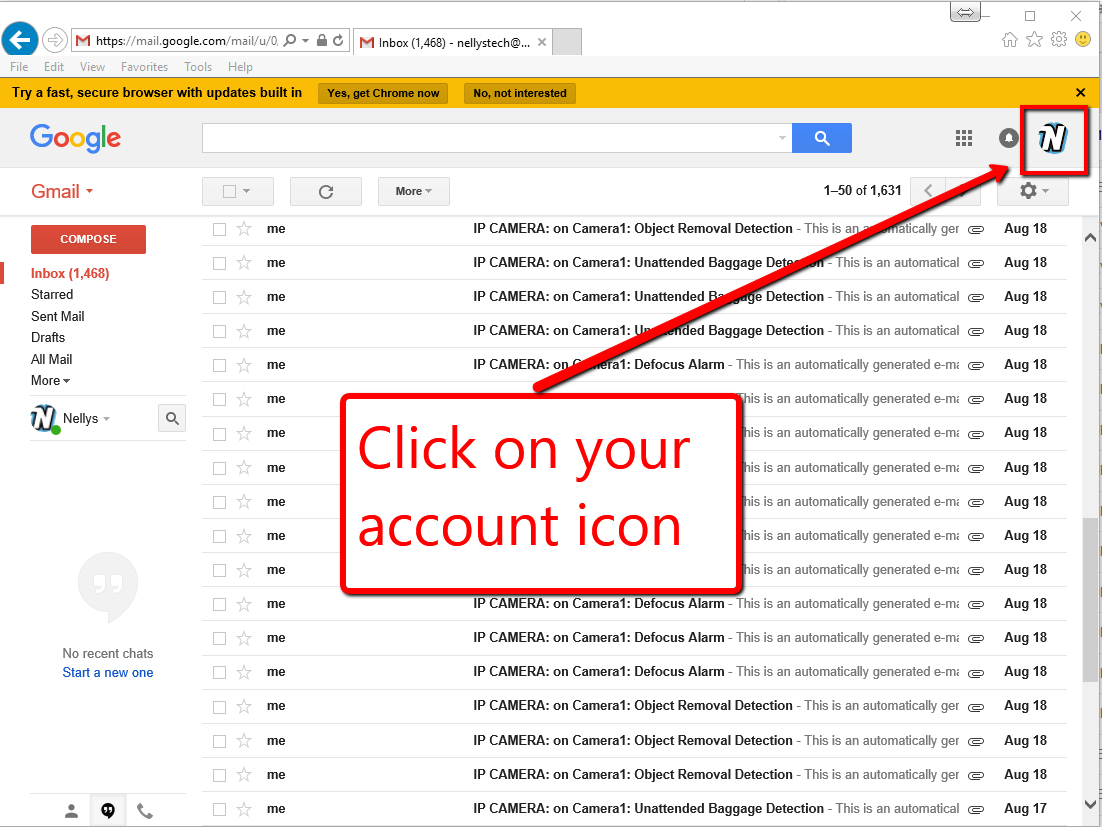
1. Log into Gmail with your user name and password, then click on your account icon in the top right. Our account has been customized with the Nelly’s “N”. Yours might have a default user icon.
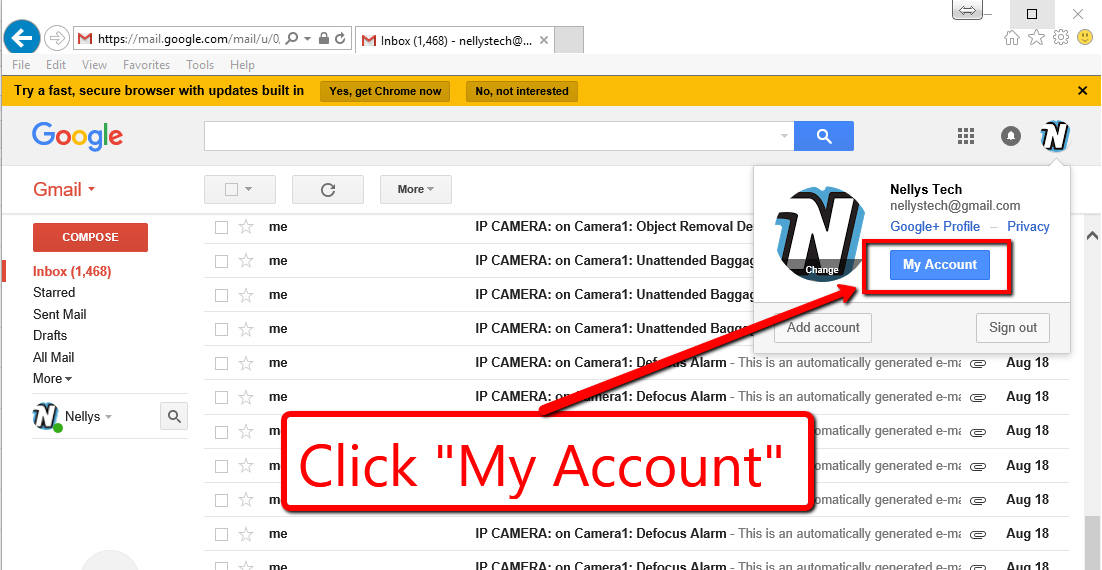
2. Then click on the “My Account” button:
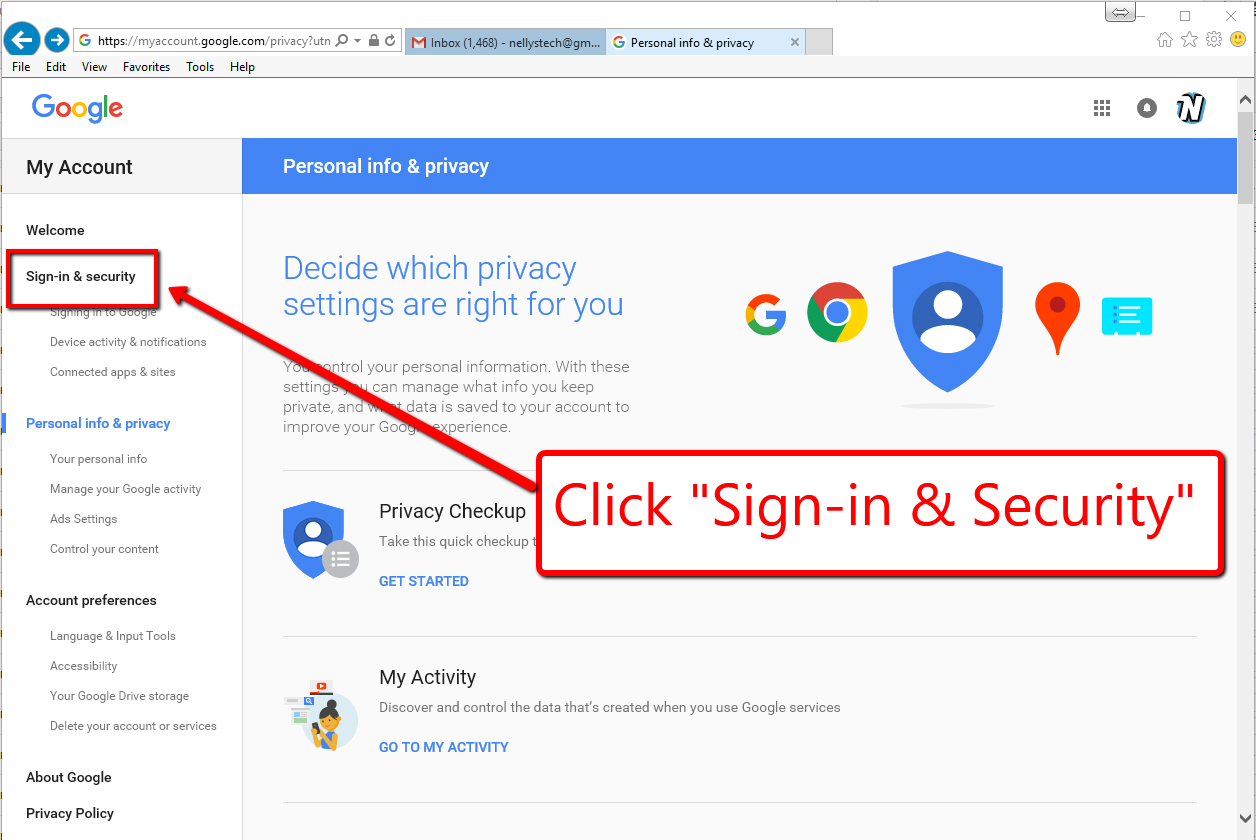
3. Then click on “Sign-in & Security” on the left:
4. 2-Step Verification: Turn on 2 Step Verification if it’s not enabled, otherwise the setting you need to enable will not be displayed.
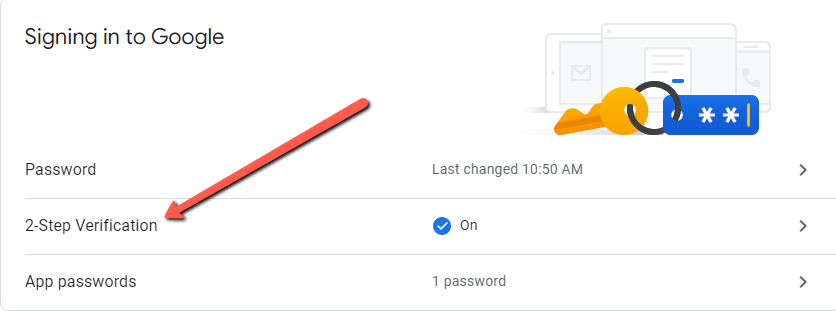
5. Now there should be an option for “App passwords” underneath 2-Step Verification. Select this option, Select App and choose “custom” and name it NVR/DVR and it will generate an app password that you will need to save for later.
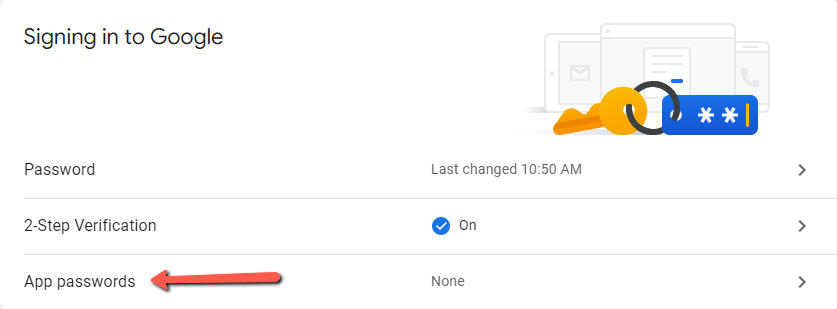
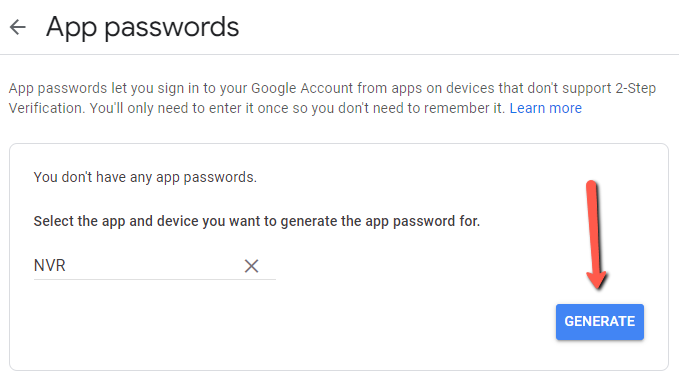
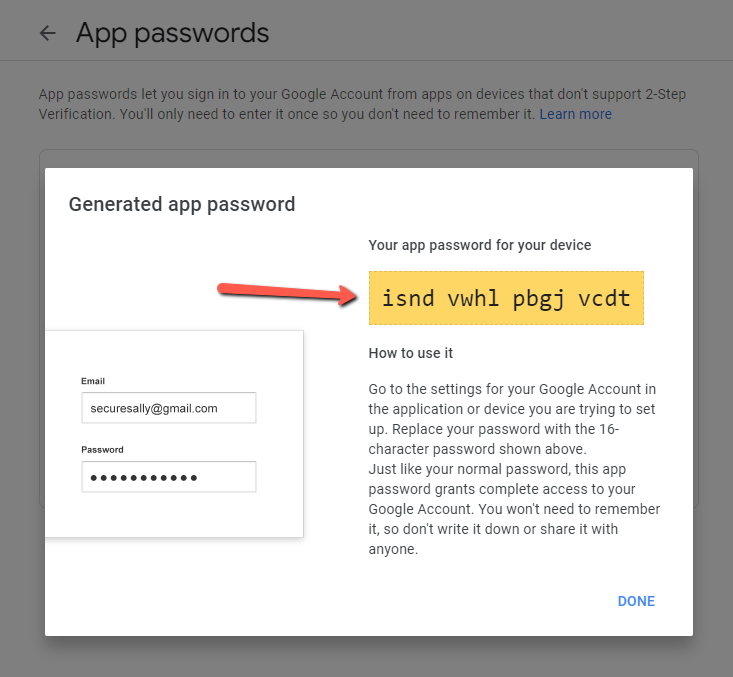
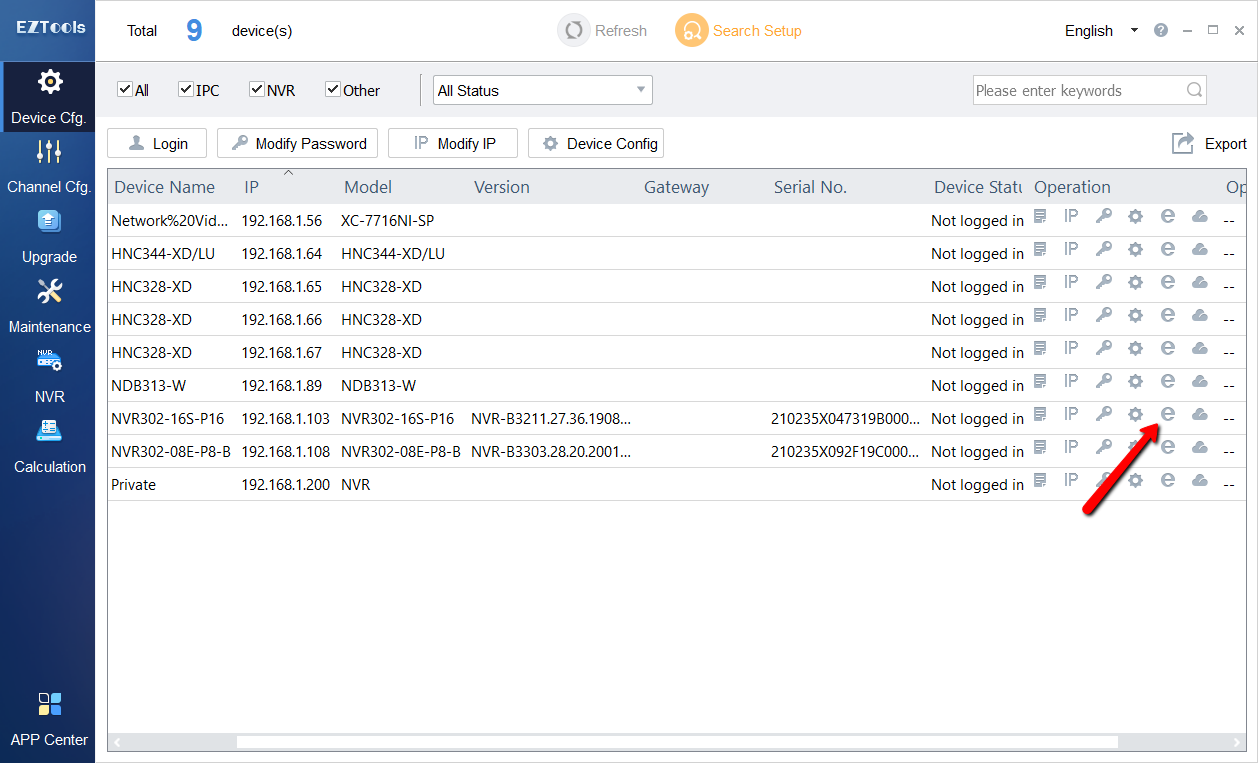
6. Now that 2-step verification and app passwords are enabled the next step is to log into your NVR by opening a web browser and typing in the IP address. Alternately, if you have the EZTools software you can click the “e” icon on the right to open the NVR in a web browser.
7. Once you’re logged in to the NVRs web interface go to Setup->Network->Email. (Click to view full size)
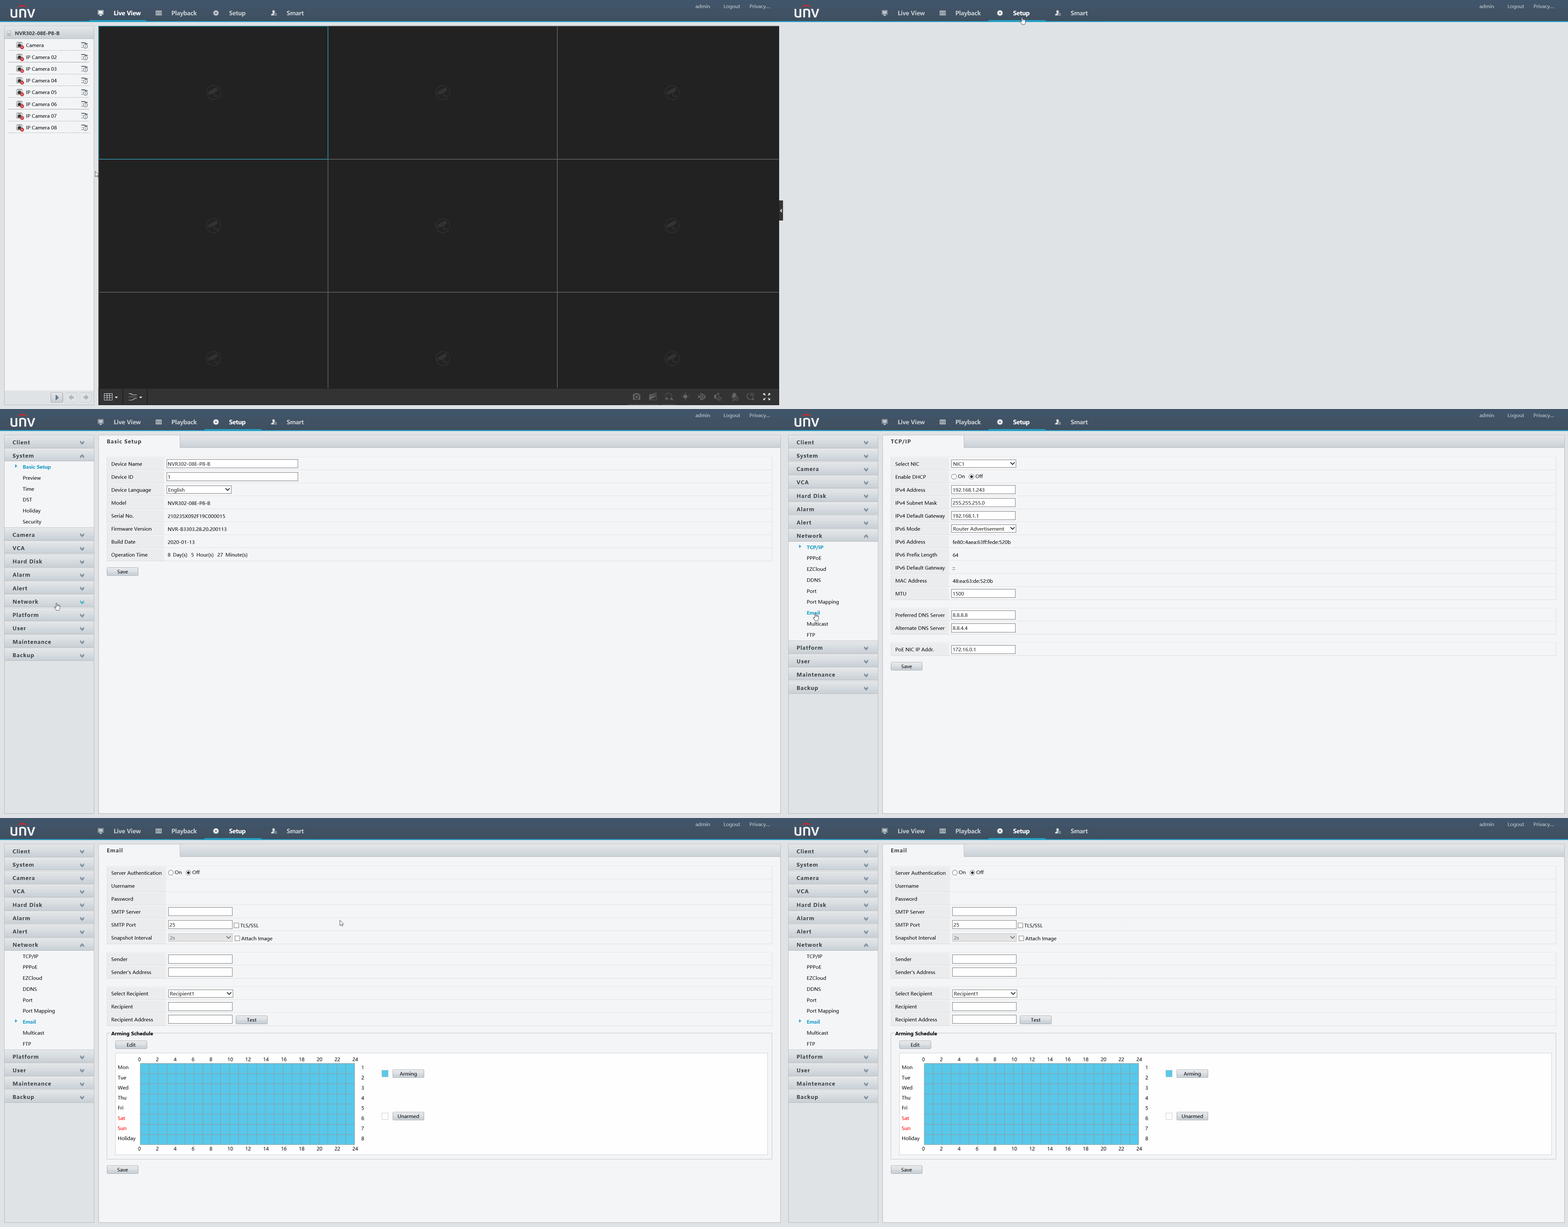
8. First turn the Server Authentication to On, this is required by Gmail. Next insert each field as explained below:
Username: Full Gmail email address (ex. nellyssecurity@gmail.com)
Password: Generated App Password
SMTP Server: smtp.gmail.com
SMTP Port: 587 – Check the TLS/SSL box
Snapshot Interval: Check the box to attach a snapshot to the email when an event has occurred
Sender: NVR
Sender’s Address: Full Gmail email address
Select Recipient: Here you can choose to send to multiple people
Recipient: The name of the person receiving the email alerts
Recipient Address: Full Gmail email address of the person that will receive the email alerts
Schedule: Whenever you want the emails to send. By default they are set to send all day every day if they are triggered.
9. Once all the information is in click Save. Next click the Test button next to “Recipient Address” to send a test email to the specified email address.
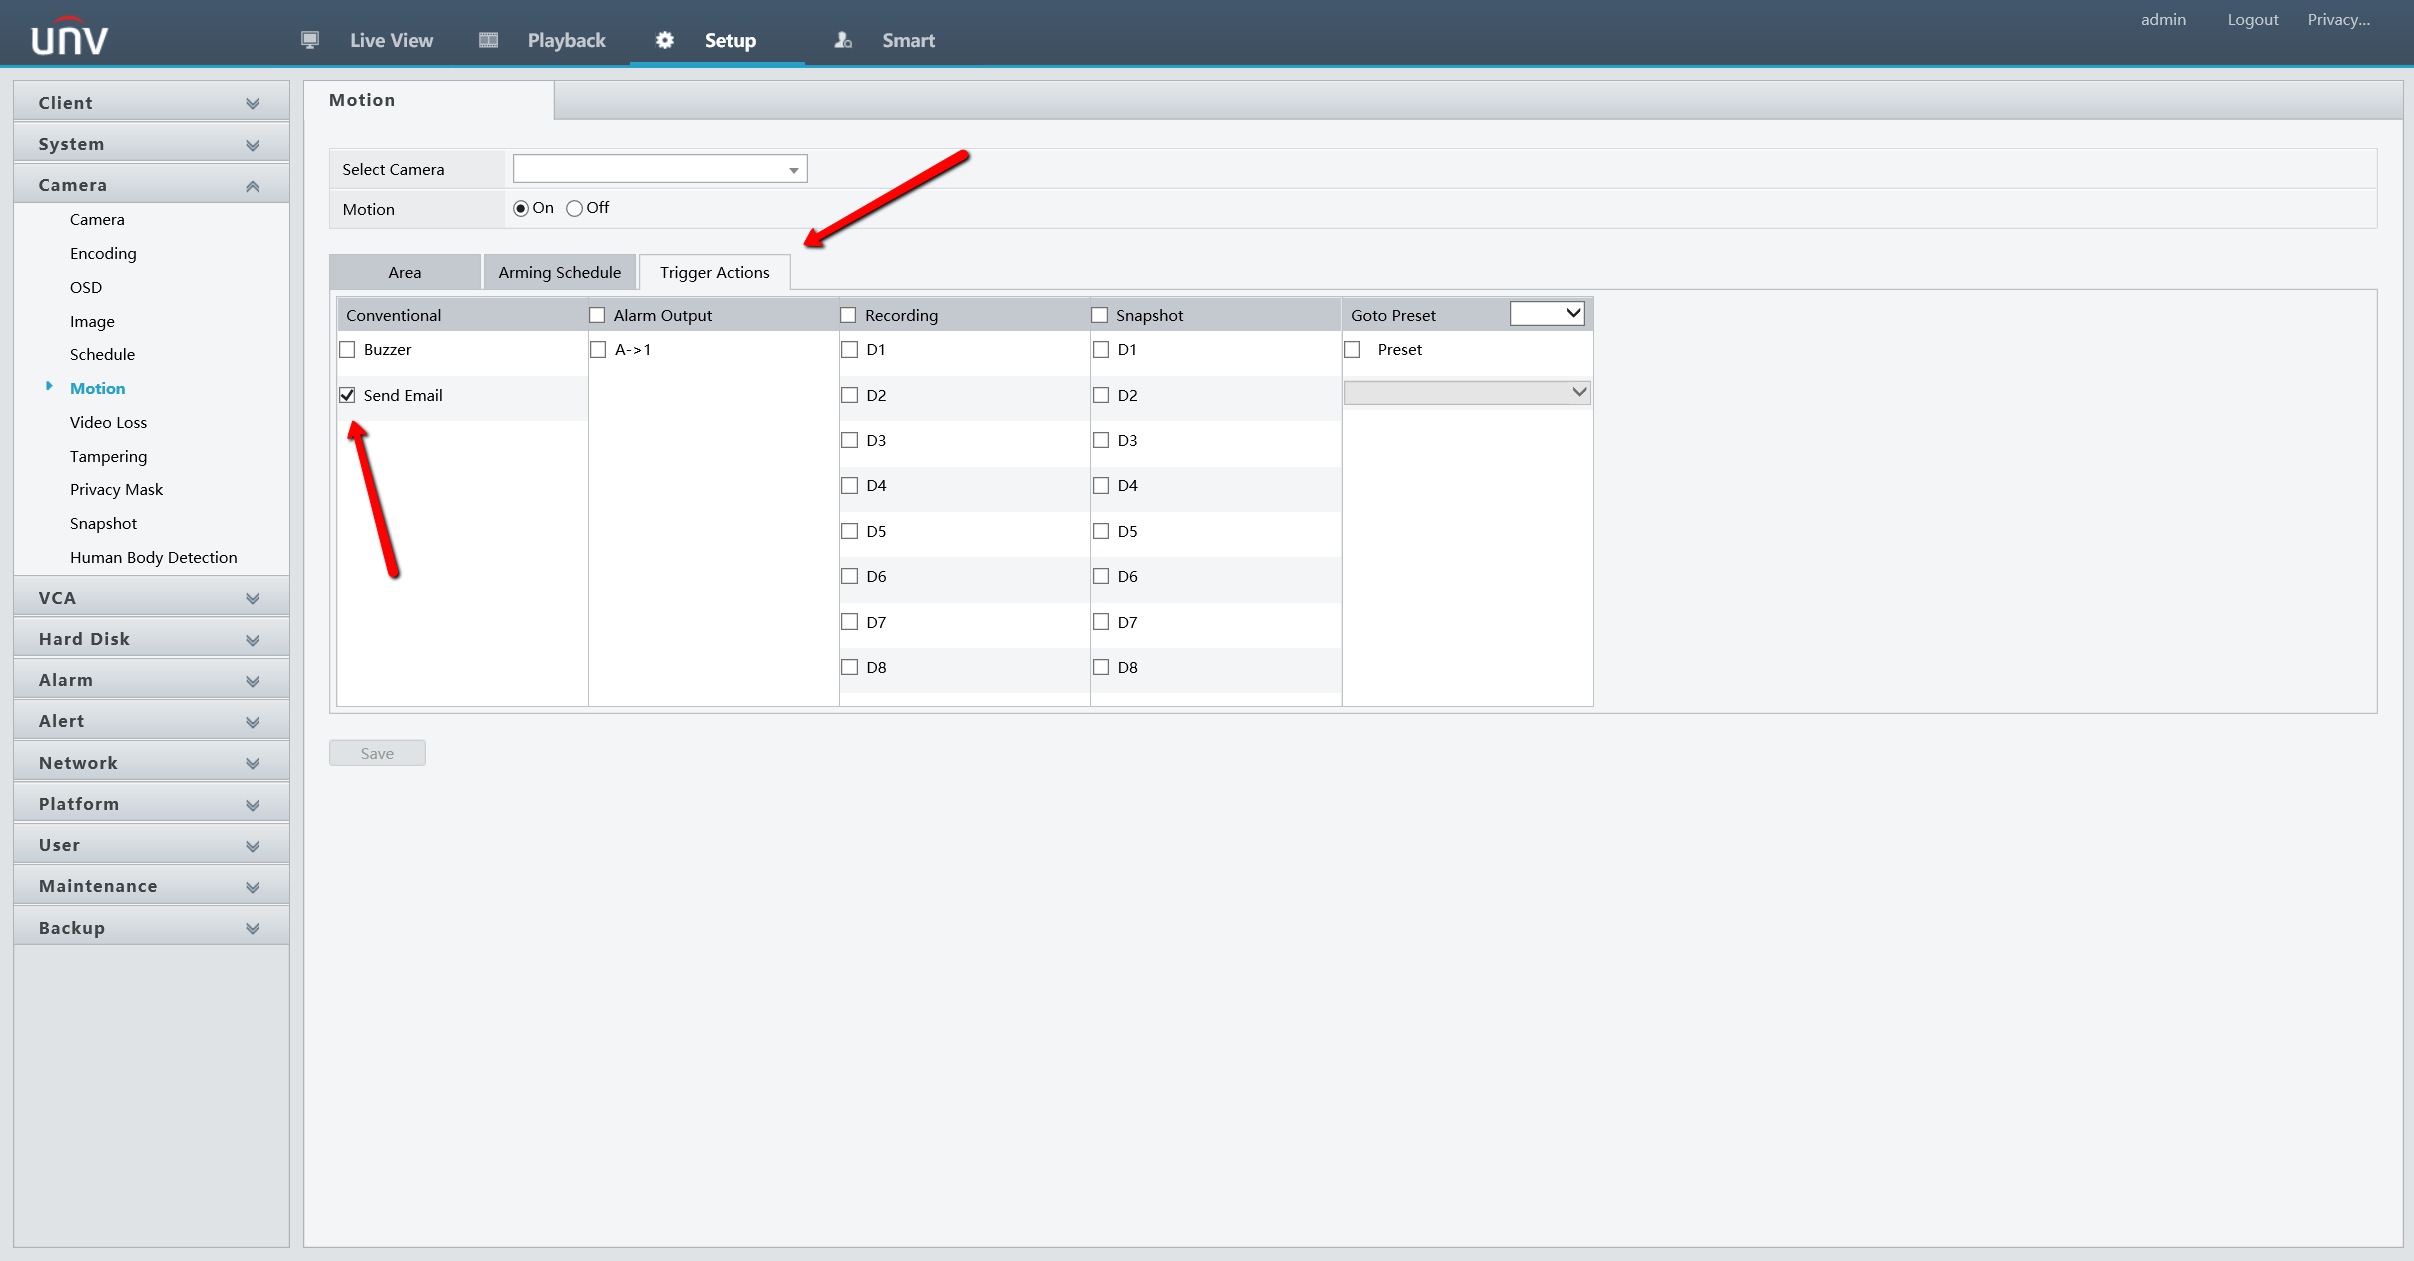
10. Lastly, you will need to check the “Send Email” box for the event you want to trigger the alerts. (Motion Detection, Cross Line Detection, etc)
If you want to set up email alerts for regular motion detection go to Camera->Motion. The check box can be found under the Trigger Actions tab.
How To Manually Upgrade a UNV NVR Via Web Interface
If your NVR is accessible on the local area network using the web interface, you may update the
firmware using a file that has been downloaded and stored locally.
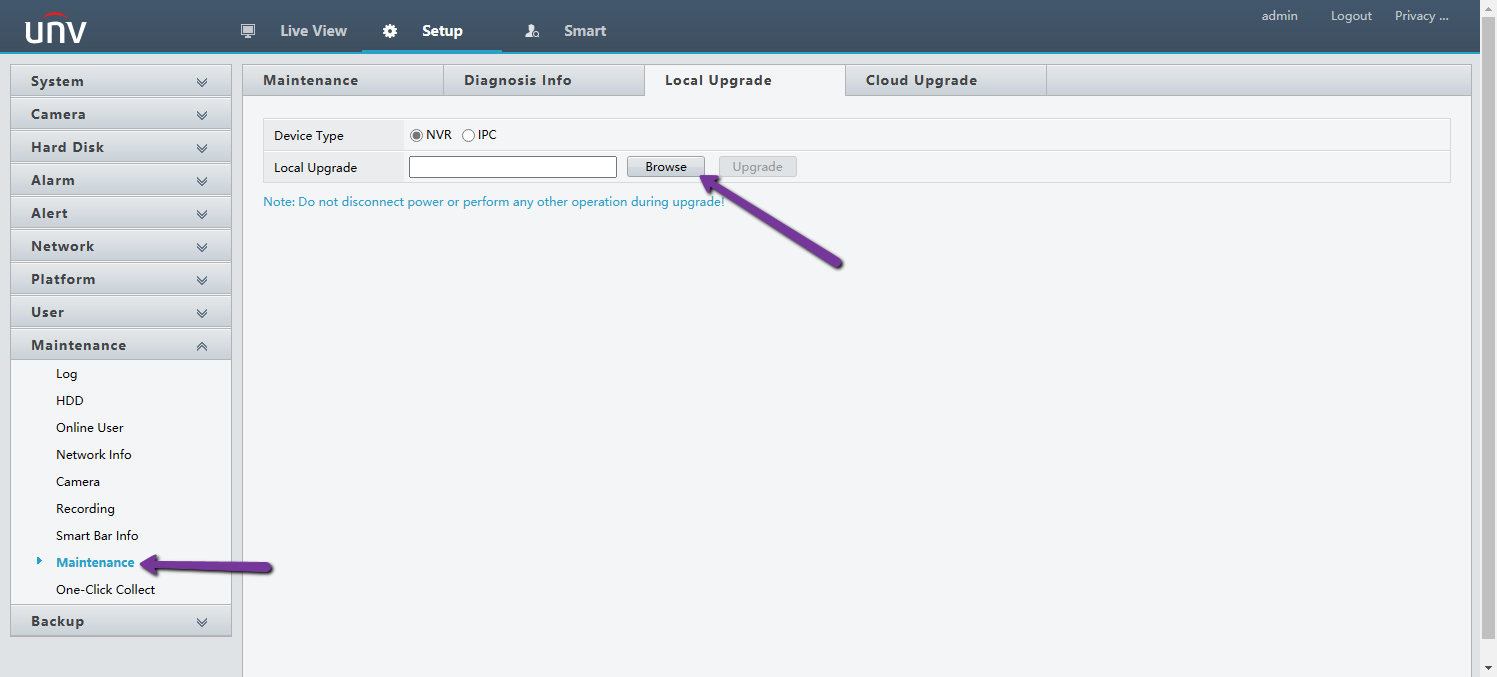
Within the Setup section of the web interface, go to the Maintenance section and select the Local Upgrade entry. On the screen that comes up, click on the Browse button next to the Upgrade text entry field and browse to the location on the local PC where the firmware file is stored and click on it. Once the file is properly entered, press the Upgrade button and the unit will perform the upgrade procedure including a reboot which will terminate your connection.
Please Note
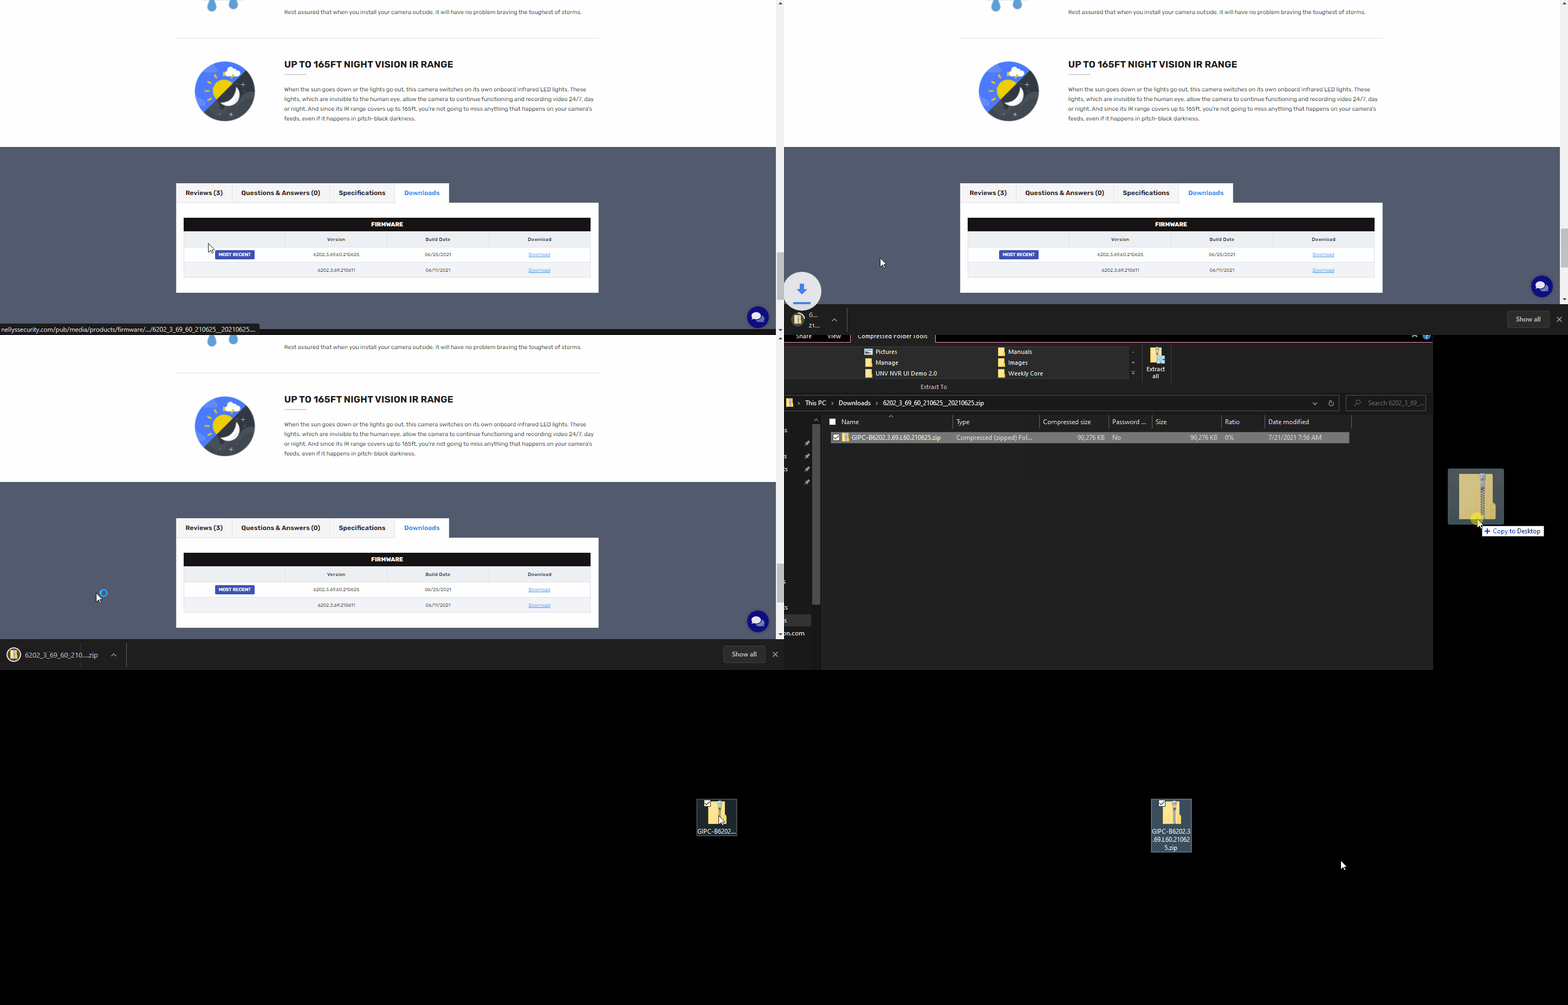
If you download a firmware off the Nelly’s website, you must export the Zip Folder out of the initial Zip Folder that is downloaded.
Adding Blank UNV Camera To UNV Retail NVR via Plug n Play
In scenarios where a Blank UNV camera is paired with a UNV Retail NVR, these will be plug n play. However, you may not get the full functionality of the Blank UNV Camera right away.
In this guide, we will show you the steps needed to allow the full functionality of the Blank UNV Camera.
Connecting The Camera
Since the Blank UNV cameras are plug n play with UNV Retail NVRs, the camera will come online if it is connected directly to the integrated POE switch of the NVR.
Camera Configuration via NVR
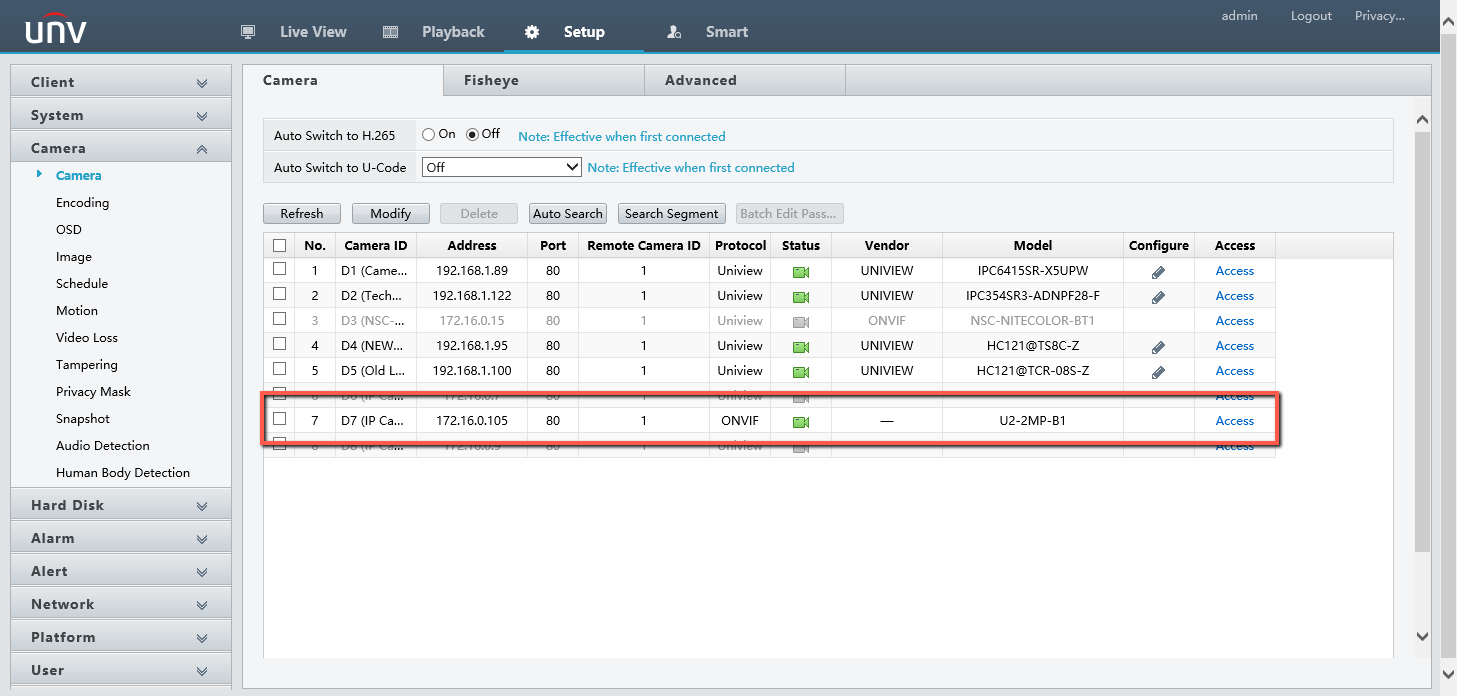
One thing you may notice however, the camera will show added with the ONVIF protocol. This can be very limiting as ONVIF only guarantees a live view and 24/7 recording.
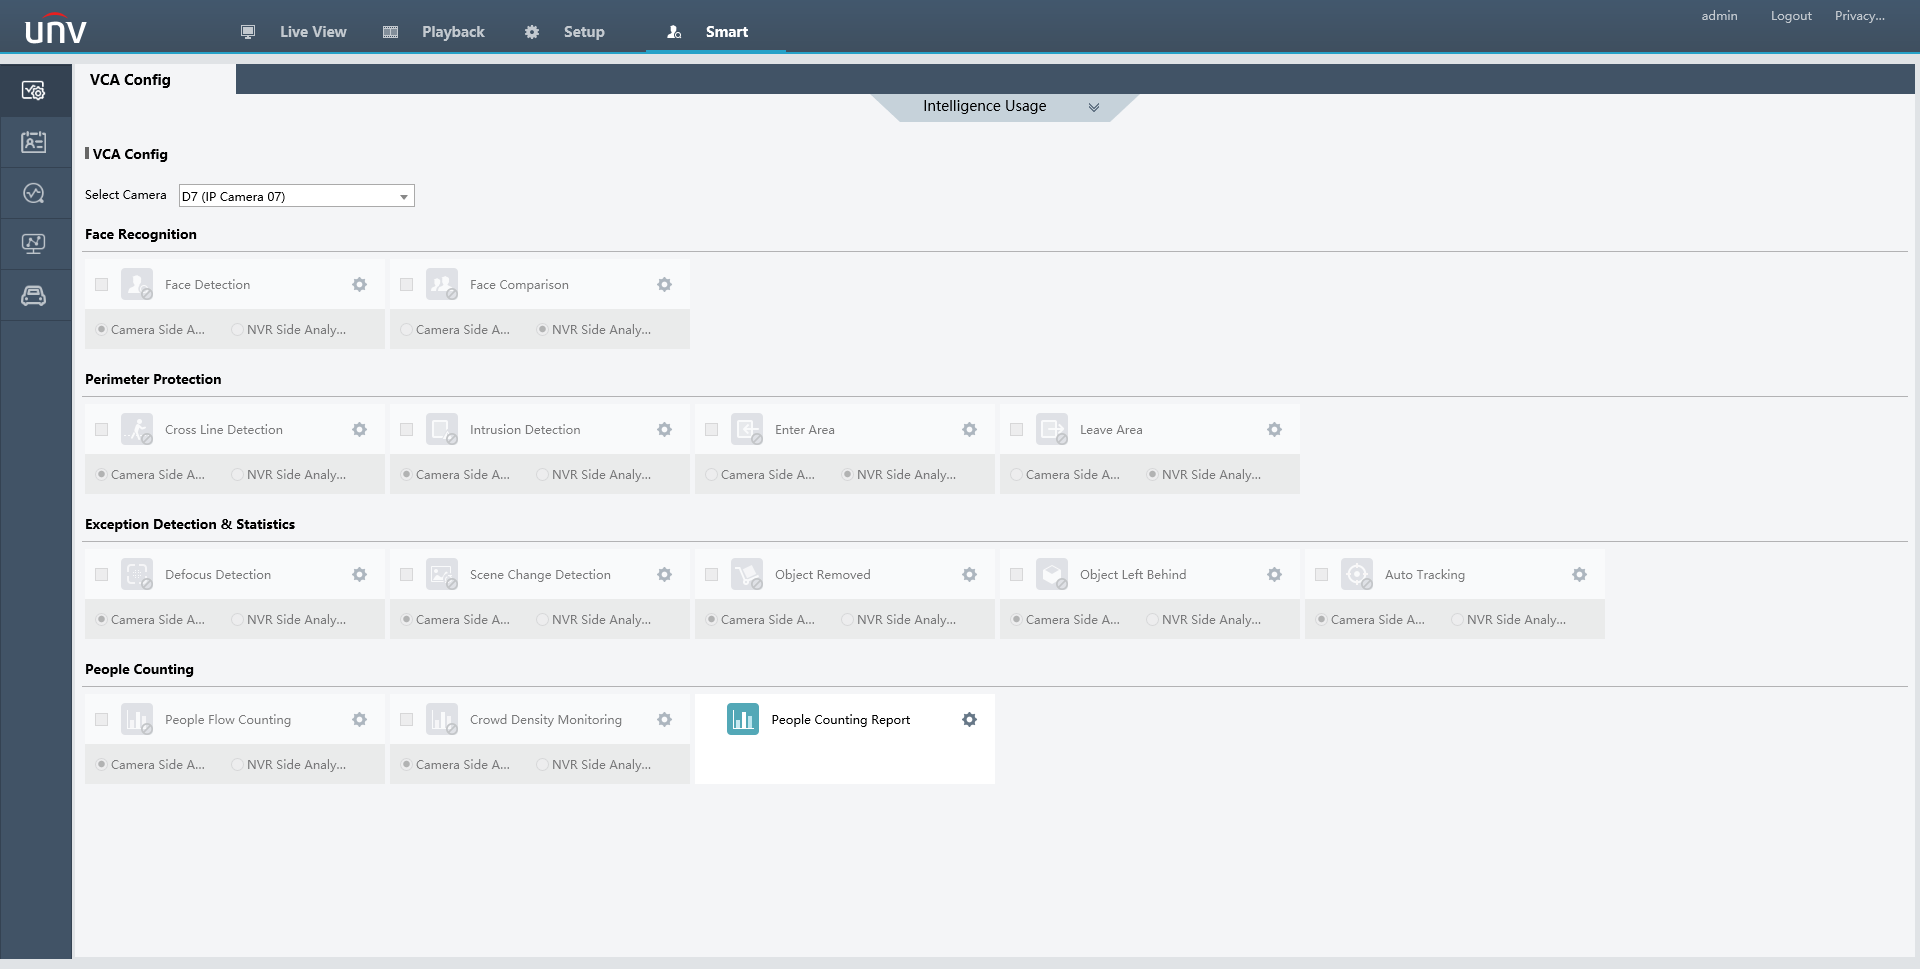
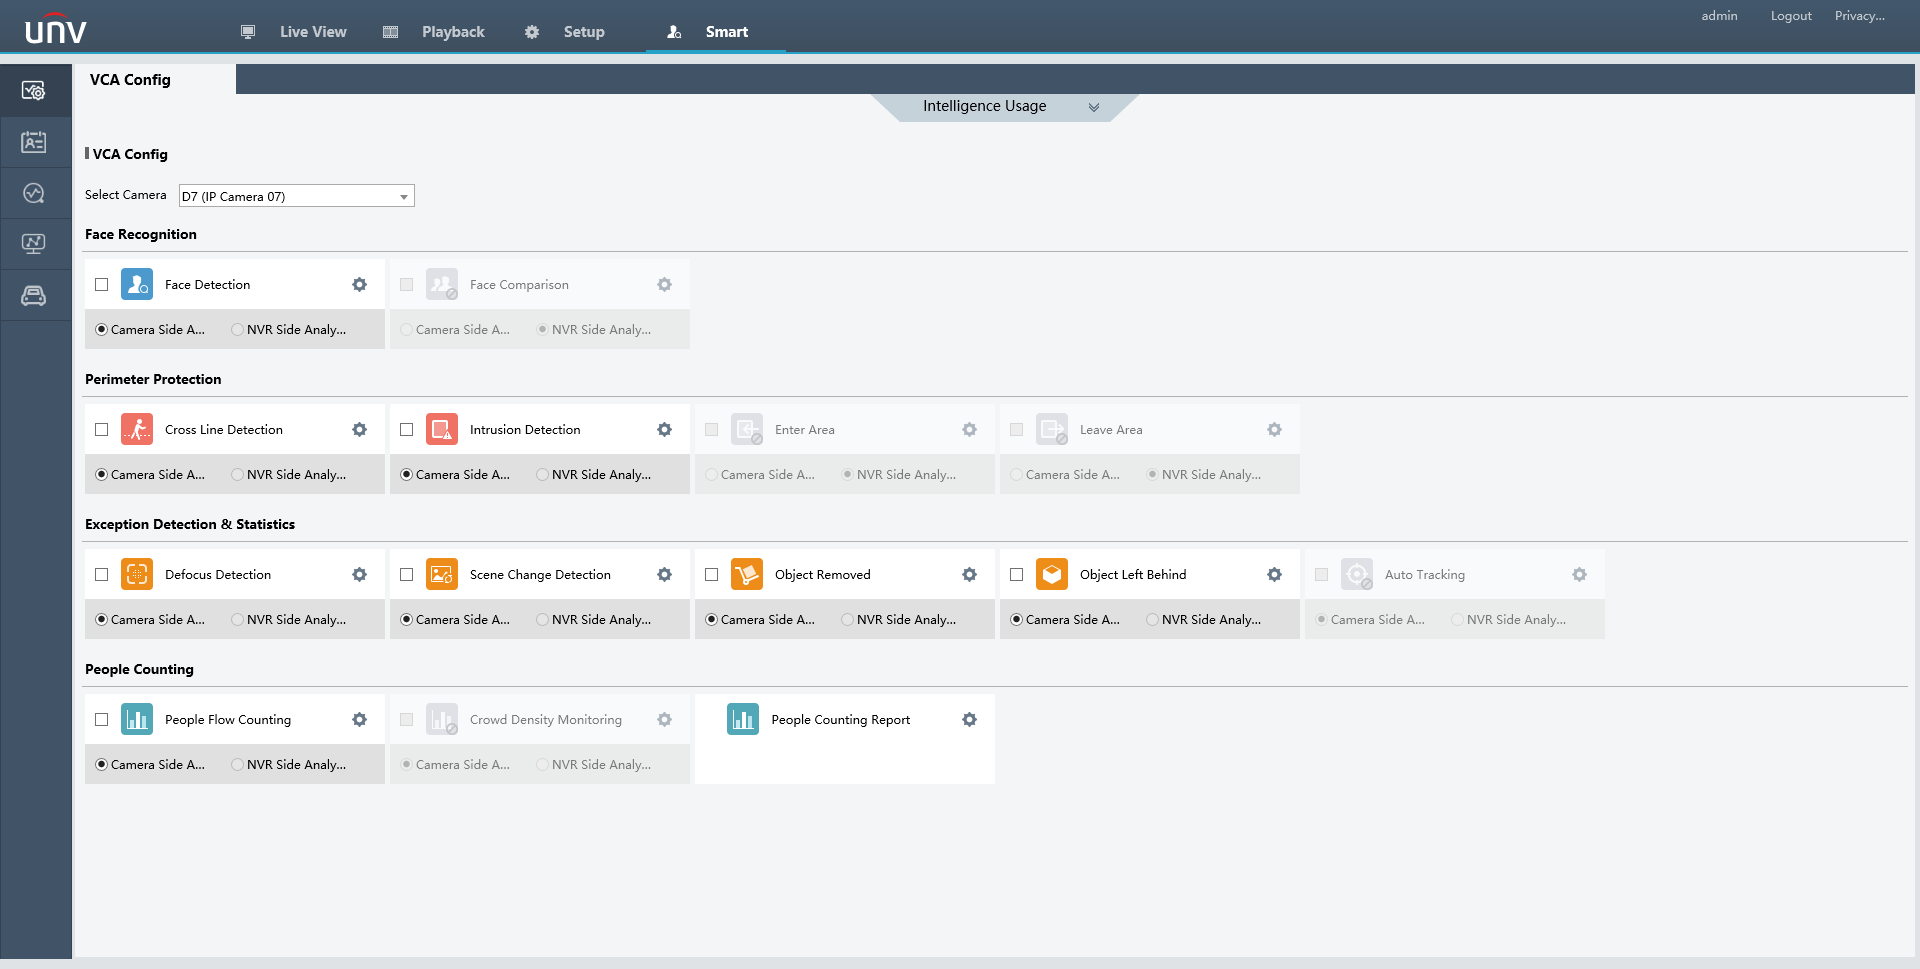
If you go into the Smart Event section of the NVR while the camera is added via ONVIF, you will notice that none are available:
To accommodate for this, Go to Setup -> Camera -> Cameras. Checkmark the Camera, select Modify, change the Add Mode to IP Address, then change the Protocol to Uniview. Save.
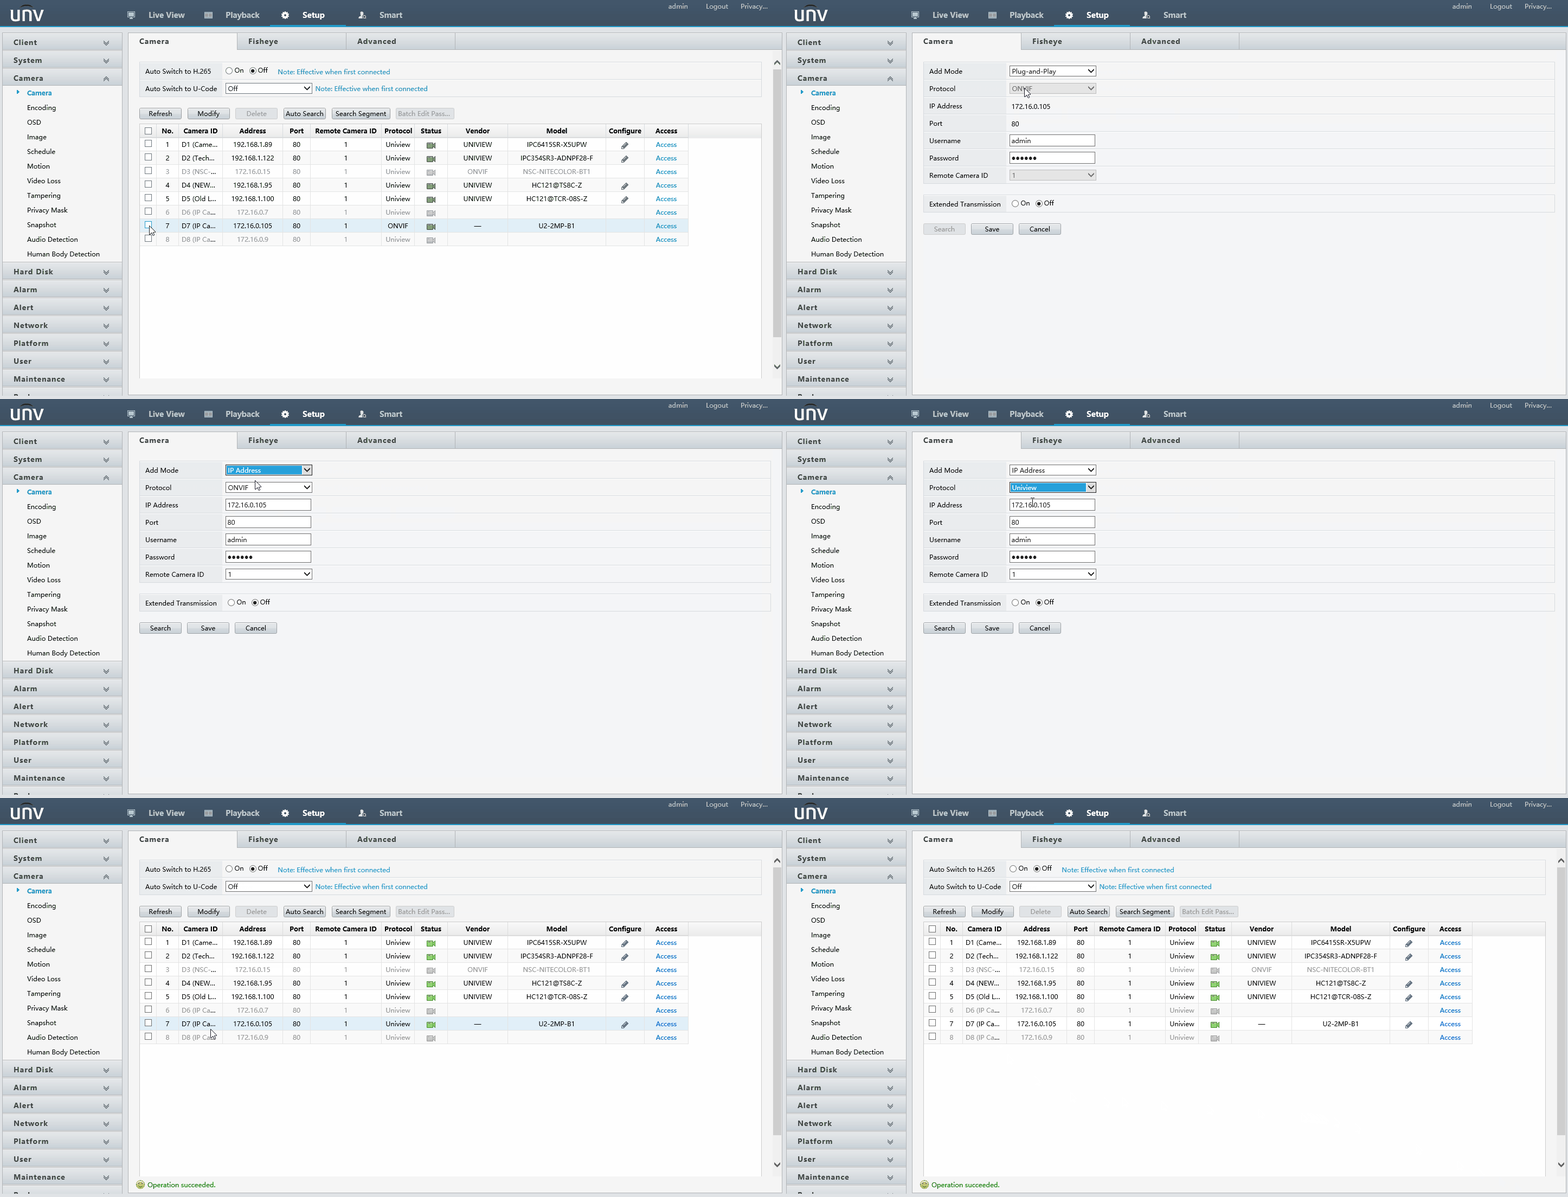
Now that the camera is talking via the Uniview protocol, the Smart Events are now available!
Please Note
Not all UNV cameras support Smart Events, be sure to verify what events the camera supports beforehand! If you are unsure what events a camera may support, feel free to contact our Support or check the camera’s spec sheet.
Also Note
This guide will work along with UNV Retail Cameras and UNV Blank NVRs. Just the protocol will be changed to Private instead of Uniview on the Blank NVR.
