Before Installation XVRView DVR Quick Setup Guide
This product may require cabling. It is strongly suggested to test all
products and parts before installation and cabling.
Load More : Topsview XVR Pro AeEye Smartviewepro Zosi Password Reset QR Code
Applications
The system is a standalone system. It need to connect with any monitor to
start live view (Such as PC monitor, TV etc.)
By adding a 3.5” SATA hard drive to the DVR, you can record&playback
videos.
By connecting the DVR to the Internet, you can view the cameras
anywhere anytime.
Note
This instruction is used to guide you install the system and remote
surveillance, more instructions please contact us
1 connecting your system:
1. Connecting your system
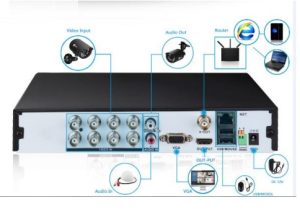
1 Connect the Camera to DVR and Plug Camera to power.
2 Connect monitor to the DVR with HDMI,VGA,BNC port
3 Connect the DVR to Router with an Ethernet cable
4 Plug the mouse to the USB port
5 Plug DVR to power1. Co
You will see the camera image on your screen within seconds
User Name: admin
Password: No password required, Pls just leave blank and login
Note: To protect your privacy, please right click Mouse > Go to Main
Menu > advanced>account> Users to change your password.
21 View on Smartphone
Step 1: connect the system with internet
A : how to connect DVR to LAN
Connect the DVR with router via Ethernet cable
B: setup the internet on DVR:
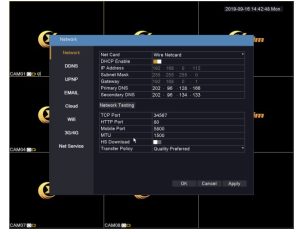
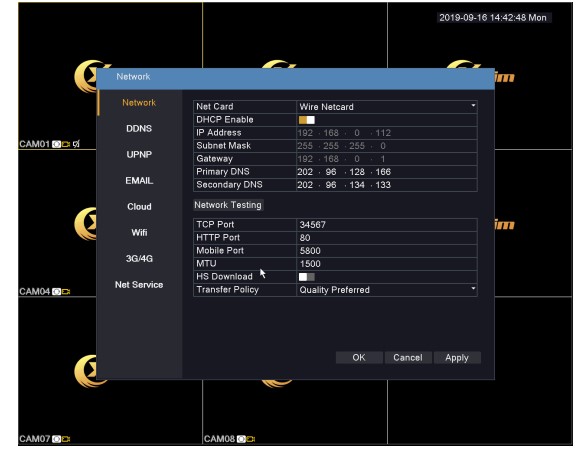
1 Right click the mouse>main menu>network
2 Please DHCP enable
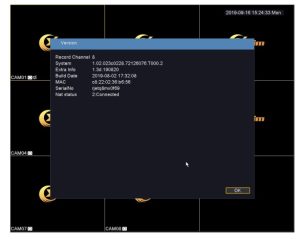
3 Check if the DVR connect with internet successful y. right click the
mouse to get into DVR main menu>version>Nat status, only the Nat
status says “connected, The DVR have internet access
Step 2: Download the APP
Steps3s
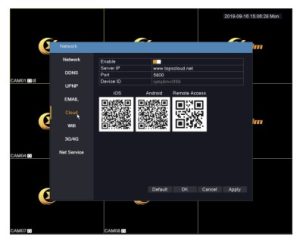
Search XVRView on APP store or google play, or scanning the QR code:
How to find the DVR QR code: right click mouse get into DVR main
menu>Netword>Cloud
Step 3: Run the APP
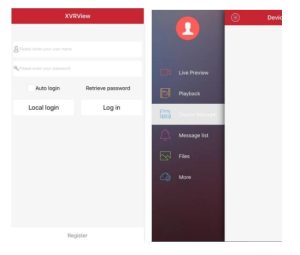
A: Install the free XVRView
B: Tap click local login or Register a new user
C: Login the App, Tap Device Manage > Tap + button.
3 on PC Client Software
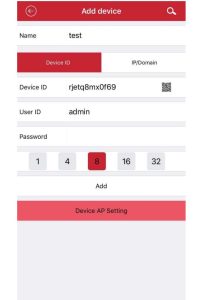
D: Config the following:
1 Name: make your own name.
2 Device ID: DVR SerialNo,you can find the SerialNo: main
menu>version>SerialNo
3 GID: Scan the QR code: right click the mouse>guide> Scan the “SN”
code
4 user’s name: admin
5 password: DVR login Password (default: No password, leave it blank)
6 channel: 4 or 8
3 View The Cameras on PC:
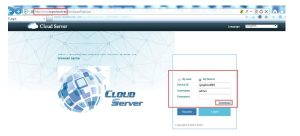
Open IE browser,enter into http://www.topscloud.net to log in Cloud
service network website.
1: Click “download” to download the activeX on your PC
Note: when first log in, you need install ActiveX, IE default stop the
ActiveX,so please go to <internet option>–<safe>–<custom
level>–<ActiveX>, and enable all ActiveX.
2 Choose by device: you can find the device id on DVR setting: main
menu>info>version>serial number
3 Enter the user and password, default is admin no password.
4 Record video:
If you system don’t come with hard drive, you have to install a SATA
3.5 inch internal hard drive to record. This system works with most
3.5”SATA Hard Disk or 3.5 internal hard disk.
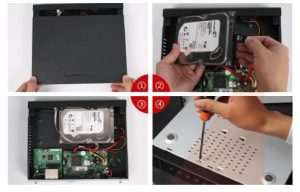
1. Install a Hard Disk (if your system has preinstalled Hard Disk,
please skip this step)
Unplug your DVR from power, unscrew and remove the top cover.
Connect the SATA power and data cables from the DVR to the
corresponding ports on your Hard Disk (as shown).
Place the Hard Disk into the DVR. Any cable should cross up over the
Hard Disk.
Holding the Hard Disk and the DVR, gently turn it over and line up the
holes on the Hard Disk with the holes on the
DVR. Using a screwdriver, screw the provided screws into the holes.
Assemble the cover.
Note: after you install a hard drive, please format the hard drive, right
click the mouse>main menu>record>HDD manage> format Disk
2 Setup to Record video:
Right click the mouse to get into DVR main menu>record>record
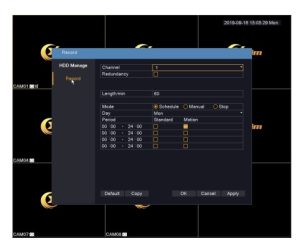
[Channel]: select the channel you want to record
Length/min: the recording video length
Schedule: Record according to the set video type (regular, detect, alarm)
and time section.
Manual: Record no matter the channel in any state.
Stop: Stop recording no matter the channel in any state.
Day: From Sunday to Saturday, if you select All.
[Recording type] set recording type.(Standard, Motion)
If you want to motion detection only, pls tick the square of motion only.
5 Playback video
Got into the DVR main menu>playback
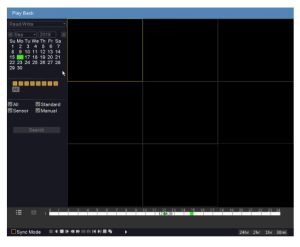
Record querying conditions include: file storing place, record
time,record channel, record type (regular, alarm, manual). After
chose the querying condition, click search button , If files exist, you
can see the corresponding color displaying in the time column, Click file
list button , you can see the files one by one displaying.
Double click the files you want to playback in the file list or click in the
time column to playback.
Sync Mode: Enable sync mode, multiple channels playback at the same
time.
Zoom in: Click left mouse to drag out an area, and then move mouse into
the area, after that click to enlarge, double click left mouse to exit
amplified state.
6 Motion detection Recording:
Get into the DVR main menu>sensor>motion detection
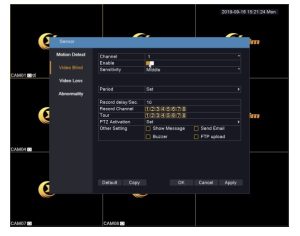
Select the channel you want to setup motion detect recording and tick
enable
Setup the sensitivity to minimize the false alarm
Region: you can select the motion detection area
Setup the the time duration
Setup motion detect linkage, tick send email, it will email alarm you
when motion triggered.
7 Email alert
Get into DVR main main menu>network>email
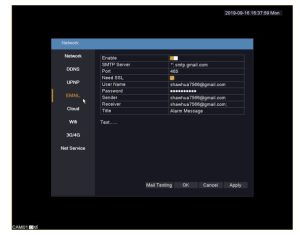
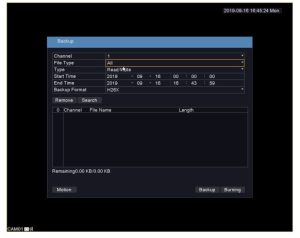
7 Video Backup
Plug in a USB flash disk to the DVR USB port
Get in the DVR main menu>backup
hello nice sharing thanks
Can you write your contact number?
I am having trouble with the installation
I can’t upload
It really worked, I appreciate it!
hi how can i do
hello nice sharing thanks
please provide support for me i leave my email address
please provide support for me i leave my email address
It really worked, I appreciate it!
can you help me please
my recorder is not working
I really love you
hi how can i do
I am having trouble with the installation
I really love you
please provide support for me i leave my email address
please provide support for me i leave my email address
I really love you
hi how can i do
hi how do i reconnect to device from my phone
hi how do i reconnect to device from my phone again