Dahua XVR Remote Access Full Guide, Remote Access Setup Setup Remote Access via Portforwarding(IP) Locate Device on Network Browser Configure Internet Explorer to Access System Setup Remote Access via P2P-No Sign Up(Browser) Setup Remote Access via P2P-w/Account Sign Up(Browser) SmartPSS etup Remote Access via P2P(SmartPSS) DDNS DNS Setup etup Dahua DDNS etup No-IP DDNS etup Quick DDNS Other iew RSTP Stream via VLC -Way Talk Setup TP Setup end Snapshot via FTP UPNP Function PNP Setup POE Setup TP Multicast Setup
Create port forwarding rule in the router
Description
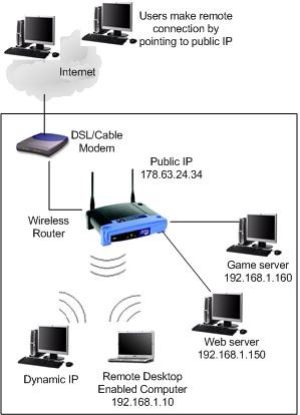
Port forwarding is a function of network routers that allows a user to configure specific communication ports to be routed to devices on an IP (Internet Protocol) network, such as a computer, DVR, or IP camera.In this case for CCTV equipment, it allows the user to view and control CCTV equipment remotely. Follow the step by step instructions and the instructions your manufacturers hardware to setup port forwarding, or try PortForward.com to search for your routers settings.
Prerequisites
Video Instructions
Step by Step Instructions
1. Connect NVR to network with a CAT5 cable.
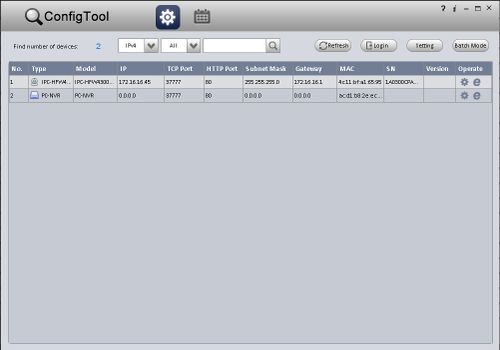
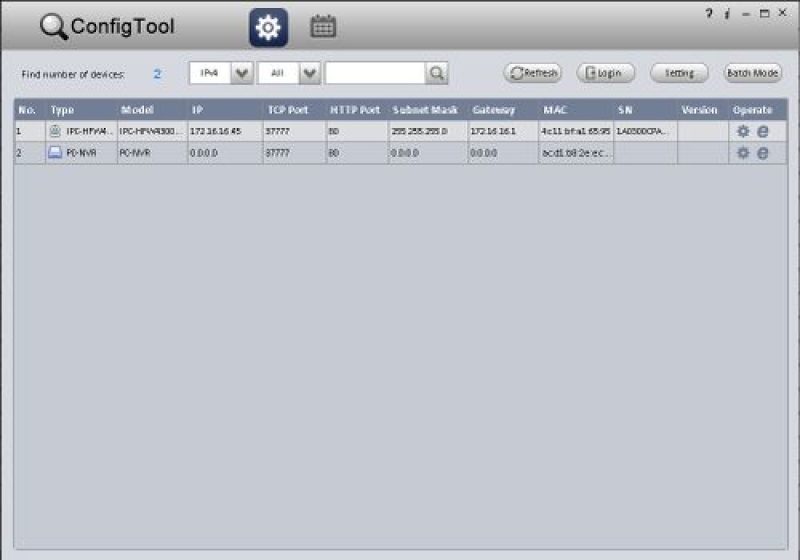
2. Download and install ConfigTool from DahuaSecurity.com, under Support->Download Center->Software
3. Run the ConfigTool.
4. The ConfigTool should display your IP Camera. Click the, “![]() ” icon to open Internet Explorer and access your NVR.
” icon to open Internet Explorer and access your NVR.
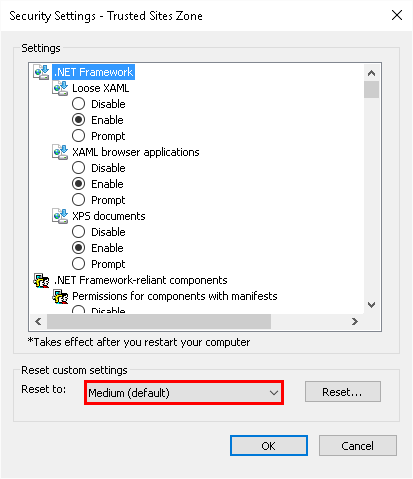
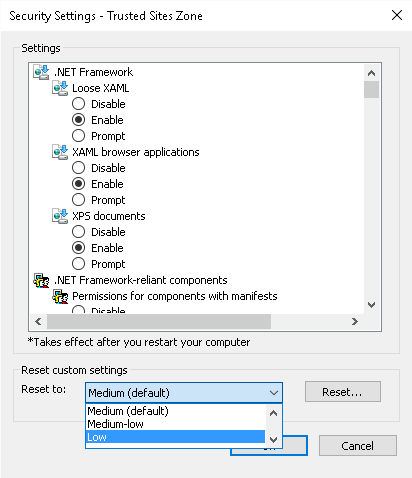
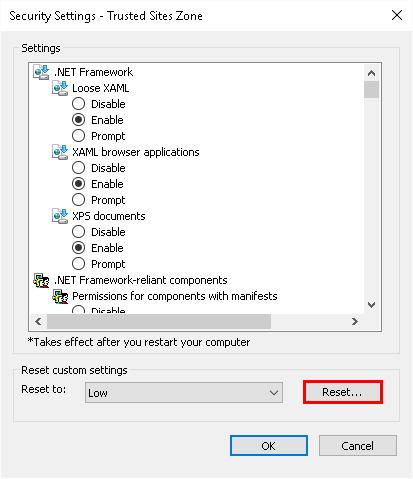
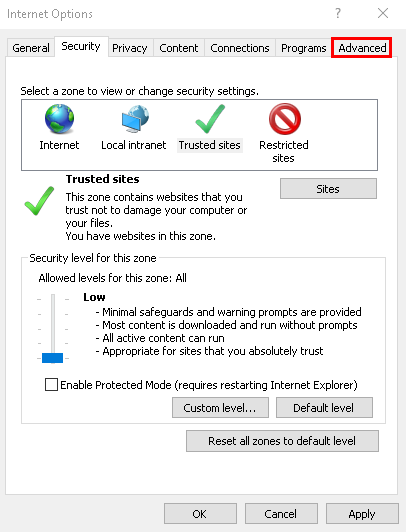
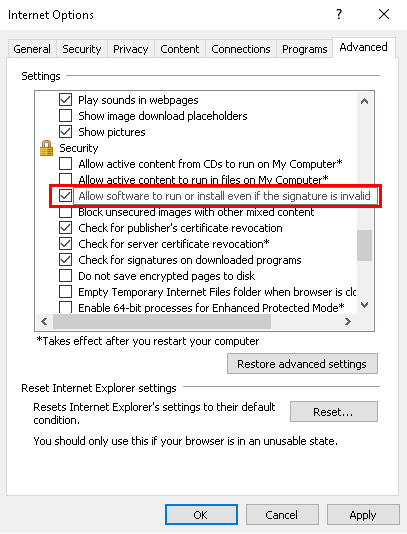
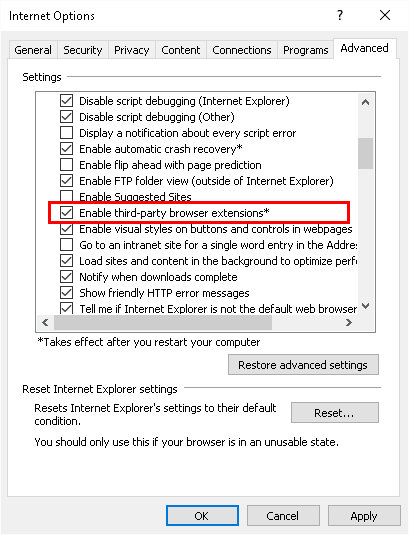
5. Configure Internet Explorer security settings to allow the plugs to work. Link to Internet Explorer Setup
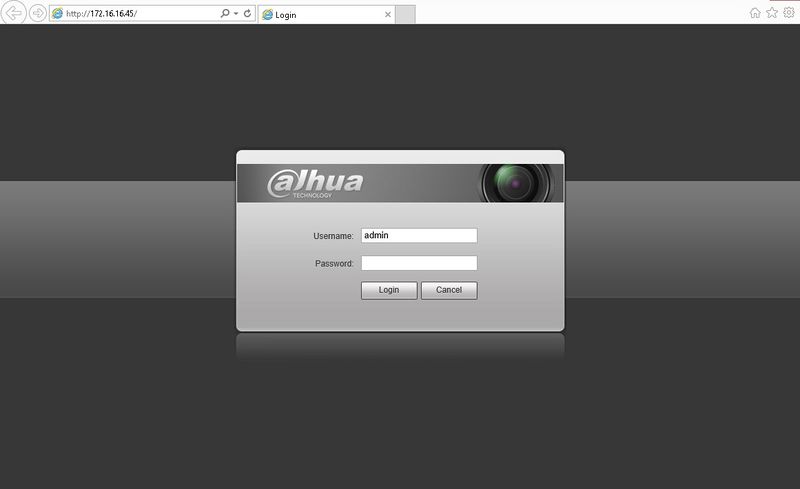
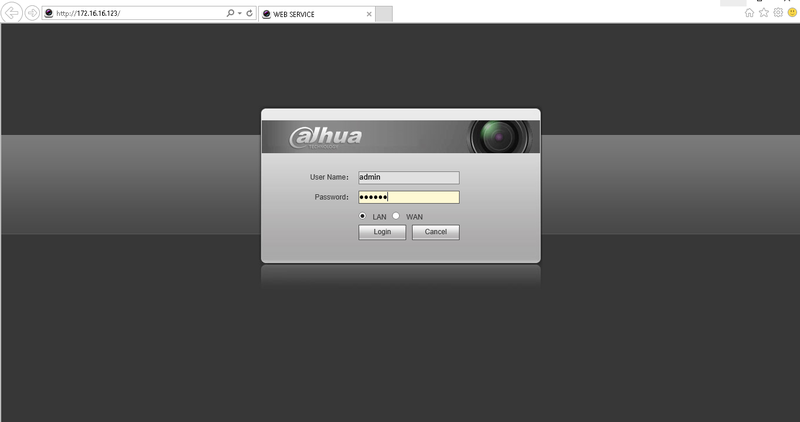
6. Login with the default credentials: User Name: admin Passsword: admin
7. Under, Main Menu -> Setup -> TCP/IP Change the IP Camera to, “Static” if the camera is currently set to, “DHCP”
8. Open another tab and enter the, “Gateway” address listed under your NVR’s Network settings. Example: 192.168.1.1, 192.168.0.1, 10.0.10.1
9. Login to your gateway and locate the, “Port Forwarding” section.
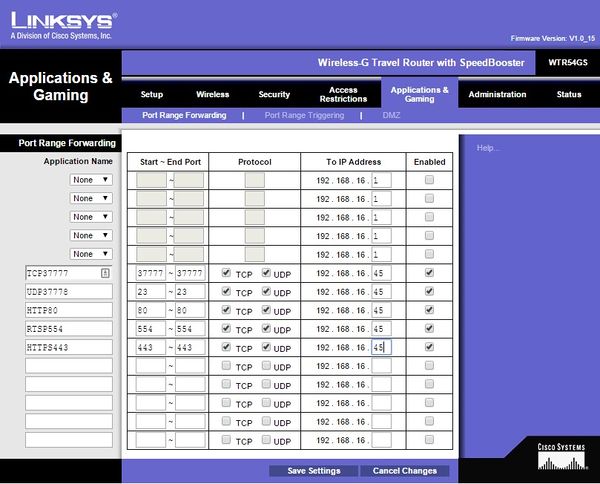
10. Create port forwarding rules for each port you wish to forward for the NVR. (Usually you will only need to forward the HTTP and the TCP port.) Default Ports: TCP: 37777 UDP: 37778 HTTP: 80 RTSP: 554 HTTPS: 443
11. The end result should look like the below image. We used a Cisco router for this example.
12. Hit, “Save” in the gateway interface, and open another tab.
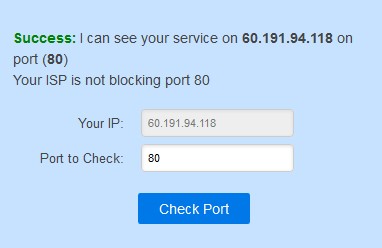
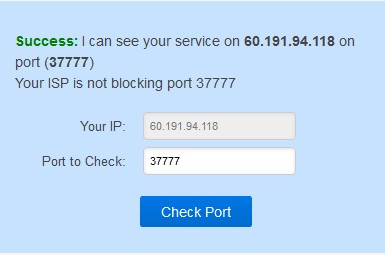
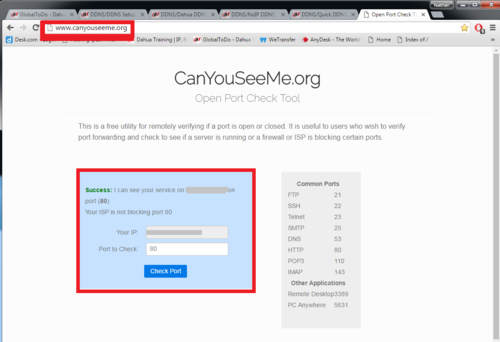
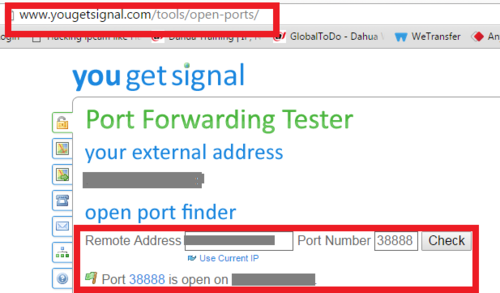
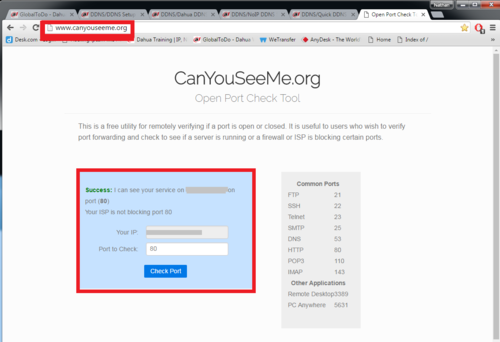
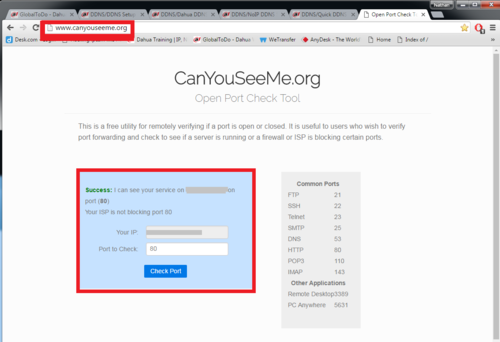
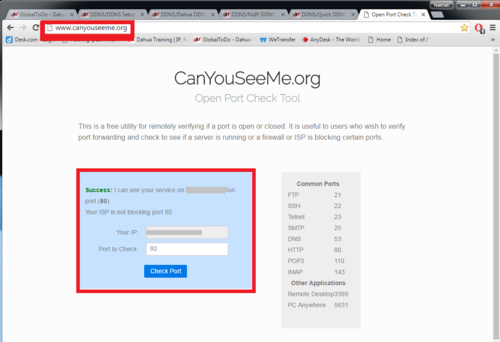
13. Go to, “www.canyouseeme.org” and check that the ports you opened on the gateway.
Dahua XVR Remote Access Full Guide
Read Also : 2MN NVR XVR Troubleshooting 2024
How to locate device on LAN via ConfigTool 3.20
Description
Prerequisites
Video Instructions
Step by Step Instructions
Note: If your IP Camera is connected to the back of an NVR, these instructions will not apply. Please see, “How to Connect IP Camera to NVR” 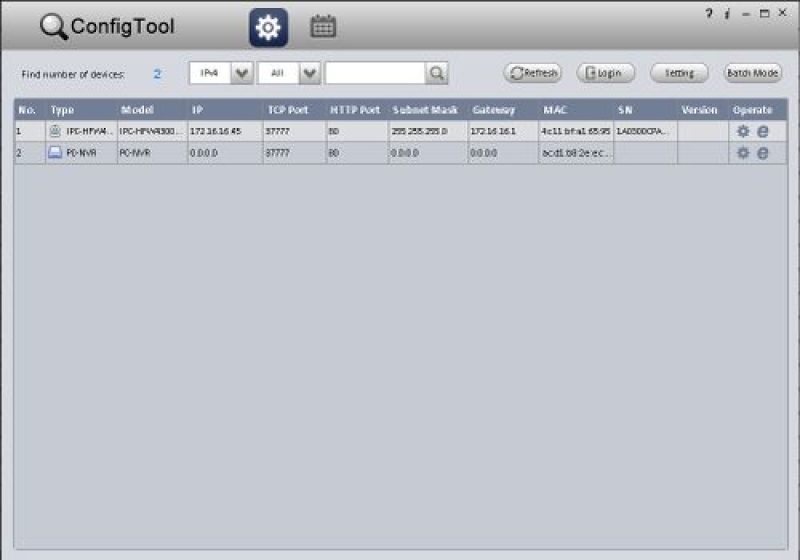
1. Download and install ConfigTool.
2. Run the ConfigTool.
3. The ConfigTool should display your IP Camera’s IP address. Click the, “![]() ” icon to open Internet Explorer and access your IP Camera. Alternatively, you can input that IP address into your browser manually.
” icon to open Internet Explorer and access your IP Camera. Alternatively, you can input that IP address into your browser manually.
4. Login with the default credentials: User Name: admin Passsword: admin
Configure Internet Explorer Security Settings
Prerequisites
Video Instructions
Step by Step Instructions
1. Open Internet Explorer.
2. Click on the gear icon in the upper right hand corner
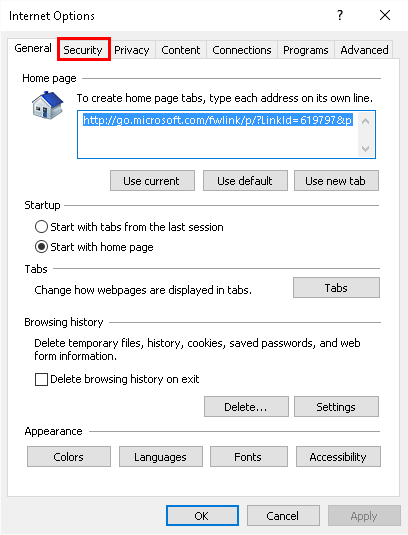
3. Click, “Internet Options”
4. Click the, “Security” tab.
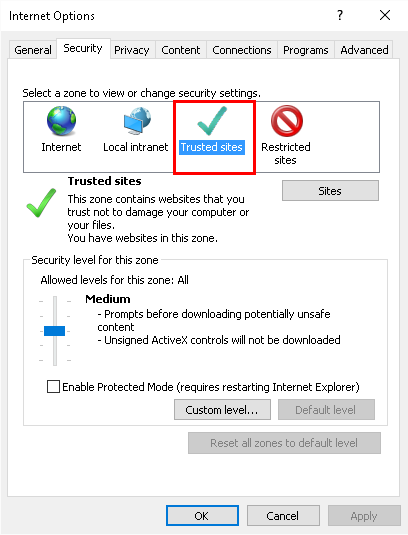
5. Click the, “Trusted sites” icon.
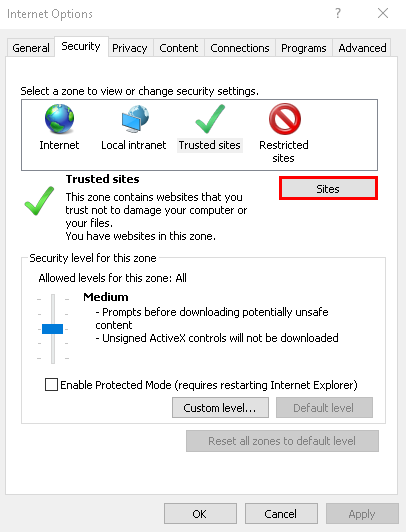
6. Click the, “Sites” box immediately below the zones.
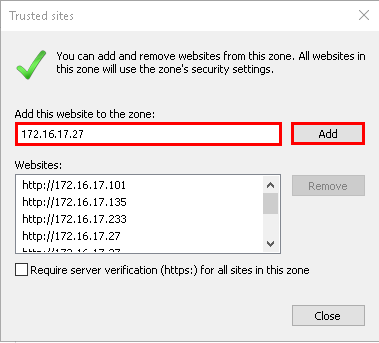
7. Input your devices IP address into the top box, click, “Add” and then, “Close”
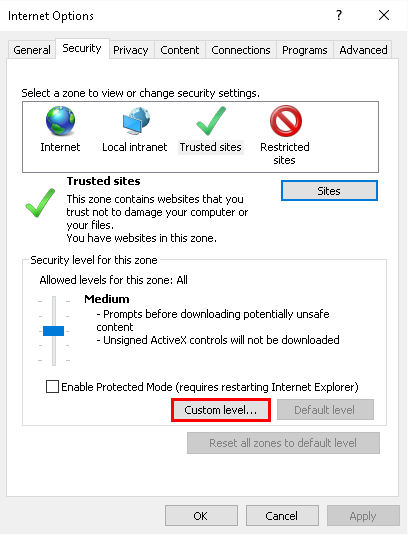
8. Click, “Custom level…”
9. Click the drop down box at the bottom of this window, and change the setting to, “Low”
10. Click, “Reset” and then, “Yes” in the confirmation dialogue.
11. Click on the, “Advanced” tab.
12. Ensure the following are ENABLED:
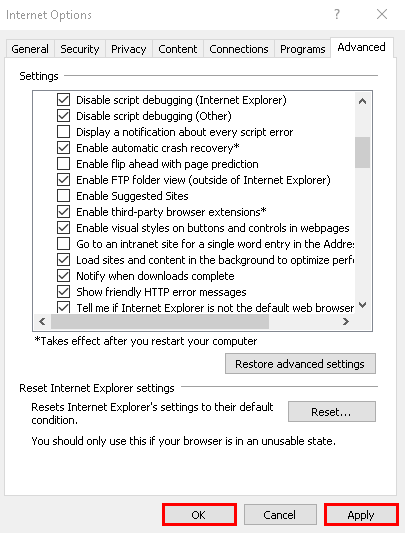
13. Click, “Apply” and then, “OK”
14. Reboot your computer, and try to access your system.
Add a Device via P2P using SmartPSS
Description
This allows you to add cameras or recorders via P2P to SmartPSS
Prerequisites
Video Instructions
Step by Step Instructions
1. Locate the serial number of your NVR or DVR. The serial number can be found at the following locations:
On the underside or side of the unit
In the web interface, under Info->Version
On the system interface under Main Menu->Settings->Network->P2P
On the system interface under Main Menu->Info->System->Version
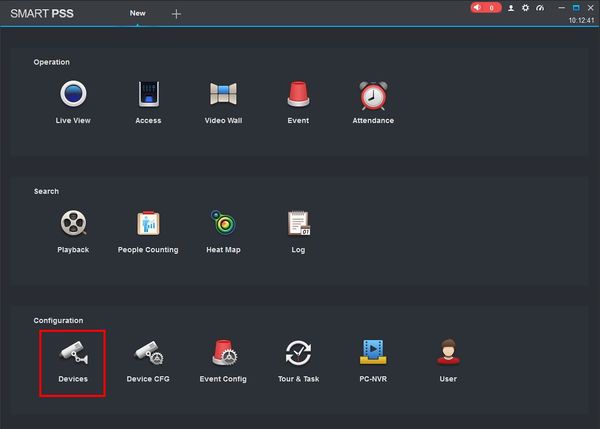
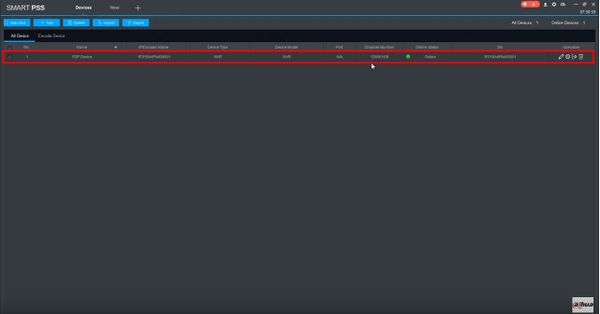
2. Launch SmartPSS. At the main page click Devices
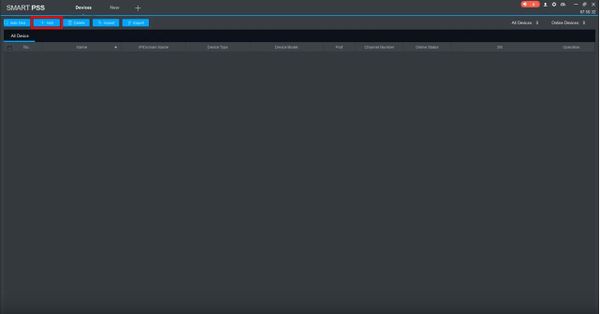
3. Click +Add to add a device
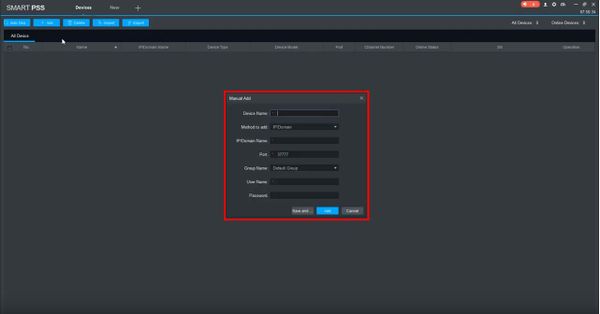
4. The Manual Add window will appear.
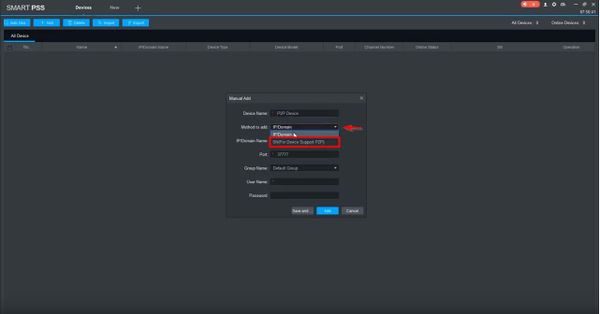
5. Use the drop-down box to change ‘Method to add’ to ‘SN(For Device Support P2P)’
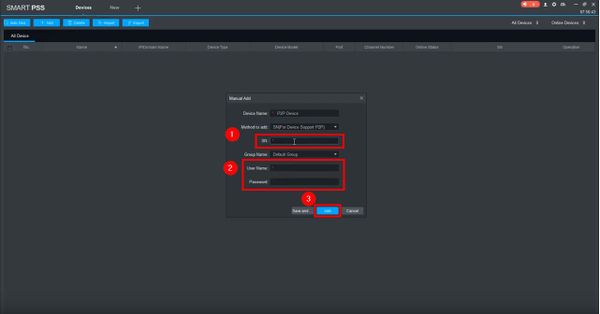
6. Enter the Serial Number for the unit in the field SN.
Enter the username and password for the device then click Add
7. The added device will appear in the Device List
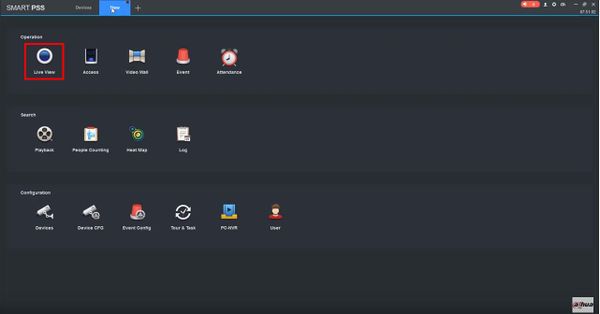
8. From the main page of SmartPSS click Live View
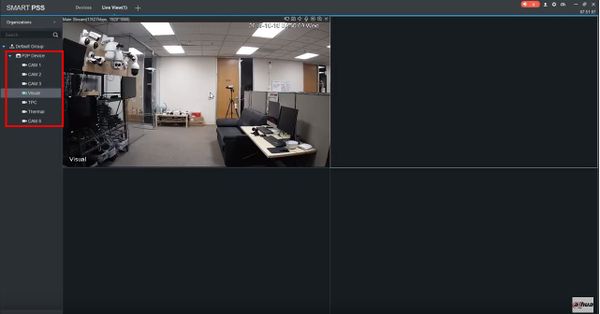
9. The added device will apear in the Device List and can be expanded to view all video channels from the device.
DDNS Setup
Description
DDNS stands for Dynamic Domain Name System. The main advantage for DDNS is If you have a dynamic ip address, (where your address can change monthly by your ISP if not static) the DDNS service will track and update with your new IP address automatically. So no matter what your numeric IP address is, your DDNS address will work even if your numeric IP address changes.
Prerequisites
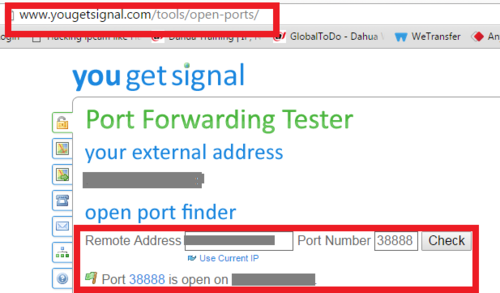
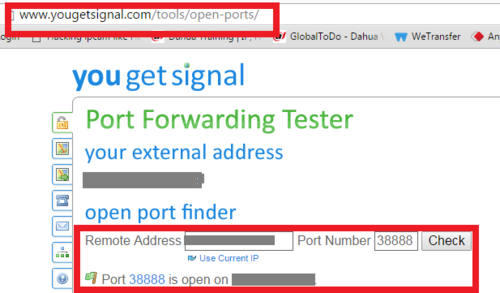
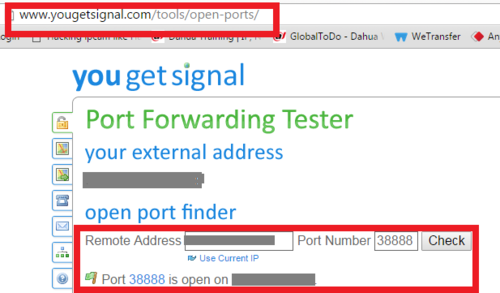
(port 37777 is default, 38888 is an example)
Video Instructions
Step by Step Instructions
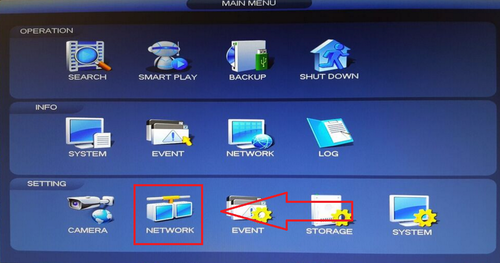
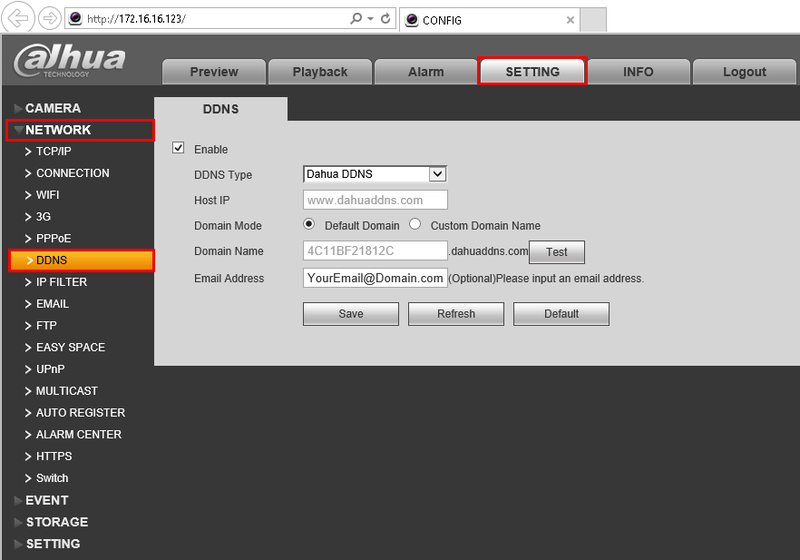
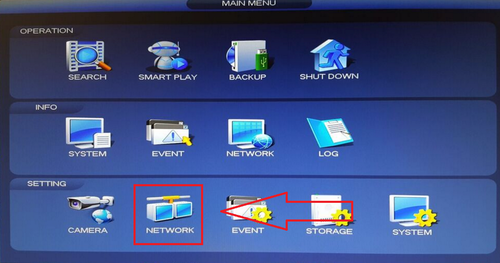
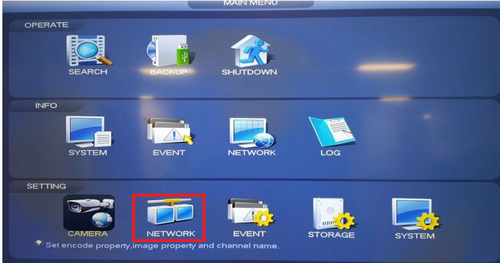
Step 1. From the Main Menu Select Network
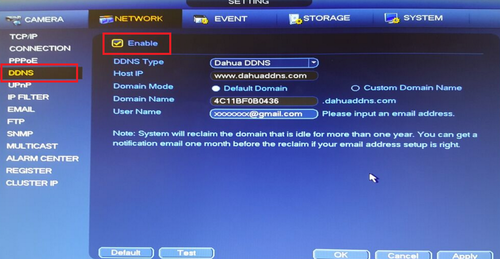
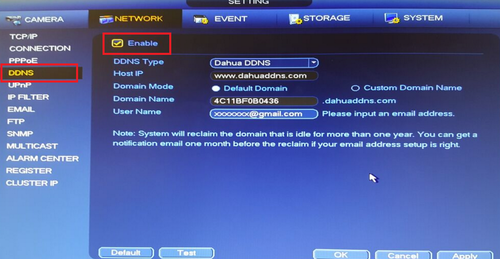
Step 2. Select DDNS ➞ Check off the “Enable” box.
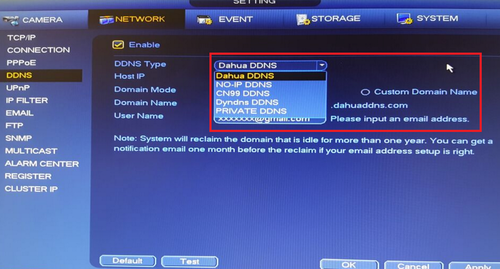
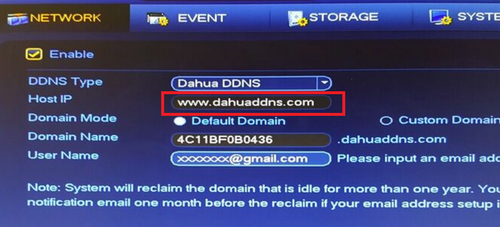
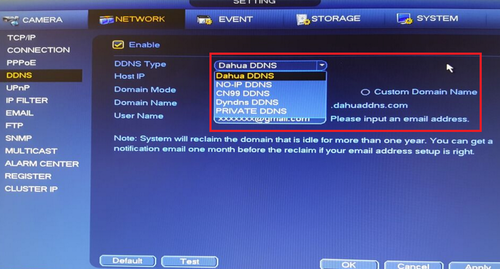
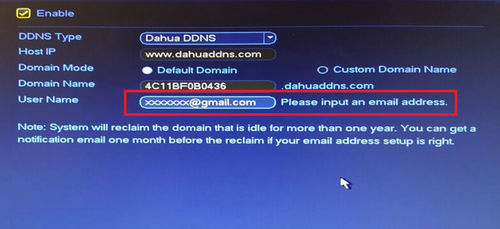
Step 3. Select “DDNS Type” from the Drop Down menu. Please Note depending on the series model of the recorder you will have either Dahua DDNS or Quick DDNS as one of the options from the drop down menu.
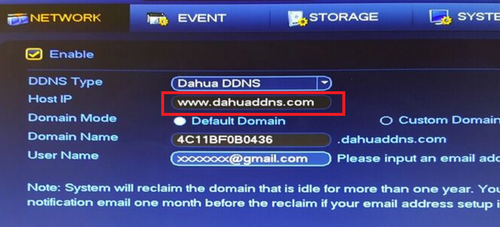
After DDNS is selected it will automatically generate a Host IP. In this case because Dahua DDNS is an option it is www.dahuaddns.com . If Quick DDNS is an option it will automatically generate the designated www.quickddns.com as the host IP.
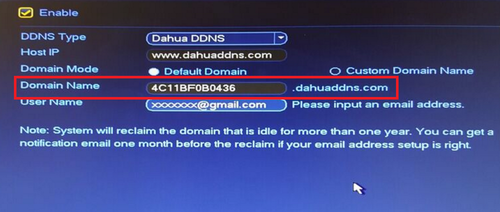
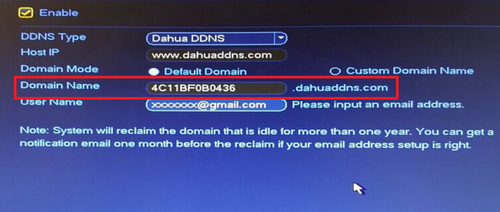
Step 4. Select either “Default Domain” or “Custom Domain Name”. By Selecting “Default Domain” a Domain Name for the device recorder is the MAC address for this recorder. In this case 4C11BF0B0436.dahuaddns.com is the designated default domain name for this particular recorder. By selecting “Custom Domain Name” you may choose a custom name up to 60 max characters. Please note if you are using a custom domain name you cannot use the same custom domain name from or for another device.
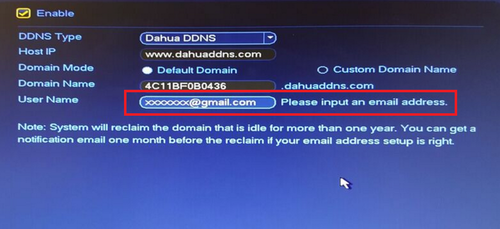
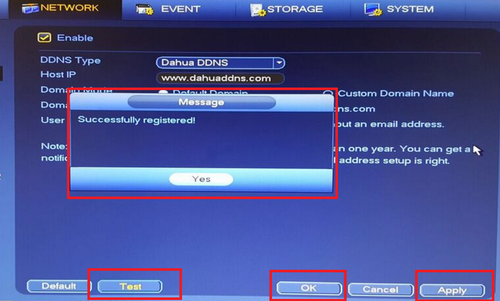
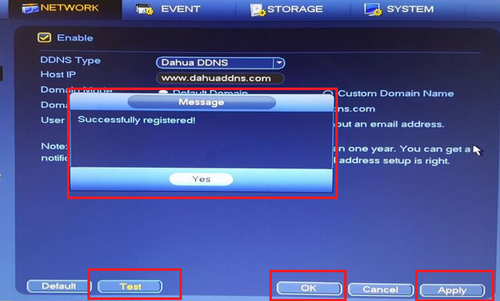
Step 5. Input your email address ➞ Select “Test” and if successful it will prompt a pop up “Successfully Registered” ➞ Select “Yes” ➞ Select “Apply” ➞ Select “OK” to save settings.
DDNS Web Registration and Management
For QuickDDNS Go to www.quickddns.com
For DahuaDDNS Go to www.Dahuaddns.com
Please Note You cannot access the settings, live view or playback of the recorder through DDNS.
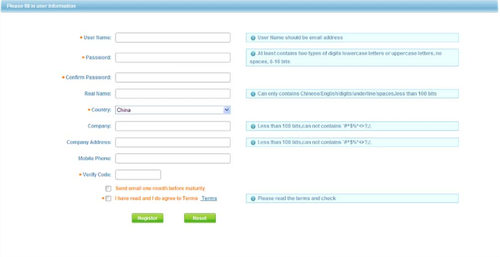
Step 1. DDNS Registration Click on Not registered link → Enter the registration page → Follow system instructions to complete registration.
Step 2. Go to The email you registered with to activate ddns account.
Step 3. After you have activated your username, you can log in DDNS website to manage and view devices under your account. When you login DDNS website, go to Equipment where you can view and manage devices under your account. Click on device domain name link to open corresponding Web interface.
Dahua DDNS Setup
NOTICE
Notice of Discontinuation of DahuaDDNS & QuickDDNS
Click Here to Download PDF Document
Description
DDNS stands for Dynamic Domain Name System. The main advantage for DDNS is If you have a dynamic ip address, (where your address can change monthly by your ISP if not static) the DDNS service will track and update with your new IP address automatically. So no matter what your numeric IP address is, your DDNS address will work even if your numeric IP address changes.
Prerequisites
(port 37777 is default, 38888 is an example)
Video Instructions
Step by Step Instructions
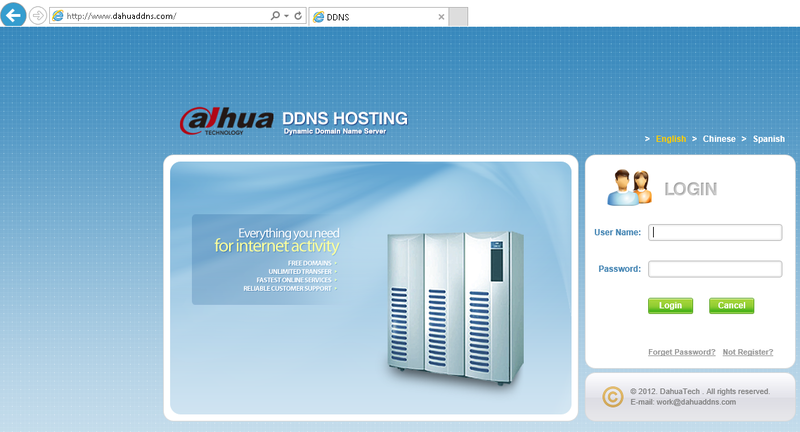
1. Go to www.DahuaDDNS.com and
2. Click, “Not Registered”
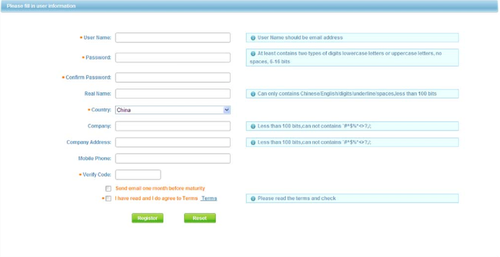
3.Input your information, and click, “Register”
4. Open your email and locate the activation email. Click the link in that email.
5. If you see the below message, please proceed with the below instructions. 
Enable Domain Name Access on Device
1. After the device boots up, please wait 1 to 3 min until the network indicator becomes green.
2. Locate your device with the ConfigTool. Click Here to Download ConfigTool.
3. Input your device’s IP address into Internet Explorer, and login.
4. Go to Settings -> Network -> DDNS
5. Click, “Test” once the test is complete, click, “Save”
DDNS Setup No-IP
NOTICE
Notice of Discontinuation of DahuaDDNS & QuickDDNS
Description
This article is a step by step setup guide for NoIP DDNS. NoIP DDNS is Dynamic Domain Name System which is a method of automatically updating a name server. This is primarily used if your public IP address on the internet changes from time to time (dynamic IP). Setting this feature up will give you another configured hostname.
Prerequisites
(port 37777 is default, 38888 is an example)
Video Instructions
Step by Step Instructions
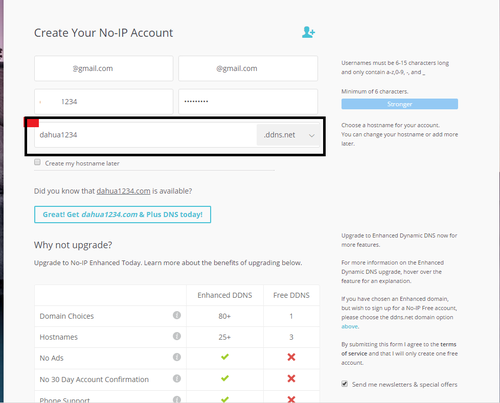
1. Go to https://www.noip.com/
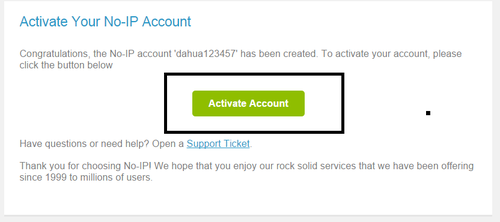
2. Create an account -> Go to your email registered with noip.com. An email activation will be sent to your registered email to activate noip.com account.
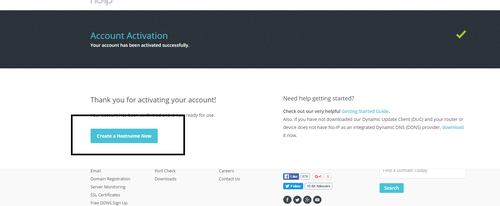
3. Once account is activated select “Create Host Name Now”
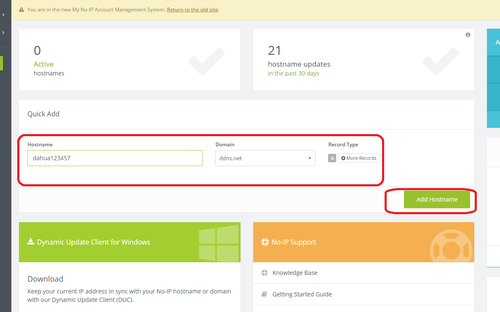
4. Input a host name of your choice > Select Add “Host Name”
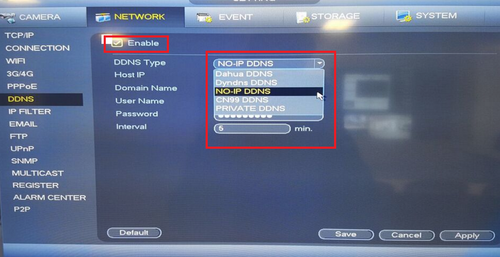
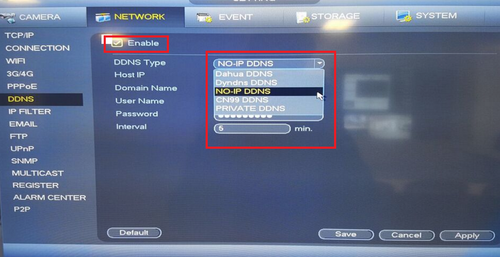
5. Login into Recorder via Web Service or Physical recorder. From the Main Menu select the network tab > Select DDNS on the left hand side. Check off “Enable” > Click on Drop down to select “No-IP”
6. Input host IP > Domain Name > User Name > Password > Do not forget to click “APPLY” to save settings.
Enabling Quick DDNS from Local Recorder
Description
This article is a step by step setup guide for Quick DDNS. Quick DDNS is Dynamic Domain Name System which is a method of automatically updating a name server. This is primarily used if your public IP address on the internet changes from time to time (dynamic IP). Setting this feature up will give you another configured hostname.
Prerequisites
(port 37777 is default, 38888 is an example)
Video Instructions
Step by Step Instructions
1. From the Main Menu Select Network
2. Select DDNS ➞ Check off the “Enable” box.
3. Select “DDNS Type” from the Drop Down menu. Please Note depending on the series model of the recorder you will have either Dahua DDNS or Quick DDNS as one of the options from the drop down menu.
After DDNS is selected it will automatically generate a Host IP. In this case because Dahua DDNS is an option it is www.dahuaddns.com . If Quick DDNS is an option it will automatically generate the designated www.quickddns.com as the host IP.
4. Select either “Default Domain” or “Custom Domain Name”. By Selecting “Default Domain” a Domain Name for the device recorder is the MAC address for this recorder. In this case 4C11BF0B0436.dahuaddns.com is the designated default domain name for this particular recorder. By selecting “Custom Domain Name” you may choose a custom name up to 60 max characters. Please note if you are using a custom domain name you cannot use the same custom domain name from or for another device.
5. Input your email address ➞ Select “Test” and if successful it will prompt a pop up “Successfully Registered” ➞ Select “Yes” ➞ Select “Apply” ➞ Select “OK” to save settings.
DDNS Web Registration and Management
For QuickDDNS Go to www.quickddns.com
For DahuaDDNS Go to www.Dahuaddns.com
1. DDNS Registration Click on Not registered link → Enter the registration page → Follow system instructions to complete registration.
2. Go to The email you registered with to activate ddns account.
3. After you have activated your username, you can log in DDNS website to manage and view devices under your account. When you login DDNS website, go to Equipment where you can view and manage devices under your account. Click on device domain name link to open corresponding Web interface.
View the RTSP stream with VLC media player
Prerequisites
Example URLs
Video Instructions
Step by Step Instructions
1. Download and install VLC. Click here to go to VLC Homepage
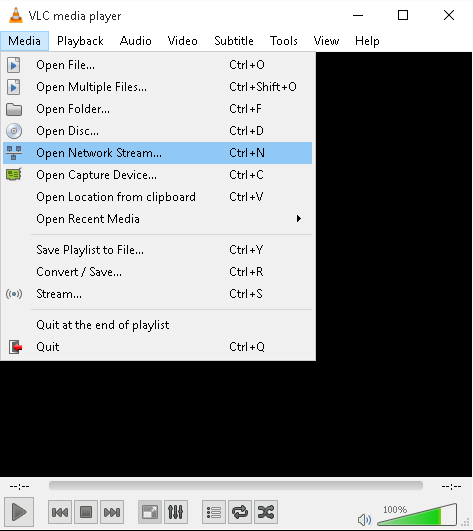
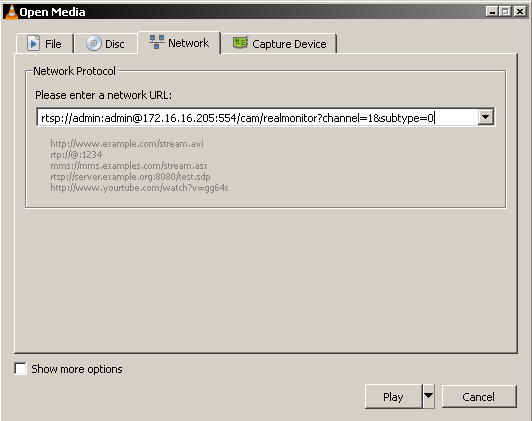
2. Click Media—Open Network Stream.
3. Input RTSP URL in Network Tab.
4. Click Play button, then the video will display.
About the URL of the RTSP, please see the explanation as follows.
URL Syntax
rtsp://:@:/cam/realmonitor?channel=&subtype=
For example, we request the extra stream 1 of channel 1,the URL is: rtsp://admin:admin@10.7.6.67:554/cam/realmonitor?channel=1&subtype=1.
The IP Camera supports both TCP and UDP transmission forms. It also supplies basic authentication and digest authentication ways.The authentication process is similar with 3.2 Authentication.
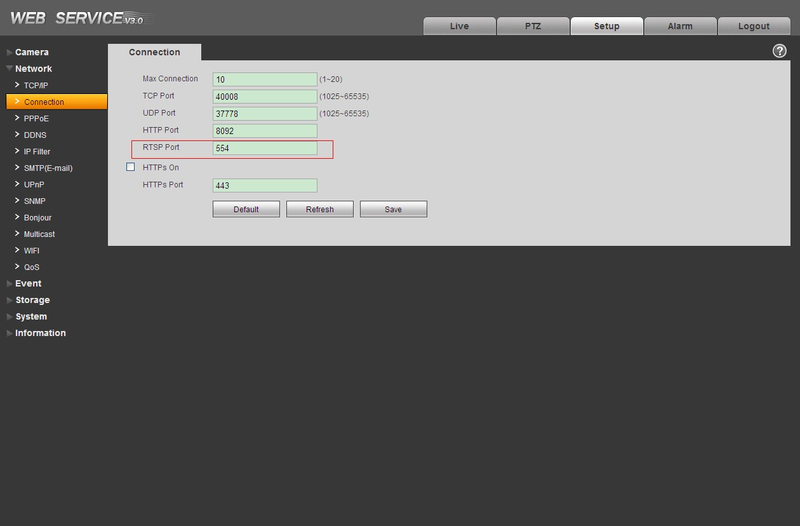
For the RTSP port, it is 554 in default, If it was changed, please change the port number in the RTSP URL.
For the IPC, you can see the RTSP port in the Web page:
Two Way Talk Setup
Description
This section will show how to setup / use Two Way Talk function with Dahua devices.
Testing
Computer Audio Setup Prerequisite (WebUI, SmartPSS and DSS Express)
Typical Computer Audio Interface (inputs/Outputs)
Microphone plugged into Microphone input (red) Speaker plugged into Output (green)
Both Microphone and speaker plugged into computer
SystemUI Old
Prerequisites
Video Instructions
Step by Step Instructions
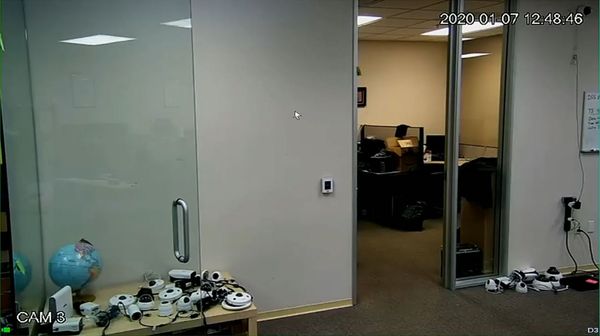
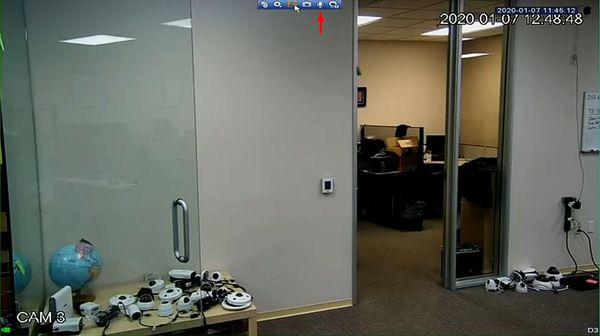
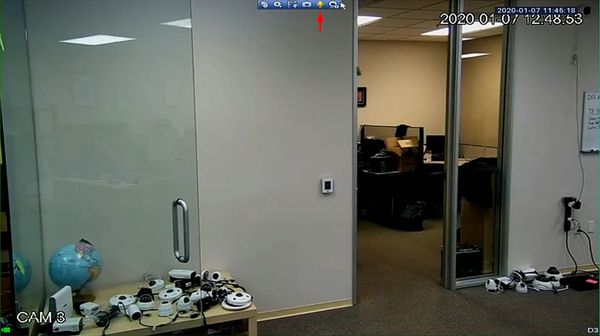
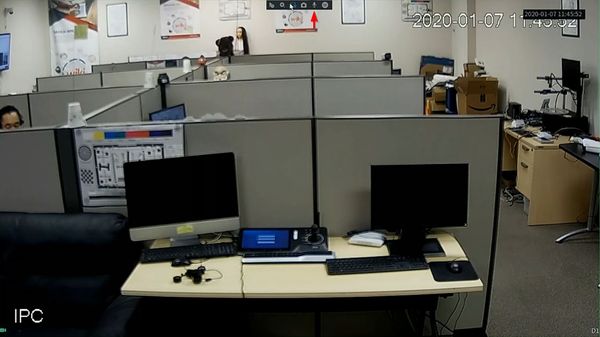
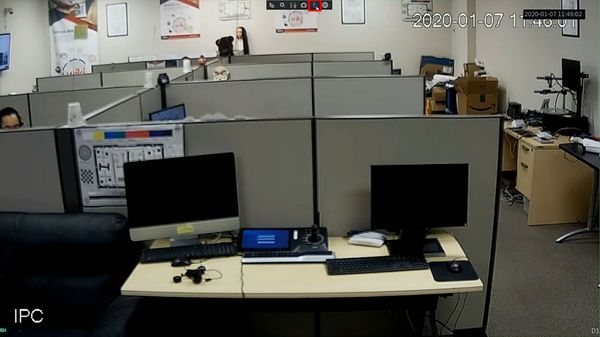
1. From Live View
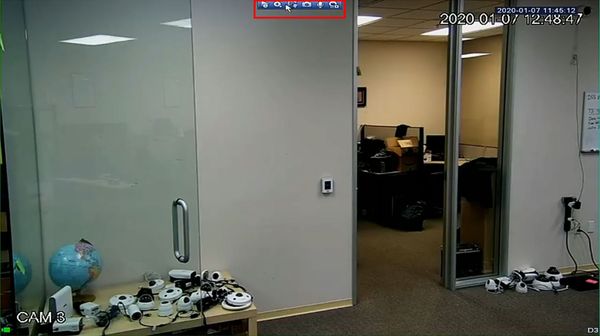
2. Hover the mouse cursor near the top of the screen until the bar appears
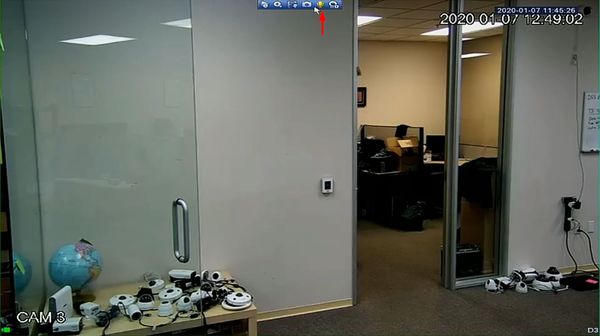
3. Click the Microphone icon to begin Two Way Talk
4. The icon will highlight when Two Way Talk is active
5. Click the icon again to end Two Way Talk
SystemUI New
Prerequisites
Video Instructions
Step by Step Instructions
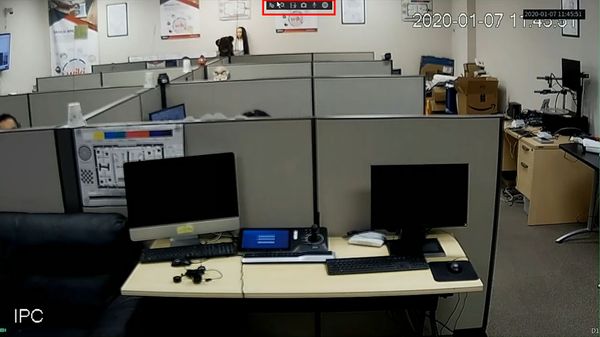
1. From Live View
2. Hover the mouse cursor near the top of the screen until the bar appears
3. Click the Microphone icon to begin Two Way Talk
4. The icon will highlight when Two Way Talk is active
5. Click the icon again to end Two Way Talk
How to Setup FTP to Record Snapshots and Sub-Stream
1. Download SmallFTPD from the following link: http://sourceforge.net/projects/smallftpd/
2. In the root of one of your hard drives, create a folder titled, “FTP”
3. Locate the file you downloaded and extract the contents of the zipped file to the FTP folder you just created in the root of your hard drive.
Your computer should look similar to the image above.
4. Double click, “smallftpd.exe“
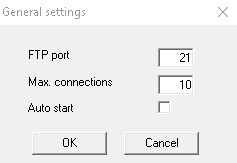
5. Click, “Settings” and then, “General”
6. Note the port, and click, “OK”
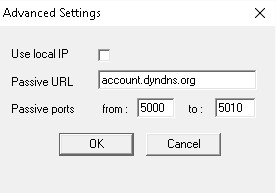
7. Click, “Settings” and then, “Advanced”
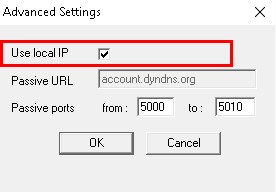
8. Click the box next to, “Use local IP” and click, “OK”
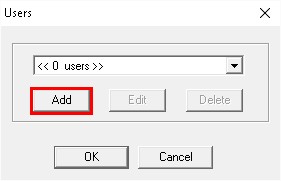
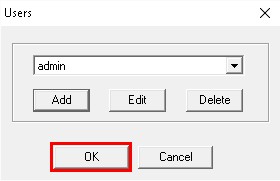
9. Click, “Settings” and then, “Users”
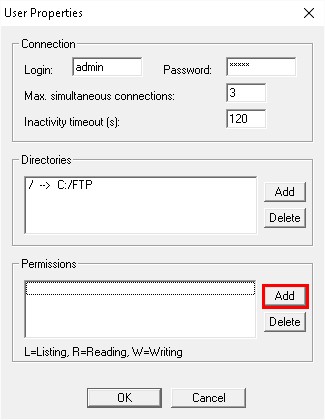
10. Click, “Add”
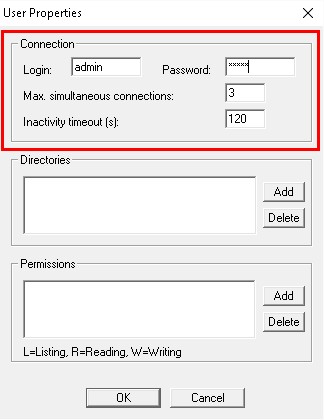
11. Input the following:
Login: admin
Password: admin
Max. simultaneous connections:3-100
Inactivity timeout(s): 999
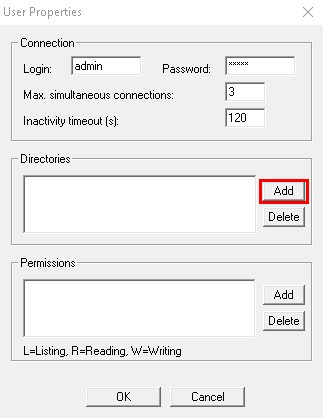
12. Under Directories click, “Add”
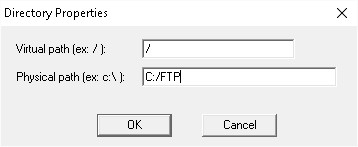
13. Leave Virtual Path set to, “/” and set the Physical path to, “C:/FTP” and click, “OK”
14. Under Permissions click, “Add”
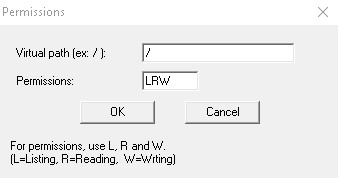
15. Leave Virtual Path set to, “/” and set the Permissions to, “LRW” and click, “OK”
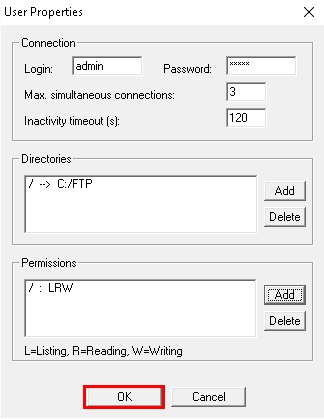
16. Click, “OK” to exit the User Properties.
17. Click, “OK” to exit the User Menu.
18. Click the, “Play” button to start the FTP server.
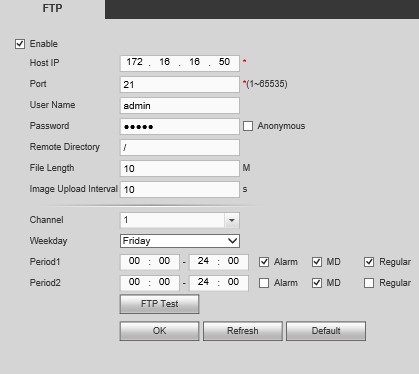
19A. For a NVR or DVR, go to Main Menu-> Settings -> Network -> FTP, and input the following: NVR or DVR
Host IP: (Your PC’s IP address)
Port: 21 or the port you setup earlier in SmallFTPD
User Name: admin
Password: admin
Remote Directory: /
File Length: 10-512
Image Upload Interval: 10-60
Channel: (any)
Period: (any)
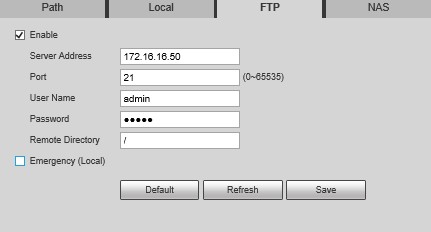
19B. For an IP Camera, login to the IP Camera via web browser and navigate to, Setup-> Storage -> Destination -> FTP, and input the following:
IP Camera
Server Address:(Your PC’s IP address)
Port: 21 or the port you setup earlier in SmallFTPD
User Name: admin
Password: admin
Remote Directory: /
Once complete click, “Save” or “OK”
20. Once complete, check the SmallFTPD and the “C:/FTP” folder. They should look like the below images:
How To Setup FTP Snapshot
Please Note You must have an FTP currently set up for this to work.
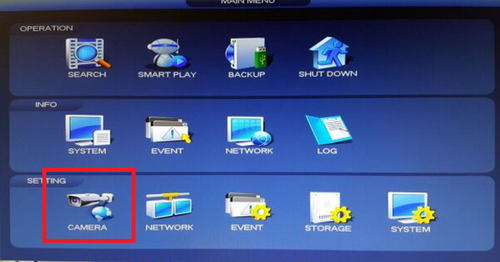
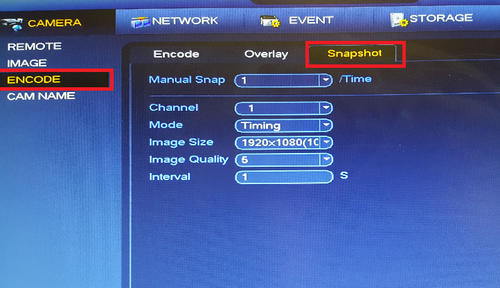
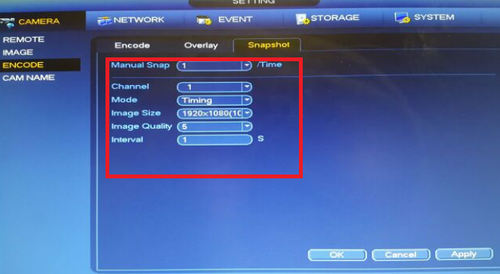
Step 1. From the Main Menu Select Camera > Encode > Snapshot
Step 2. Select Manual Snap Time. This selection will determine how many snapshots are taken at a time.> Select Channel you want snapshot enabled for > Select Mode Trigger or Timing. Trigger is for events such as motion detect or alarm. You can use timing to set periods for which day of the week and or time you want to snapshot > Select image size > select image quality > select interval > Select “Apply” > Select “OK”
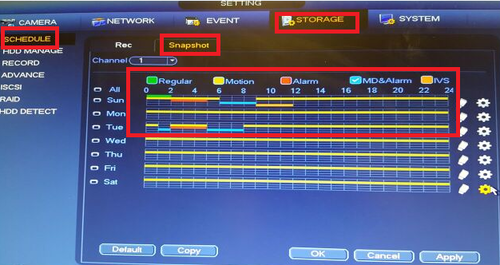
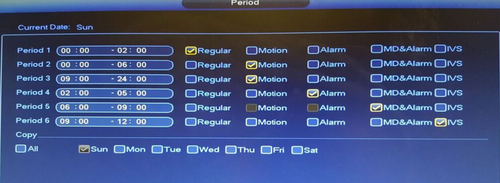
• For Timing Go to the Storage tab > Select Schedule Select Snapshot > Choose which type of event snap shot such as motion, alarm and or IVS if model has IVS capabilities. > Set schedule for which event for the periods, days and hours you wany snapshots set for.
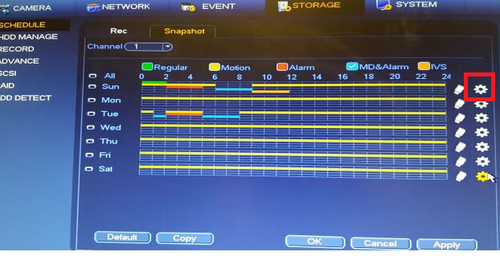
• You can also set the schedule by selecting the settings icon.
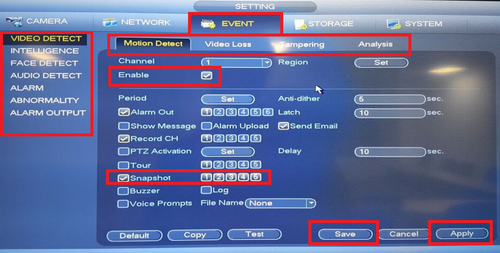
•For Trigger Go to Event tab > Choose event type > Check Enable > Check Snapshot and channels > Repeat process for the different types of events > Apply > Save
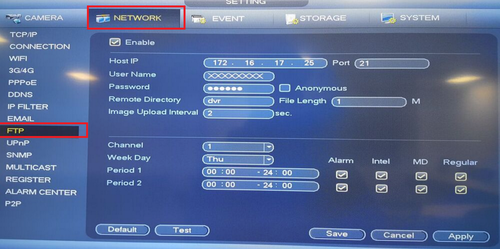
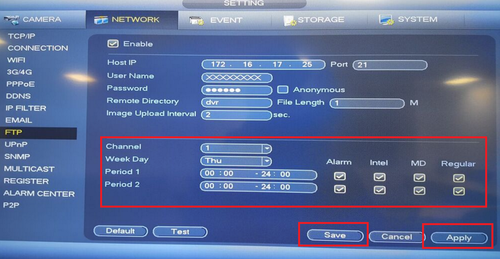
Step 3. Select Network Tab > Select FTP
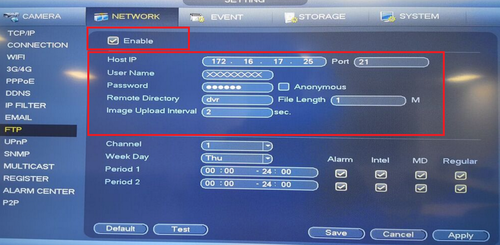
Step 4. Check Enable > FTP Server address > Input Username > Input Password
Step 5.Select Channel or all channels > Select Day or all Days > Input period times > Check off event types such as Alarm or Intel > Click “Apply” > Click “Save”
UPnP (Universal Plug and Play)
Definition
Prerequisites
Step by Step Instructions
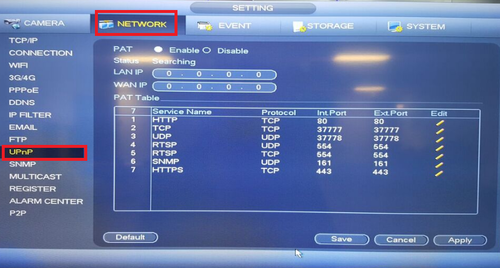
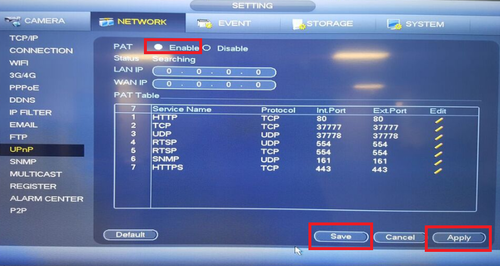
1. From the local Device Recorder Menu select Networking
2. Select Networking ➞ Select UPnP
3. Select “Enable” ➞ Select OK Apply ➞ Save
Multicast
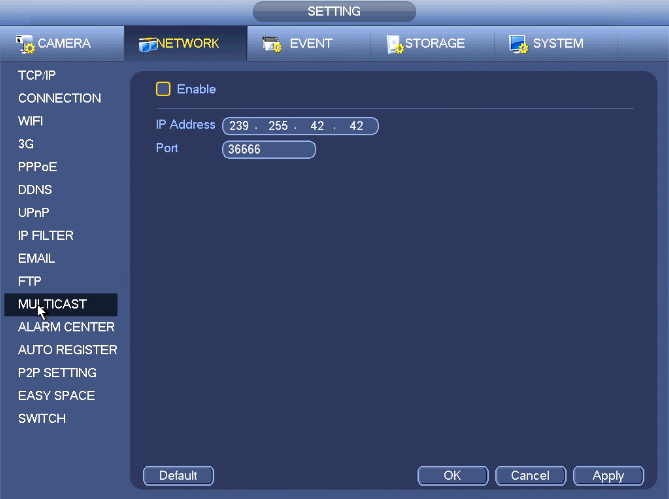
Here you can set a multiple cast group. Please refer to the following sheet for detailed information.
-224.0.0.0-239.255.255.255
-“D” address space
-224.0.0.0-224.0.0.255
-TTL=1 When sending out telegraph
-For example
224.0.0.13 PIMv2 router
-239.0.0.0-239.255.255.255
-Private address space
Except the above mentioned addresses of special meaning, you can use other addresses. For example:
Multiple cast IP: 235.8.8.36
Multiple cast PORT: 3666.
After you logged in the Web, the Web can automatically get multiple cast address and add it to the multiple cast groups. You can enable real-time monitor function to view the view.
Please note multiple cast function applies to special series only.
PPPoE
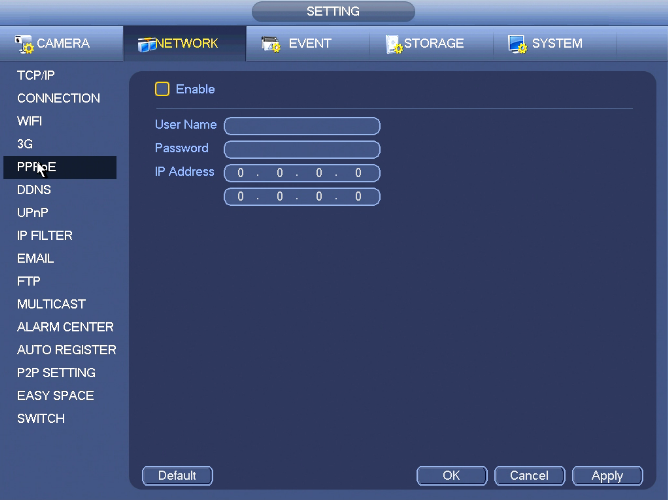
PPPoE interface is shown in the above image. Input “PPPoE name” and “PPPoE password” you get from your ISP (Internet service provider). Click save button, you need to restart to activate your configuration. After rebooting, NVR will connect to internet automatically. The IP in the PPPoE is the NVR dynamic value. You can access this IP to visit the unit.
