X-Security installation and user guide, Visiotech, leading CCTV distributor, offers an extensive catalogue of surveillance cameras and recorders; from conventional to professional systems, featuring advanced artificial intelligence. Among our renowned brands, such as Safire, X-Security, Uniview, Hikvision or Nivian, you can choose a wide range of devices for different applications such as general video coverage, perimeter videosurveillance, with alarm filters that can classify objects into humans or vehicles, or facial recognition.
In this article we will see how to configure an ALARMBOX in the recorders X-SECURITY
:XVR -VS2, -H and -HEVC.
For this tutorial we have used the following references:
XS-XVR6116-4KL-HEVC + XS-ALARMBOX16-6 + XS-PIRW-2EHAC.
Very important, the recorders must be updated to the latest version of firmware available, it is essential.
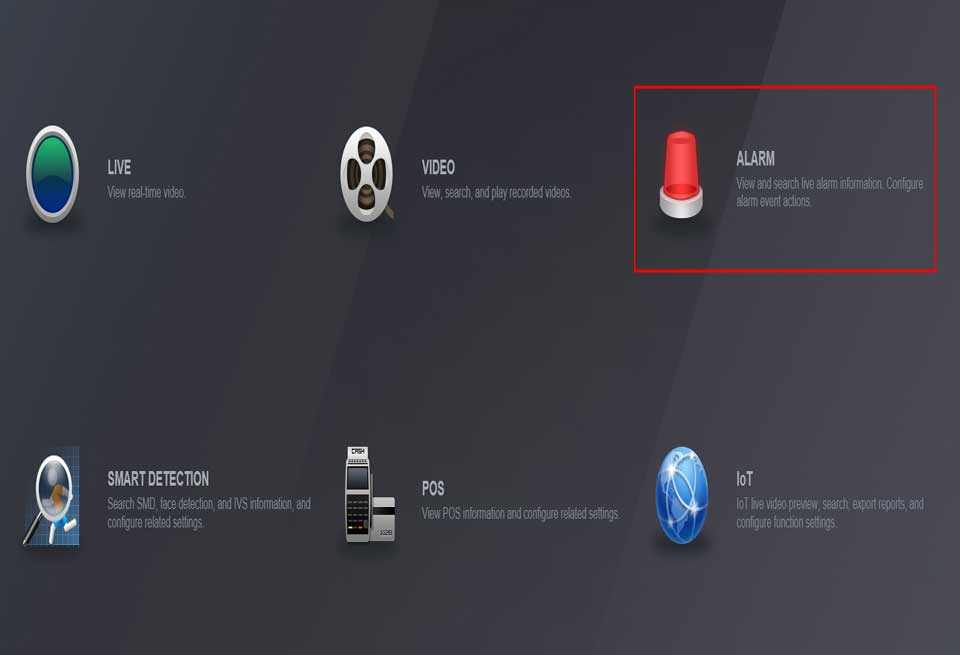
Step 1: Access the recorder and select the option “ALARM”

Step 2: Access the “ALARM INPUT” option

After accessing this option, we have the possibility to check the status of the ALARMBOX and be sure that it is working and also check which is its address.

3rd Step: Once the Alarmbox status has been checked, we are going to configure the HDCVI alarm.

In this case, as we are using a camera with PIR (in our example the XS-PIRW-2EHAC) we enable the HDCVI Alarm and then we will proceed to make the linkage with the desired alarm output.

In this option, we can configure the period in which the alarm is going to work, to which alarm output we can associate the event of the selected channel, configure the PTZ of another channel and, in advanced options, we can choose other options such as send e-mail, send a beep, send messages, and so on.
Step 4: Connect the alarm output by clicking on ALARM OUT.

If we had more than one Alarmbox, we would have to choose the corresponding one (up to 4). In this case we leave selected the Alarmbox 1 and the Alarm 1 output.
After these steps, the alarm output 1 of the Alarmbox will automatically be activated when the XS-PIRW-2EHAC detects motion.
Remember that this example is basic, we could go further and perform other actions that can be comfortably explored in the ALARMBOX configuration menu.
RTSP stream in X-Security – Dahua
The general form of the RTSP chain in brands such as X-Security and Dahua is:
rtsp://<user>:<password>@<ip>:<port>/cam/realmonitor?channel=1&subtype=0&unicast=true
For example: <rtsp://172.18.2.210:554/cam/realmonitor?channel=1&subtype=0&unicast=true>
To take advantage of the MJPEG format:
http://<user>:<passwrod>@<IP_address>/cgi-bin/mjpg/video.cgi?subtype=1
To play a video video:
rtsp://<user>:<password>@<ip>:<port>/cam/playback?channel=<num canal>&starttime=<initial>&endtime=<fin>>
If what is required is to add an mjpeg video stream on a web by http, click here.
Ports used by Dahua and X-Security’s P2P Service
These are the outbound ports used by Dahua and X-Security teams to connect to the P2P cloud.
P2P Relay Service Port: 8900-8903 TCP Port
P2P Server Service Port: 8800-8803 TCP/UDP Port
P2P AS Service Port: 12366 TCP Port
WEB Service Port: 80 or 443 TCP Port
GMS Service: 8180 TCP/UDP Port
+ALL UDP ports
The servers involved in Dahua’s P2P service are www.easy4ipcloud.com and www.easy4ip.com.
X-Security installation and user guide
Read More : How To basic setup of Hikvision NVR
Reset of IP Dahua and X-Security cameras via mobile app and reset boton
Web user interface of the IP Camera
1. Type the IP of the IP camera into a web browser
2. Click the ‘Forgot password?’ option
3. A prompt will appear to confirm the reset
Select OK
4. A QR code will be displayed.
This code must be scanned using the mobile app, either iDMSS or gDMSS on a mobile phone
The Security Code will be sent to the email address that was set during the device’s initialization; the email will be shown partially below the QR code
On iDMSS / gDMSS
1. Open the iDMSS / gDMSS app
Select ‘Me’ in the lower right portion of the screen
2. Select ‘Password Security’
3. Select ‘Reset Device Password’
4. Scan the QR Code from the Web UI of the IP Camera
Once scanned, after a few minutes you will receive an email with a Security Code
5. Enter the Security Code into the Web UI of the camera, then select Next
The camera’s password will be reset and you will be able to set a new password for the device
Reset via Physical Button
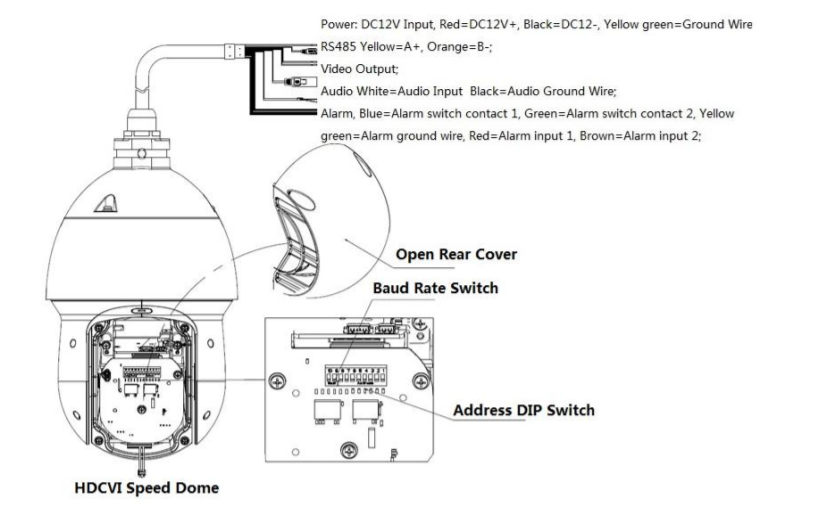
Depending on the model of your IP Camera, there could be a physical reset button on the outside body of the camera, or inside the camera body
1. Reset: Press the reset button for 5 seconds
2. Serial port connection: Please use connector and weld it on the package of the serial port
mark “RESET”
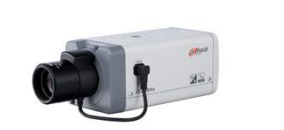
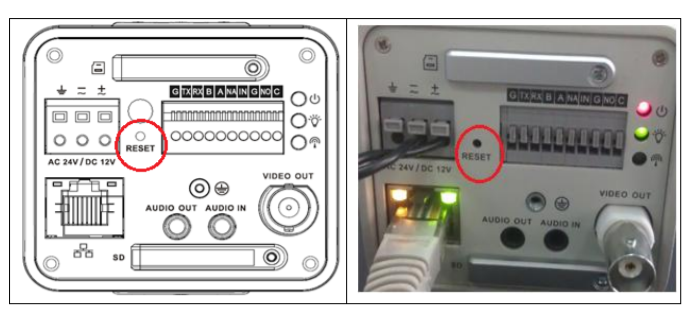
cable; you need to perform a shortage in order to reset.
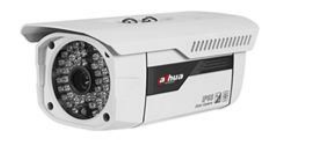
The picture below regards the cable coming out of the camera; you need an extension cable to
do the reset. Shortage the Blue wire (RESET) and the Orange wire (GND) for at least 5
seconds until the camera restarts


The pictures below are the sample of multi-function cable, and the reset is a button. (The
appearance may not exactly the same)
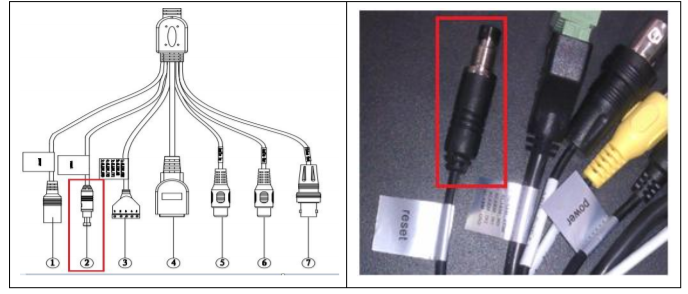 There is also a multiple-function combination cable for even earlier models; the reset terminal goes together with the alarm terminal (you can find the identifications on the label), you need shortage the RESET and GND pin (7&6 in the picture below) for at least 5 seconds to make a reset.
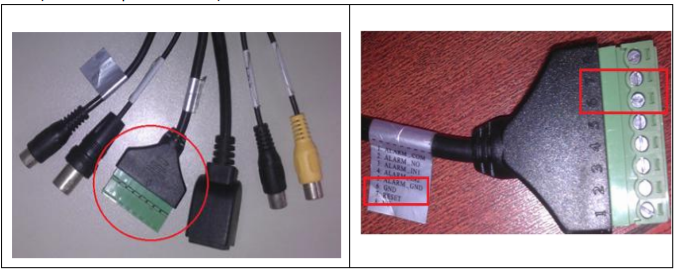
Appearance:

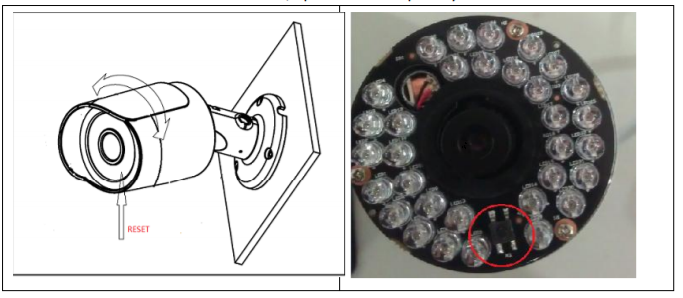
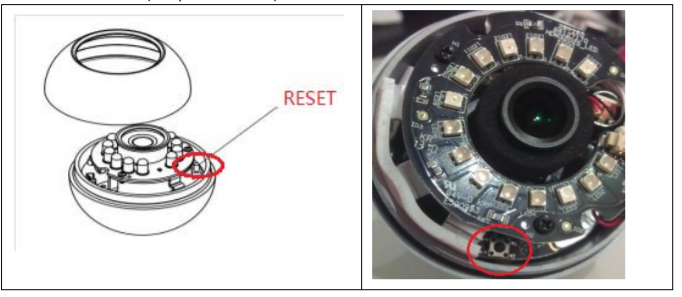
The reset button is inside of the camera, open the lens cap and you will find it.

The reset button is inside of the camera, open the dome camera enclosure; you will find it
next to the alarm terminals (see the picture below).
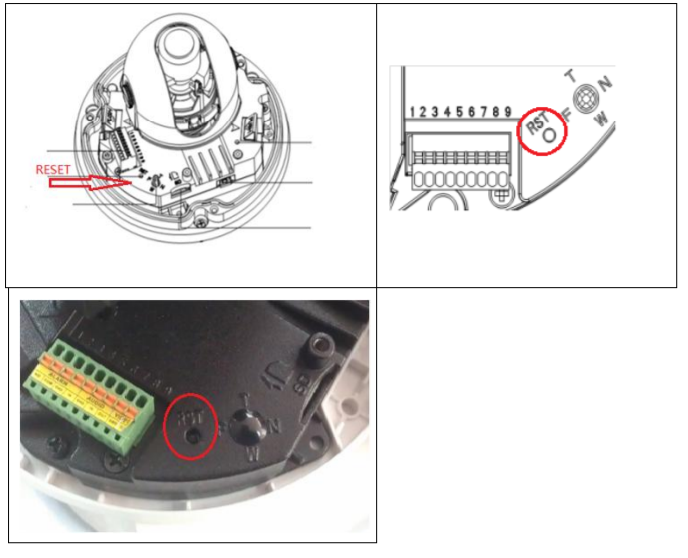

The reset module is inside the camera, open the dome camera enclosure and you will find it


The reset button is inside of the camera, open the dome camera enclosure and will find it
under the IR board (see picture below)

This type of network camera is very simple and small, and there reset button is mostly on
the back or side of the camera.


More models:
IT IS POSSIBLE THAT SOME MODELS DO NOT HAVE THE BUTTON TO BE ABLE TO DO THE RESET, IT WILL BE ENOUGH TO MAKE A BRIDGE WITH SOME CLAMPS DURING 20 SECONDS
How to activate or deactivate visible light LEDs in X-Security
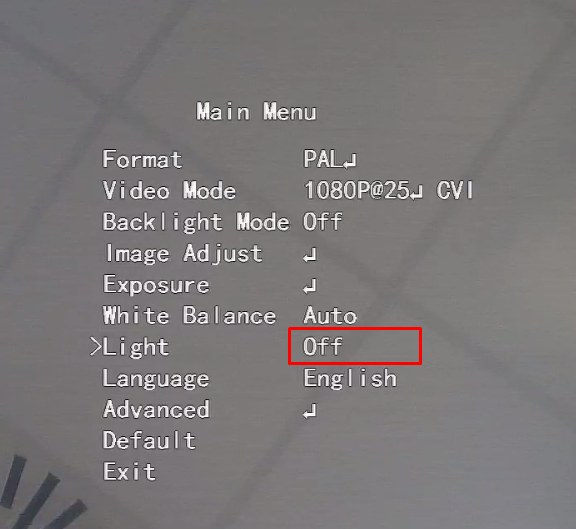
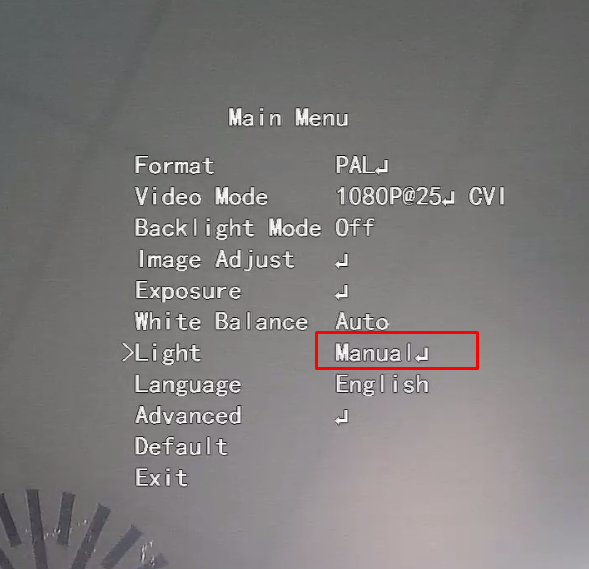
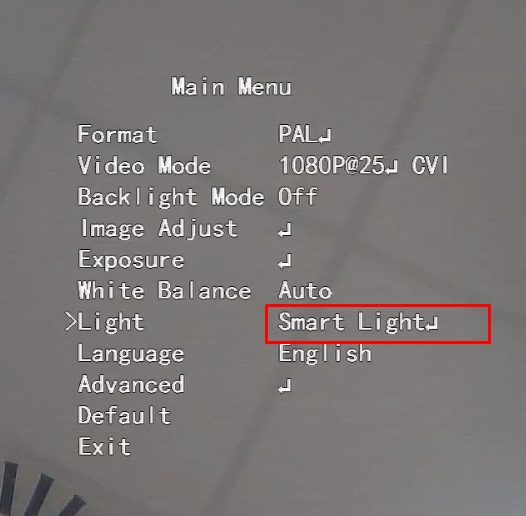
In the following example we show a camera that has leds, which we can leave in three states:
Always off, day or night:
Always on:
Switching to day/night mode according to the lighting level, which is the default option:
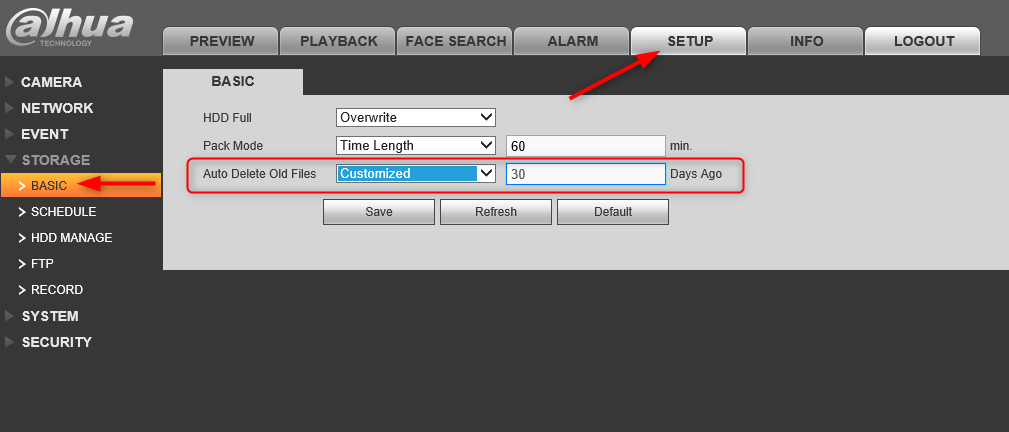
Where to change the storage calendar of recordings in X-Security
For example, to change the parameter to 30 days, we need to set the Basic–>Setup as shown in the image below:
How to access X-SECURITY video recorders via P2P on a mobile application
First we must access the NETWORK menu of the recorder:
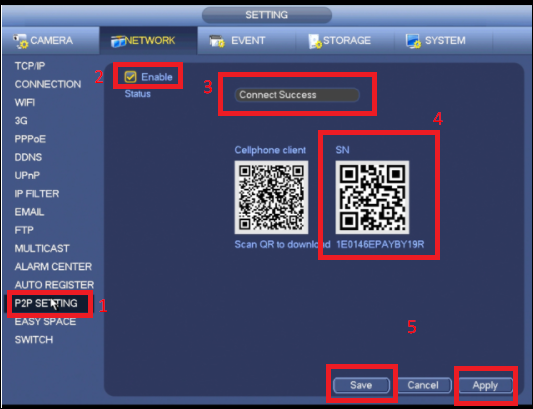
Step 1 – We will access the P2P SETTING menu.
Step 2 – We will check the Status box.
Step 3 – We will have to check that it appears as Connected.
Step 4 – Scan the QR code.
Step 5 – Save the operation.
APP MOBILE:
For this guide we have used the gDMSS PLUS app, however the procedure is the same for iDMSS PLUS and SmartViewer.
Open the mobile app

In the initial screen, we select the upper left icon (Home).
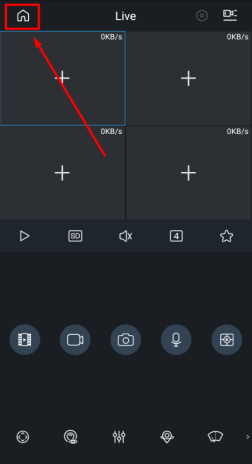
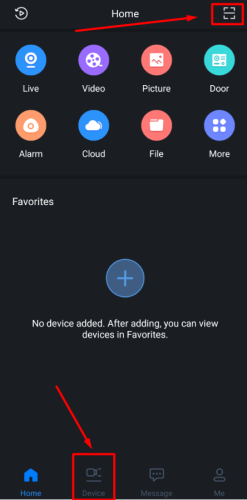
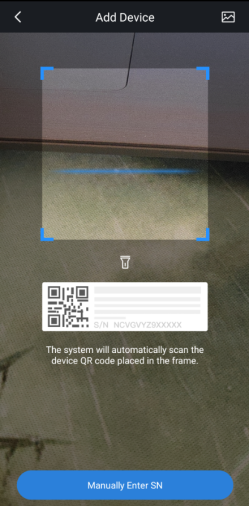
Before choosing the upper right option that will automatically open the mobile phone camera.
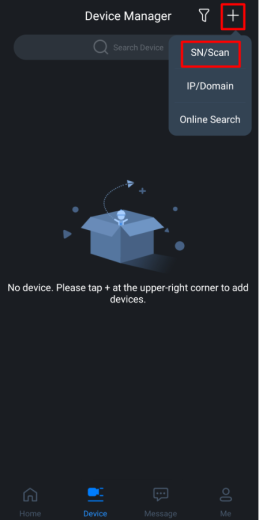
Then press “DEVICE” and then select the + symbol to add devices.
Then, pressing SN/SCAN, both options will take us directly to the camera to read the QR code of the recorder, taking us to the next screen of the mobile app
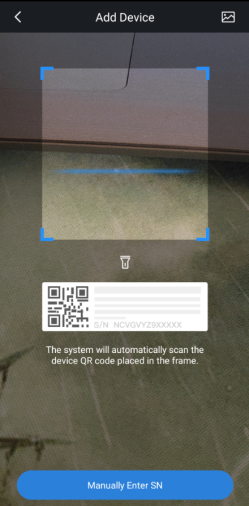
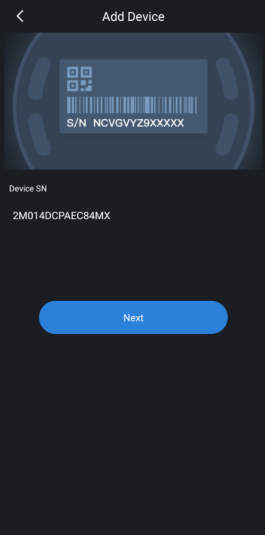
We scanned the QR code.
Then the mobile app will ask us what kind of devices we are adding:
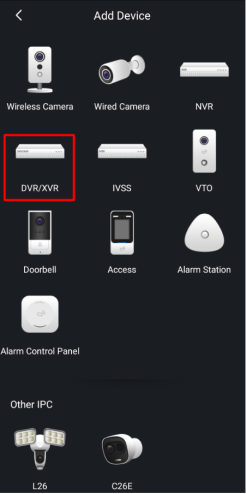
In our case we choose ENGRAVER.
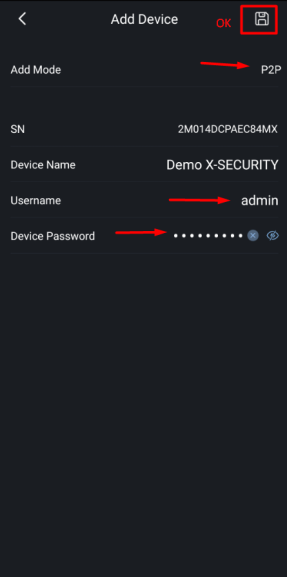
The next step is to check user and password.
Check that the P2P option is still marked in “Add Mode” and then press OK to save.
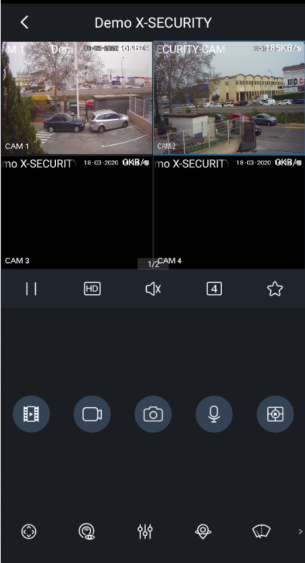
After this we will have the images of the recorder.
Checking and Updating Firmware on X-SECURITY Recorders
In this guide we are going to indicate the necessary steps to check and update the firmware in the X-SECURITY recorders, both in the firmware version V3.2.
For this update we will use the Internet Explorer and we must install the plugins of the recorder to the web browser.
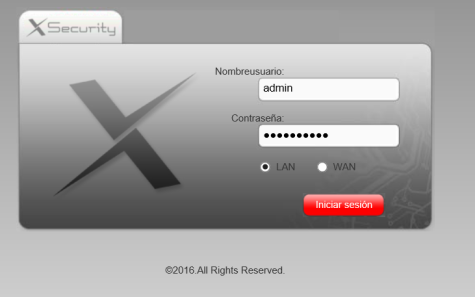
Access the recorder and then go to INFO
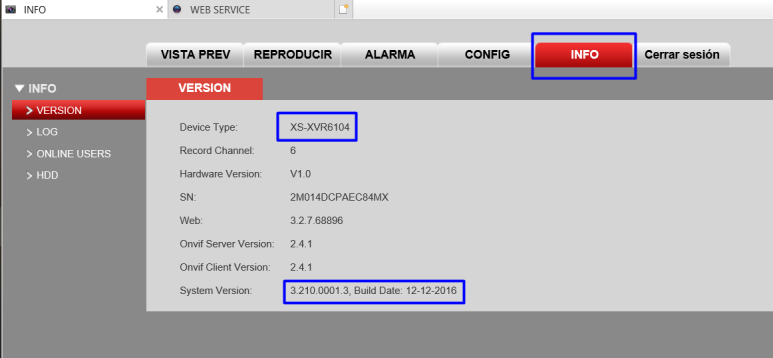
First we have to check the model of the recorder and the firmware version that is currently installed.
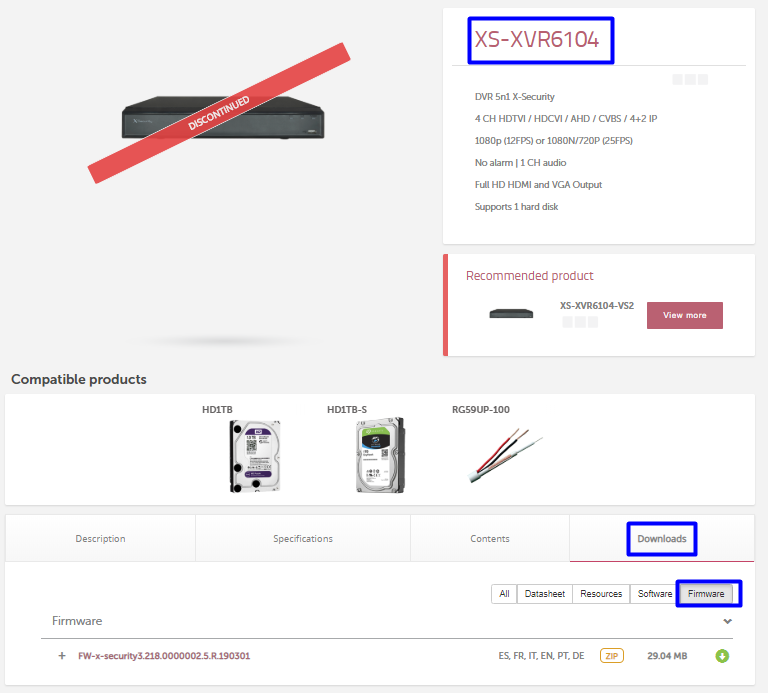
Then we go to the Visiotech website and look for the recorder, in this case the XS-XVR6104, click on Downloads and then apply the FIRMWARE filter.
Our recorder currently has the firmware System Version: 3.210.0001.3, Build Date: 12-12-2016 and the Visiotech web version is System Version: 3.218.0000002.5. Therefore we proceed to download the firmware:

The download file is a .zip file, so let’s unpack it. The file we are interested in for the update via web is the .bin file.
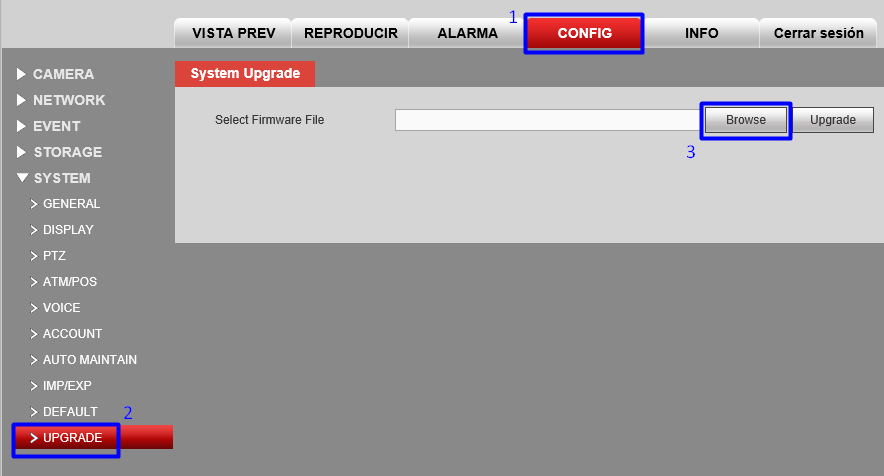
Then go back to the recorder, press CONFIG / SYSTEM / UPGRADE and then look for the file you have downloaded by pressing Browse.
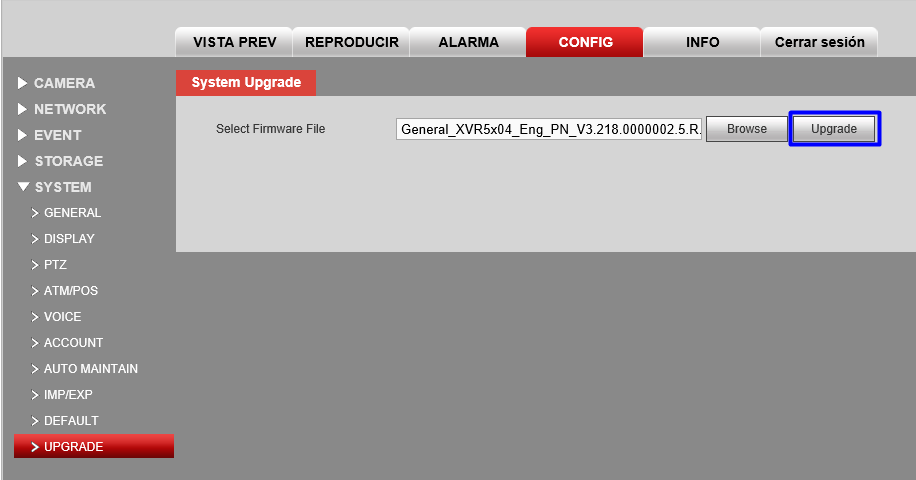
Once the file is selected, we proceed to finish the update by pressing UPGRADE.
To update the firmware of an X-SECURITY recorder with Firmware version V4.0.X or higher, the procedure will be the same, however, it changes a little the interface of the recorder.
For this procedure we will also use Internet Explorer as a browser to access the device and perform the update.
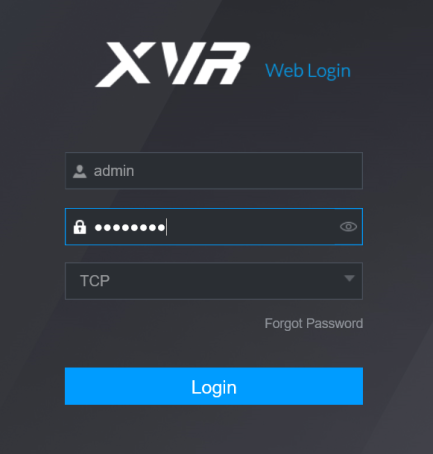
After accessing the recorder the first thing to do is to check the firmware version, press Management on the upper left side.
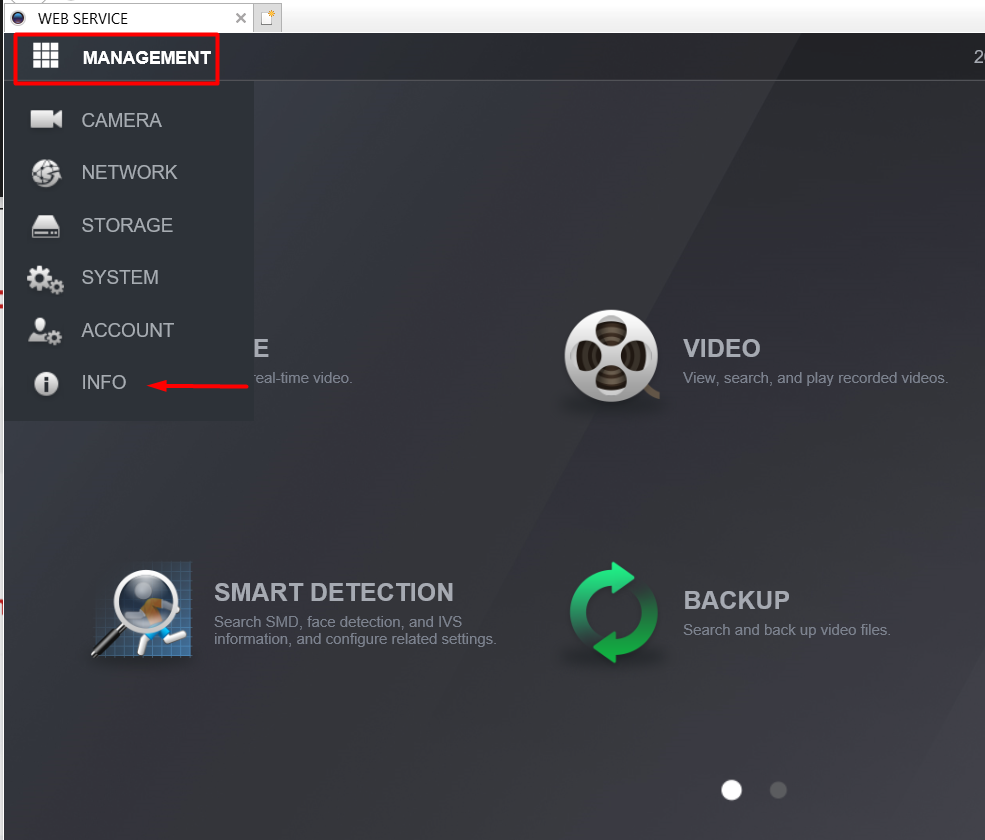
Then we choose INFO.
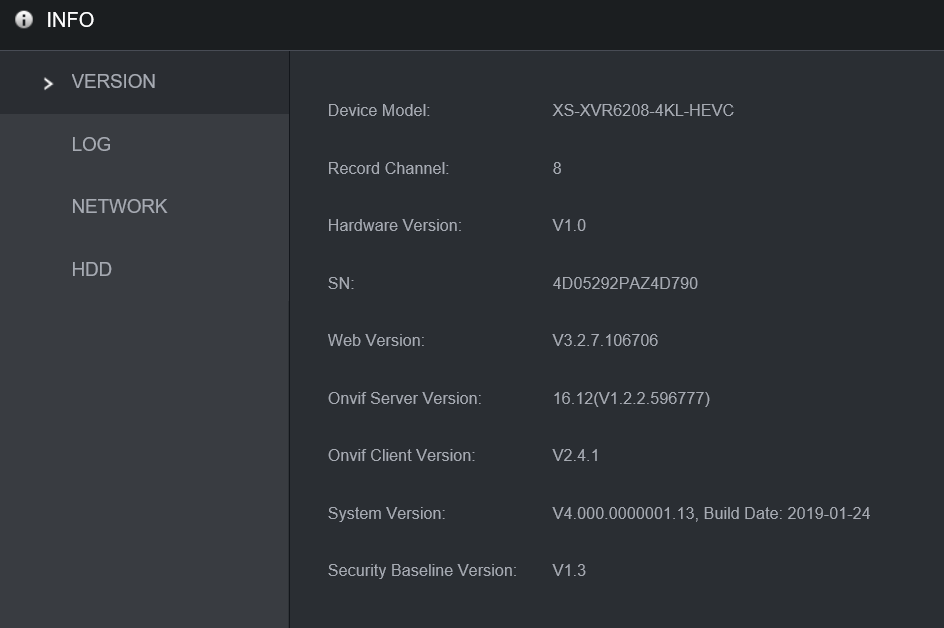
We see that the recorder is the XS-XVR6208-4KL-HEVC and the firmware version is System Version: V4.000.0000001.13, Build Date: 2019-01-24.
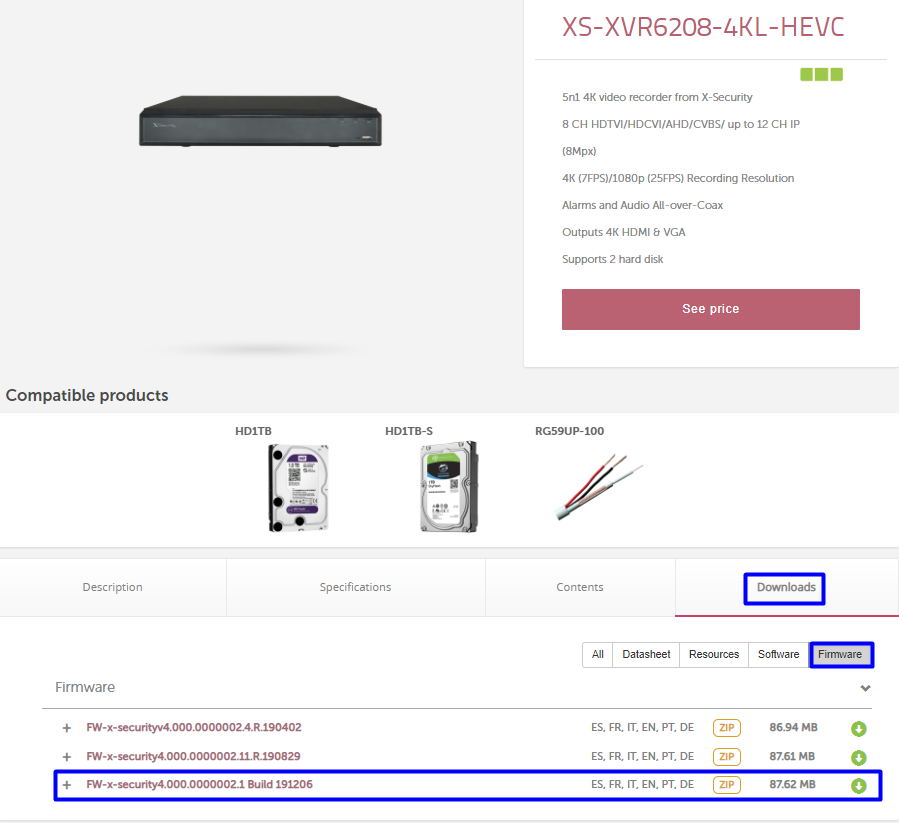
We download the most recent version from the Visiotech website and proceed to update.
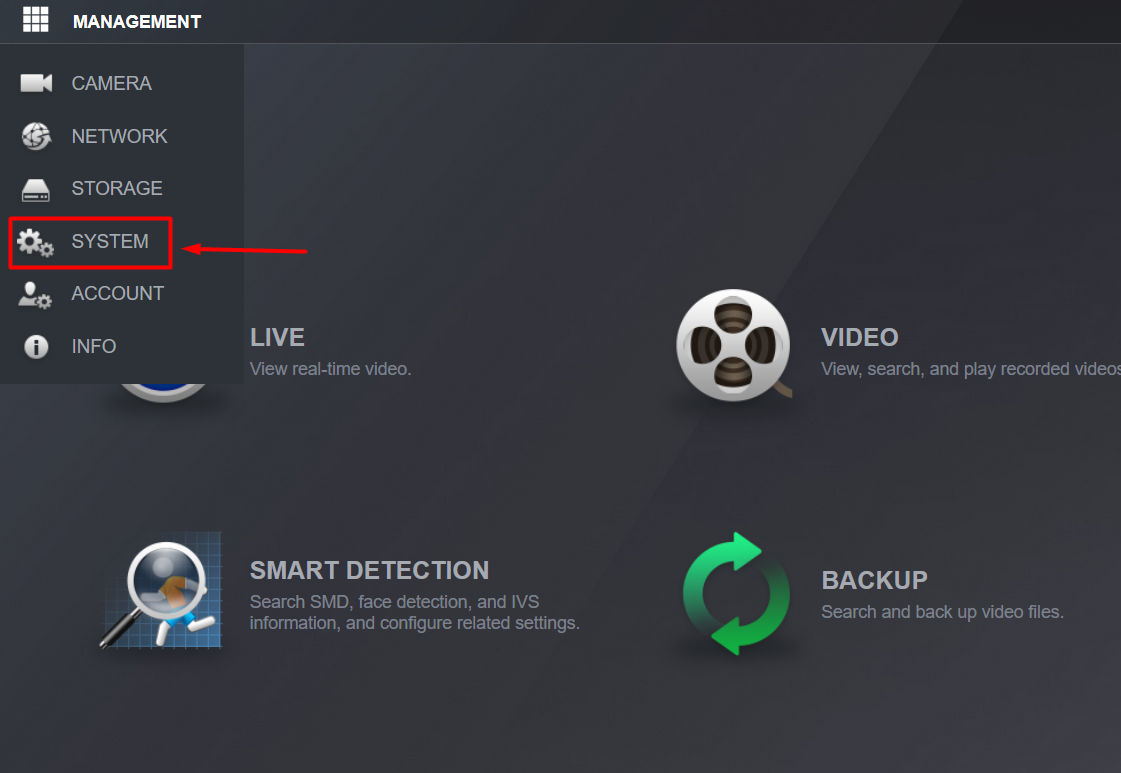
In the option MANAGEMENT / SYSTEM / UPGRADE
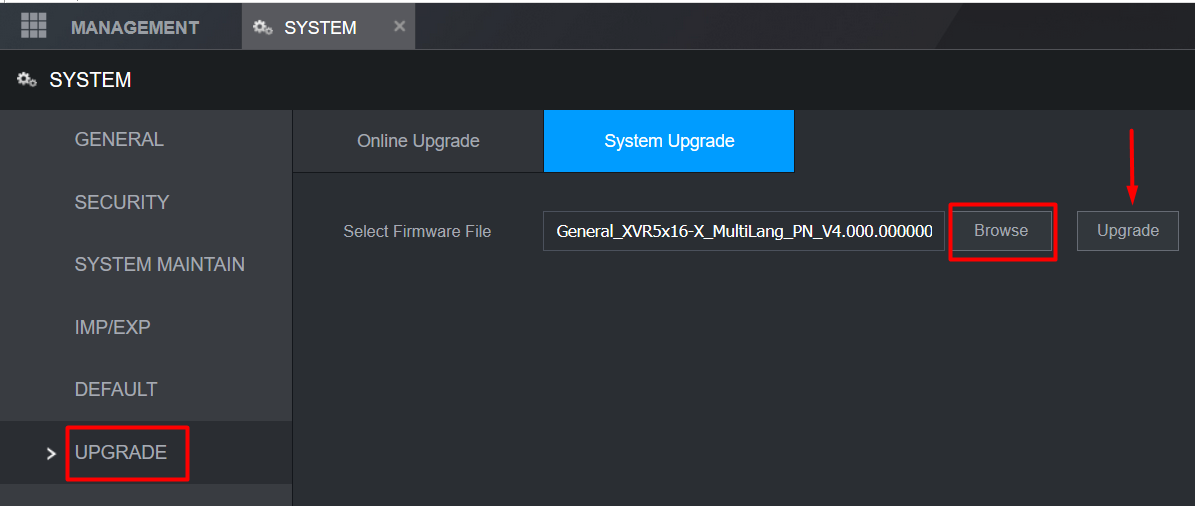
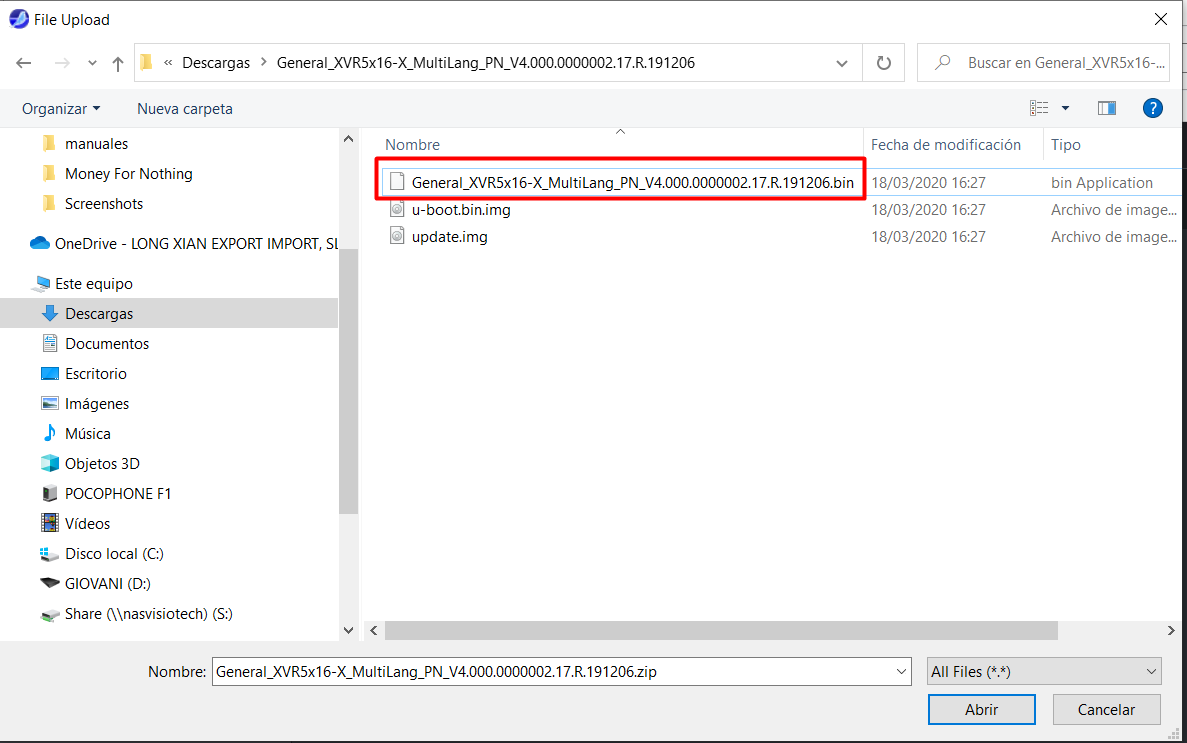
Press Browse and look for the file that has been downloaded from the Visiotech website.
Remember that the file is a .zip file and you will have to unzip the files contained in it; the update file we are interested in for this procedure is the .bin file.
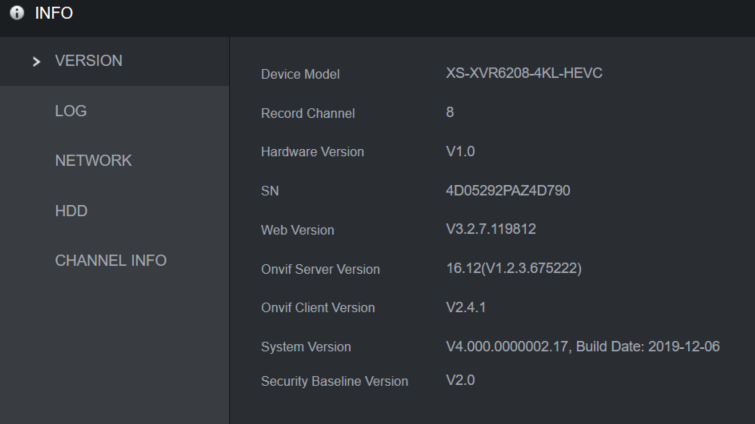
Once updated, we can check again the version to have the confirmation that it was successfully updated.
How to access an X-SECURITY recorder via Web with a P2P connection
We already know that many parameters can only be changed from the web interface of a recorder or directly on the recorder itself.
The problem starts after an installation is finished and the recorder is added to our SmartPss only by P2P.
Many times we are unable to open the ports on the router because we do not have access to it, but it is possible to access the recorder via browser to change certain parameters only with P2P access.
1 – ADDING THE P2P RECORDER TO THE SMARTPSS
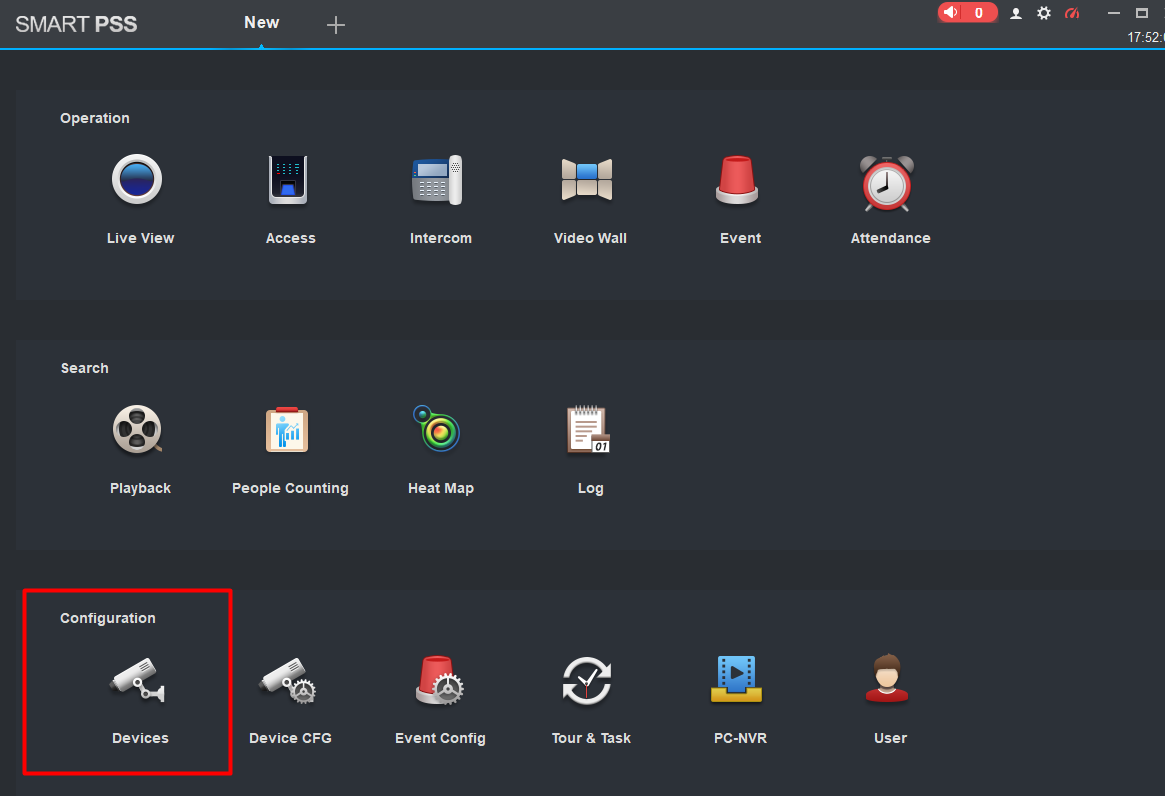

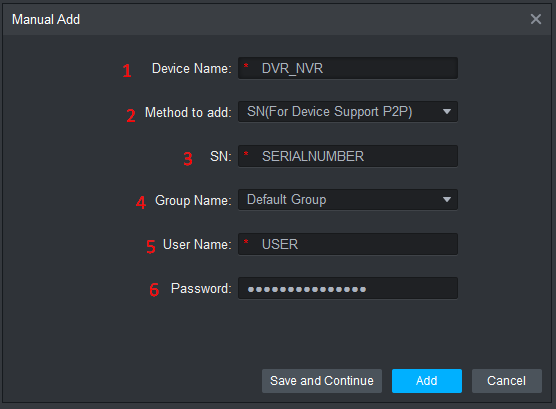
1 – Define the name of the recorder
2 – Choose the method by P2P
3 – Enter the Serial Number of the recorder
4 – Leave the Default Group or choose a group created previously
5 – Enter the user
6 – Enter the user password
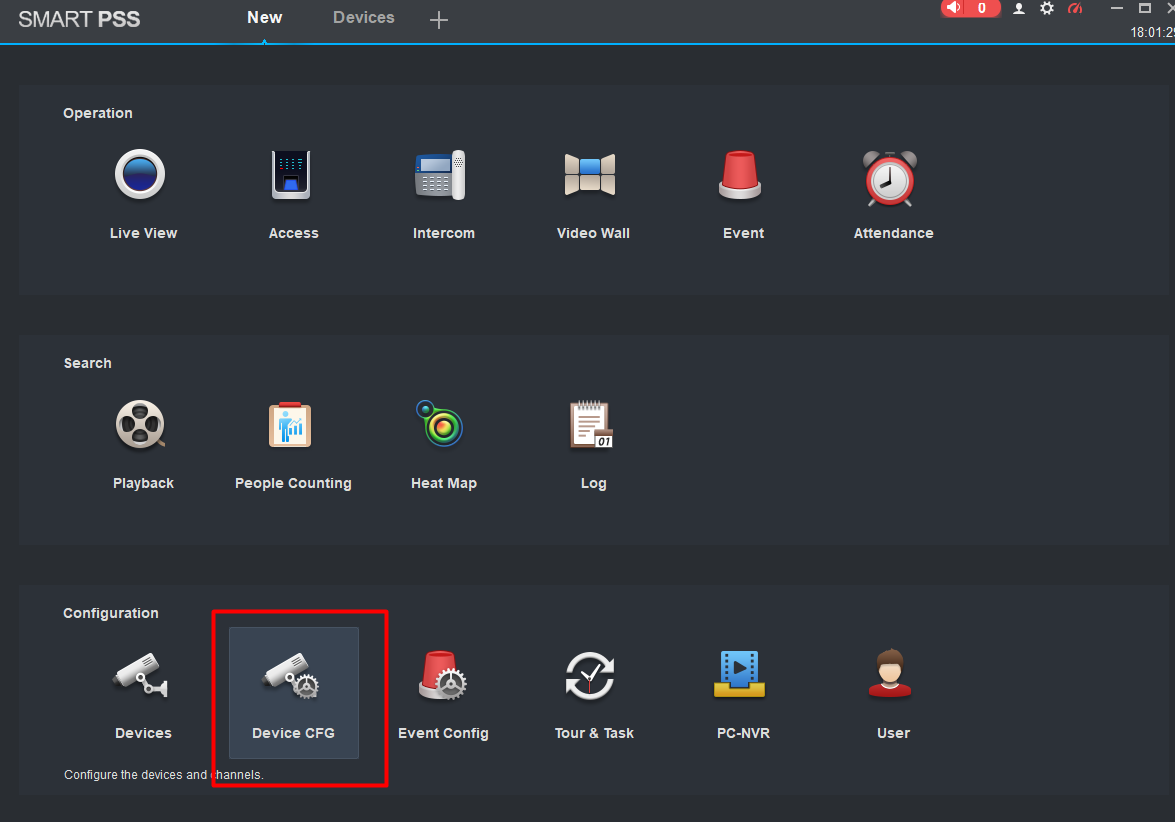
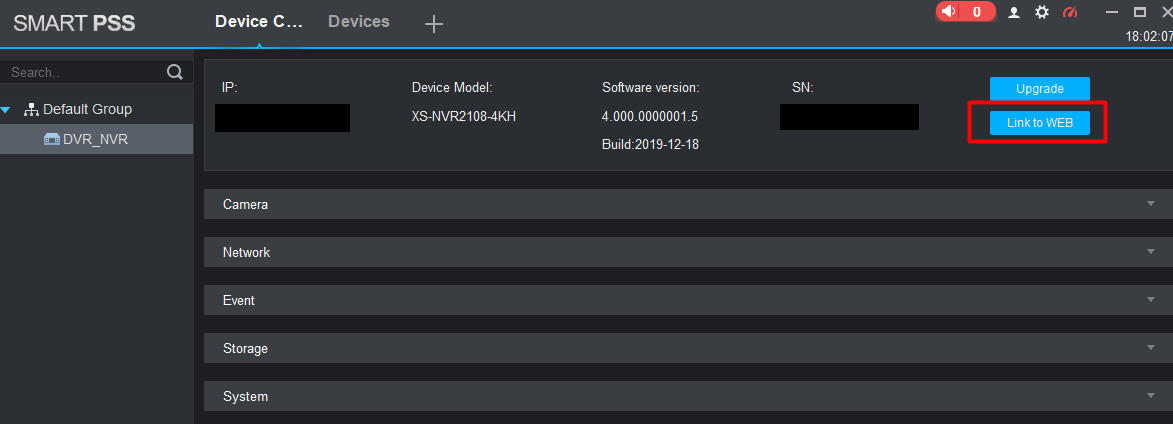
Check that the IP is that of the LocalHost, however the port is a random one; in each connection we will have a different port, but this does not prevent us from making the configurations via web interface.
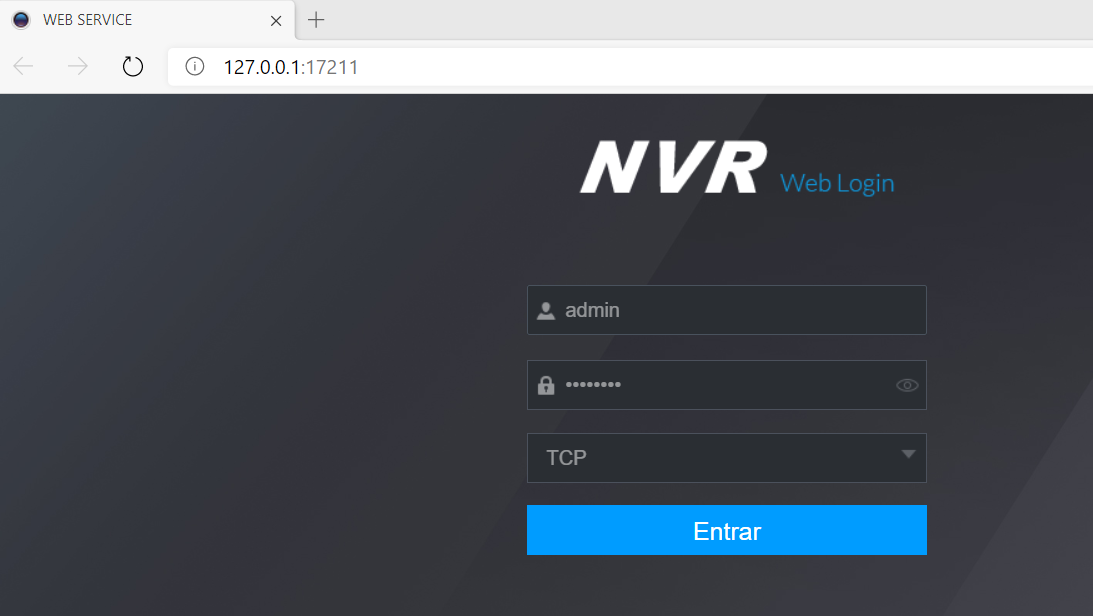
Some operations such as adding an IP camera by custom protocol is only possible via web interface (in remote), from the smartpss instead is not possible.
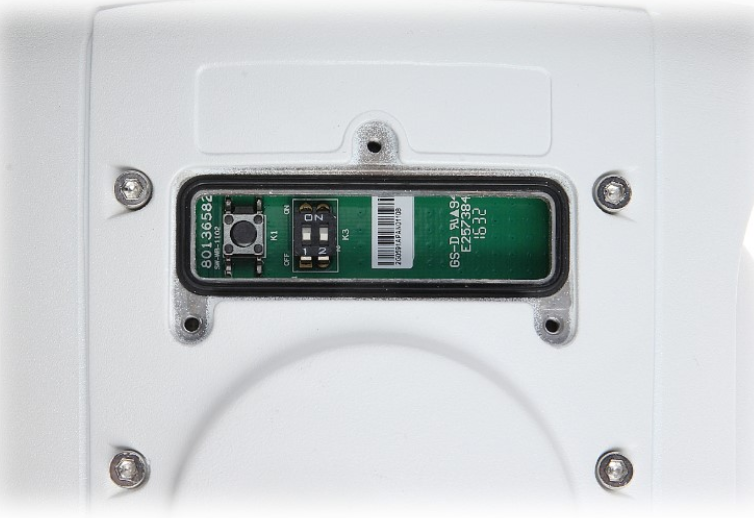
reset button XS-IPSD8130IA-4
The button can be found by following the image below:
How to enter the OSD menu of X-Security / Dahua 4N1 or HDCVI cameras
The first thing to emphasize is that the OSD menu cannot be accessed using CVBS video technology, which implies that with a traditional composite or analog video format we will not be able to access the OSD menu.
To be able to access the device, the camera must be in HDCVI, HDTVI or AHD format.
If it is in CVBS format we must use a PFM820 control switch, interposing it between the camera and the recorder, and switch the format to HDCVI or HDTVI preferably.

A recorder or a tester is required to access the menu:
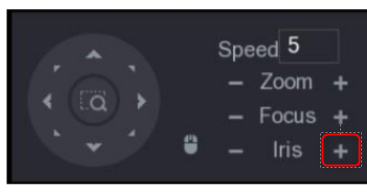
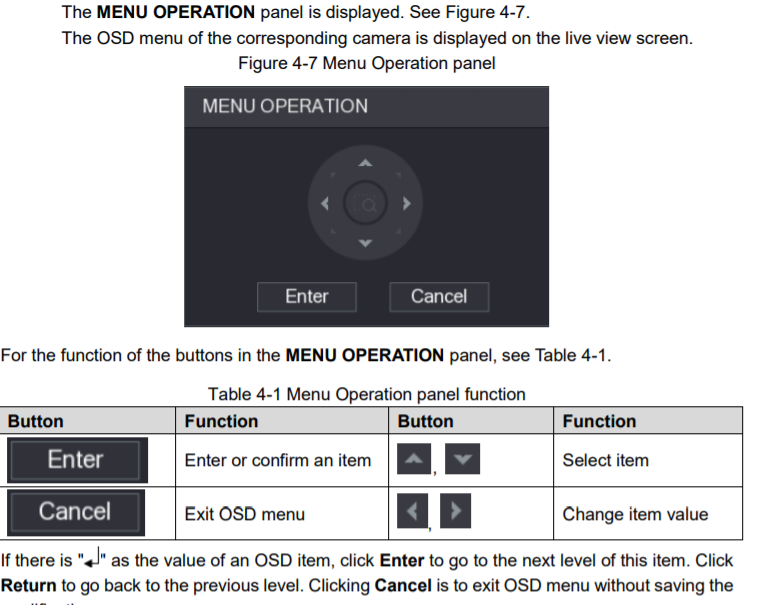
With a recorder you can access from local with a mouse and screen or from the web interface, accessed through the PTZ controls.
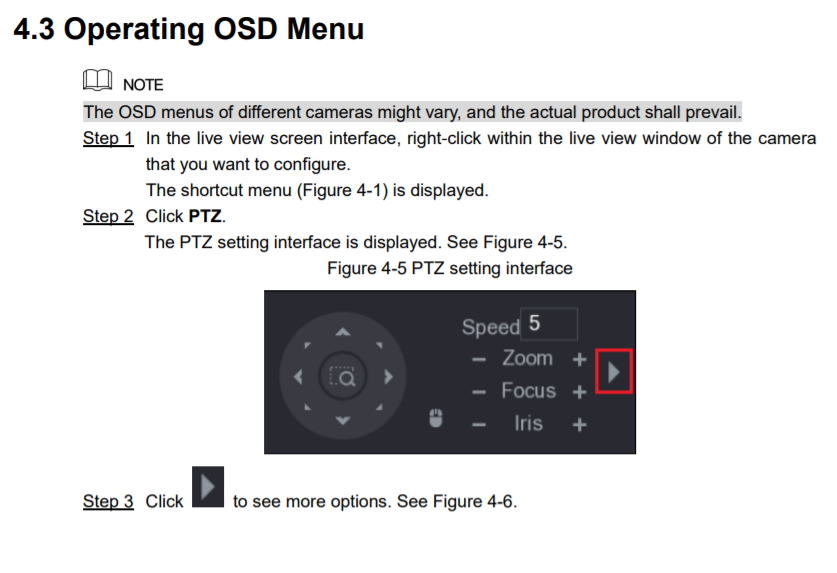
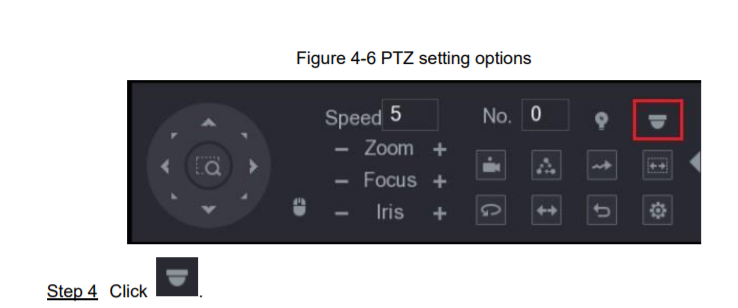
If the device does not allow us to enter with the configuration button, we have to try clicking on the Iris + button.
2 MB Download
Separate outputs in X-Security
Usually we are going to find VGA and HDMI video outputs, which normally show the same information, but there are also some models that allow to display different video signals (independent outputs).
The independent output function in X-Security / Dahua is normally available when the device has 2 HDMI outputs.
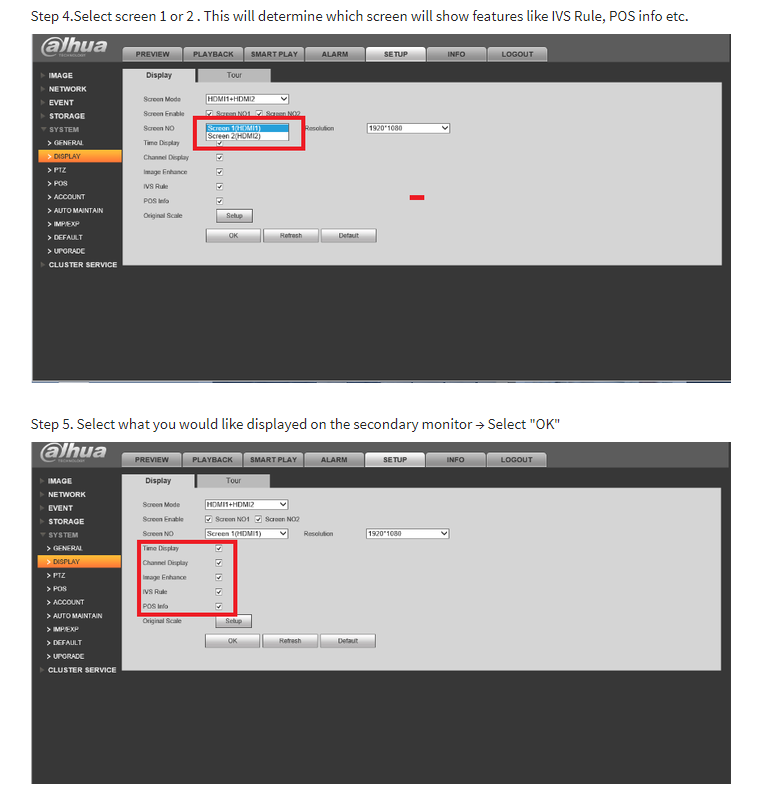
This wiki explains everything related to the topic:
https://dahuawiki.com/NVR/Basic_Setup/Dual_HDMI
And following its explanation, only the main output lets us have control (i.e. it provides the menu tabs) although it is possible to add additional information to the secondary monitor.
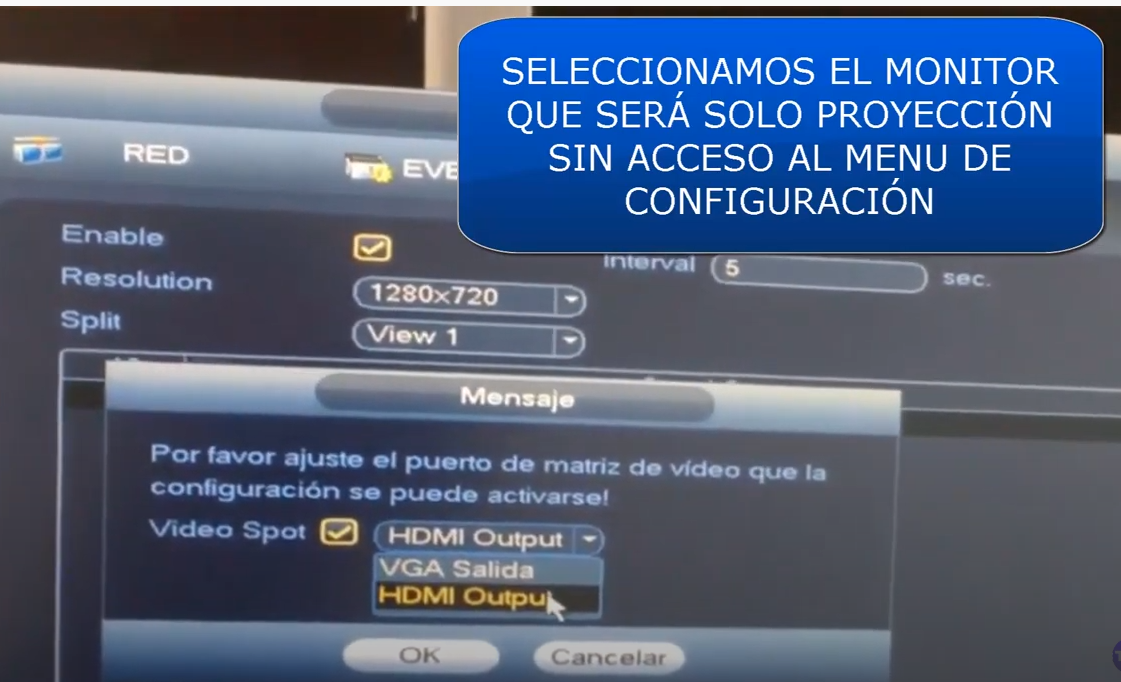
If, instead, we talk about a spot-type output (typically they have BNC-type connectors), this third-party YouTube video explains exactly that once a specific output is marked as a spot, menus no longer appear in it.
https://www.youtube.com/watch?v=UKp8Jh46iVk
How to change video technology in XS-SD6325SIW-F4N1 cameras

What do the X-Security XVR IoTs need to be able to link accessories?

https://www.visiotechsecurity.com/es/productos/cctv/hdcvi-iot
A PFM871A-N1 connection dongle is required: https://www.visiotechsecurity.com/productos/cctv/hdcvi-iot/accesorios-297/pfm871a-n1-detail
There is also this camera can be used as a gateway XS-CV036-FHAC-IG: https://www.visiotechsecurity.com/productos/cctv/hdcvi-iot/camaras-295/xs-cv036-fhac-ig-detail
Connection of the second output of the X-Security Alarm Recorder
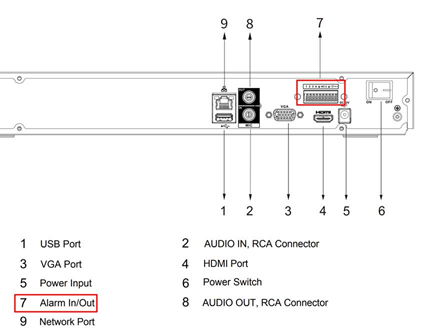
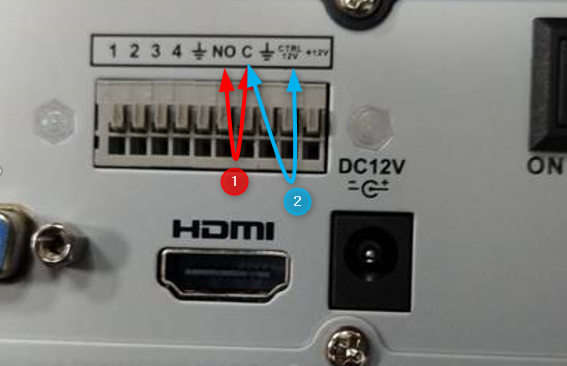
As it indicates the CTRL 12V supplies 12 volts in continuous. The circuit is Normally Closed (NC) and when the alarm is generated it goes from 12V to 0V.
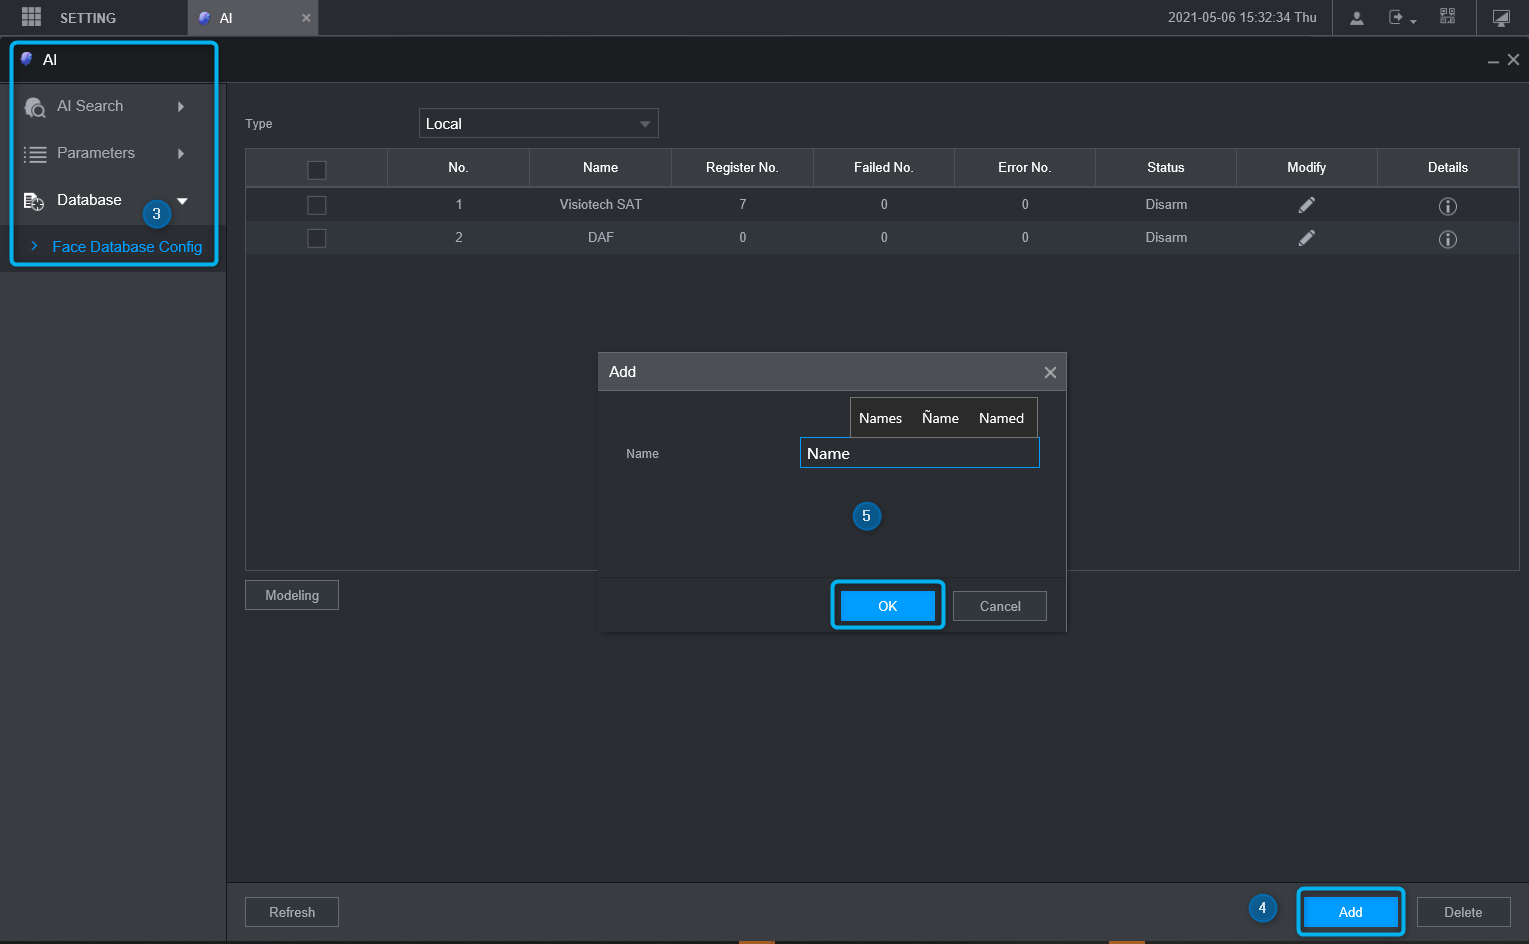
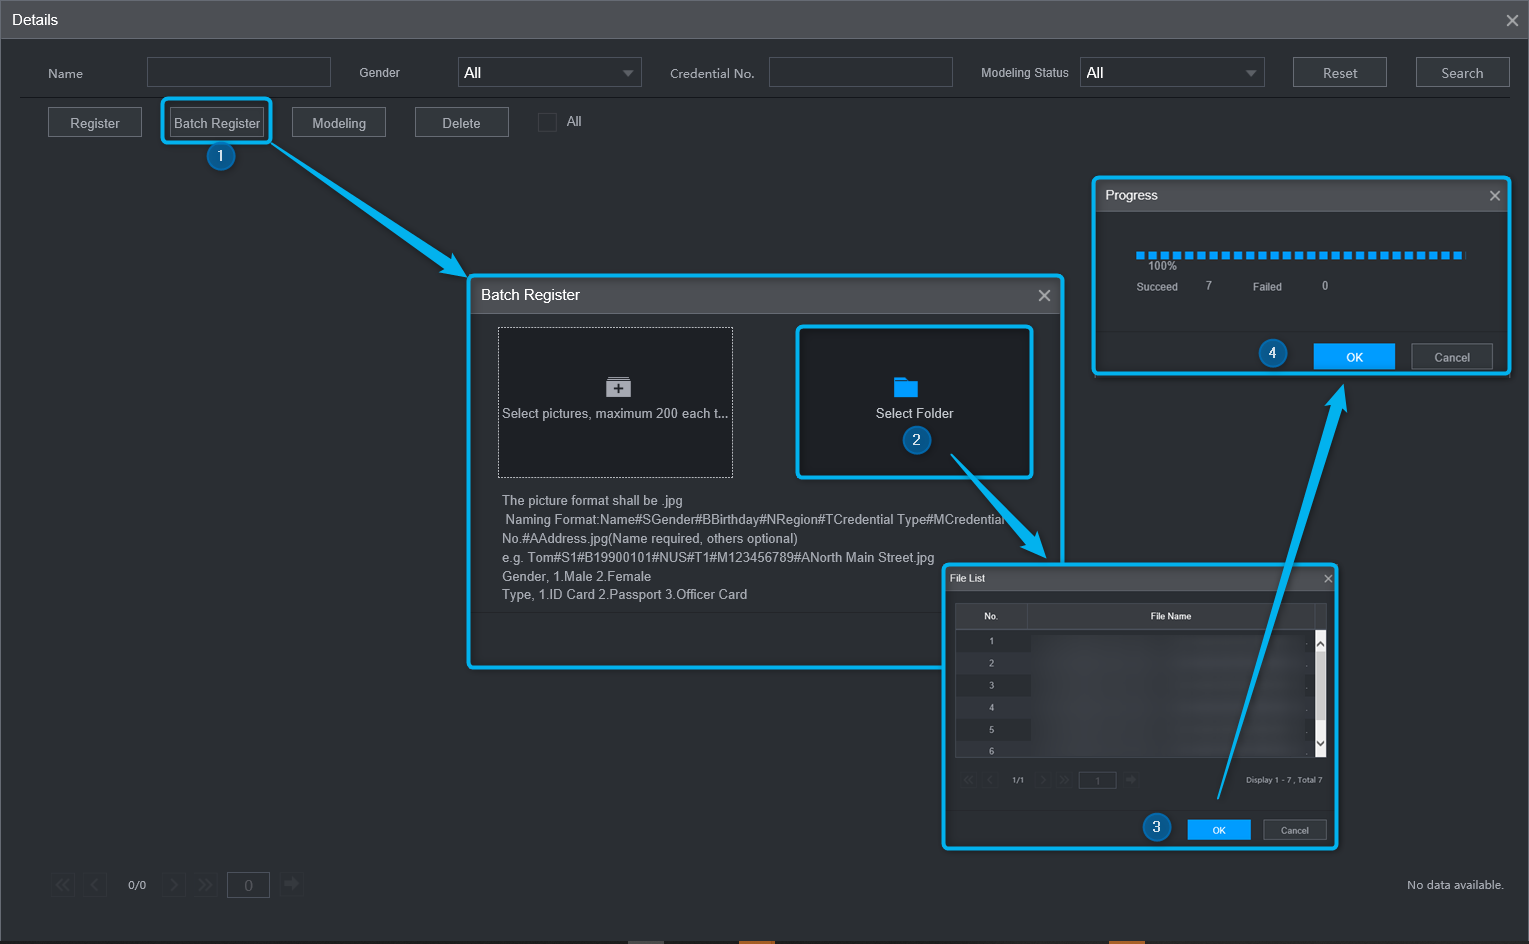
Create face database in X-security
For this FAQ we have used an XS-NVR3116-4K-1FACE
Note:
This is only for XS-NVRxxxx-xx-xx-xFACE models
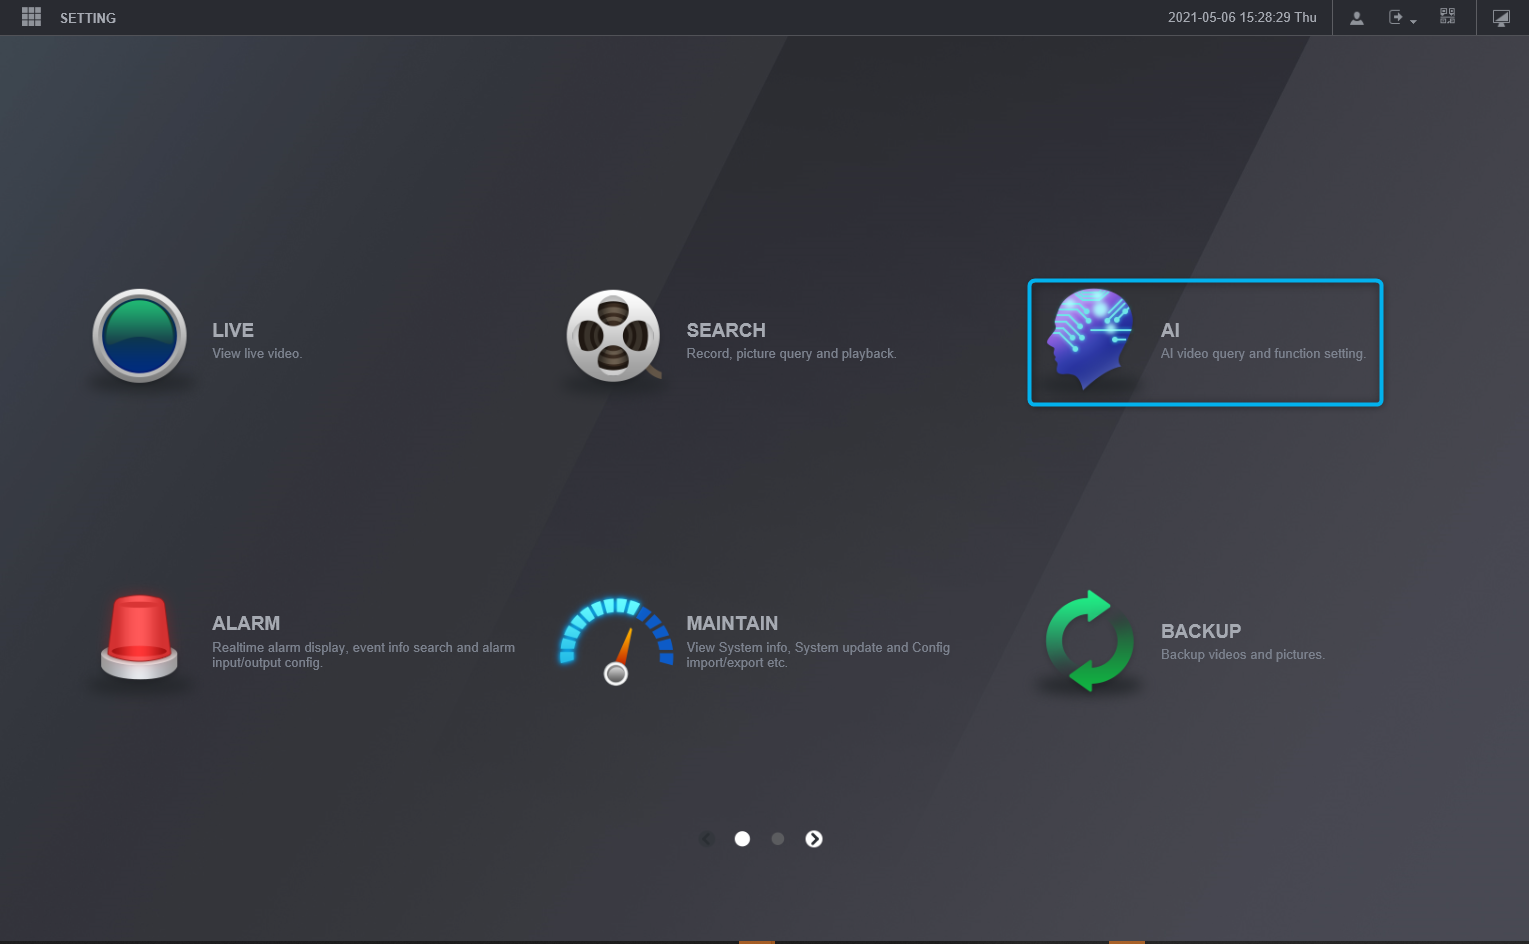
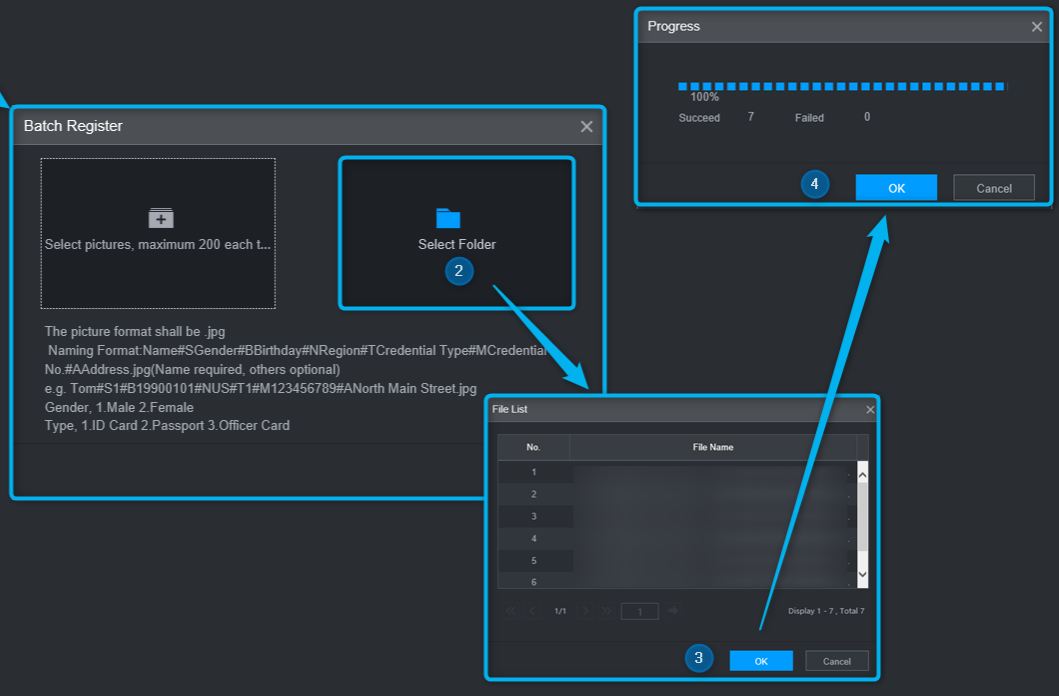
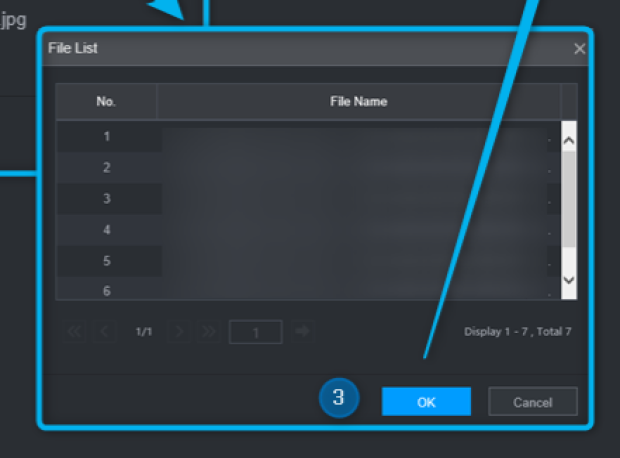
Database configuration

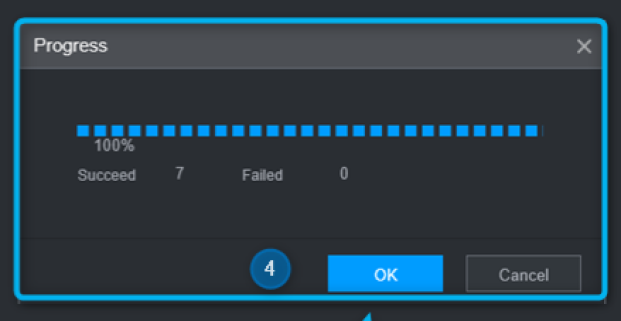
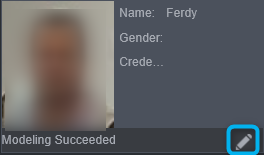
AI Face Search X-security with Firmware V4.0
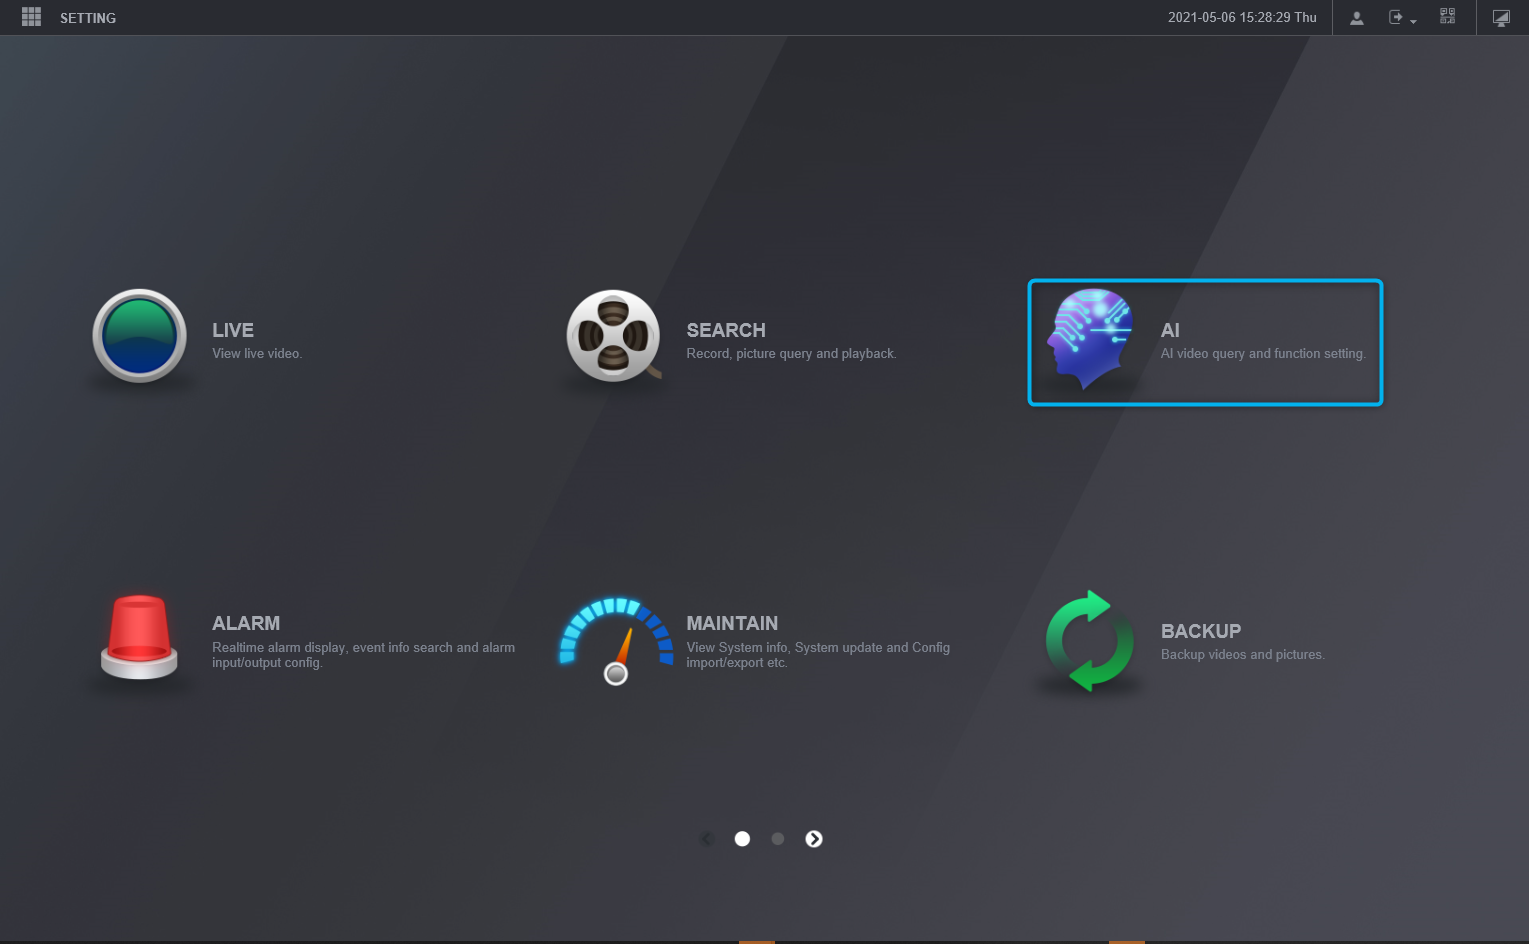
X-security AI Face Search with Firmware V4.0
Note:
This is only for X-security recorder models with firmware V4.0
Search for faces
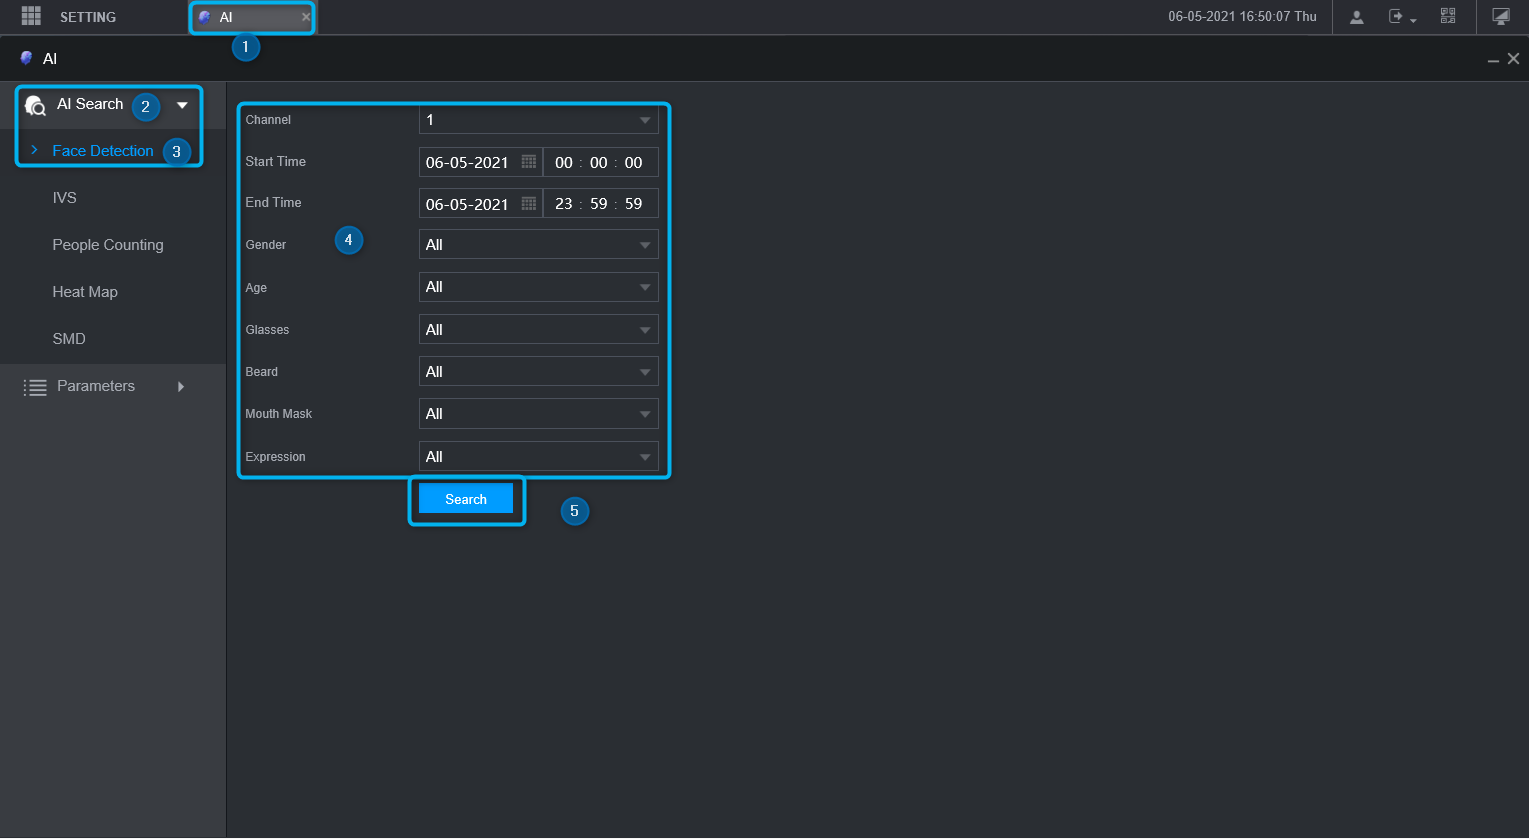
Playback Face search
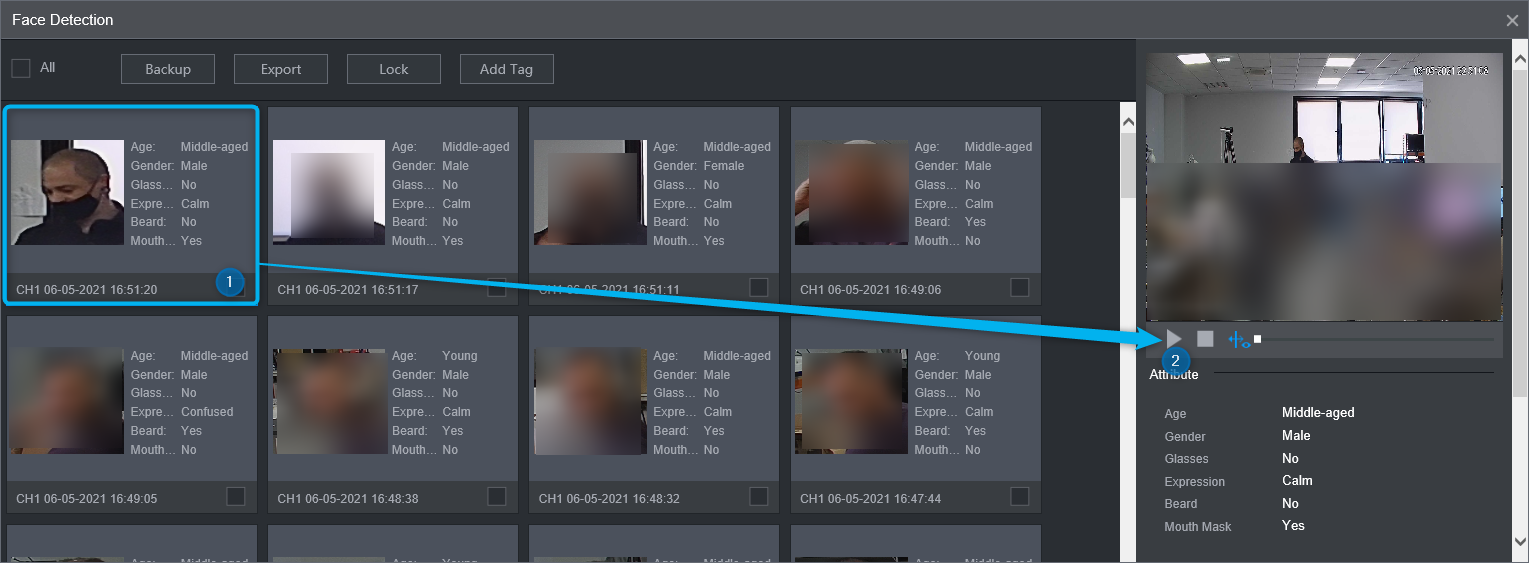
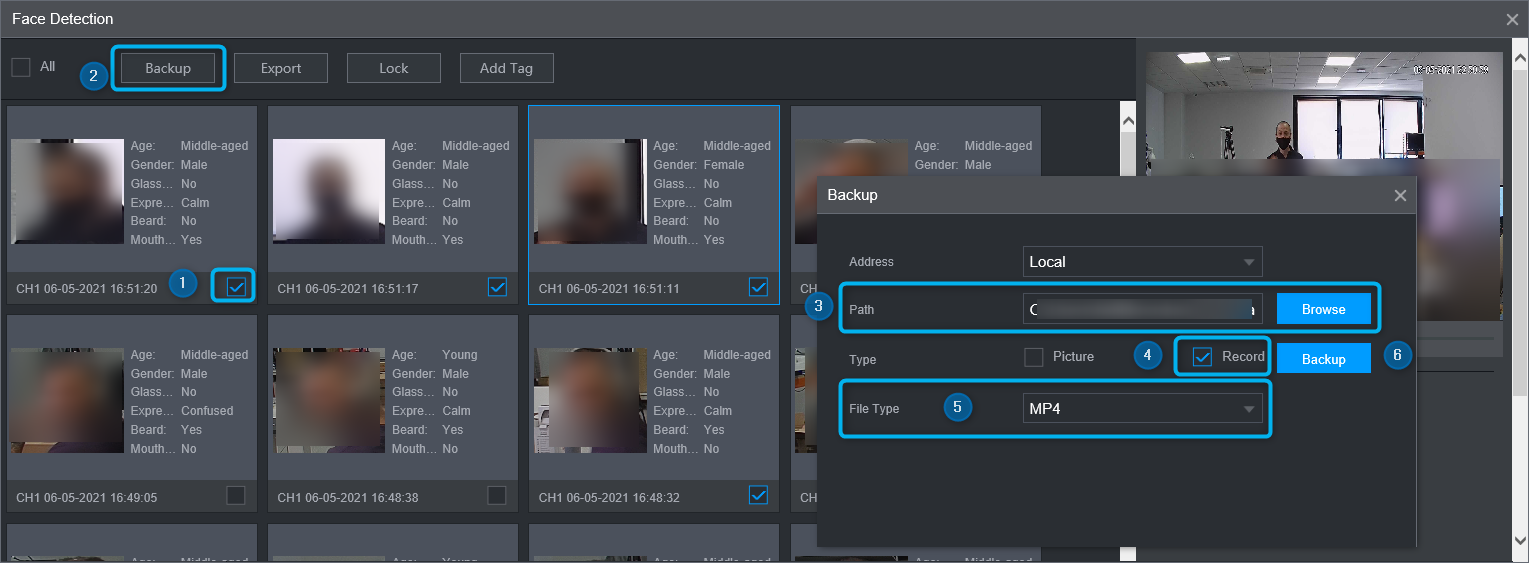
Download the selected face search:
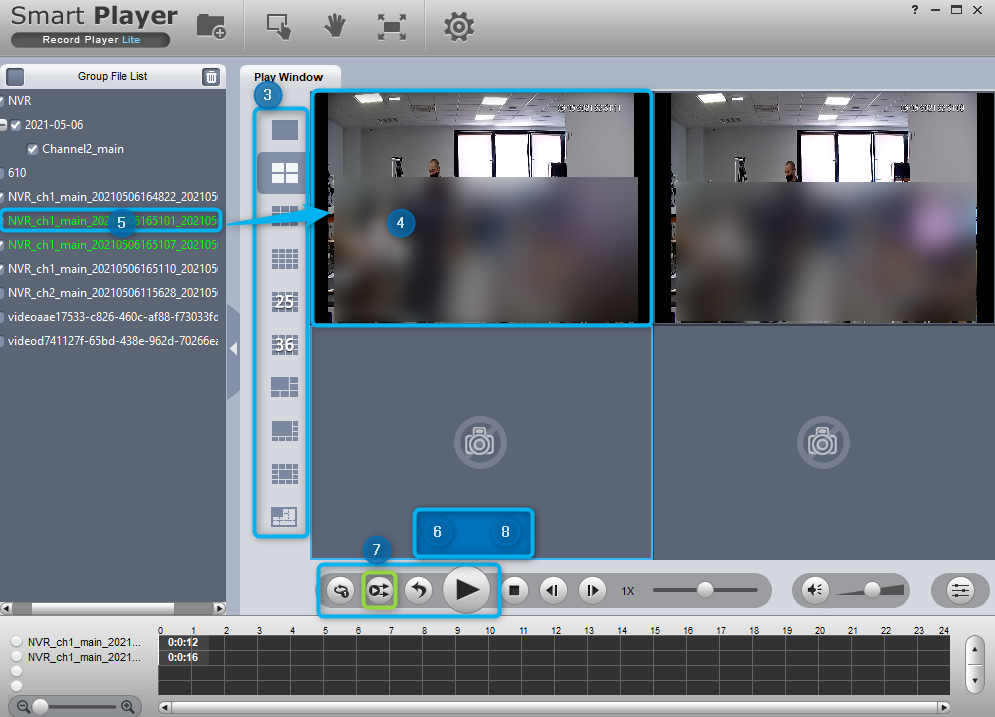
Play the downloaded videos:
How to update X-security devices via Configtool found in ToolBox
1. Download and install Toolbox
Download link: – ToolBox
2. Via the ToolBox, open the ConfigTool
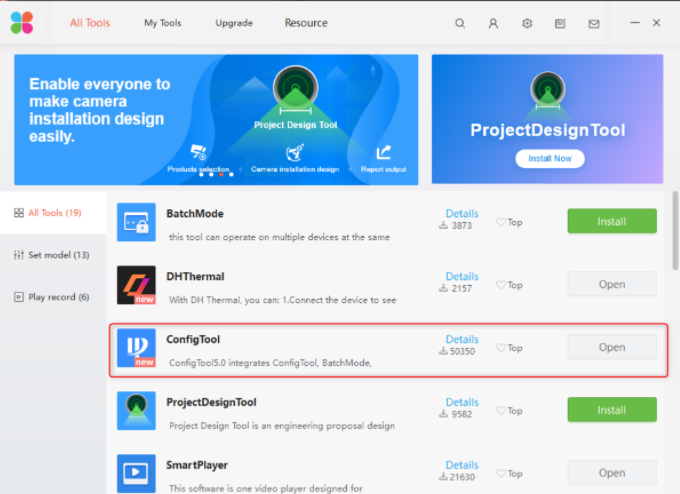
3. Check the version via the drop-down icon
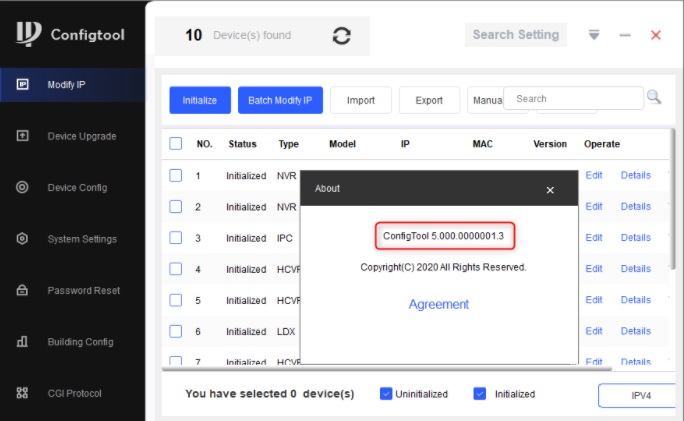
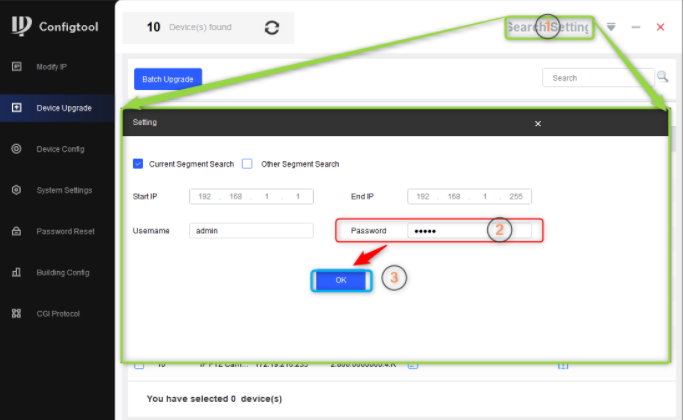
4. Search for the device you need to update with the correct username and password (by default admin, admin)
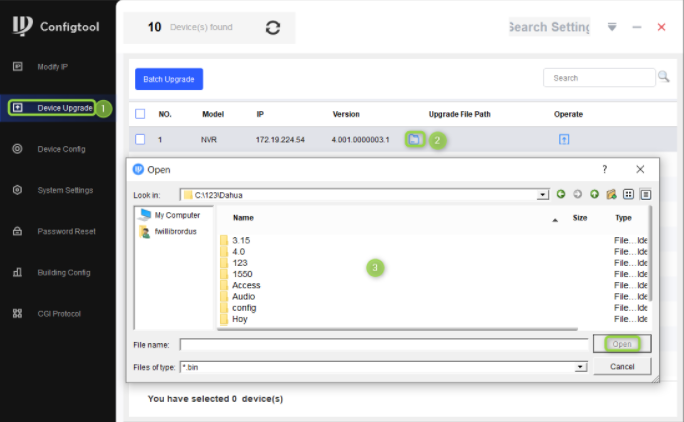
5. Select the update file
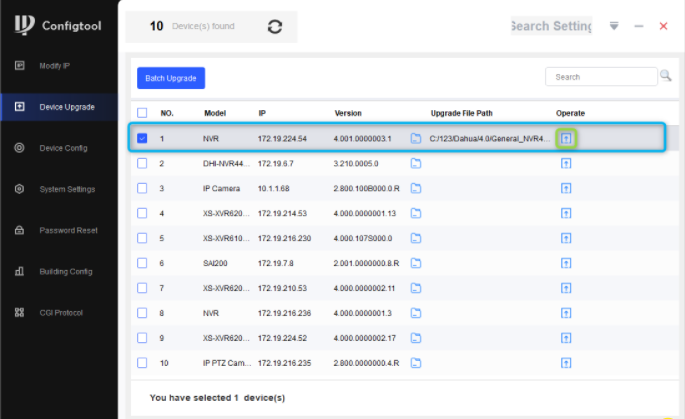
6. Then click on the update button ![]() ver imagen de abajo
ver imagen de abajo
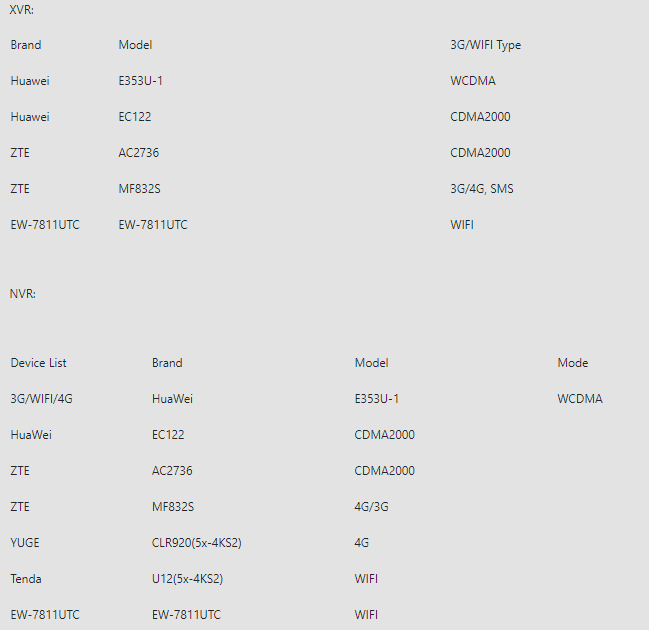
USB devices with 3G/4G, WIFI supported by X-Security
 Enabling line crossing or facial recognition in X-Security V4.001.xxx
For this example we have used the model: XS-XVR6108AH-2FACE
Firmware Version: V4.001.0000001.0, Build Date: 2020-09-08
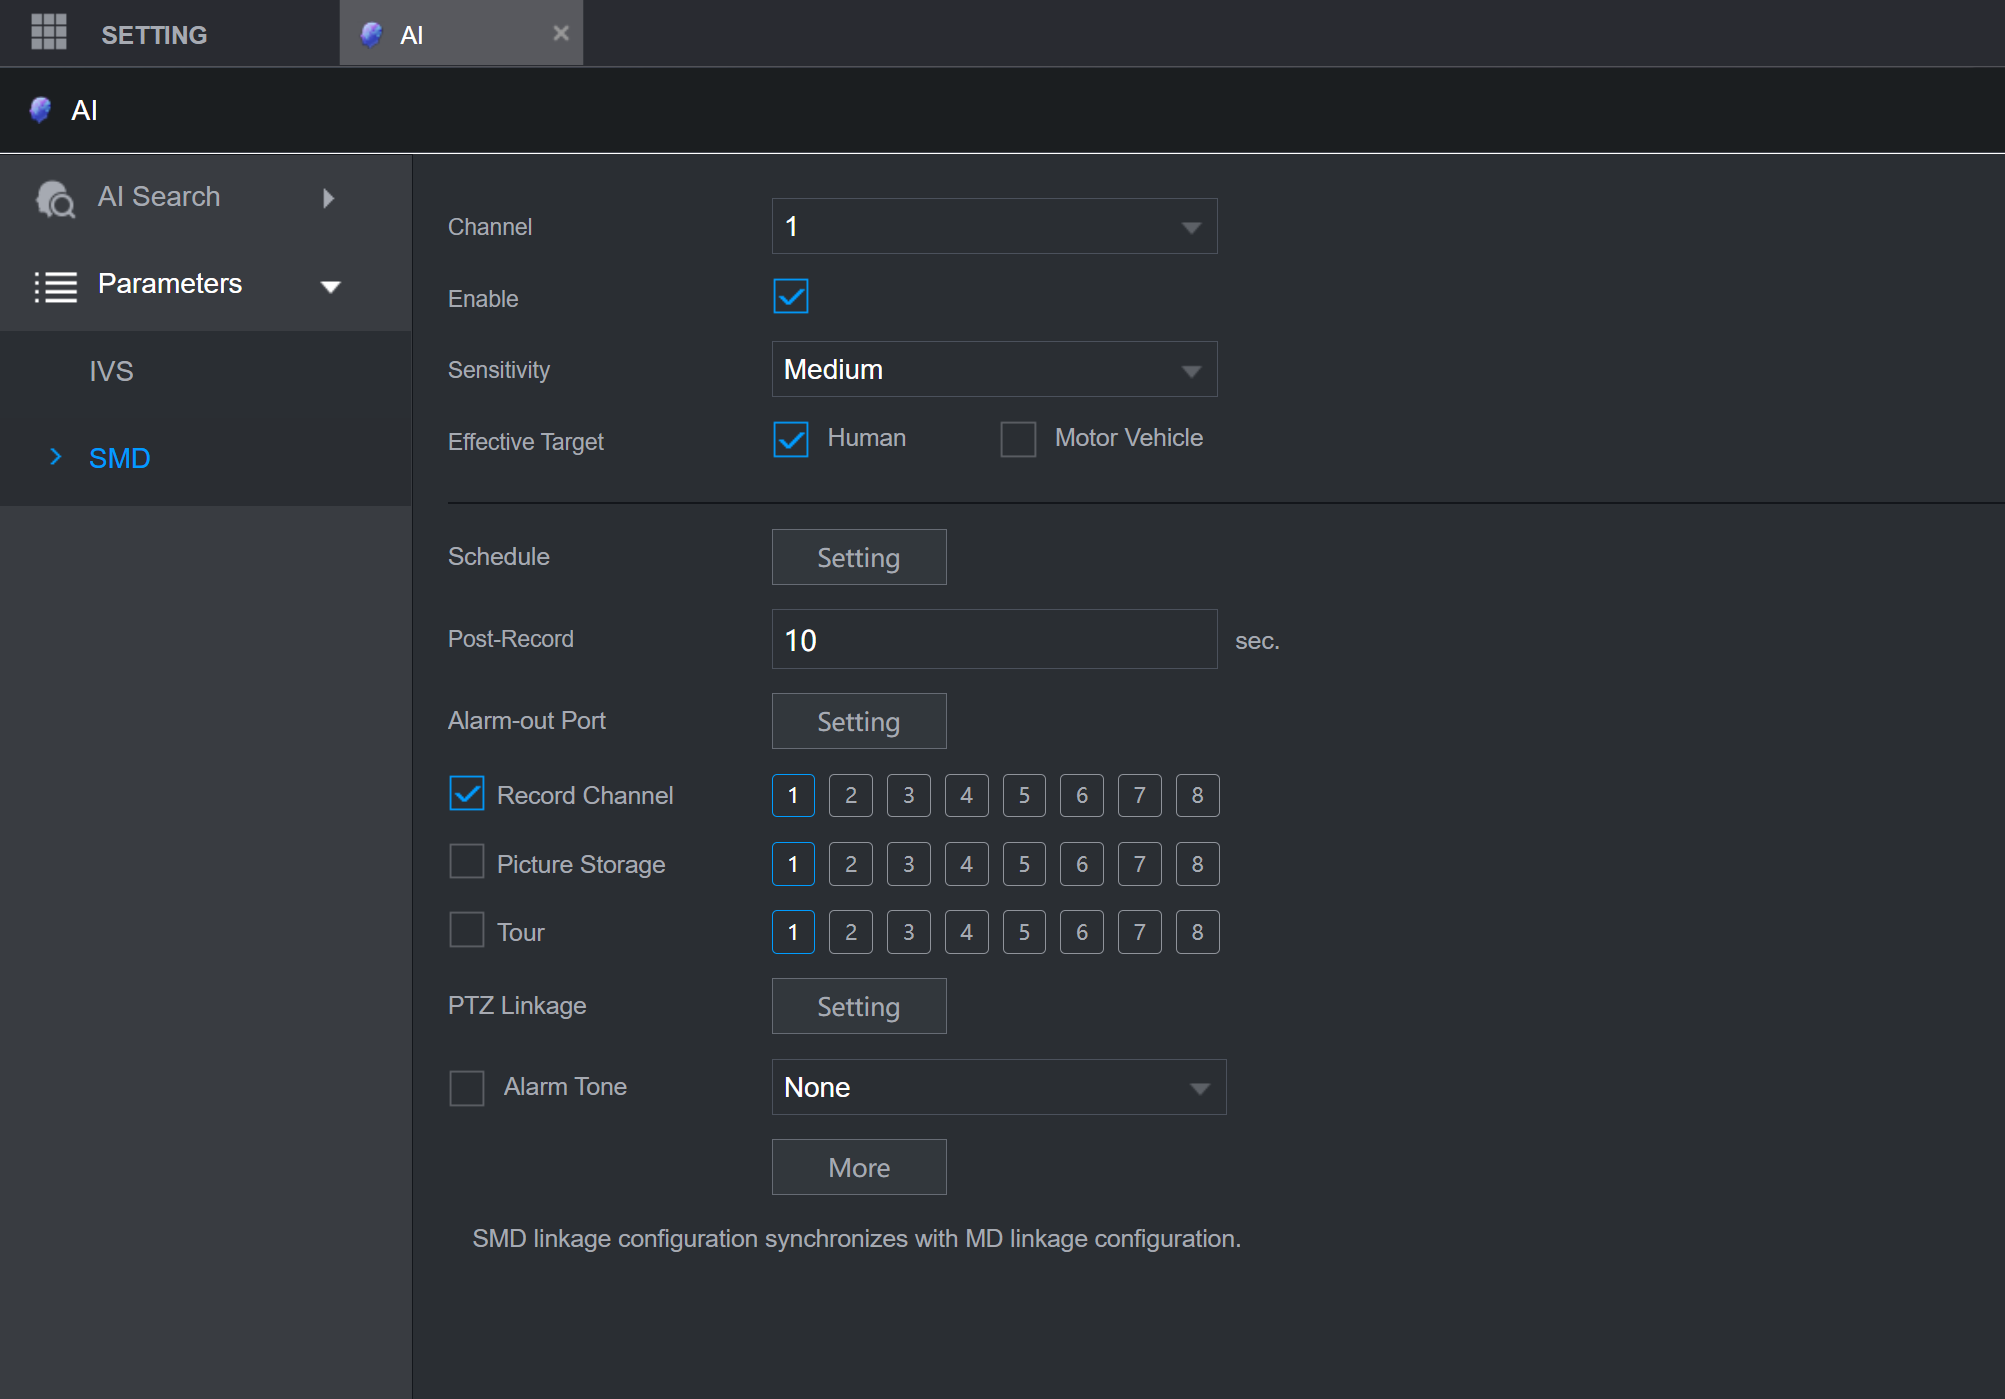
By default it comes with the SMD option, which is an enhanced motion detection with human or vehicle detection. And with IVS & SMD, we enhance perimeter protection, area intrusion, line crossing, etc.

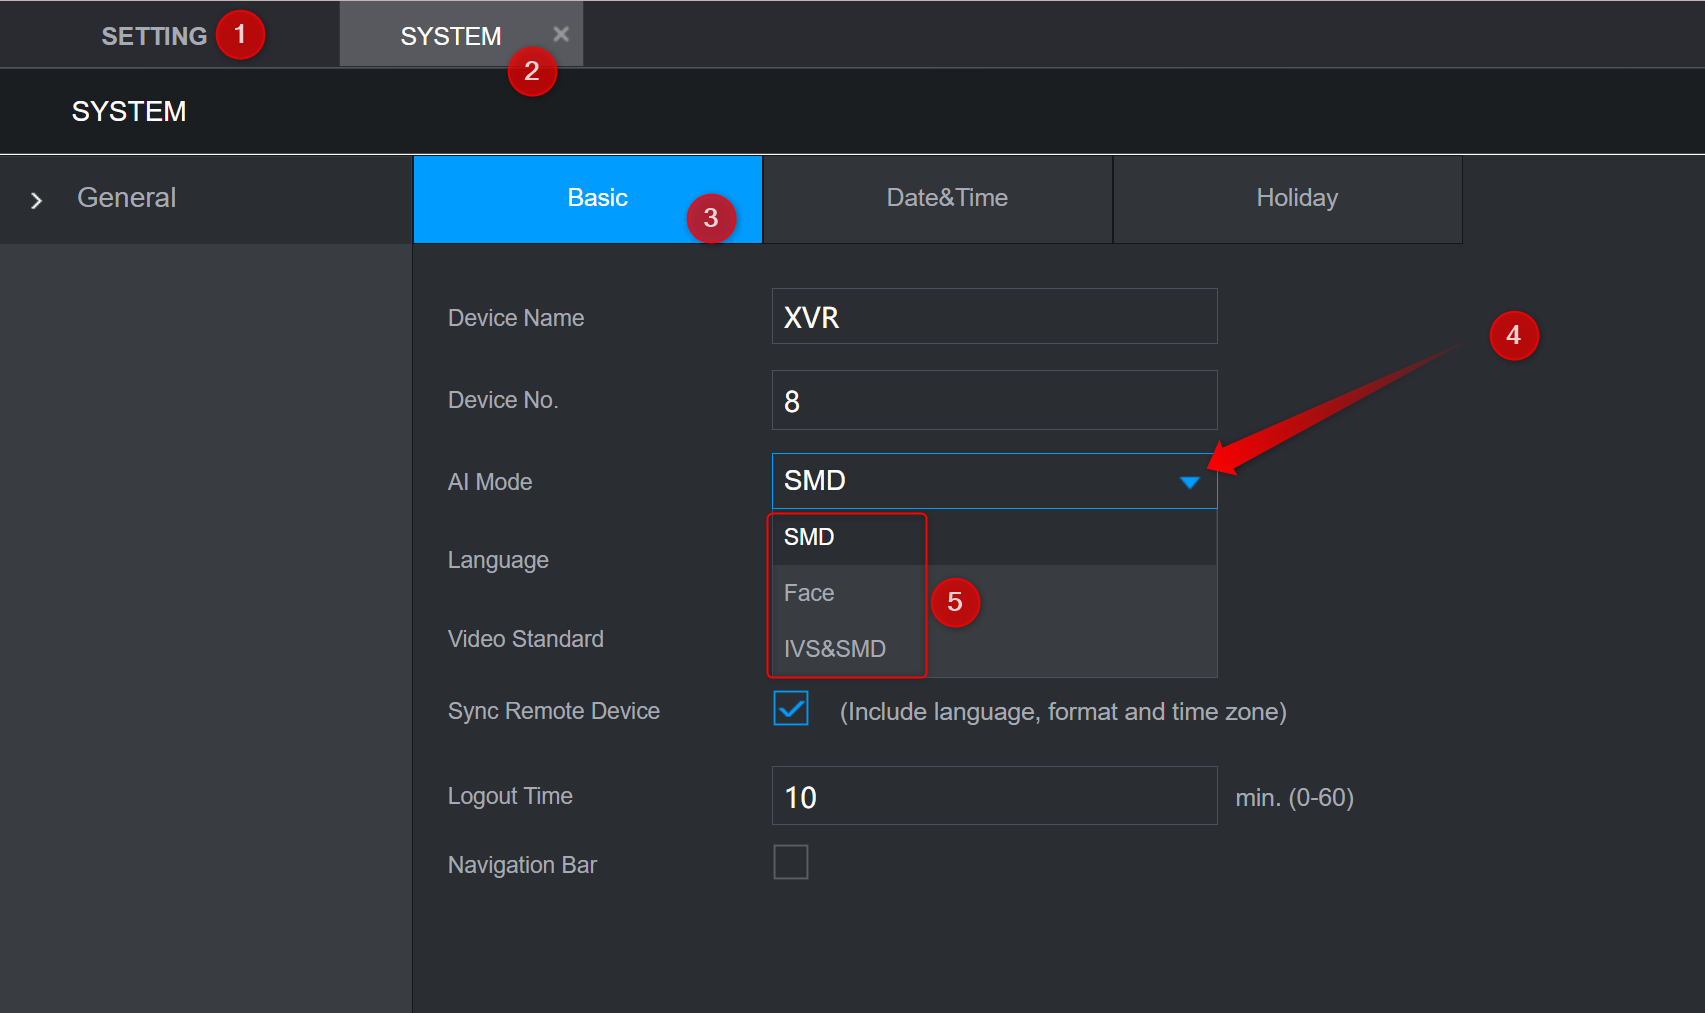
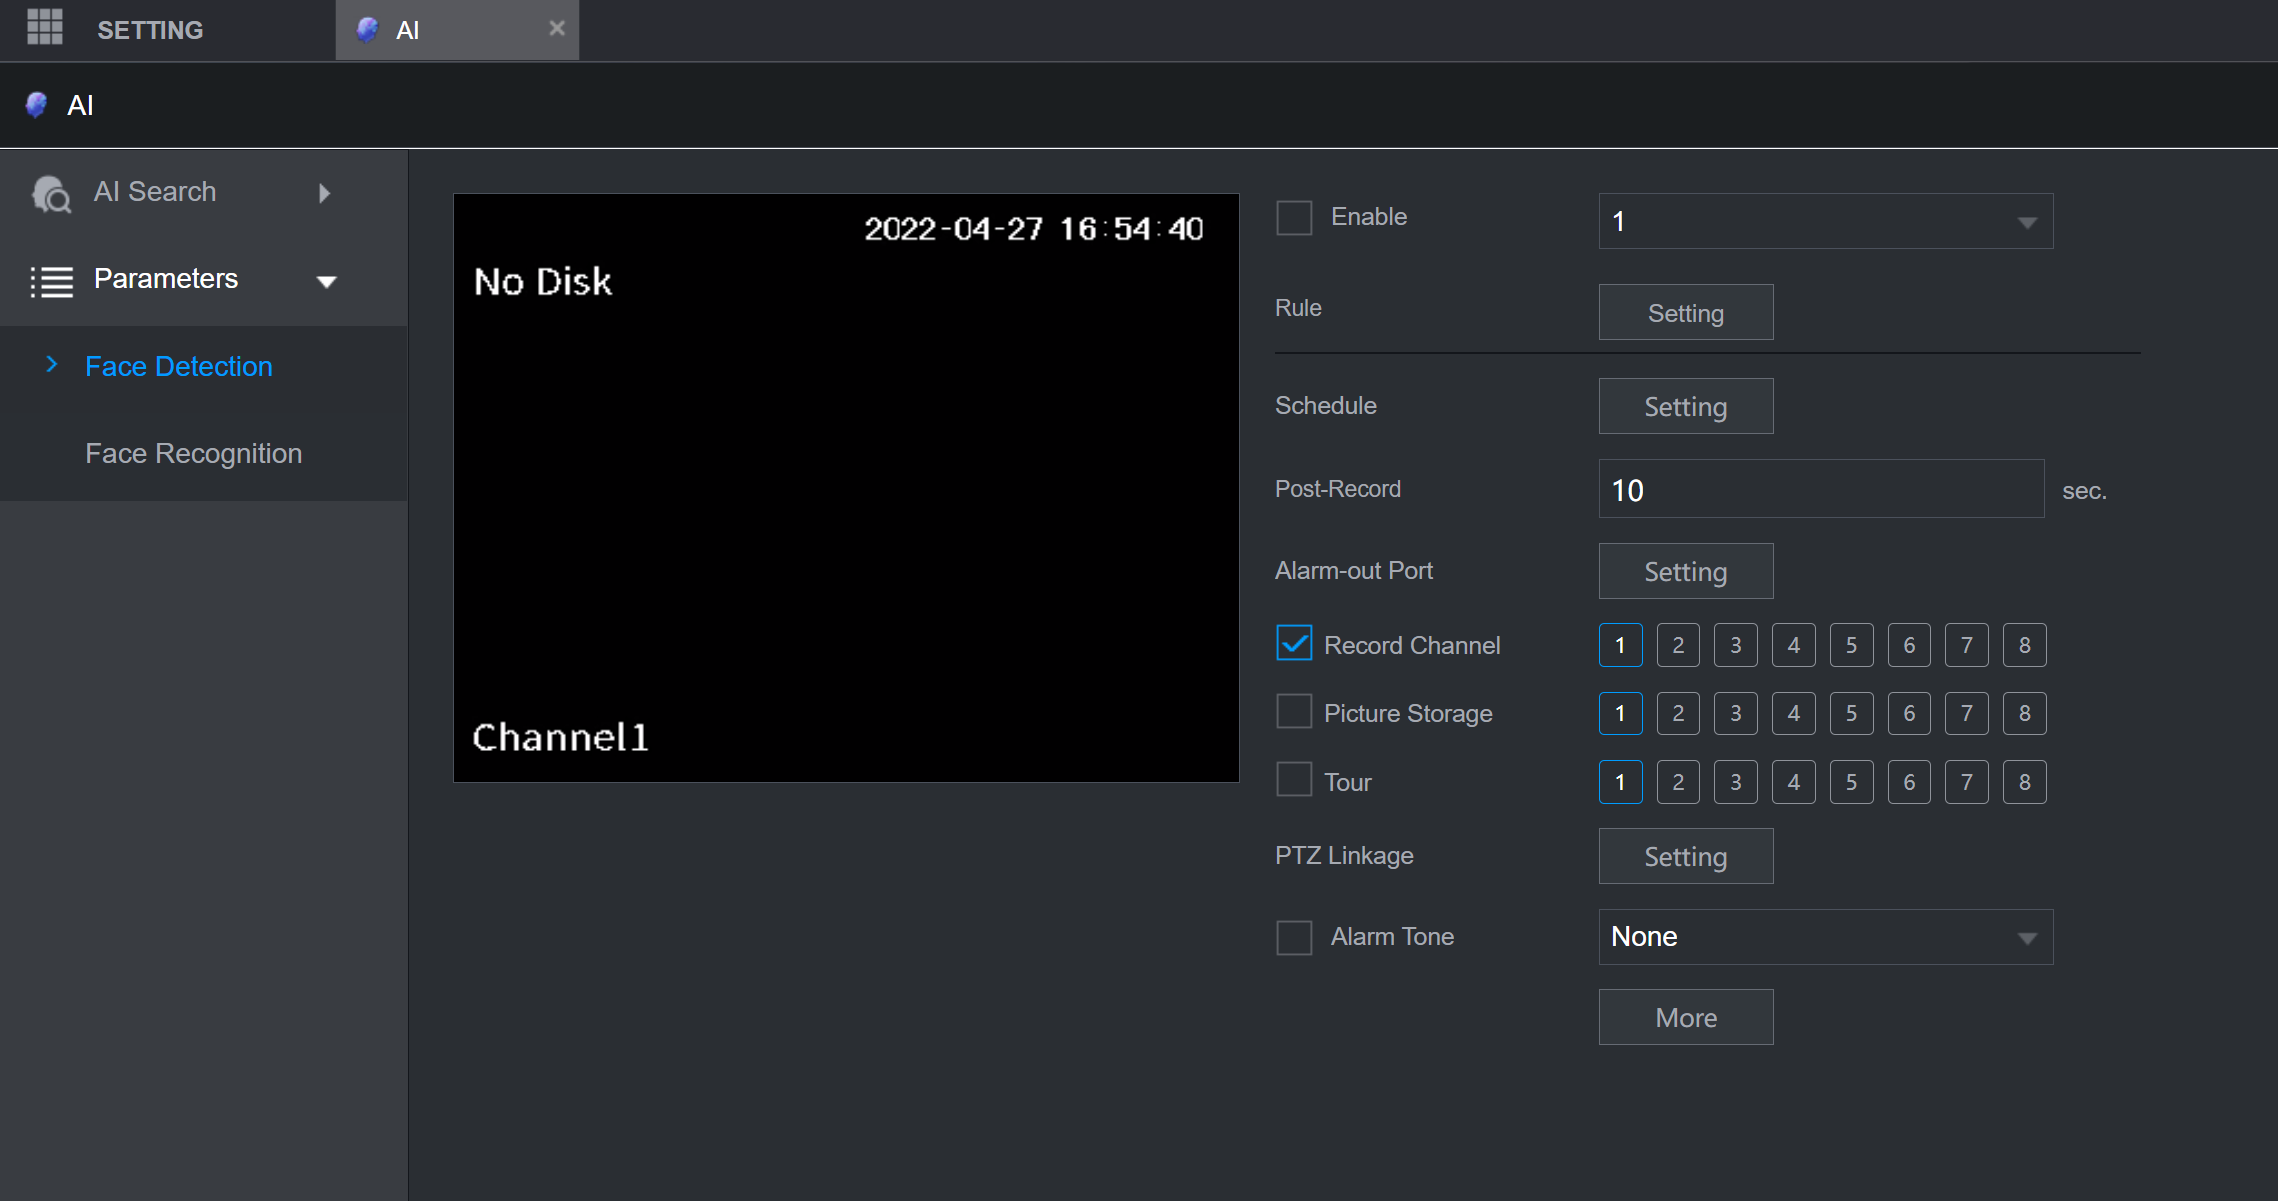
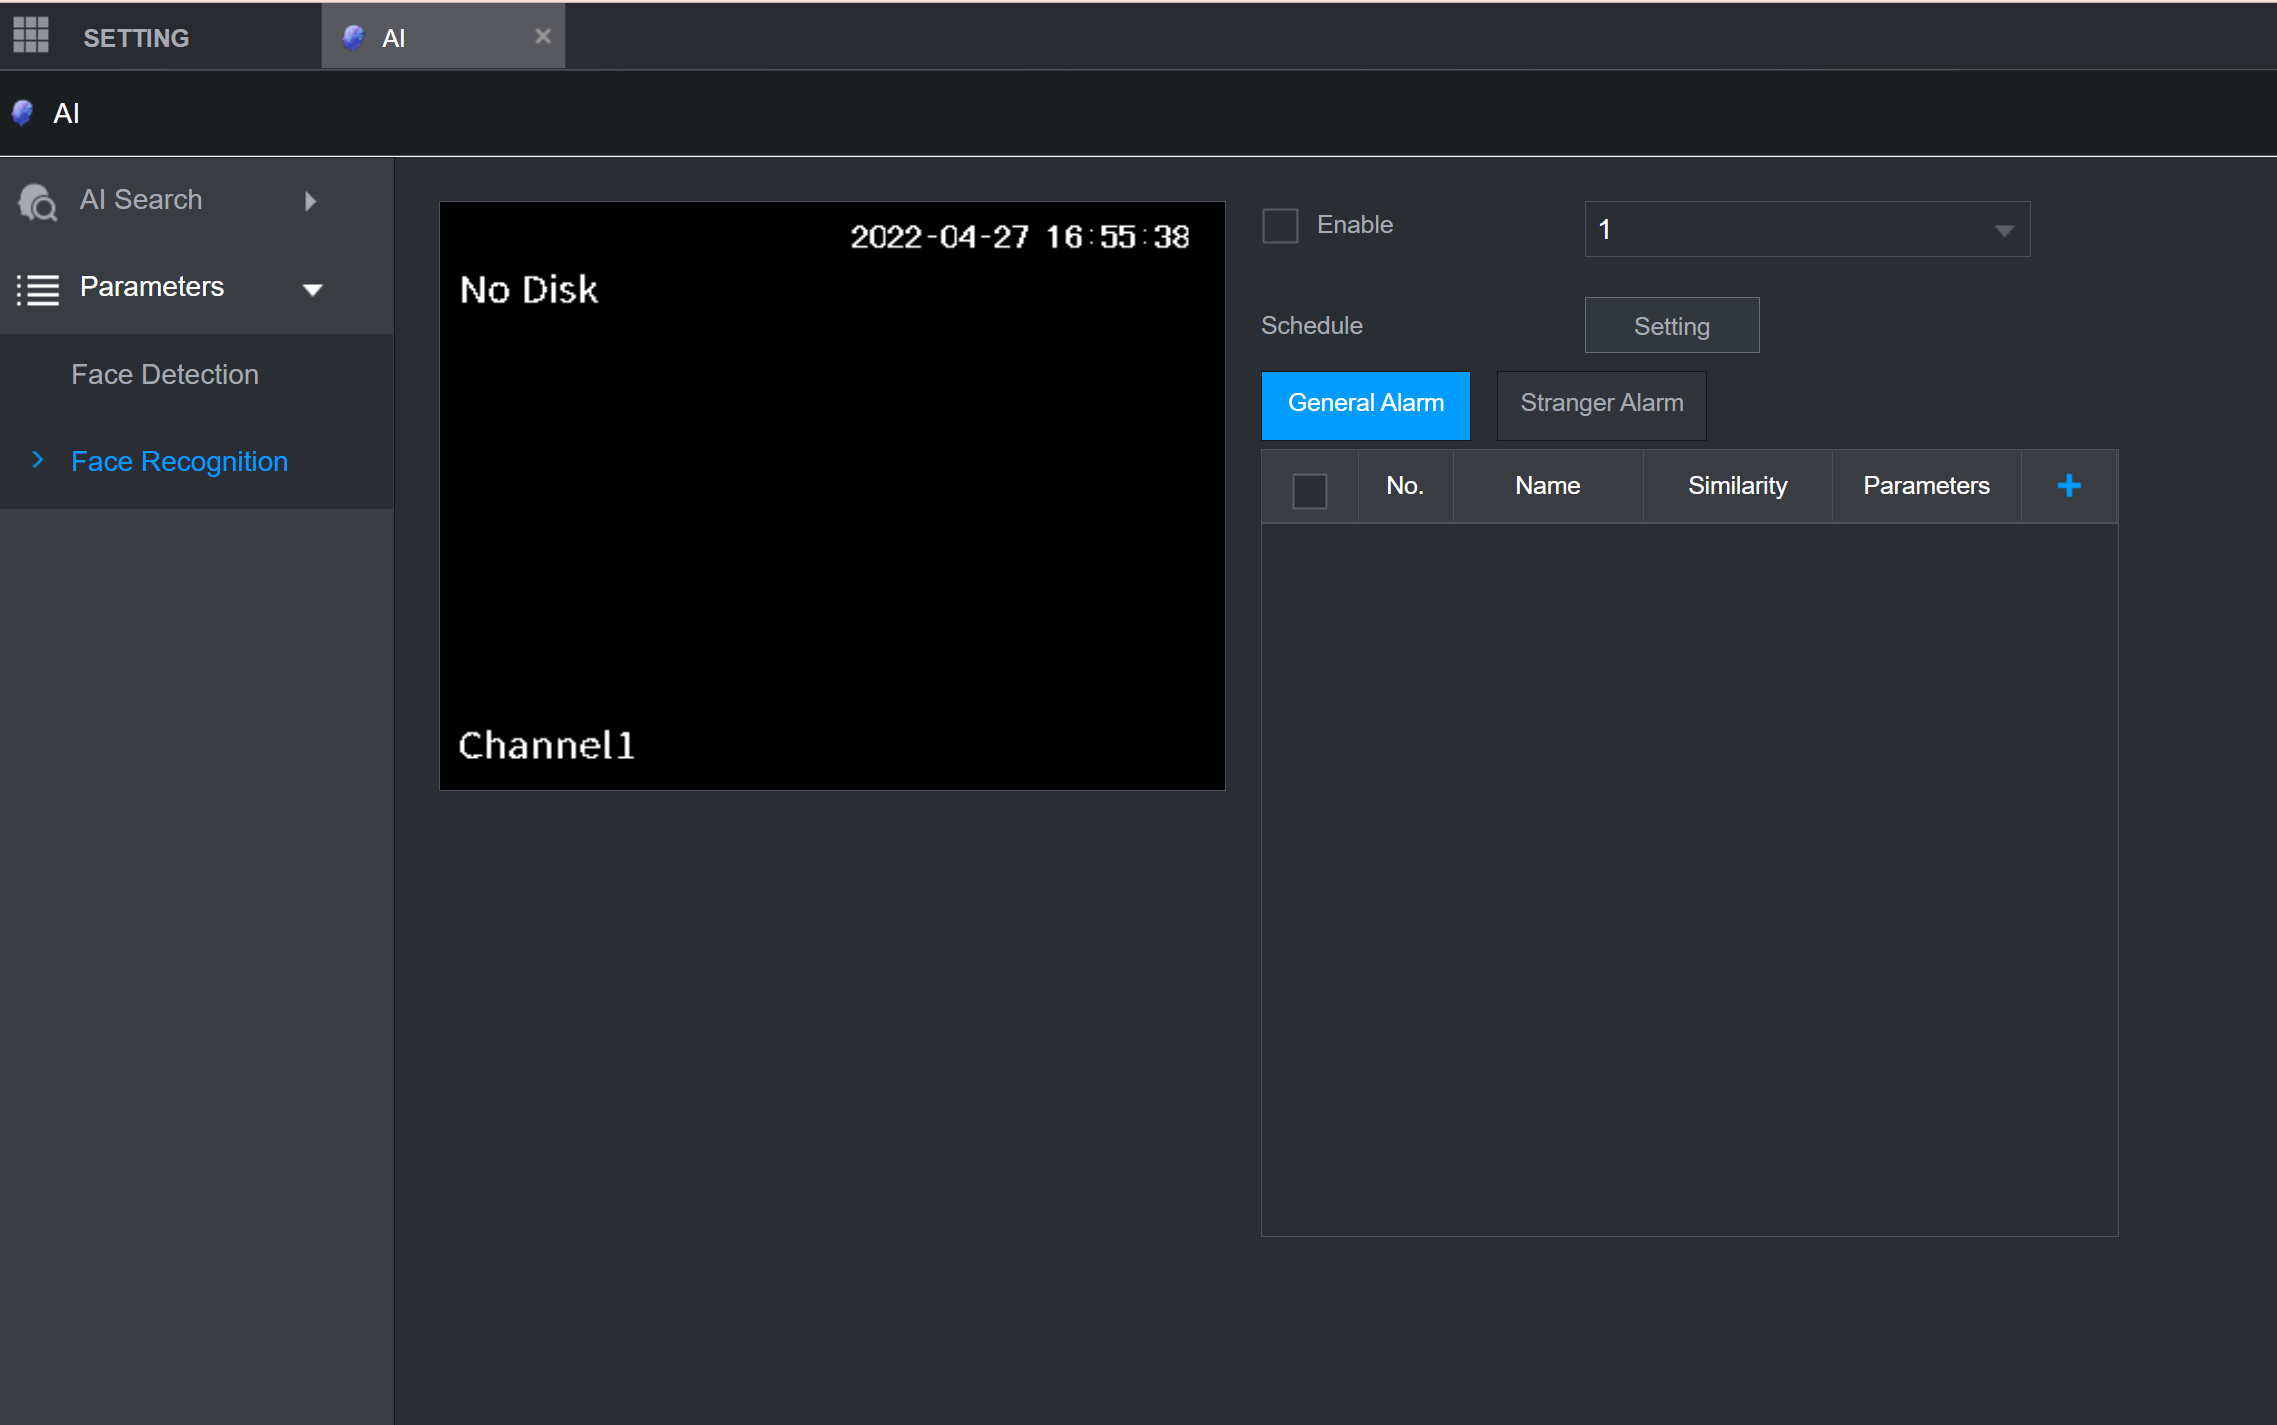
SMD, IVS and FACE menus
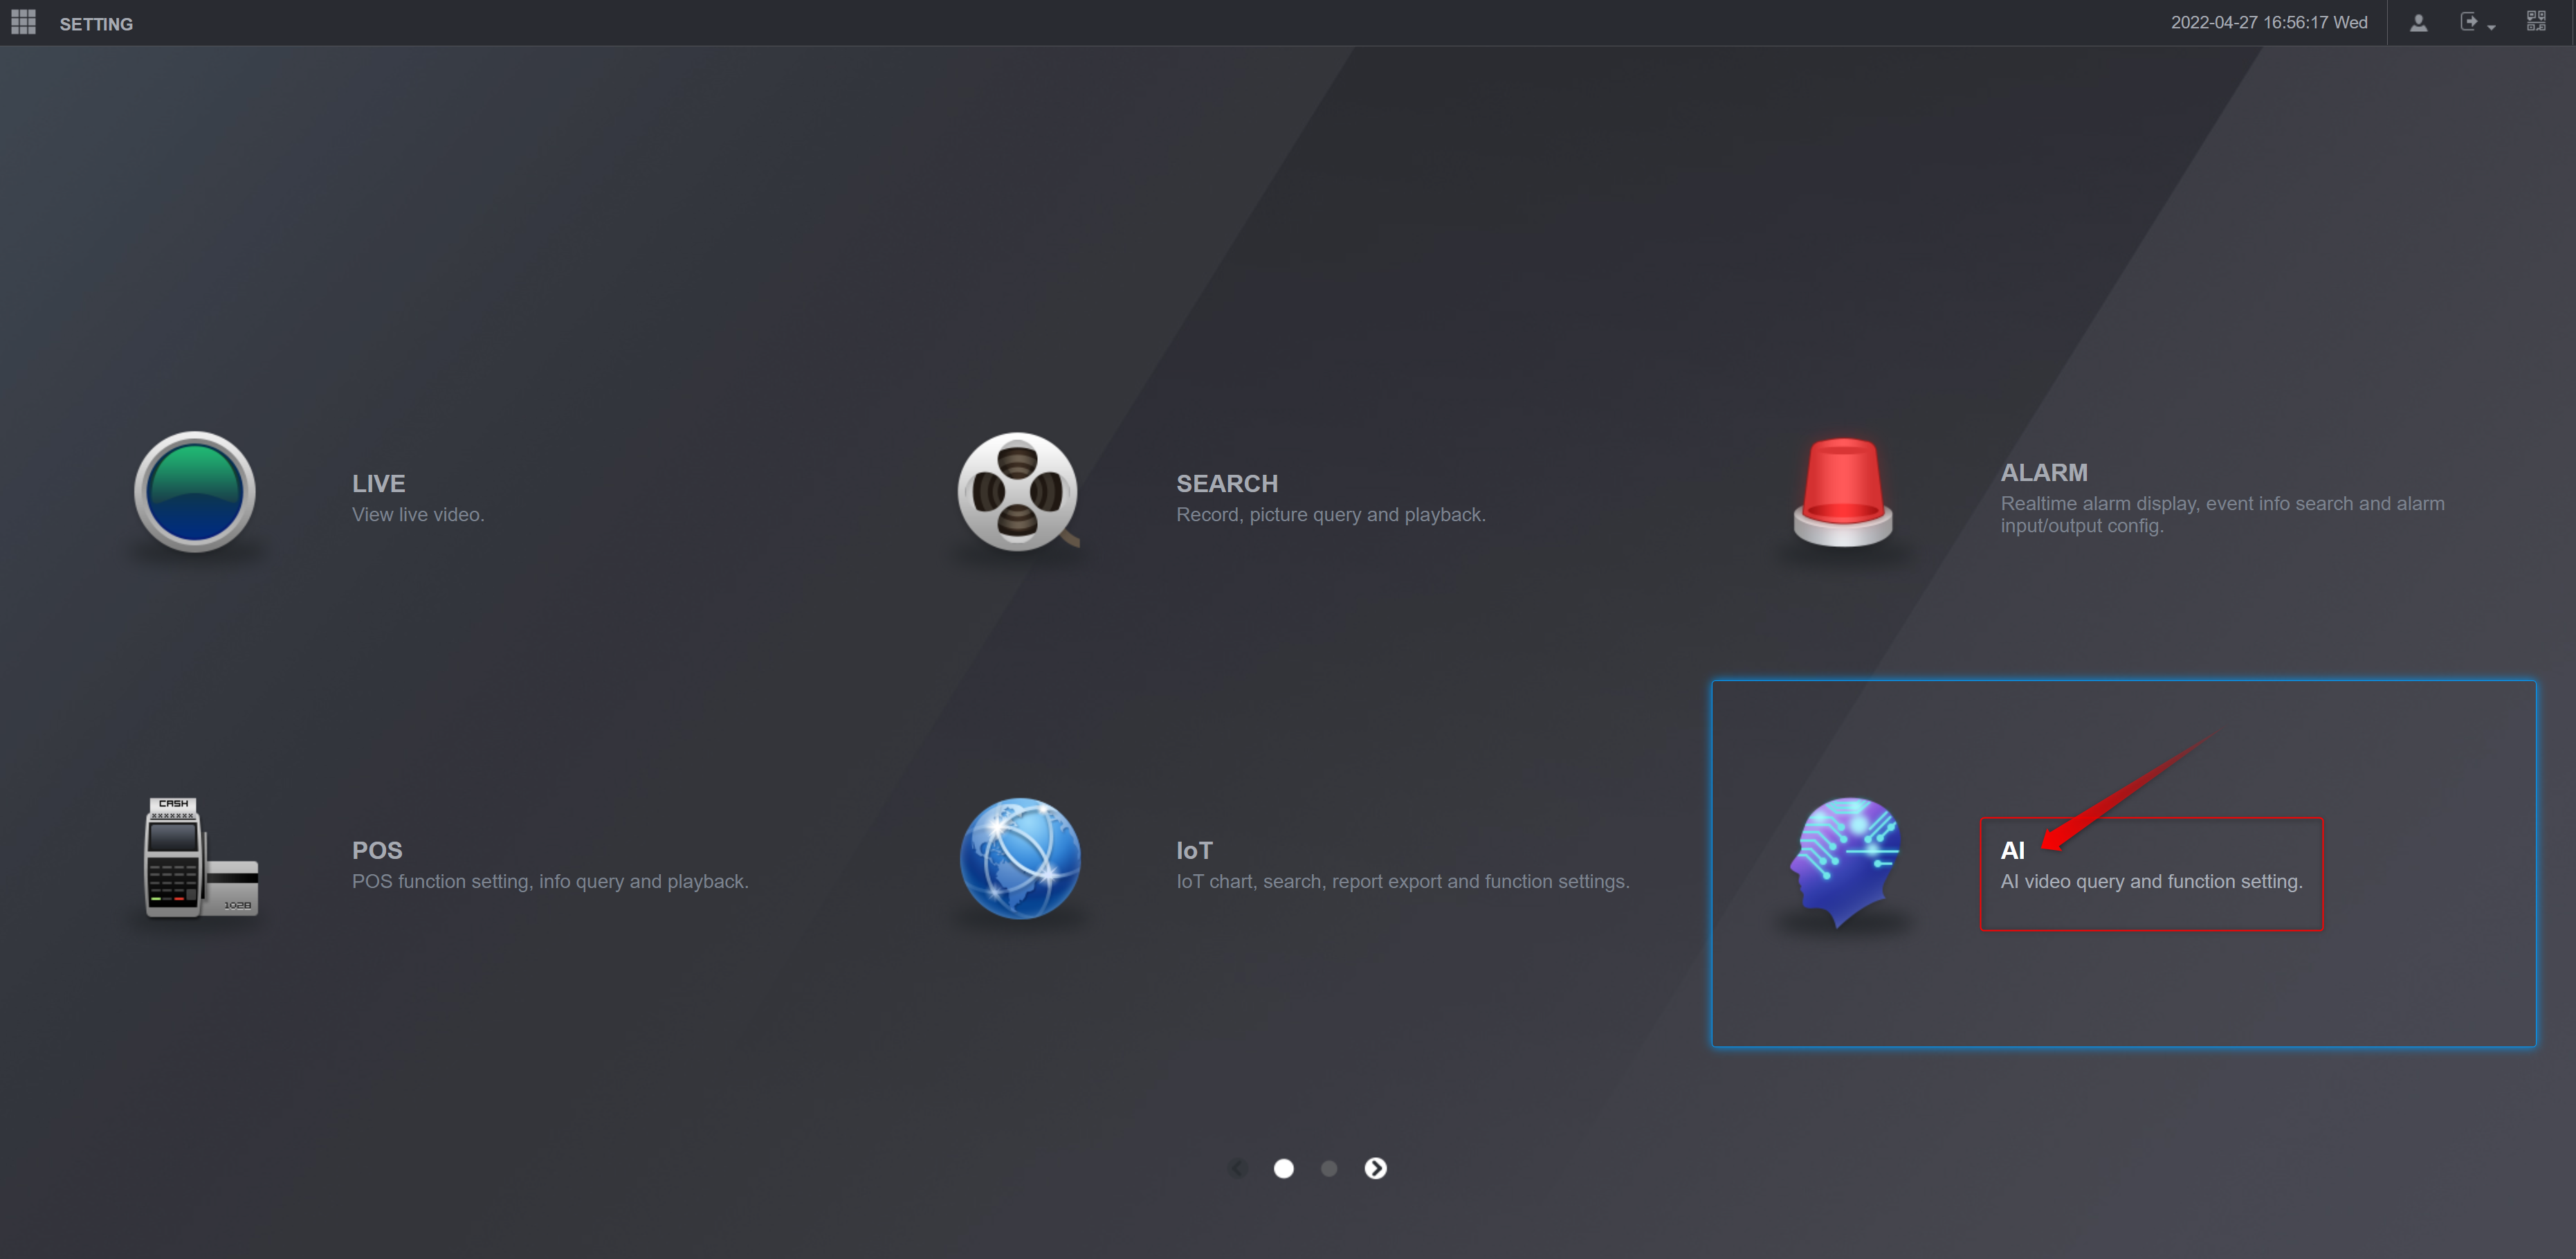
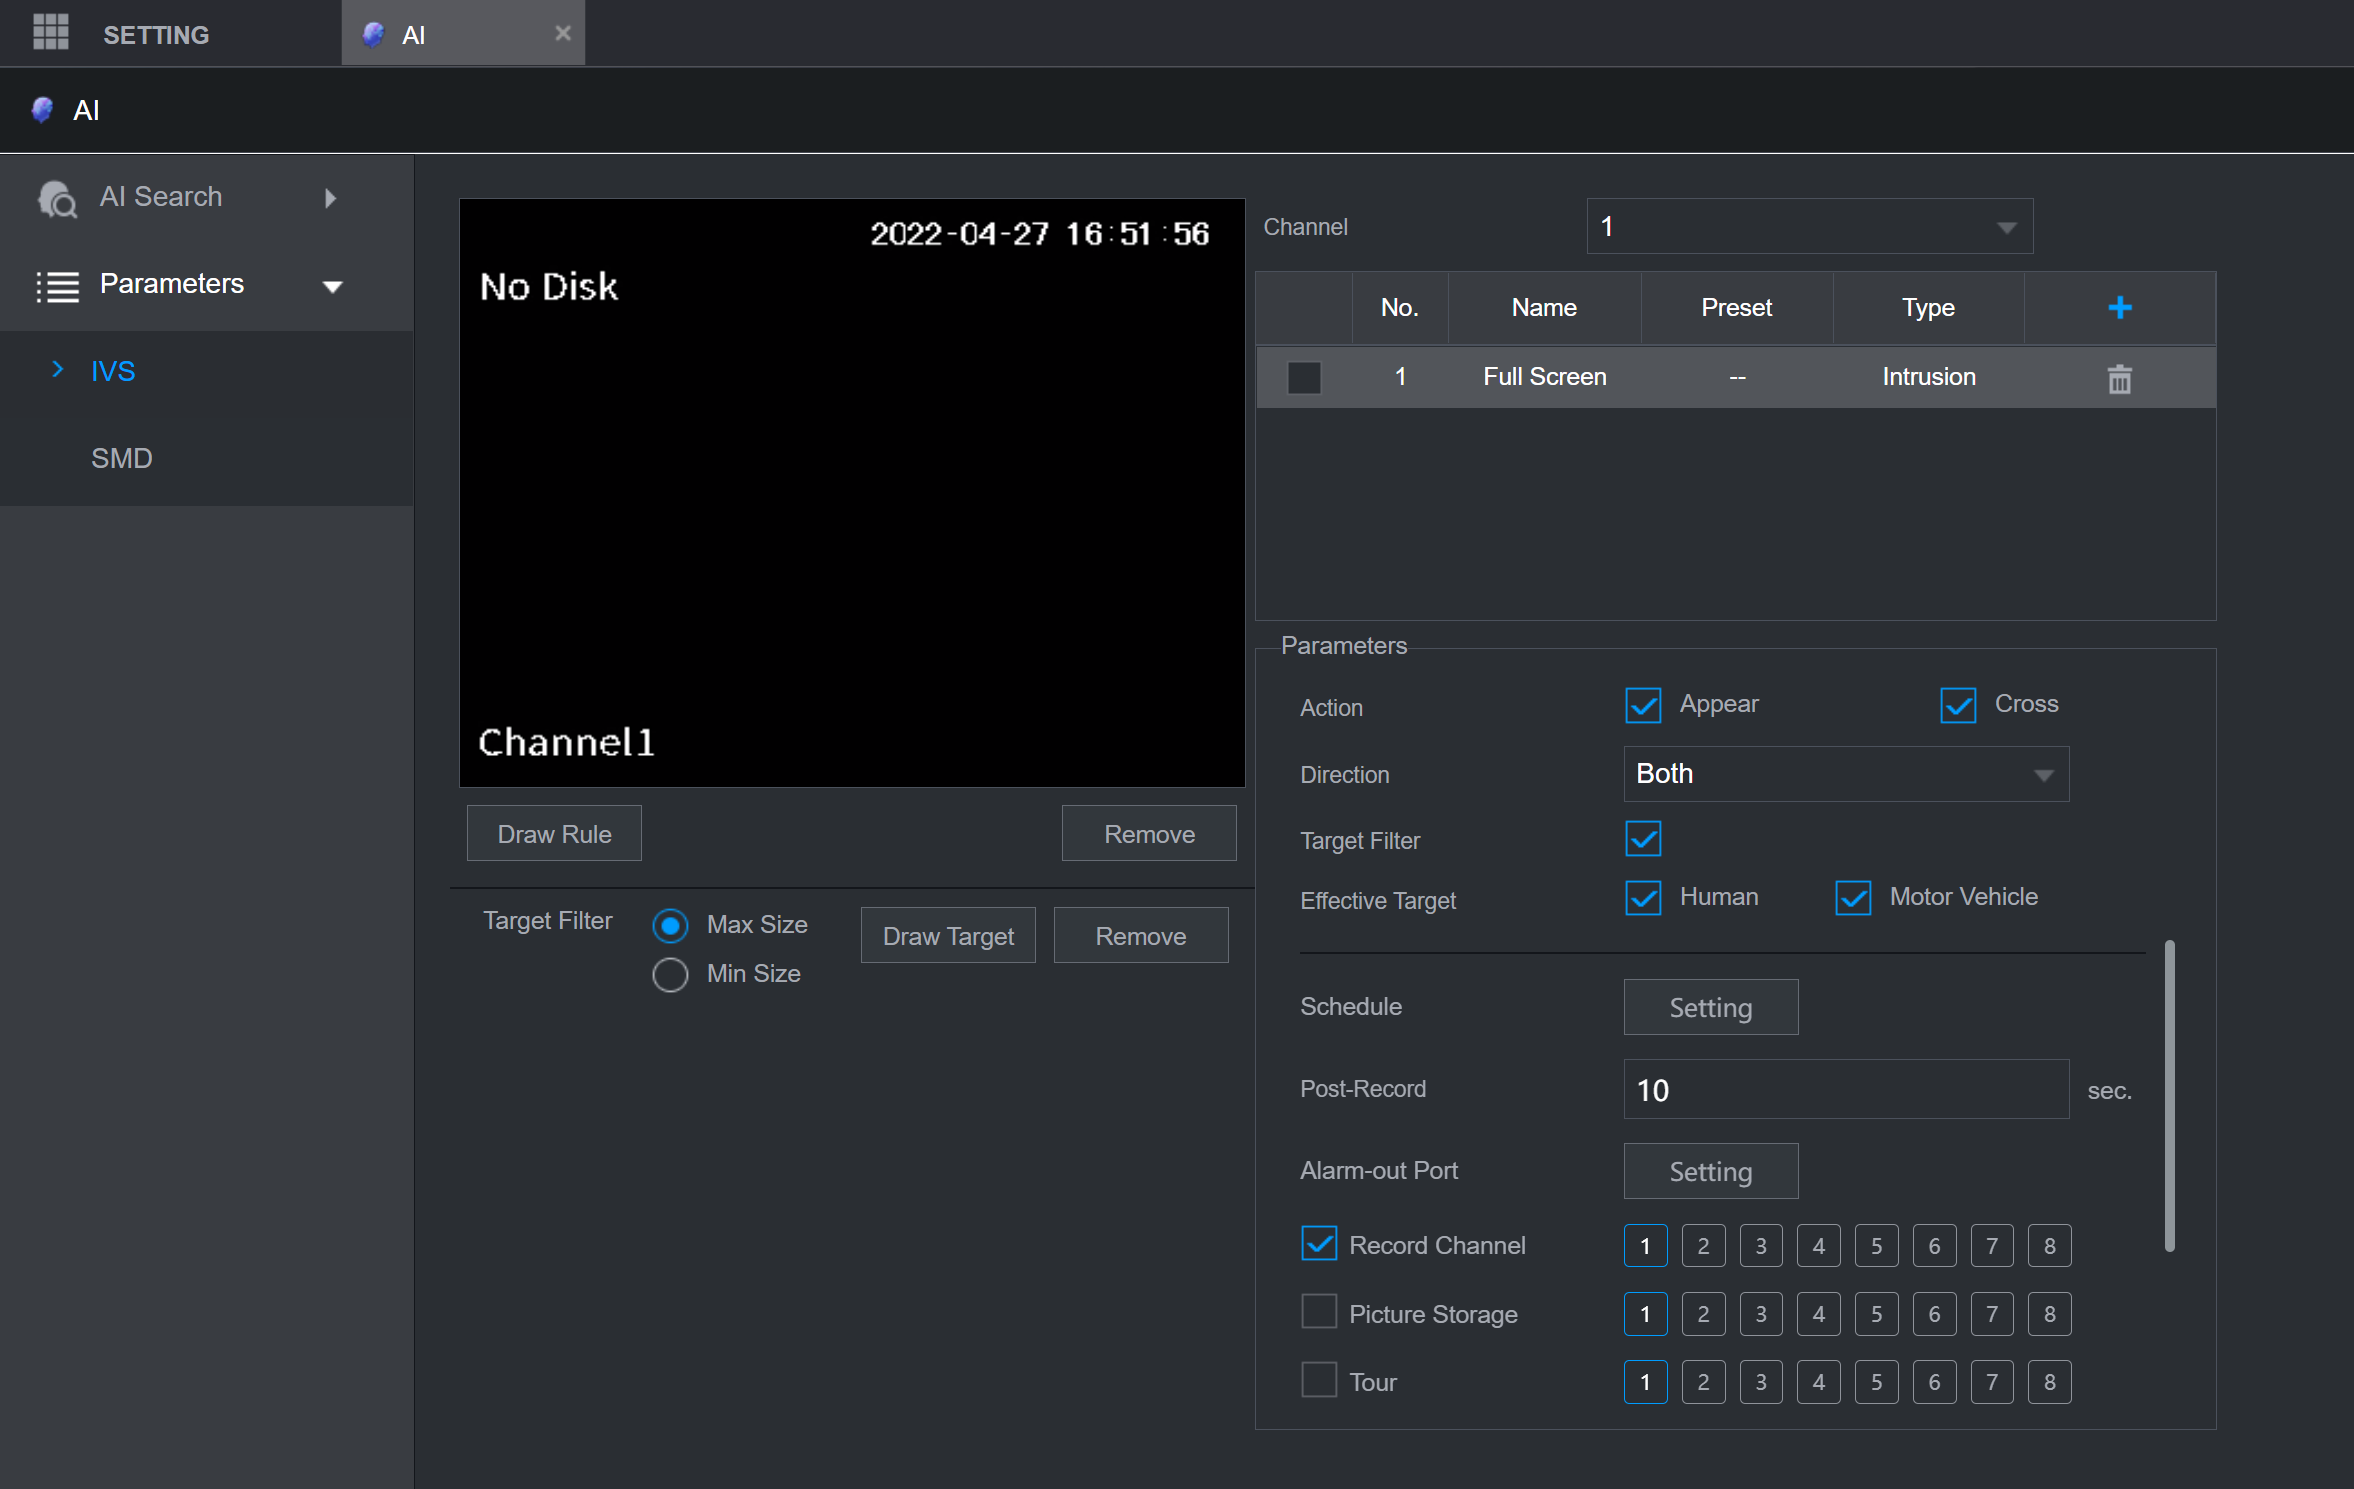
IVS:
SMD:
Facial Detection and Recognition (FACE)
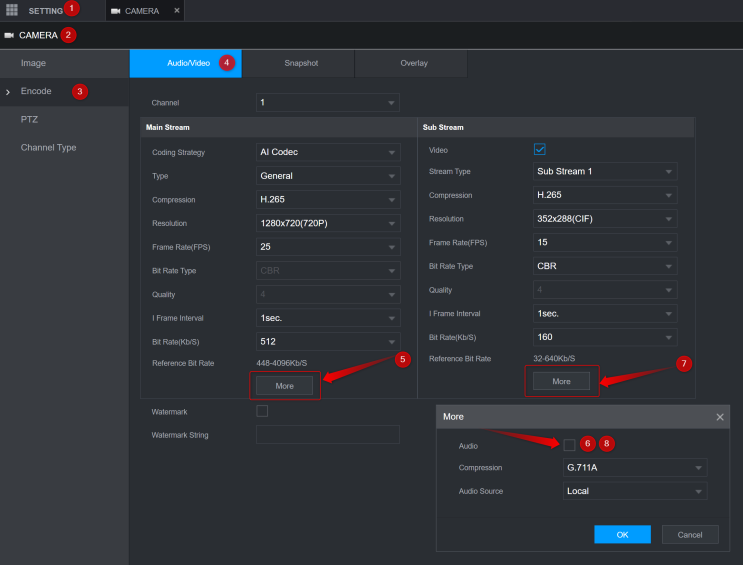
How to activate audio in X-Security recorders
For this example we have used the model: XS-XVR6108AH-2FACE
Firmware Version: V4.001.0000001.0, Build Date: 2020-09-08
Selection of channels to be displayed in the default view, when connecting monitor to X-Security recorder
For this example we have used the model: XS-XVR6108AH-2FACE
Firmware version: V4.001.0000001.0, Build Date: 2020-09-08
By default all channels of the video recorder are displayed when the monitor and mouse are connected, in the default view.
To prevent all or some of the channels from being displayed, we have to modify the user group “user”, as this is the default group.
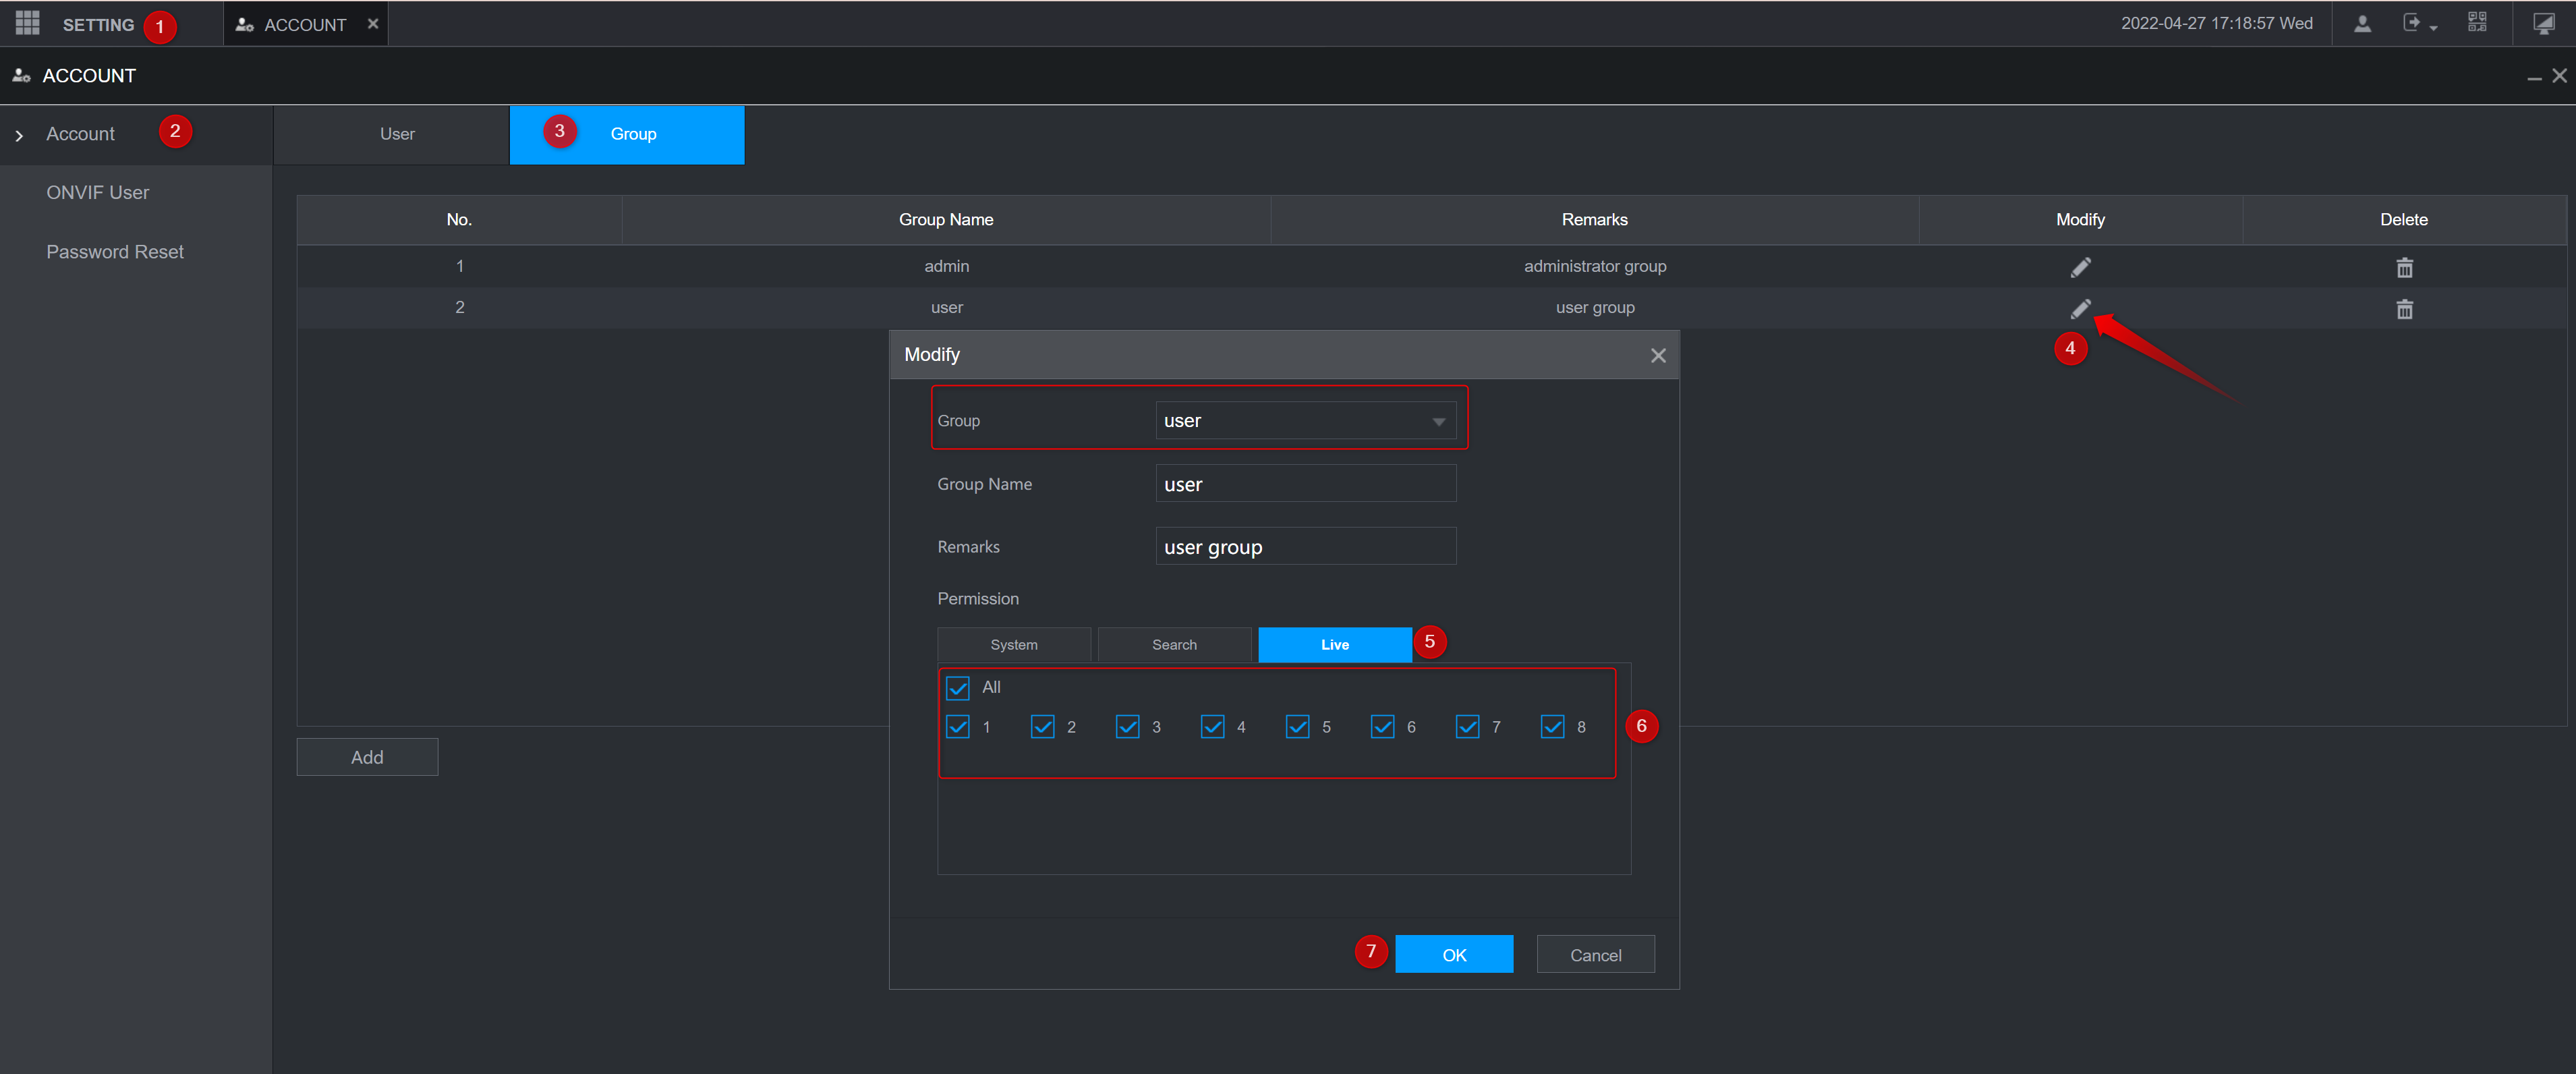
You will only be able to access all or part of the channels if you create a user group with privileges. Having to create a user within this group, we can also limit access within the channels that already have permissions.
